CMU数据库(15-445)Lab3- QUERY EXECUTION
Lab3 - QUERY EXECUTION
实验三是添加对在数据库系统中执行查询的支持。您将实现负责获取查询计划节点并执行它们的executor。您将创建执行下列操作的executor
- Access Methods: Sequential Scans, Index Scans (with your B+Tree from Project #2)
- Modifications: Inserts, Updates, Deletes
- Miscellaneous: Nested Loop Joins, Index Nested Loop Joins, Aggregation, Limit/Offset
拓展阅读following a select statement through the PostgreSQL internals
Task1 - 热身任务
数据库维护一个内部目录来跟踪关于数据库的元数据。例如,目录用于回答存在哪些表以及表的位置。更多细节请参见Lecture #04 - Database Storage (Part II).
你需要修改src/include/catalog/catalog.h允许DBMS添加新表到数据库中,并使用名称或内部对象标识符(table_oid_t)检索它们。你将实现以下方法
CreateTable(Transaction *txn, const std::string &table_name, const Schema &schema)GetTable(const std::string &table_name)GetTable(table_oid_t table_oid)
您还需要支持向目录添加索引(基于项目#2 Project #2))。与table_oid_t类似,索引oid t是索引的唯一对象标识符。您将实现以下方法
CreateIndex(txn, index_name, table_name, schema, key_schema key_attrs, keysize)GetIndex(const std::string &index_name, const std::string &table_name)GetIndex(index_oid_t index_oid),GetTableIndexes(const std::string &table_name)
第一个任务官网给的评价是简单。
1.1 添加新表
其实就围绕这table的构造函数和源代码给的数据结构设计就好了
这里要维护好两个hash表
- table_name --- table_id
- Table_id --- unique_ptr
 TableMetadata *CreateTable(Transaction *txn, const std::string &table_name, const Schema &schema) {

    BUSTUB_ASSERT(names_.count(table_name) == 0, "Table names should be unique!");

    auto table_id = next_table_oid_++;

    TableHeap *_table = new TableHeap(bpm_, lock_manager_,

                                          log_manager_, txn);

    names_[table_name] = table_id;

    auto new_table = new TableMetadata(schema, table_name, static_cast<std::unique_ptr<TableHeap>>(_table),table_id);

    tables_[table_id] = static_cast<std::unique_ptr<TableMetadata>>(new_table);

    return new_table;

  }
剩下的两个get函数就是简单的hash表操作。由于Andy教授不提倡share代码。这里就简单附上一个实现,剩下的另一个基本没差
TableMetadata *GetTable(const std::string &table_name) {

  if (names_.count(table_name) == 0) {

    throw std::out_of_range(table_name);

  }

  table_oid_t id = names_[table_name];

  if (tables_[id] != 0) {

    return tables_[id].get();

  }

  return 0;

}
1.2 添加索引
这里要注意一点我们添加的索引。是基于我们lab2实现过的b+树索引。
这里注意我们的
index_Info函数需要一个Index的unique_ptr这里我们需要new一个BPlusTreeIndex传入。我们要对当前表中所有tuple加上index
这里也需要维护好两个hash表
  template <class KeyType, class ValueType, class KeyComparator>

  IndexInfo *CreateIndex(Transaction *txn, const std::string &index_name, const std::string &table_name,

                         const Schema &schema, const Schema &key_schema, const std::vector<uint32_t> &key_attrs,

                         size_t keysize) {

    auto index_id = next_index_oid_++;

    auto index_me = new IndexMetadata(index_name, table_name, &schema, key_attrs);

    std::unique_ptr<Index> BPlusTree_Index(new BPlusTreeIndex<KeyType, ValueType, KeyComparator>(index_me, bpm_));

    IndexInfo *new_index =

        new IndexInfo(key_schema, index_name, std::move(BPlusTree_Index), index_id, table_name, keysize);

    indexes_[index_id] =  static_cast<std::unique_ptr<IndexInfo>>(new_index);

    index_names_[table_name].insert(std::unordered_map<std::string, index_oid_t>::value_type (index_name, index_id));

    auto table = GetTable(table_name)->table_.get();

    // add index for every tuple

    for (auto it = table->Begin(txn); it != table->End(); ++it) {

      new_index->index_->InsertEntry(it->KeyFromTuple(schema, key_schema, key_attrs), it->GetRid(), txn);

    }

    return new_index;

  }
最后的get操作还是一样的。附上一个实现
 IndexInfo *GetIndex(const std::string &index_name, const std::string &table_name) {

    if (index_names_.count(table_name) == 0) {

      throw std::out_of_range(table_name);

    }

    index_oid_t index_id = index_names_[table_name][index_name];

    return indexes_[index_id].get();

  }

可以通过cmu给出的对于catalog的test。这个测试文件就是线上评测用的测试文件。
Task2 - EXECUTORS
在第二个任务中,您将实现执行程序以进行顺序扫描,插入,哈希联接和聚合。 对于每种查询计划运算符类型,都有一个相应的executor对象,该对象实现Init和Next方法。 Init方法用于设置有关操作调用的内部状态(例如,检索要扫描的对应表)。 Next方法提供了迭代器接口,该接口在每次调用时返回一个元组(如果没有更多的元组,则返回null)。
你需要修改下面的文件来完成这一任务。
src/include/execution/executors/seq_scan_executor.hsrc/include/execution/executors/index_scan_executor.hsrc/include/execution/executors/insert_executor.hsrc/include/execution/executors/update_executor.hsrc/include/execution/executors/delete_executor.hsrc/include/execution/executors/nested_loop_join_executor.hsrc/include/execution/executors/nested_index_join_executor.hsrc/include/execution/executors/aggregation_executor.hsrc/include/execution/executors/limit_executor.h
我们假设执行器在整个项目中都是单线程的。您还可以根据需要随意添加私有函数和类成员。
我们提供了ExecutionEngine(src / include / execution / execution_engine.h)作为帮助类。 它将输入的查询计划转换为查询执行程序,并执行直到收集所有结果。 您将需要修改ExecutionEngine以捕获执行程序引发的任何异常。
若要了解如何在查询执行期间创建excutors,请参阅ExecutorFactory(src / include / execution / executor_factory.h)帮助程序类。 此外,每个执行程序都有一个ExecutorContext(src / include / execution / executor_context.h)作为执行上下文环境。
SEQUENTIAL SCANS
顺序扫描遍历一个表并每次返回一个元组。顺序扫描由SeqScanPlanNode指定。plan节点指定要迭代的表。节点还可以包含一个predicate;如果一个元组不满足predicate,则跳过它。
提示:您需要使用顺序扫描中的predicate来判断。特别需要注意的是AbstractExpression::Evaluate。会返回Value。需要使用GetAs<bool>变成bool类型。
实现
这个实验其实并不难。重点就是实现之前要先梳理一下整个系统的一些设计模式。
以这一行为例利用了工厂设计模式
auto executor = ExecutorFactory::CreateExecutor(exec_ctx, plan);
整个顺序扫描的思路非常简单。就是从头开始遍历整个表的所有tuple。找到满足要求的tuple。并将tuple中的满足要求的value和outSchema组合成新的tuple存入result就ok。
这里注意由于要进行遍历。所以要引入TableIterator。
这里附上最重要的Init实现。由于要遍历表的所有tuple。所以理应有一个table_info。同时要遍历整个表所以我们需要一个迭代器
void SeqScanExecutor::Init() {

  table_heap_ = exec_ctx_->GetCatalog()->GetTable(plan_->GetTableOid())->table_.get();

  iter = table_heap_->Begin(exec_ctx_->GetTransaction());

}
另一个实现就是一个tuple(其实就是一行)中的元素并不一定都是我们想要的。所以要有一个从tuple中获取和ouSchema中对应列的元素的函数这里就叫它getValuesFromTuple
std::vector<Value> SeqScanExecutor::getValuesFromTuple(const Tuple *tuple, const Schema *schema) {

  std::vector<Value> res;

  for (const Column &col : schema->GetColumns()) {

    Value val = tuple.GetValue(schema, schema->GetColIdx(col.GetName()));

    res.push_back(val);

  }

  return res;

}
INDEX SCANS
就是利用加了索引的顺序扫描。
实现
这个基本和上面的类似。只不过利用了索引
   index_key = tuple_.KeyFromTuple(table_info->schema_, index_info->key_schema_, index_info->index_->GetKeyAttrs());

   index_Expression->Evaluate(&index_key, &table_info->schema_).GetAs<bool>()
INSERT
插入将元组添加到表中。插入由InsertPlanNode指定。有两种类型的插入:1. 直接插入(只有插入语句),2. 非直接插入(从子语句中获取要插入的值)。例如INSERT INTO empty_table2 SELECT colA, colB FROM test_1 WHERE colA > 500需要先执行后面的select语句在进行insert。
实现
- 先判断一下是否只有一个plan。
- 如果是的话则非常简单的插入就好了
if (is_rawInsert && num_inserted < num_values) {

  bool inserted = table_info->table_->InsertTuple(Tuple(raw_vals[num_inserted], &table_info->schema_), rid, exec_ctx_->GetTransaction());

  BUSTUB_ASSERT(inserted, "Sequential insertion cannot fail");

  for (auto index : table_Indexs) {

    index->index_->InsertEntry(Tuple(raw_vals[num_inserted], &table_info->schema_), *rid, exec_ctx_->GetTransaction());

  }

  num_inserted++;

  return true;

}
- 否则的话则需要先执行后面的子
plan
注意对于insert只能有一个子plan。这样就无需关注子plan的顺序问题
先执行子查询语句
 execution_engine_ = std::make_unique<ExecutionEngine>(GetExecutorContext()->GetBufferPoolManager(), GetExecutorContext()->GetTransactionManager(),

                                                          GetExecutorContext()->GetCatalog());

    auto pNode = plan_->GetChildPlan();

    execution_engine_->Execute(pNode, &result_set,GetExecutorContext()->GetTransaction(),GetExecutorContext());
然后在进行插入
这里注意插入的时候我们value是直接从子计划获得的result_set中获取
bool inserted = table_info->table_->InsertTuple(*result_set.begin(), rid, exec_ctx_->GetTransaction());

BUSTUB_ASSERT(inserted, "Sequential insertion cannot fail");

for (auto index : table_Indexs) {

  index->index_->InsertEntry(*result_set.begin(), *rid, exec_ctx_->GetTransaction());

}

result_set.erase(result_set.begin());

return true;
UPDATE
Update修改指定表中的现有元组并更新其索引。UpdatePlanNode可以利用SeqScanPlanNode或IndexScanPlanNode来提供进行更新的目标元组如
- 先向
empty_table2表中插入数据 - 然后修改
colA的值
INSERT INTO empty_table2 SELECT colA, colA FROM test_1 WHERE colA < 50

UPDATE empty_table2 SET colA = colA+10 WHERE colA < 50
实现
这里也是附上比较重要的next函数实现
bool UpdateExecutor::Next([[maybe_unused]] Tuple *tuple, RID *rid) {

  if (child_executor_->Next(tuple, rid)) {

    *tuple = GenerateUpdatedTuple(*tuple);

    return table_info_->table_.get()->UpdateTuple(*tuple, *rid, txn);

  }

  return false;

}
Delete
delete的逻辑都是非常简单的。就是找到满足要求的tuple,然后将其删除。这里还要注意出了删除tuple还要删除对应的index
实现
std::vector<RID> rids;

index->index_->ScanKey(key, &rids, txn);

table_info_->table_->MarkDelete(rids[0], txn);

index->index_->DeleteEntry(key, key.GetRid(), txn);
JOIN
join操作用于将两个子执行语句的结果组合在一起。在这个任务中你需要实现两种形式的join操作一种是基本的join另外一种是基于索引的join操作
实现
1. 基本join操作
这个实现非常简单,就是二重循环。对于外查询中的每一个元素在内表中进行遍历看一下是否有相等的。
SELECT test_1.colA, test_1.colB, test_2.col1, test_2.col3 FROM test_1 JOIN test_2 ON test_1.colA = test_2.col1 AND test_1.colA < 50
比如对于上面这个语句。我们要先把后面的select语句执行完。然后就是一个二重循环
  const Schema *left_schema = left_executor_->GetOutputSchema();

  const Schema *right_schema = right_executor_->GetOutputSchema();

  for (const auto &p1 : left_tuples) {

    for (const auto &p2 : right_tuples) {

      Tuple left_tuple = p1;

      Tuple right_tuple = p2;

      if (plan_->Predicate()->EvaluateJoin(&left_tuple, left_schema, &right_tuple, right_schema).GetAs<bool>()) {

        std::vector<Value> left_values = getValuesFromTuple(&left_tuple, left_schema);

        std::vector<Value> right_values = getValuesFromTuple(&right_tuple, right_schema);

        left_values.insert(left_values.end(), right_values.begin(), right_values.end());

        res.emplace_back(left_values, plan_->OutputSchema());

      }

    }

  }
2. 利用index的join操作
主要有两个注意点。获得key_tuple和在index中利用key_tuple找到rid
    Tuple key_tuple =

        outer_tuple.KeyFromTuple(*outer_table_schema, *index_key_schema, inner_index_->index_->GetKeyAttrs());

    inner_index_->index_->ScanKey(key_tuple, &rids, exec_ctx_->GetTransaction());
别的基本逻辑和上面的类似了不能贴太多代码啊。
AGGREGATION
聚合用于将来自单个子执行器的多个元组结果组合为单个元组。在这个项目中,我们要求您实现COUNT、SUM、MIN和MAX。
我们为您提供了一个SimpleAggregationHashTable。我们强烈建议您使用这个哈希表。
实现
SimpleAggregationHashTable这个hash表提供了一系列操作。下面我们依次来看一下。
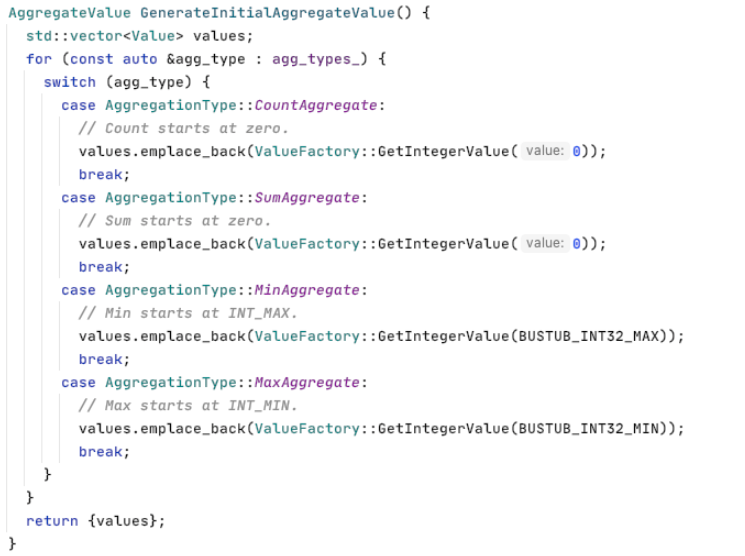
1.为聚合操作提供不同的初始值
可以发现这个函数为count和sum操作提供的初始值为0。而为求最小值操作提供的初始值是32位的最大值。max函数则提供了32位的最小值。这都是符合我们思维的
2. 这个函数主要是为了构建一个迭代器方便后面的having group by操作
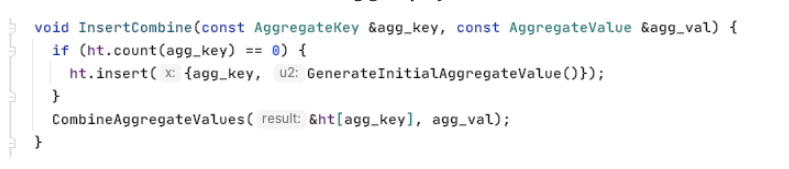
3. 帮你实现聚合操作的函数

注意这里的hash表。就是groupby操作用的
std::unordered_map<AggregateKey, AggregateValue> ht{};
它的key就是group by操作的列。这样就可以实现去重操作。嗯设计的真不错
因此整个代码的核心就在Init函数对于这个hash表和迭代器的构建
void AggregationExecutor::Init() {

  auto childE = child_.get();

  {

    childE->Init();

    try {

      Tuple tuple;

      RID rid;

      while (childE->Next(&tuple, &rid)) {

        aht_.InsertCombine(MakeKey(&tuple), MakeVal(&tuple));

      }

    } catch (Exception &e) {

      throw "you met error";

    }

    aht_iterator_ = aht_.Begin();

  }

}
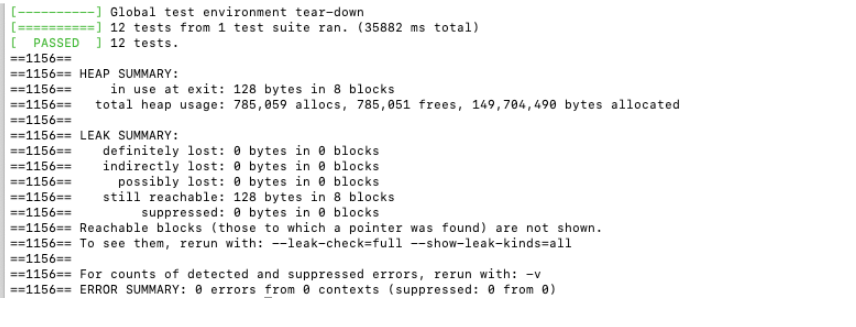
无内鬼通过啦。
后面就是把之前的笔记补一下。然后开始看最后一个project的课。然后最后一个实验了加油。所以的都搞完之后准备整理一个对这个项目的整理(后面面试用)
CMU数据库(15-445)Lab3- QUERY EXECUTION的更多相关文章
- (十二)数据库查询处理之Query Execution(1)
(十二)数据库查询处理之Query Execution(1) 1. 写在前面 这一大部分就是为了Lab3做准备的 每一个query plan都要实现一个next函数和一个init函数 对于next函数 ...
- Query execution was interrupted, max_statement_time exceeded
版本:5.6.16 群里看见一个问题,在备份的时候,报如下错误:[root@B28-19-75 bak]# mysqldump -root -p --single-transaction --mast ...
- CMU数据库(15-445) Lab4-CONCURRENCY CONTROL
Lab4- CONCURRENCY CONTROL 拖了很久终于开始做实验4了.lab4有三个大任务1. Lock Manager.2. DEADLOCK DETECTION .3. CONCURRE ...
- Multiple Server Query Execution报The result set could not be merged..
在SQL Server中使用Multiple Server Query Execution这个功能做数据库维护或脚本发布时非常方便,昨天由于磁盘空间原因,删除清理了大量的软件和组件,结果导致SSMS客 ...
- CMU数据库(15-445)Lab0-环境搭建
0.写在前面 从这篇文章开始.开一个新坑,记录以下自己做cmu数据库实验的过程,同时会分析一下除了要求我们实现的代码之外的实验自带的一些代码.争取能够对实现一个数据库比较了解.也希望能写进简历.让自己 ...
- 直接取HANA数据库数据,动态QUERY
"COPY别人的TYPE-POOLS:ADBC. DATA LV_SQL TYPE STRING. DATA LV_FROM TYPE STRING. DATA LV_WHERE TYPE ...
- ClickHouse之Distributed Query Execution
原文地址:https://clickhouse.yandex/docs/en/development/architecture/ 集群中的所有节点都是彼此独立的,当你在集群中的一个节点或者多个节点创建 ...
- 一次MySQL异常排查:Query execution was interrupted
异常日志: 查询被中断了,先是在Google上查,又是再百度上查,基本上都是说程序超时设置setQueryTimeout的问题,就是说查询时间超过了设置的最大查询时间,导致查询被中断.我也没办法断定是 ...
- delphi 数据库中Connection与Query连接数量问题思考
今天闲着没事,测试了一下Connection连接MSSQL,可以承受多少连接. 1.看看ADOConnection的连接数:写了一个代码,动态创建,测试了10000个连接,花了大约5~10分钟创 ...
随机推荐
- 记录一些Python中不常用但非常好用的函数
zfill(): 方法返回指定长度的字符串,原字符串右对齐,前面填充0. print('Helloworld'.zfill(50))0000000000000000000000000000000000 ...
- 【非原创】codeforces 1029F Multicolored Markers 【贪心+构造】
题目:戳这里 题意:给a个红色小方块和b个蓝色小方块,求其能组成的周长最小的矩形,要求红色或蓝色方块至少有一个也是矩形. 思路来源:戳这里 解题思路:遍历大矩形可能满足的所有周长,维护最小值即可.需要 ...
- 让你像黑客一样写代码(not really)
让你像黑客一样写代码(not really) http://poznan.tvp.pl 这是一个波兰的视频网站. poznan 波兹南(波兰城市 视屏链接 http://video.sina.com. ...
- React render algorithm & Fiber vs Stack
React render algorithm & Fiber vs Stack React 渲染算法 & Fiber vs Stack https://stackoverflow.co ...
- 埋点 & 数据上报 & 数据异常处理
埋点 & 数据上报 & 数据异常处理 如何在用户关闭浏览器前面,发送请求 beforeunload unload https://developer.mozilla.org/en-US ...
- c++ 读取ASCII
void ReadASCII(BYTE* addr, size_t offset, char r[]) { size_t i = 0; char c; while (true) { c = *(add ...
- 发布npm包时,发布源码,而不是dist后的打包文件
基于webpack-scaffold 此脚手架配置 删除.gitignore文件中对dist文件夹的无视配置 修改package.json文件 { "private": true, ...
- NGK新加坡峰会:超级节点和开源代码为DeFi生态带来新曙光!
据伦敦金融时报以及纽约商业报等多家媒体报道的消息,1月31日,2021 NGK区块链峰会于新加坡正式开幕,全球多位区块链研究所专家线上受邀出席参会,NGK灵石技术研发Clifton先生,法国区块链专家 ...
- 「NGK每日快讯」2021.1.26日NGK公链第84期官方快讯!
- Python爬虫_qq音乐示例代码
import requests url = 'https://c.y.qq.com/soso/fcgi-bin/client_search_cp' for x in range(5): headers ...