
iOS仿京东分类菜单之UICollectionView内容
在上《iOS仿京东分类菜单实例实现》已经实现了大部分主体的功能,本文是针对右边集合列表进行修改扩展,使它达到分组的效果,本文涉及到的主要是UICollectionView的知识内容,左边列表的实现见上一篇文章,先看实现的效果图:
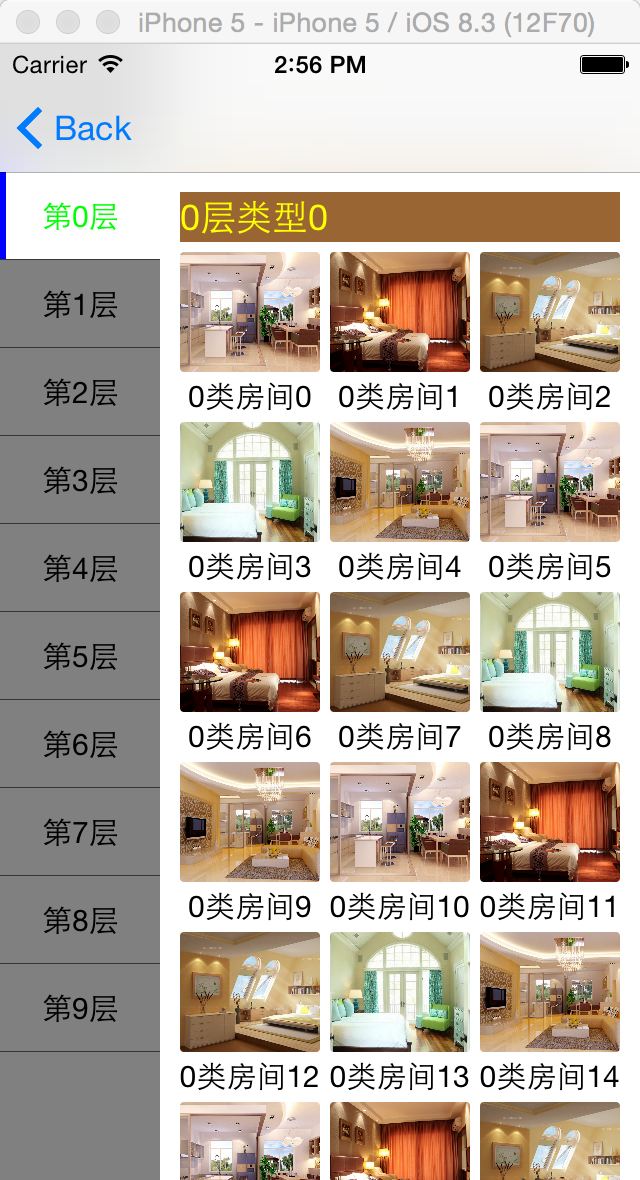 |
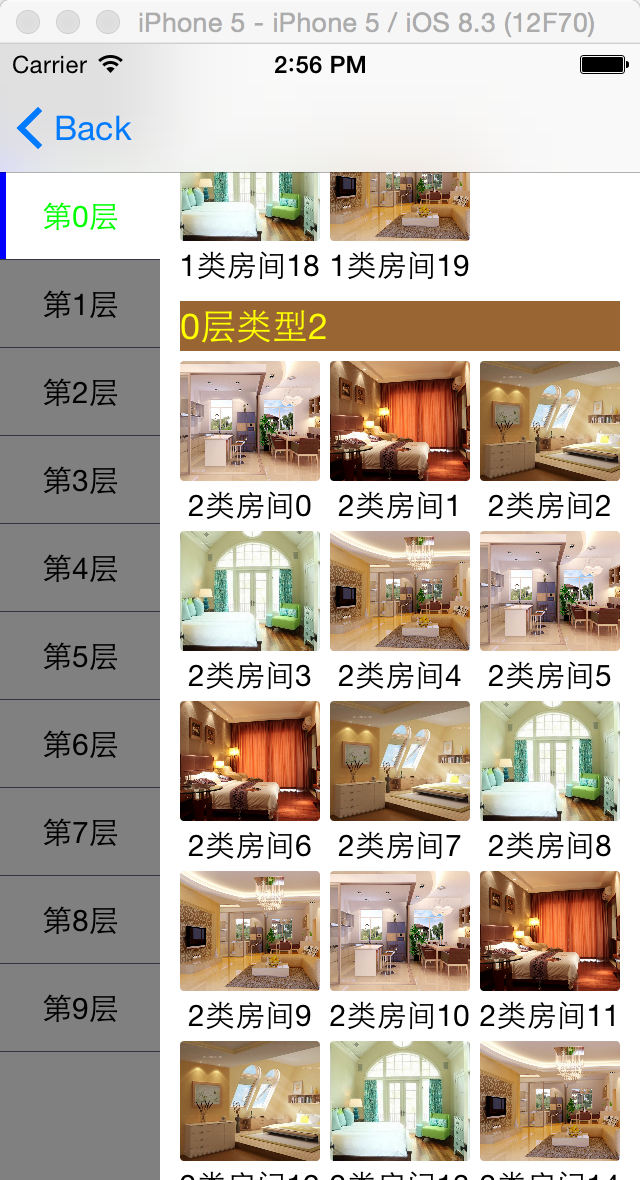 |
一:实体的创建
1.1分组实体的创建(tagID跟左边表格进行关联,roomArray是存放房间的数组,也就是单元格的集合)
#import <Foundation/Foundation.h>

@interface rightModel : NSObject

//实体leftTageModel中的主键值

@property(assign,nonatomic)long tagID;

@property(assign,nonatomic)long roomStyleID;

@property(copy,nonatomic)NSString *roomStyleName;

//房间实体headRightModel的数组

@property(strong,nonatomic)NSMutableArray *roomArray;

@end
1.2房间实体的创建
#import <Foundation/Foundation.h>

@interface headRightModel : NSObject

@property(assign,nonatomic)long roomID;

@property(copy,nonatomic)NSString *roomName;

@property(copy,nonatomic)NSString *roomImageUrl;

@end
二:单元格的创建
#import <UIKit/UIKit.h>

#import "headRightModel.h"

@interface rightCollectionViewCell : UICollectionViewCell

@property(strong,nonatomic)headRightModel *curHeadRightModel;

+(CGSize)ccellSize;

@end
#import "rightCollectionViewCell.h"

@interface rightCollectionViewCell()

@property(strong,nonatomic)UIImageView *roomImageView;

@property(strong,nonatomic)UILabel *roomLabel;

@end

static const CGFloat collectionCellHeight=;

static const CGFloat labelHeight=;

@implementation rightCollectionViewCell

//这边很关键 CollectionViewCell重用

- (id)initWithFrame:(CGRect)frame

{

    self = [super initWithFrame:frame];

    if (self) {

        if (self.roomImageView==nil) {

            self.roomImageView=[[UIImageView alloc] initWithFrame:CGRectMake(, , ([UIScreen mainScreen].bounds.size.width--*)/, collectionCellHeight-labelHeight)];

            self.roomImageView.contentMode=UIViewContentModeScaleAspectFill;

            self.roomImageView.clipsToBounds = YES;

            self.roomImageView.layer.masksToBounds = YES;

            self.roomImageView.layer.cornerRadius = 2.0;

            [self.contentView addSubview:self.roomImageView];

        }

        if (self.roomLabel==nil) {

            self.roomLabel=[[UILabel alloc]init];

            self.roomLabel.font=[UIFont systemFontOfSize:];

            self.roomLabel.textAlignment=NSTextAlignmentCenter;

            [self.roomLabel sizeToFit];

            [self.contentView addSubview:self.roomLabel];

            [self.roomLabel mas_makeConstraints:^(MASConstraintMaker *make) {

                make.top.mas_equalTo(self.roomImageView.mas_bottom).with.offset();

                make.centerX.mas_equalTo(self.roomImageView).with.offset();

                make.height.mas_equalTo(labelHeight);

            }];

        }

    }

    return self;

}

-(void)setCurHeadRightModel:(headRightModel *)curHeadRightModel

{

    _curHeadRightModel=curHeadRightModel;

    self.roomImageView.image=[UIImage imageNamed:_curHeadRightModel.roomImageUrl];

    self.roomLabel.text=_curHeadRightModel.roomName;

}

+(CGSize)ccellSize

{

    return CGSizeMake(([UIScreen mainScreen].bounds.size.width--*)/,collectionCellHeight);

}

@end
三:创建节点显示视图
#import <UIKit/UIKit.h>

@interface myHeadView : UICollectionReusableView

- (void) setLabelText:(NSString *)text;

@end
注意它是继承UICollectionReusableView
#import "myHeadView.h"

@interface myHeadView()

@property (strong, nonatomic) UILabel *label;

@end

@implementation myHeadView

- (id)initWithFrame:(CGRect)frame

{

    self = [super initWithFrame:frame];

    if (self)

    {

        self.label = [[UILabel alloc] init];

        //在这边调整它的位置

        self.label.frame=CGRectMake(, , , );

        self.label.font = [UIFont systemFontOfSize:];

        self.label.backgroundColor=[UIColor brownColor];

        self.label.textColor=[UIColor yellowColor];

        [self addSubview:self.label];

    }

    return self;

}

- (void) setLabelText:(NSString *)text

{

    self.label.text = text;

}

@end
四:创建测试数据跟初始化集合列表
- (void)viewDidLoad {

    [super viewDidLoad];

    //初始化

    self.view.backgroundColor=[UIColor whiteColor];

    self.dataList=[[NSMutableArray alloc]init];

    self.rightdataList=[[NSMutableArray alloc]init];

    self.allRightDataList=[[NSMutableArray alloc]init];

    self.isReturnLastOffset=YES;

    //是否允许右位保持滚动位置

    self.isKeepScrollState=YES;

    //测试数据

    for (int i=; i<; i++) {

        //左边列表数据

        leftTagModel *item=[[leftTagModel alloc]init];

        item.tagID=i;

        item.tagName=[NSString stringWithFormat:@"第%d层",i];

        [self.dataList addObject:item];

        //右边列表数据

        for (int j=; j<; j++) {

            rightModel *model=[[rightModel alloc]init];

            model.tagID=i;

            model.roomStyleID=j;

            model.roomStyleName=[NSString stringWithFormat:@"%d层类型%d",i,j];

            NSMutableArray *headRightModelArray=[[NSMutableArray alloc]init];

            for (int z=; z<; z++) {

                headRightModel *headrightModel=[[headRightModel alloc]init];

                headrightModel.roomID=z;

                headrightModel.roomName=[NSString stringWithFormat:@"%d类房间%d",j,z];

                headrightModel.roomImageUrl=[NSString stringWithFormat:@"room%d",z%];

                [headRightModelArray addObject:headrightModel];

            }

            model.roomArray=headRightModelArray;

            [self.allRightDataList addObject:model];

        }

    }

    //创建列表

    if (!_myTableView) {

        _myTableView = [[UITableView alloc] initWithFrame:CGRectMake(,,tableWidthSize, kScreenHeight) style:UITableViewStylePlain];

        _myTableView.backgroundColor=[UIColor grayColor];

        _myTableView.showsVerticalScrollIndicator = NO;

        _myTableView.showsHorizontalScrollIndicator=NO;

        _myTableView.dataSource = self;

        _myTableView.delegate = self;

        _myTableView.tableFooterView=[[UIView alloc]init];

        _myTableView.separatorColor= [UIColor colorWithRed:52.0f/255.0f green:53.0f/255.0f blue:61.0f/255.0f alpha:];

        [_myTableView registerClass:[leftTableCell class] forCellReuseIdentifier:NSStringFromClass([leftTableCell class])];

        if ([self.myTableView respondsToSelector:@selector(setLayoutMargins:)]) {

            self.myTableView.layoutMargins=UIEdgeInsetsZero;

        }

        if ([self.myTableView respondsToSelector:@selector(setSeparatorInset:)]) {

            self.myTableView.separatorInset=UIEdgeInsetsZero;

        }

        [self.view addSubview:_myTableView];

    }

    //创建集合表格

    if (!_myCollectionView) {

        UICollectionViewFlowLayout *layout = [[UICollectionViewFlowLayout alloc] init];

        self.myCollectionView = [[UICollectionView alloc] initWithFrame:CGRectMake(tableWidthSize+leftMargin,, kScreenWidth-tableWidthSize-*leftMargin, kScreenHeight) collectionViewLayout:layout];

        self.myCollectionView.backgroundColor=[UIColor whiteColor];

        self.myCollectionView.showsHorizontalScrollIndicator=NO;

        self.myCollectionView.showsVerticalScrollIndicator=NO;

        [self.myCollectionView registerClass:[rightCollectionViewCell class] forCellWithReuseIdentifier:NSStringFromClass([rightCollectionViewCell class])];

        [self.myCollectionView registerClass:[myHeadView class] forSupplementaryViewOfKind:UICollectionElementKindSectionHeader withReuseIdentifier:NSStringFromClass([myHeadView class])];

        self.myCollectionView.dataSource = self;

        self.myCollectionView.delegate = self;

        [self.view addSubview:self.myCollectionView];

    }

    self.selectIndex=;

    //默认选择第一个

    if (self.dataList.count>) {

        self.curSelectModel=[self.dataList objectAtIndex:self.selectIndex];

        [self.myTableView selectRowAtIndexPath:[NSIndexPath indexPathForRow:self.selectIndex inSection:] animated:YES scrollPosition:UITableViewScrollPositionTop];

        [self.myTableView reloadData];

        //右边数据加载

        [self predicateDataSoure];

    }

}
注意:关于节视图的注册
[self.myCollectionView registerClass:[myHeadView class] forSupplementaryViewOfKind:UICollectionElementKindSectionHeader withReuseIdentifier:NSStringFromClass([myHeadView class])];
五:集合视图UICollectionViewDataSource, UICollectionViewDelegate的内容
-(NSInteger)numberOfSectionsInCollectionView:(UICollectionView *)collectionView{

    return self.rightdataList.count;

}

- (NSInteger)collectionView:(UICollectionView *)collectionView numberOfItemsInSection:(NSInteger)section{

    rightModel * array=self.rightdataList[section];

    if (array.roomArray.count==) {

        return ;

    }

    else

    {

        return array.roomArray.count;

    }

}

- (UICollectionViewCell *)collectionView:(UICollectionView *)collectionView cellForItemAtIndexPath:(NSIndexPath *)indexPath{

    rightCollectionViewCell *ccell = [collectionView dequeueReusableCellWithReuseIdentifier:NSStringFromClass([rightCollectionViewCell class]) forIndexPath:indexPath];

    rightModel * array=self.rightdataList[indexPath.section];

    headRightModel *model=[array.roomArray objectAtIndex:indexPath.row];

    ccell.curHeadRightModel=model;

    return ccell;

}

-(CGSize)collectionView:(UICollectionView *)collectionView layout:(UICollectionViewLayout *)collectionViewLayout referenceSizeForHeaderInSection:(NSInteger)section

{

    CGSize size = {,};

    return size;

}

- (UICollectionReusableView *)collectionView:(UICollectionView *)collectionView viewForSupplementaryElementOfKind:(NSString *)kind atIndexPath:(NSIndexPath *)indexPath{

    myHeadView *headView;

    rightModel * array=self.rightdataList[indexPath.section];

    if([kind isEqual:UICollectionElementKindSectionHeader])

    {

        headView = [collectionView dequeueReusableSupplementaryViewOfKind:UICollectionElementKindSectionHeader withReuseIdentifier:NSStringFromClass([myHeadView class]) forIndexPath:indexPath];

        //别在这对headView坐标做处理

        [headView setLabelText:[NSString stringWithFormat:@"%@",array.roomStyleName]];

    }

    return headView;

}

- (CGSize)collectionView:(UICollectionView *)collectionView layout:(UICollectionViewLayout*)collectionViewLayout sizeForItemAtIndexPath:(NSIndexPath *)indexPath{

    return [rightCollectionViewCell ccellSize];

}

- (UIEdgeInsets)collectionView:(UICollectionView *)collectionView layout:(UICollectionViewLayout*)collectionViewLayout insetForSectionAtIndex:(NSInteger)section{

    return UIEdgeInsetsZero;

}

- (CGFloat)collectionView:(UICollectionView *)collectionView layout:(UICollectionViewLayout*)collectionViewLayout minimumLineSpacingForSectionAtIndex:(NSInteger)section{

    return ;

}

- (CGFloat)collectionView:(UICollectionView *)collectionView layout:(UICollectionViewLayout*)collectionViewLayout minimumInteritemSpacingForSectionAtIndex:(NSInteger)section{

    return ;

}

- (void)collectionView:(UICollectionView *)collectionView didSelectItemAtIndexPath:(NSIndexPath *)indexPath{

}
注意:别在viewForSupplementaryElementOfKind,对myHeadView进行坐标的调整,因为它是全局的,会导致所有的节点都混在一起,记得设置它的节头大小,才会显示出来;
六:扩展关于viewForSupplementaryElementOfKind,它可以设置节头跟节脚,下面引用网上一个比较全的说明
- (UICollectionReusableView *)collectionView:(UICollectionView *)collectionView viewForSupplementaryElementOfKind:(NSString *)kind atIndexPath:(NSIndexPath *)indexPath

为collection view添加一个补充视图(页眉或页脚)

- (CGSize)collectionView:(UICollectionView *)collectionView layout:(UICollectionViewLayout*)collectionViewLayout referenceSizeForHeaderInSection:(NSInteger)section

设定页眉的尺寸

- (CGSize)collectionView:(UICollectionView *)collectionView layout:(UICollectionViewLayout*)collectionViewLayout referenceSizeForFooterInSection:(NSInteger)section

设定页脚的尺寸

- (void)registerClass:(Class)viewClass forSupplementaryViewOfKind:(NSString *)elementKind withReuseIdentifier:(NSString *)identifier
视图创建:
[self.myCollectionView registerClass:[MyHeadView class] forSupplementaryViewOfKind:UICollectionElementKindSectionHeader withReuseIdentifier:@"hxwHeader"];

[self.myCollectionView registerClass:[MyHeadView class] forSupplementaryViewOfKind:UICollectionElementKindSectionFooter withReuseIdentifier:@"hxwHeader"];

-(CGSize)collectionView:(UICollectionView *)collectionView layout:(UICollectionViewLayout *)collectionViewLayout referenceSizeForHeaderInSection:(NSInteger)section

{

    CGSize size = {,};

    return size;

}

-(CGSize)collectionView:(UICollectionView *)collectionView layout:(UICollectionViewLayout *)collectionViewLayout referenceSizeForFooterInSection:(NSInteger)section

{

    CGSize size = {,};

    return size;

}

- (UICollectionReusableView *)collectionView:(UICollectionView *)collectionView viewForSupplementaryElementOfKind:(NSString *)kind atIndexPath:(NSIndexPath *)indexPath

{

    MyHeadView *headView;

    if([kind isEqual:UICollectionElementKindSectionHeader])

    {

         headView = [collectionView dequeueReusableSupplementaryViewOfKind:UICollectionElementKindSectionHeader withReuseIdentifier:@"hxwHeader" forIndexPath:indexPath];

        [headView setLabelText:[NSString stringWithFormat:@"section %d's header",indexPath.section]];

    }

    else if([kind isEqual:UICollectionElementKindSectionFooter])

    {

        headView = [collectionView dequeueReusableSupplementaryViewOfKind:UICollectionElementKindSectionFooter withReuseIdentifier:@"hxwHeader" forIndexPath:indexPath];

        [headView setLabelText:[NSString stringWithFormat:@"section %d's footer",indexPath.section]];

    }

    return headView;

}
iOS仿京东分类菜单之UICollectionView内容的更多相关文章
- iOS仿京东分类菜单实例实现
在APP开发过程中此功能还是比较常见的模块,左边为菜单展示,右边为菜单下数据的展示,选择不同的菜单右边的数据源进行更新,此实例主要运用到UITableView,UICollectionView,OC谓 ...
- iOS仿QQ侧滑菜单、登录按钮动画、仿斗鱼直播APP、城市选择器、自动布局等源码
iOS精选源码 QQ侧滑菜单,右滑菜单,QQ展开菜单,QQ好友分组 登录按钮 3分钟快捷创建高性能轮播图 ScrollView嵌套ScrolloView(UITableView .UICollecti ...
- jQuery仿京东无限级菜单HoverTree
官方网址:http://keleyi.com/jq/hovertree/ 效果图: 看了上面效果图,你或许已经明白为什么是仿京东菜单.如果还不明白,请访问http://list.jd.com/list ...
- 仿京东树形菜单插件hovertree
hovertree是一个仿京东的树形菜单jquery插件,暂时有银色和绿色两种. 官方网址:http://keleyi.com/jq/hovertree/欢迎下载使用 查看绿色效果:http://ke ...
- Jquery仿京东分类导航层简单实现
<script src="/js/jquery-1.11.1.min.js" type="text/javascript"></script& ...
- 仿京东左侧菜单 hover效果-简易demo
简单描述: 用到的知识点 css 中的绝对定位 以及 Js 中的事件冒泡(或事件委托) .cont{display:inline-block;width:200px;height:200px;bord ...
- iOS开发笔记13:顶部标签式导航栏及下拉分类菜单
当内容及分类较多时,往往采用顶部标签式导航栏,例如网易新闻客户端的顶部分类导航,最近刚好有这样的应用场景,参考网络上一些demo,实现了这种导航效果,记录一些要点. 效果图(由于视频转GIF掉帧,滑动 ...
- iOS 仿看了吗应用、指南针测网速等常用工具、自定义弹出视图框架、图片裁剪、内容扩展等源码
iOS精选源码 扩展内容的cell - folding-cell 一个近乎完整的可识别中国身份证信息的Demo 可自动快速... JPImageresizerView 仿微信的图片裁剪 带年月和至今以 ...
- Android:实现仿 美团/淘宝 多级分类菜单效果
本例要实现的是诸如美团/淘宝/百度糯米 多级分类菜单效果.当分类数量许多时能够考虑採用两级分类.而诸如美团这样的表现方式是一个不错的选择. 首先上效果图: 主要代码: 1. PopupWin ...
随机推荐
- IE代理文件自动设置
想如果代理可用就使用代理,代理不可用就直接连接网络. 新建文件放入javascript代码,保存为proxy.pac,保存路径c:\proxy.pac function FindProxyForURL ...
- 菜鸟学Windows Phone 8开发(1)——创建第一个应用程序
本系列文章来源MSDN的 面向完全新手的 Windows Phone 8 开发 主要是想通过翻译本系列文章来巩固下基础知识顺带学习下英语和练习下自己的毅力(因为打算每天翻译一篇,但是发现翻译这篇花费了 ...
- 在JAVA和android中常用的单列模式
在很多开发中,项目为了节约资源,都把一个类的构造函数变为私有化,这样整个项目中就不能创建多个实例,这样的方法我们称为单例模式 现在通过代码来简介下这个单例模式: 在新建一个java项目后,创建一个实体 ...
- Spring Remoting: Hessian--转
原文地址:http://www.studytrails.com/frameworks/spring/spring-remoting-hessian.jsp Concept Overview The p ...
- django 快速实现登录
前言 对于web开来说,用户登陆.注册.文件上传等是最基础的功能,针对不同的web框架,相关的文章非常多,但搜索之后发现大多都不具有完整性,对于想学习web开发的新手来说不具有很强的操作性:对于web ...
- Cool!12幅由小图片组成的创意图像重组作品
这里分享15幅创意插图作品,这些创意插图作品都是有成千上万的小图片组成的,很多创意广告会采用这个形式的设计.下面这组创意作品的作者是 Charis Tsevis,来自希腊的视觉设计师,擅长图像重组的创 ...
- .Net魔法堂:史上最全的ActiveX开发教程——ActiveX与JS间交互篇
一.前言 经过上几篇的学习,现在我们已经掌握了ActiveX的整个开发过程,但要发挥ActiveX的真正威力,必须依靠JS.下面一起来学习吧! 二.JS调用ActiveX方法 只需在UserContr ...
- R语言简单聚类分析
#以R基础包自带的鸢尾花(Iris)数据进行聚类分析iris data <- iris[,:] #系统聚类法(层次聚类法) distance <- dist(data) #计算距离 iri ...
- jQuery的事件click
不管是在asp.net 还是asp.net mvc中,对象的click事件是我们最常用到的一个事件,说明用户click点击一下mouse的左键,铵下并放开的事件. 今天已经是十一月份了,学习又是新的开 ...
- C# 实现WinForm窗口最小化到系统托盘代码,并且判断左右鼠标的事件
1.设置WinForm窗体属性showinTask=false 2.加notifyicon控件notifyIcon1,为控件notifyIcon1的属性Icon添加一个icon图标. 3.添加窗体最小 ...