
jenkins2 pipeline入门
本文通过简单的pipeline的实例和详细的讲解,能够学习基本pipeline的groovy用法,然后开始实现自己的pipeline job。
翻译和修改自:https://github.com/jenkinsci/pipeline-plugin/blob/master/TUTORIAL.md
文章来自:http://www.ciandcd.com
文中的代码来自可以从github下载: https://github.com/ciandcd
1. 安装java,maven,配置jenkins
安装java和maven:
#install java jdk
sudo apt-get update
sudo apt-get install default-jdk
#install maven in ubuntu
sudo apt-get update
sudo apt-get install maven
#setting for maven
~/.bashrc
export JAVA_HOME=/usr/lib/jvm/java-8-openjdk-amd64
#testing maven
/usr/share/maven/bin/mvn -v
Apache Maven 3.3.9
Maven home: /usr/share/maven
Java version: 1.8.0_91, vendor: Oracle Corporation
Java home: /usr/lib/jvm/java-8-openjdk-amd64/jre
Default locale: en_GB, platform encoding: UTF-8
OS name: "linux", version: "4.4.0-24-generic", arch: "amd64", family: "unix"
在jenkins的global tool configuration里配置环境变量
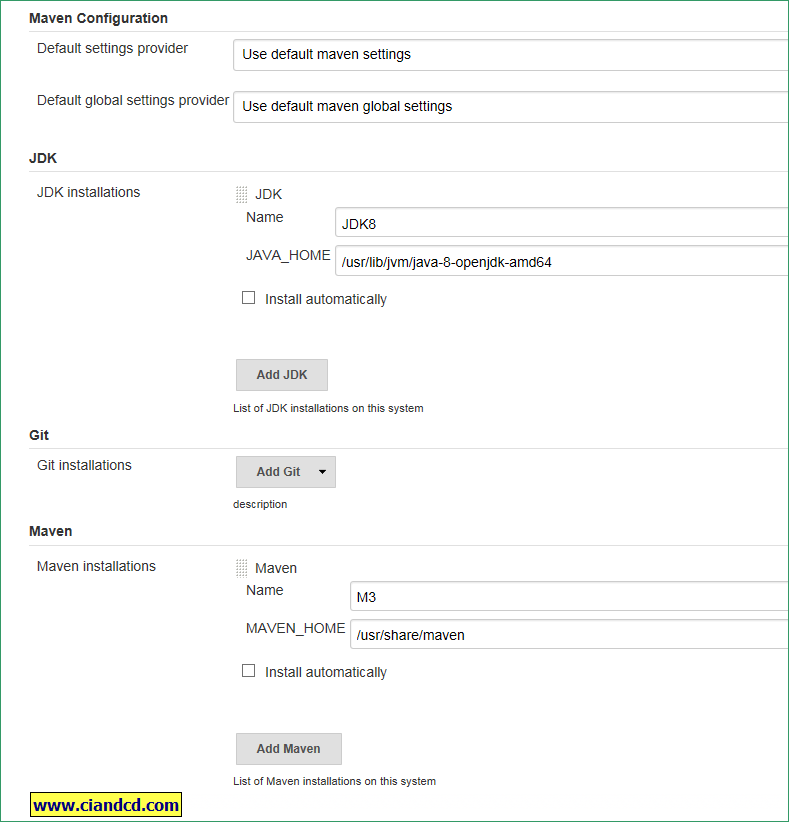
2. 创建简单的pipeline job
groovy代码如下:
node {
git url: 'https://github.com/jglick/simple-maven-project-with-tests.git'
def mvnHome = tool 'M3'
sh "${mvnHome}/bin/mvn -B verify"
}
上面的代码实现了从github checkout源代码,然后通过maven来构建, 代码中包含了测试用例,有可能会随机的失败, 如果有测试用例失败,则整个pipeline job将会标记为失败。
如果是windows系统,需要修改为bat "${mvnHome}\\bin\\mvn -B verify"。
groovy的node用来选择运行的机器,只要node还有可用的executor,node里的step任务将会在选中的机器上运行,且会在选中的机器上创建workspace。
许多的step必须在node里执行,例如git,sh等必须在node环境里执行。
不像用户定义的函数,pipeline step总是接受命名参数,括号可以省略,也可以使用标准的groovy语法传入map作为参数,例如等价用法:
git url: 'https://github.com/jglick/simple-maven-project-with-tests.git'
git url: 'https://github.com/jglick/simple-maven-project-with-tests.git', branch: 'master'
git([url: 'https://github.com/jglick/simple-maven-project-with-tests.git', branch: 'master'])

如果只有一个强制的参数,则可以省略参数名字,如下两种等价效果:
sh 'echo hello'
sh([script: 'echo hello'])

def可以定义groovy变量,tool可以检查指定名字的工具是否存在且可以访问,在双引号里使用变量,变量将会被替换为真实的值:
def mvnHome = tool 'M3'
"${mvnHome}/bin/mvn -B verify"
3. 环境变量的使用
最简单的使用工具的方式是将工具路径加入到PATH中,通过env可以修改node对应机器的环境变量,后面的steps可以看到环境变量的修改。
node {
git url: 'https://github.com/jglick/simple-maven-project-with-tests.git'
def mvnHome = tool 'M3'
env.PATH = "${mvnHome}/bin:${env.PATH}"
sh 'mvn -B verify'
}
jenkins的job有一些内置的默认的环境变量,可以通过http://jenkins-server/job/javahelloworld/pipeline-syntax/globals来查看job默认的环境变量。 如下:
BRANCH_NAME
CHANGE_ID
CHANGE_URL
CHANGE_TITLE
CHANGE_AUTHOR
CHANGE_AUTHOR_DISPLAY_NAME
CHANGE_AUTHOR_EMAIL
CHANGE_TARGET
BUILD_NUMBER
BUILD_ID
BUILD_DISPLAY_NAME
JOB_NAME
JOB_BASE_NAME
BUILD_TAG
EXECUTOR_NUMBER
NODE_NAME
NODE_LABELS
WORKSPACE
JENKINS_HOME
JENKINS_URL
BUILD_URL
JOB_URL
例如你可以在node中的step中使用env.BUILD_TAG。
同样地,如果你使用参数化build,则同名的参数在groovy里可以使用。
4. 记录测试结果和构建产物
当有测试用例失败的时候,你可能需要保存失败的用例结果和构建产物用于人工排查错误。
node {
git url: 'https://github.com/jglick/simple-maven-project-with-tests.git'
def mvnHome = tool 'M3'
sh "${mvnHome}/bin/mvn -B -Dmaven.test.failure.ignore verify"
step([$class: 'ArtifactArchiver', artifacts: '**/target/*.jar', fingerprint: true])
step([$class: 'JUnitResultArchiver', testResults: '**/target/surefire-reports/TEST-*.xml'])
}
上面的例子中,-Dmaven.test.failure.ignore将忽略测试用例的失败,jenkins将正常执行后面的step然后退出。
上面的两个step调用相当于调用传统的jenkins的steps将构建产物和测试结构保存。
以下两个是等价作用,第一个是简写:
git url: 'https://github.com/jglick/simple-maven-project-with-tests.git'
checkout scm: [$class: 'GitSCM', branches: [[name: '*/master']], userRemoteConfigs: [[url: 'https://github.com/jglick/simple-maven-project-with-tests']]
5. slave机器的选择、
groovy中通过node的参数labels来选择slave,用法跟jenkins1里的一样,我们需要先定义jenkins node,且给jenkins node定义label,然后在groovy里使用node加label来选择slave。
例如如下node选择同时定义了unix和64bit的slave。
node('unix && 64bit') { // as before }
6. 暂停pipeline
新建pipeline job,修改groovy脚本如下:
node {
git url: 'https://github.com/jglick/simple-maven-project-with-tests.git'
def mvnHome = tool 'M3'
sh "${mvnHome}/bin/mvn -B -Dmaven.test.failure.ignore verify"
input 'save artifacts and unit results?'
// rest as before
step([$class: 'ArtifactArchiver', artifacts: '**/target/*.jar', fingerprint: true])
step([$class: 'JUnitResultArchiver', testResults: '**/target/surefire-reports/TEST-*.xml'])
}
在job的运行页面可以看到
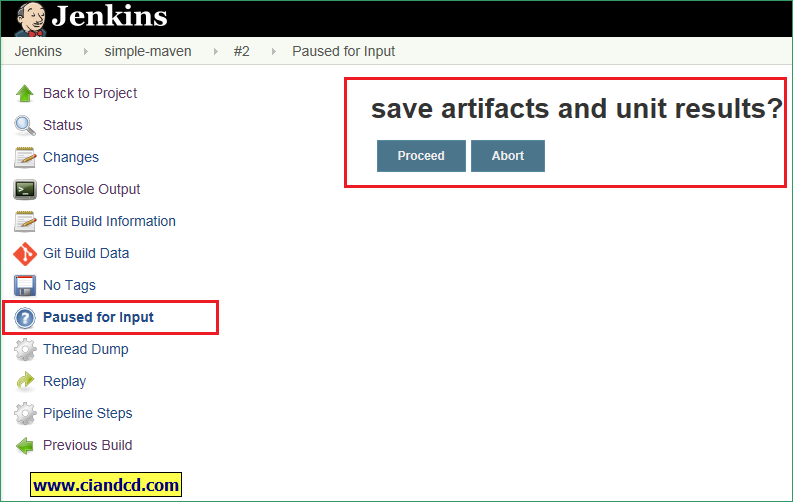
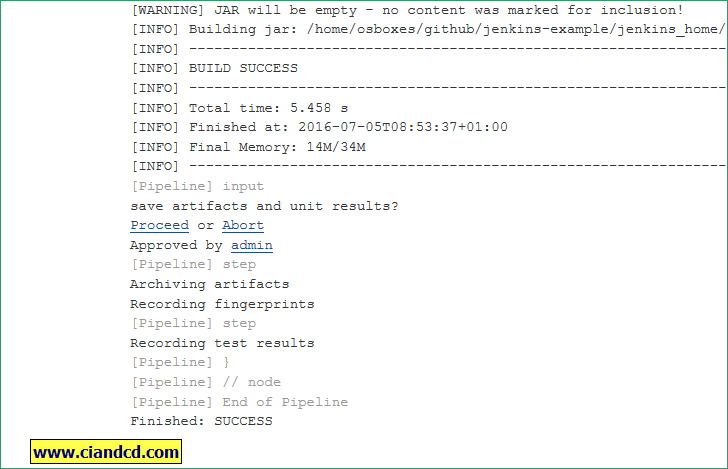
然后点击proceed,pipelinejob就继续执行了。貌似job console output中的 proceed/Abort连接点了没有用。必须要要点击pause for input的proceed/abort按钮才可以。
7. 分配workspace
当node执行steps的时候会自动分配workspace,用于checkout代码,运行命令和其他任务。在step执行的时候workspace是被lock的,workspace只能同时被一个build使用。如果多个build需要使用同一个node的workspace,新的workspace将会被自动分配。
例如你同时运行你的同一个job两次,则第二个job log中可以看到使用了不同的workspace:
Running on <yourslavename> in /<slaveroot>/workspace/<jobname>@2

并行的job如果在新的workspace,则需要重新checkout代码,可以查看job log来证实。

下一节将学习更复杂的groovy用法。
jenkins2 pipeline入门的更多相关文章
- Jenkins pipeline 入门到精通系列文章
Jenkins2 入门到精通系列文章. Jenkins2 下载与启动jenkins2 插件安装jenkins2 hellopipelinejenkins2 pipeline介绍jenkins2 jav ...
- jenkins2 pipeline 语法快速参考
jenkins2 pipeline中常用的语法快速参考. 文章来自:http://www.ciandcd.com文中的代码来自可以从github下载: https://github.com/ciand ...
- jenkins2 pipeline高级
jenkins2 pipeline里groovy的高级用法.翻译自:https://github.com/jenkinsci/pipeline-plugin/blob/master/TUTORIAL. ...
- jenkins2 pipeline介绍
文章来自:http://www.ciandcd.com 文中的代码来自可以从github下载: https://github.com/ciandcd 什么是jenkins2的pipeline? ...
- jenkins2 -pipeline 常用groovy脚本
jenkins2的核心是pipeline,pipeline的核心是groovy. 那有一些基础的groovy是必须经常使用的,如变量赋值,变量引用,打印变量,输出字符,任务调用,循环判断等. Groo ...
- jenkins2 pipeline插件的10个最佳实践
jenkins pipeline的10个最佳实践. 文章来自:http://www.ciandcd.com文中的代码来自可以从github下载: https://github.com/ciandcd ...
- jenkins2 pipeline实例
比较完整的实例,使用了maven打包,git tag,发通知邮件,等待用户deploy,deploy到nexus. 文章来自:http://www.ciandcd.com文中的代码来自可以从githu ...
- Jenkins2 插件 Pipeline+BlueOcean 实现持续交付的初次演练
需要完成的目标 使用Pipeline完成项目的checkout,package.deploy.restart 提取出公有部分封装为公有JOB 实现pipeline对其他JOB的调用和逻辑的判断 实现任 ...
- (转)Jenkins2.0 Pipeline 插件执行持续集成发布流程 - git -资料 - 不错的文档
1.Jenkins 2.0 的精髓是 Pipeline as Code Jenkins 2.0 的精髓是 Pipeline as Code,是帮助 Jenkins 实现 CI 到 CD 转变的重要角色 ...
随机推荐
- <img>标签
<img src="w3school.jpg" width="104" height="142" />注释:图像的名称和尺寸是以 ...
- strcat strcpy 使用出现的问题汇总
事例1(转) 在程序中多次用的strcat函数,但是有时候编译通过,但是执行时却出现了错误.为了进一步了解strcat函数的使用,我首先写了这样的一个测试程序: main(){ char ...
- C#与时间有关的一些方法
stopWatch var stopWatch = new StopWatch(); //创建一个Stopwatch实例 stopWatch.Start(); //开始计时 stopWatc ...
- goto
-------siwuxie095 goto 无条件跳转命令 语法: GOTO label label 指定批处理程序中用作标签的字符串 标签必须单独一行,且以冒号开头.即 goto 和 : 分不 ...
- 2.Java对象创建
1. 对象的创建 虚拟机遇到一条new指令时,首先将去检查这个指令的参数是否能在常量池中定位到一个类的符号引用,并且检查这个符号引用代表的类是否已被加载.解析和初始化过.如果没有,那必须先执行相应的类 ...
- WPF错误:当前上下文中不存在名称“InitializeComponent”
当修改一个View的名称为VCFCView.xaml的时候,一定要记得在内部x:Class也要修改为XXXX.VCFCView,否则会报错误(图三) 当前上下文中不存在名称"Initiali ...
- 解析Tomcat内部结构和请求过程
Tomcat Tomcat的组织结构 由Server.xml的结构看Tomcat的体系结构 Tomca的两大组件:Connecter和Container Connecter组件 Container组件 ...
- poj练习题的方法
poj1010--邮票问题 DFSpoj1011--Sticks dfs + 剪枝poj1020--拼蛋糕poj1054--The Troublesome Frogpoj1062--昂贵的聘礼poj1 ...
- 低版本的无法打开高版本的VM
低版本VM工具運行高版本VM環境時,會彈出不支持虚拟机配置.例如:使用VM8工具打開VM9配置的VM環境,會彈出下面的提示 在遇到這種情況的時候,一般都會選擇升級VM工具.如果不想升級VM工具,可以通 ...
- 20145225《Java程序设计》 实验三 "敏捷开发与XP实践"
20145225<Java程序设计> 实验三 "敏捷开发与XP实践" 实验报告 实验内容 使用 git 上传代码 使用 git 相互更改代码 实现代码的重载 git 上 ...