Vue2.0 + Element-UI + WebAPI实践:简易个人记账系统
最近正在学习Vue2.0相关知识,正好近期饿了么桌面端组件Element-UI发布,便动手做了一款简易个人记账系统,以达到实践及巩固目的。
1.开发环境
Win10 + VS2015 + Sqlserver2008R2 + WebAPI + Dapper + Vue2.0 + Element-UI
2.项目解决方案概览

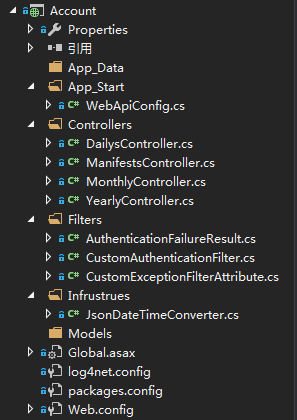
简单介绍下,Account是WebAPI项目,承载前端请求;Account.BLL、Account.DAL、Account.Entity不废话;Account.Common是对Dapper及Log4net等简单封装;KnockoutFE是较早时候弄的一个基于Bootstrap + Knockout的前端;VueFE是主角,待会儿重点介绍。
Account工程截图:
Account.Common工程截图:

VueFE工程截图:

3.前端实现
初始界面:

1.左边导航部分
使用el-menu + vue-router实现:
<div id="sideBar">

            <!--<ul>

                <router-link to="/manifests" tag="li">日消费明细</router-link>

                <router-link to="/daily" tag="li">日消费清单</router-link>

                <router-link to="/monthly" tag="li">月消费清单</router-link>

                <router-link to="/yearly" tag="li">年消费清单</router-link>

            </ul>-->

            <el-menu default-active="manifests" theme="dark" v-bind:router="true">

                <el-menu-item index="manifests">日消费明细</el-menu-item>

                <el-menu-item index="daily">日消费清单</el-menu-item>

                <el-menu-item index="monthly">月消费清单</el-menu-item>

                <el-menu-item index="yearly">年消费清单</el-menu-item>

            </el-menu>

        </div>
注释掉部分是最开始时候没有采用el-menu组件导航,而是使用了vue-router自己的路由导航。
路由部分对应JS代码:
const router = new VueRouter({

    routes: [

        { name: "manifests", path: "/manifests", component: Manifests },

        { name: "daily", path: "/daily", component: Daily },

        { name: "monthly", path: "/monthly", component: Monthly },

        { name: "yearly", path: "/yearly", component: Yearly }

    ]

});
其中,Manifests、Daily、Monthly、Yearly分别代表日消费明细、日消费清单、月消费清单、年消费清单自定义Vue组件。
2.具体内容页组件实现
这里以日消费明细组件为例来详细介绍,里边囊括了CRUD。
组件完整定义:
/// <reference path="index.js" />

/// <reference path="vue.js" />

/// <reference path="vue-resource.js" />

/// <reference path="util.js" />

const Manifests = {

    template: "#manifests",

    created: function () {

        this.fetchData();

    },

    data: function () {

        let currentDate = new Date();

        let costValidator = (rule, value, callback) => {

            if (!/^[0-9]+(.[0-9]{2})?$/.test(value)) {

                callback(new Error("请输入合法金额"));

            }

            else {

                callback();

            }

        };

        return {

            start: new Date(currentDate.getFullYear(), currentDate.getMonth() - 3, 1),

            end: new Date(),

            manifests: [],

            title: "",

            manifest: {},

            showOperateManifest: false,

            isAdd: false,

            rules: {

                Date: [

                    { type: "date", required: true, message: "请选择消费日期", trigger: "change" }

                ],

                Cost: [

                    { required: true, message: "请填写消费金额", trigger: "blur" },

                    { validator: costValidator, trigger: "change" }

                ],

                Remark: [

                    { required: true, message: "请填写消费明细", trigger: "blur" }

                ]

            },

            pageIndex: 0,

            pageSize: 10,

            total: 0,

            pageSizes: [10, 20, 50, 100]

        }

    },

    methods: {

        fetchData: function () {

            this.manifests = [];

            this.$http.get("http://localhost:1500/api/Manifests/paged", {

                params: {

                    start: this.start.format("yyyy-MM-dd"),

                    end: this.end.format("yyyy-MM-dd"),

                    pageIndex: this.pageIndex,

                    pageSize: this.pageSize

                }

            })

                      .then(response => {

                          this.total = response.body.count;

                          this.manifests = response.body.data;

                      })

                      .catch(response => this.$alert(response.body.Message, "日消费明细", { type: "error" }));

        },

        add: function () {

            this.title = "添加消费明细";

            this.manifest = {

                ID: Guid.NewGuid().ToString("D"),

                Date: new Date(),

                Cost: "",

                Remark: ""

            };

            this.isAdd = true;

            this.showOperateManifest = true;

        },

        save: function () {

            this.$refs.formManifest.validate(valid => {

                if (valid) {

                    let operateManifest = JSON.parse(JSON.stringify(this.manifest));

                    operateManifest.Date = this.manifest.Date.format("yyyy-MM-dd");

                    if (this.isAdd) {

                        this.$http.post("http://localhost:1500/api/Manifests", operateManifest)

                        .then(() => {

                            this.manifests.push(operateManifest);

                            this.showOperateManifest = false;

                            bus.$emit("manifestChanged");

                            this.$message({

                                message: "添加成功",

                                type: "success"

                            });

                        })

                        .catch(err => {

                            //console.log(err);

                            this.$alert(err.body.Message, "添加日消费明细", { type: "error" });

                        });

                    }

                    else {

                        this.$http.put("http://localhost:1500/api/Manifests", operateManifest)

                        .then(response => {

                            let updatedManifest = this.manifests.find(x => x.ID == this.manifest.ID);

                            updatedManifest.Date = operateManifest.Date;

                            updatedManifest.Cost = operateManifest.Cost;

                            updatedManifest.Remark = operateManifest.Remark;

                            this.showOperateManifest = false;

                            bus.$emit("manifestChanged");

                            this.$message({

                                message: "修改成功",

                                type: "success"

                            });

                        })

                        .catch(err => {

                            //console.log(err);

                            this.$alert(err.body.Message, "修改消费明细", { type: "error" });

                        });

                    }

                }

                else {

                    return false;

                }

            });

        },

        cancel: function () {

            this.manifest = {};

            this.showOperateManifest = false;

        },

        edit: function (ID) {

            let currentManifest = this.manifests.find(x => x.ID == ID);

            this.manifest = JSON.parse(JSON.stringify(currentManifest));

            this.manifest.Date = new Date(this.manifest.Date);

            this.title = "编辑消费明细";

            this.isAdd = false;

            this.showOperateManifest = true;

        },

        del: function (ID) {

            this.$confirm("是否删除?", "警告", { type: "warning" })

            .then(() => {

                this.$http.delete("http://localhost:1500/api/Manifests/" + ID)

                .then(response => {

                    let index = this.manifests.findIndex(x => x.ID == ID);

                    this.manifests.splice(index, 1);

                    bus.$emit("manifestChanged");

                    this.$message({

                        message: "删除成功",

                        type: "success"

                    });

                })

                .catch(err => {

                    this.$alert(err.body.Message, "删除消费明细", { type: "error" });

                    //console.log(err);

                });

            });

        },

        dialogClosed: function () {

            this.$refs.formManifest.resetFields();

        },

        sizeChange: function (pageSize) {

            this.pageSize = pageSize;

            this.fetchData();

        },

        pageIndexChange: function (pageIndex) {

            this.pageIndex = pageIndex;

            this.fetchData();

        }

    }

}
组件对应的模板定义:
<script type="text/x-template" id="manifests">

        <div>

            <div>

                开始日期:

                <el-date-picker v-model="start" type="date" placeholder="选择日期"></el-date-picker>

                结束日期:

                <el-date-picker v-model="end" type="date" placeholder="选择日期"></el-date-picker>

                <el-button type="primary" size="small" v-on:click="fetchData" icon="search">查  询</el-button>

                <el-button type="primary" size="small" v-on:click="add" icon="plus">添  加</el-button>

            </div>

            <div class="table">

                <el-table v-bind:data="manifests" highlight-current-row border height="500">

                    <el-table-column prop="Date" label="日期"></el-table-column>

                    <el-table-column prop="Cost" label="金额"></el-table-column>

                    <el-table-column prop="Remark" label="备注"></el-table-column>

                    <el-table-column inline-template label="操作">

                        <span>

                            <el-button type="text" size="small" v-on:click="edit(row.ID)" icon="edit">编 辑</el-button>

                            <el-button type="text" size="small" v-on:click="del(row.ID)" icon="delete">删 除</el-button>

                        </span>

                    </el-table-column>

                </el-table>

            </div>

            <div class="pager">

                <el-pagination v-bind:current-Page="pageIndex" v-bind:page-size="pageSize" :total="total"

                               layout="total,sizes,prev,pager,next,jumper" v-bind:page-sizes="pageSizes"

                               v-on:size-change="sizeChange" v-on:current-change="pageIndexChange">

                </el-pagination>

            </div>

            <div>

                <el-dialog v-bind:title="title" v-bind:close-on-click-modal="false" v-model="showOperateManifest" v-on:close="dialogClosed">

                    <el-form v-bind:model="manifest" v-bind:rules="rules" ref="formManifest" label-position="left" label-width="80px">

                        <el-form-item label="日  期" prop="Date">

                            <el-date-picker v-model="manifest.Date"></el-date-picker>

                        </el-form-item>

                        <el-form-item label="金  额" prop="Cost">

                            <el-input v-model="manifest.Cost"></el-input>

                        </el-form-item>

                        <el-form-item label="备  注" prop="Remark">

                            <el-input v-model="manifest.Remark"></el-input>

                        </el-form-item>

                        <el-form-item>

                            <el-button type="primary" v-on:click="save">确 定</el-button>

                            <el-button type="primary" v-on:click="cancel">取 消</el-button>

                        </el-form-item>

                    </el-form>

                </el-dialog>

            </div>

        </div>

    </script>
查询部分  :
:
<div>

                开始日期:

                <el-date-picker v-model="start" type="date" placeholder="选择日期"></el-date-picker>

                结束日期:

                <el-date-picker v-model="end" type="date" placeholder="选择日期"></el-date-picker>

                <el-button type="primary" size="small" v-on:click="fetchData" icon="search">查  询</el-button>

                <el-button type="primary" size="small" v-on:click="add" icon="plus">添  加</el-button>

            </div>
这里关于事件处理绑定,官网推荐简写的@click,但这里没有采用,而是使用了完整绑定V-on:click,因为考虑到以后可能会和Razor整合,@符可能会冲突
查询JS:
fetchData: function () {

            this.manifests = [];

            this.$http.get("http://localhost:1500/api/Manifests/paged", {

                params: {

                    start: this.start.format("yyyy-MM-dd"),

                    end: this.end.format("yyyy-MM-dd"),

                    pageIndex: this.pageIndex,

                    pageSize: this.pageSize

                }

            })

                      .then(response => {

                          this.total = response.body.count;

                          this.manifests = response.body.data;

                      })

                      .catch(response => this.$alert(response.body.Message, "日消费明细", { type: "error" }));

        }
API请求采用了Vue开源社区的vue-resource,简单轻便,再搭配ES6 Promise,写起来很顺手。
添加/编辑的实现:

这里使用了el-dialog嵌套el-form
<el-dialog v-bind:title="title" v-bind:close-on-click-modal="false" v-model="showOperateManifest" v-on:close="dialogClosed">

                    <el-form v-bind:model="manifest" v-bind:rules="rules" ref="formManifest" label-position="left" label-width="80px">

                        <el-form-item label="日  期" prop="Date">

                            <el-date-picker v-model="manifest.Date"></el-date-picker>

                        </el-form-item>

                        <el-form-item label="金  额" prop="Cost">

                            <el-input v-model="manifest.Cost"></el-input>

                        </el-form-item>

                        <el-form-item label="备  注" prop="Remark">

                            <el-input v-model="manifest.Remark"></el-input>

                        </el-form-item>

                        <el-form-item>

                            <el-button type="primary" v-on:click="save">确 定</el-button>

                            <el-button type="primary" v-on:click="cancel">取 消</el-button>

                        </el-form-item>

                    </el-form>

                </el-dialog>
save: function () {

            this.$refs.formManifest.validate(valid => {

                if (valid) {

                    let operateManifest = JSON.parse(JSON.stringify(this.manifest));

                    operateManifest.Date = this.manifest.Date.format("yyyy-MM-dd");

                    if (this.isAdd) {

                        this.$http.post("http://localhost:1500/api/Manifests", operateManifest)

                        .then(() => {

                            this.manifests.push(operateManifest);

                            this.showOperateManifest = false;

                            bus.$emit("manifestChanged");

                            this.$message({

                                message: "添加成功",

                                type: "success"

                            });

                        })

                        .catch(err => {

                            //console.log(err);

                            this.$alert(err.body.Message, "添加日消费明细", { type: "error" });

                        });

                    }

                    else {

                        this.$http.put("http://localhost:1500/api/Manifests", operateManifest)

                        .then(response => {

                            let updatedManifest = this.manifests.find(x => x.ID == this.manifest.ID);

                            updatedManifest.Date = operateManifest.Date;

                            updatedManifest.Cost = operateManifest.Cost;

                            updatedManifest.Remark = operateManifest.Remark;

                            this.showOperateManifest = false;

                            bus.$emit("manifestChanged");

                            this.$message({

                                message: "修改成功",

                                type: "success"

                            });

                        })

                        .catch(err => {

                            //console.log(err);

                            this.$alert(err.body.Message, "修改消费明细", { type: "error" });

                        });

                    }

                }

                else {

                    return false;

                }

            });

        }
其中包括了表单验证部分,也是采用Element-UI文档中介绍的验证方式,目前有些验证支持不是很好,比如number,可能是哪里用的不对吧,所以上边对金额部分采取了正则自定义验证。
底部分页部分:

<el-pagination v-bind:current-Page="pageIndex" v-bind:page-size="pageSize" :total="total"

                               layout="total,sizes,prev,pager,next,jumper" v-bind:page-sizes="pageSizes"

                               v-on:size-change="sizeChange" v-on:current-change="pageIndexChange">

                </el-pagination>
如上所示,直接使用了饿了么分页组件,设置几个属性, 再绑定几个JS属性、分页事件处理程序即可,十分方便
Vue Date对象中分页相关的属性:

页索引及分页大小变动事件处理:
 sizeChange: function (pageSize) {

            this.pageSize = pageSize;

            this.fetchData();

        },

        pageIndexChange: function (pageIndex) {

            this.pageIndex = pageIndex;

            this.fetchData();

        }
没什么特别, 根据最新页索引或页尺寸大小从新拉取一遍数据就行了。
4.源码
https://github.com/KINGGUOKUN/Account/tree/master/AccountWeb
Vue2.0 + Element-UI + WebAPI实践:简易个人记账系统的更多相关文章
- vue2.0 + Element UI + axios实现表格分页
注:本文分页组件用原生 html + css 实现,element-ui里有专门的分页组件可以不用自己写,详情见另一篇博客:https://www.cnblogs.com/zdd2017/p/1115 ...
- vue2.0 + element ui 实现表格穿梭框
element ui 官网里介绍了穿梭框(Transfer),但在实际使用过程中,会出现一些问题: 1.穿梭框里能放置的内容太少,不能满足复杂的业务需求. 2.当选项过多时,穿梭框很难实现分页,左右两 ...
- vue2.0+Element UI 表格前端分页和后端分页
之前写过一篇博客,当时对element ui框架还不太了解,分页组件用 html + css 自己写的,比较麻烦,而且只提到了后端分页 (见 https://www.cnblogs.com/zdd20 ...
- vue2.0+Element UI 实现动态表单(点击按钮增删一排输入框)
对于动态增减表单项,Element UI 官方文档表单那一节已经介绍得很清楚了,我之前没有看见,绕了很多弯路,这里针对点击按钮增删一排输入框的问题做一个总结. 效果图如下 存在一排必填的姓名与手机号, ...
- vue2.0 element学习
1,bootstrap和vue2.0结合使用 vue文件搭建好后,引入jquery和bootstrap 我采用的方式为外部引用 在main.js内部直接导入 用vue-cli直接安装jquery和bo ...
- Vuex2.0+Vue2.0构建备忘录应用实践
一.介绍Vuex Vuex 是一个专为 Vue.js 应用程序开发的状态管理模式.它采用集中式存储管理应用的所有组件的状态,并以相应的规则保证状态以一种可预测的方式发生变化,适合于构建中大型单页应用. ...
- vue2.0+element+node+webpack搭建的一个简单的后台管理界面
闲聊: 今天是六一儿童节哟,小颖祝大家节日快乐哈哈哈.其实这个demo小颖断断续续做了将近两个礼拜了,心塞的,其实这个也没有多难,主要是小颖有点最近事情有点多,所以就把这个一直拖着,今天好不容易做好了 ...
- 【重点突破】—— Vue2.0 transition 动画Demo实践填坑
前言:vue1.0版本和2.0版本的过渡系统改变是很大的,具体请详看文档介绍.本文转载自郭锦荣的博客,一共列举了四种transition的使用实践,分别是css过渡.css动画.javascript钩 ...
- 2021新年 Vue3.0 + Element UI 尝鲜小记
2021年,又是新的一年,Vue 已经发布 3.0 版本,最好用的 UI 组件库 Element UI 也发布了适配 Vue3.0 的新版本,是时候开始学习一下这两个新技术. 本文主要记录了使用 Vu ...
随机推荐
- 分享45个android实例源码,很好很强大
分享45个android实例源码,很好很强大 http://www.apkbus.com/android-20978-1-1.html 分享45个android实例源码,很好很强大http://www ...
- js原型基础
js中的原型链是实现继承等面向对象的一种方式,而我这里不详细展开,仅仅是画了一张原型部分结构图,主要说明: 1._proto_和prototype之间的关系 2.原型链的起点是Object.proto ...
- Windows Server 2008 R2 服务器安装(重装)流程备忘
系统相关 一.安装Windows Server R2 (略) 二.激活系统:Windows Loader 三.创建域 (自行参考: http://www.cnblogs.com/zhongweiv/a ...
- 外网无法访问本地IIS站点
自己申请了个花生壳动态域名,本来是打算在IIs上建个站点测试一下的,路由器上的端口也配置好了,把80端口指向我本机.域名也通过 ping 测试确实指向了我这里的路由器.但是用这个域名老是访问不了我这个 ...
- 17.linux下root用户与普通用户
默认安装完成之后并不知道root用户的密码,那么如何应用root权限呢? (1)sudo 命令 这样输入当前管理员用户密码就可以得到超级用户的权限.但默认的情况下5分钟root权限就失效了. (2 ...
- lnmp下启动mysql报错 The server quit without updating PID file
启动时候错误代码:Starting MySQL[FAIL.] The server quit without updating PID file (/var/run/mysqld/mysqld.pid ...
- List集合的remove一个对象的方法
import java.util.ArrayList;import java.util.List;class A{ public boolean equals(Object obj){ return ...
- linux 下 TeXmacs 作 Mathematica 10 的前端
TeXmacs可以作很多种数学软件的前端,比如maxima,octave,R等.甚至还可以作mathematica的前端.TeXmacs的mathematica 插件比较老,默认条件下无法运行math ...
- 用java代码把docx转换成pdf文件
import java.io.IOException; import java.io.InputStream; import java.io.OutputStream; import java.nio ...
- redis 与 spring整合 hash 增删改操作 list增删改操作
本人,对于以前redis的学习是非常痛苦的!近期将以前的东西捡起来.以博客的形式存储,以便于以后快速捡起来,并和广大同胞一起分享! 1):简单介绍 redis 是基于C语言开发. redis是一个ke ...