centos 安装gitlab
1.开始安装依赖软件:yum -y install policycoreutils openssh-server openssh-clients postfix
2.设置postfix开机自启动,postfix支持gitlab发信功能:systemctl enable postfix && systemctl start postfix
如果出现:
Job for postfix.service failed because the control process exited with error code. See "systemctl status postfix.service" and "journalctl -xe" for details.
vim /etc/postfix/main.cf
inet_protocols = ipv4

inet_interfaces = all
3.下载gitlab包(建议去网站下载最新版本https://mirrors.tuna.tsinghua.edu.cn/gitlab-ce/yum/el7/?C=M&O=A)
wget https://mirrors.tuna.tsinghua.edu.cn/gitlab-ce/yum/el7/gitlab-ce-11.3.3-ce.0.el7.x86_64.rpm
rpm -i gitlab-ce-11.3.3-ce.0.el7.x86_64.rpm
如果报错:
error: Failed dependencies:
policycoreutils-python is needed by gitlab-ce-10.7.3-ce.0.el7.x86_64
安装环境
yum install policycoreutils-python
别的网站下载后有时候会报错


4.修改gitlab 端口和ip
vim /etc/gitlab/gitlab.rb
IP地址+端口号: external_url 'http://192.168.0.217:8010'
5.配置并启动gitlab
gitlab-ctl reconfigure (可能会一段时间)
gitlab-ctl restart
下图表示成功

6.页面打开 如果出现这个错误

1.更改端口号 vim /etc/gitlab/gitlab.rb(更改后要重新运行)
gitlab-ctl reconfigure (可能会一段时间)
gitlab-ctl restart
2.权限问题,解决方法:chmod -R 755 /var/log/gitlab
3.内存大于4G
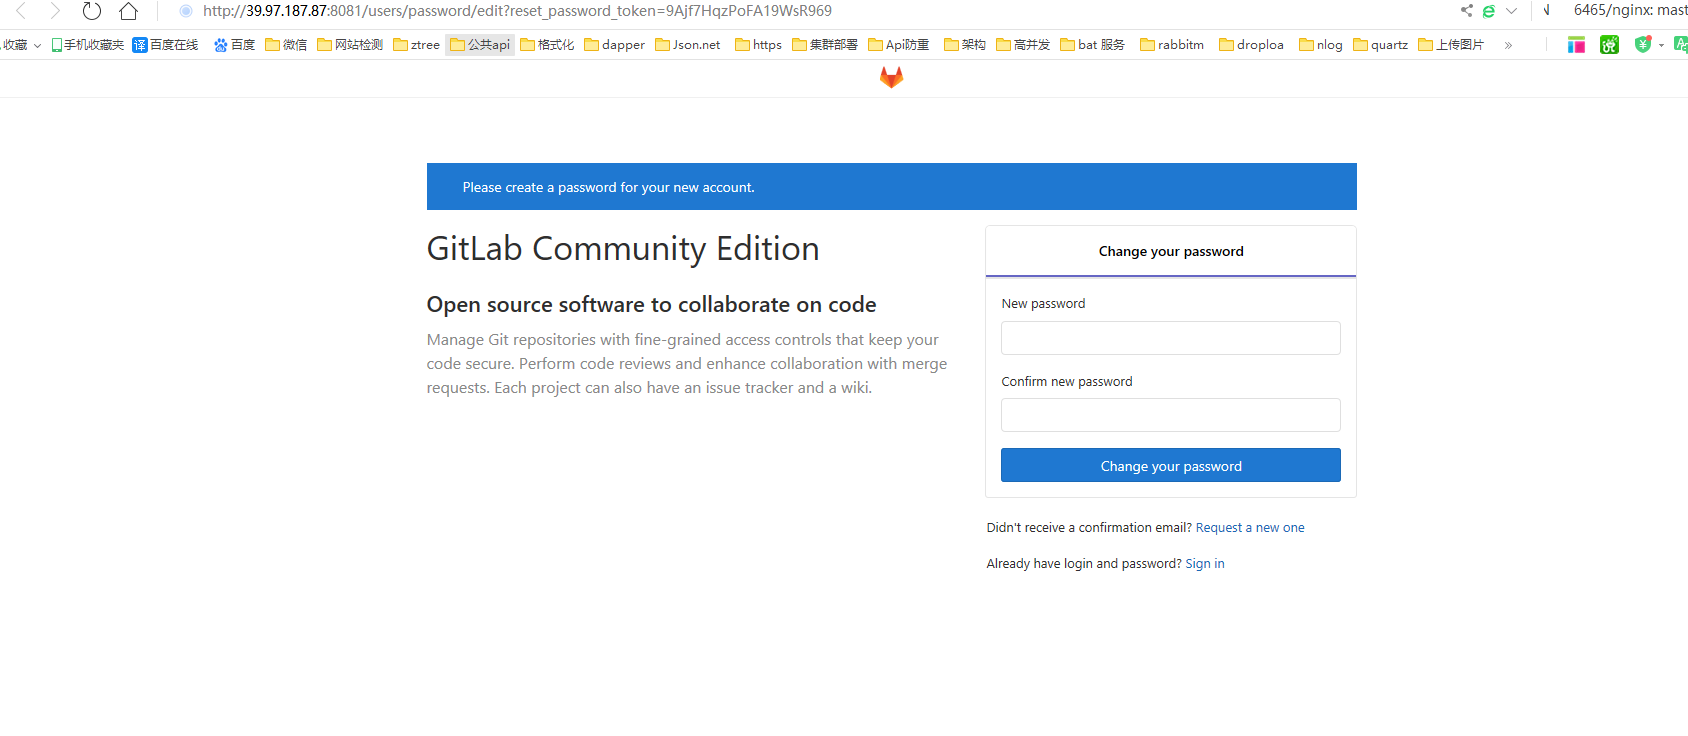
7.首次进入会让你修改密码:修改后进入
.后来把端口改为8081后就可以了
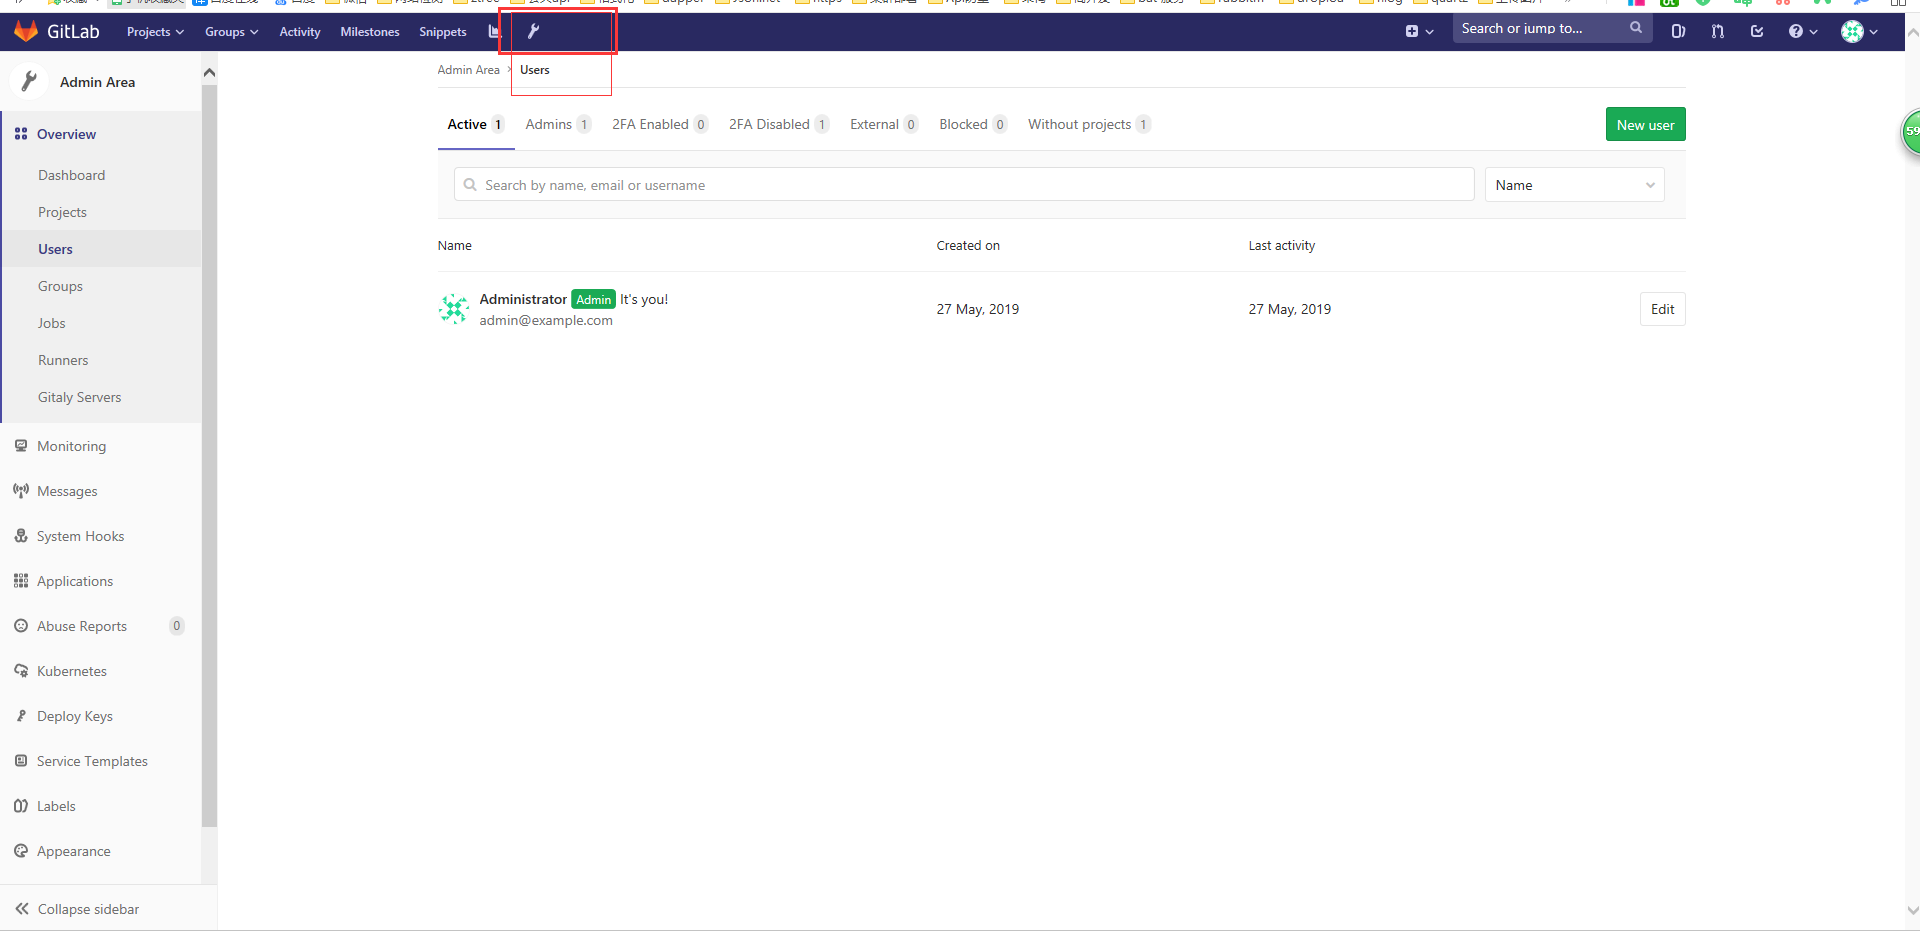
9.创建用户
1.点击小工具
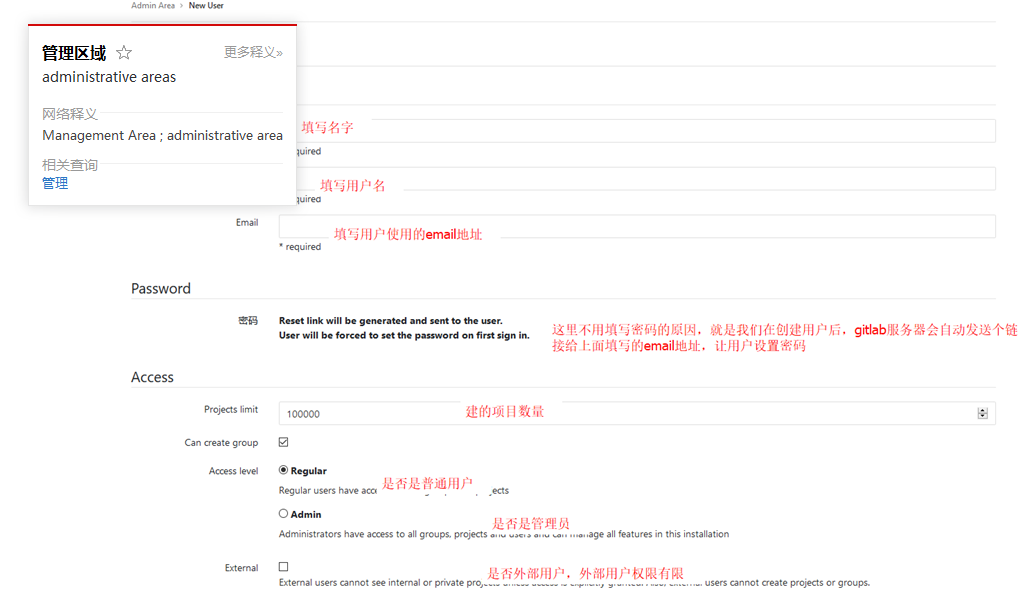
2.添加user
10.关于发送邮箱。postfix默认用的25端口,但是阿里云又不让开启25端口。
vim /etc/gitlab/gitlab.rb
gitlab_rails['smtp_enable'] = true

gitlab_rails['smtp_address'] = "smtp.qq.com"

gitlab_rails['smtp_port'] =

gitlab_rails['smtp_user_name'] = "2833xxx@qq.com"  # 你自己QQ号

gitlab_rails['smtp_password'] = "*************"             # QQ授权码

gitlab_rails['smtp_domain'] = "smtp.qq.com"

gitlab_rails['smtp_authentication'] = "login"

gitlab_rails['smtp_enable_starttls_auto'] = true

gitlab_rails['smtp_tls'] = true

gitlab_rails['gitlab_email_from'] = '2833xxx@qq.com'   # 你自己QQ号
3.打开自己的qq邮箱
打开QQ邮箱-设置-账户-帐户安全-开启服务-POP3/SMTP服务-生成授权码-发个短信
gitlab-ctl reconfigure 重新配置
4.进入gitlab-rails console
Notify.test_email('yoyo_你自己随便邮箱@qq.com', '邮件标题_test', '邮件正文_test').deliver_now
[root@iZ2ze9m7ocdxc43mxwv5uwZ ~]# gitlab-rails console

-------------------------------------------------------------------------------------

 GitLab:       11.11.0 (3e8ca2fb781)

 GitLab Shell: 9.1.0

 PostgreSQL:   9.6.11

-------------------------------------------------------------------------------------

Loading production environment (Rails 5.1.7)

irb(main):001:0> Notify.test_email('1003487863@qq.com','标题党','正文').deliver_now

Notify#test_email: processed outbound mail in 189.3ms

Sent mail to 1003487863@qq.com (1514.7ms)

Date: Mon, 27 May 2019 15:56:21 +0800

From: GitLab <1003487863@qq.com>

Reply-To: GitLab <noreply@39.97.187.87>

To: 1003487863@qq.com

Message-ID: <5ceb9825445e3_3d873ff6a9dd65f0390e9@iZ2ze9m7ocdxc43mxwv5uwZ.mail>

Subject: =?UTF-8?Q?=E6=A0=87=E9=A2=98=E5=85=9A?=

Mime-Version: 1.0

Content-Type: text/html;

 charset=UTF-8

Content-Transfer-Encoding: 7bit

Auto-Submitted: auto-generated

X-Auto-Response-Suppress: All

<!DOCTYPE html PUBLIC "-//W3C//DTD HTML 4.0 Transitional//EN" "http://www.w3.org/TR/REC-html40/loose.dtd">

<html><body><p>正文</p></body></html>

=> #<Mail::Message:70328290558700, Multipart: false, Headers: <Date: Mon, 27 May 2019 15:56:21 +0800>, <From: GitLab <1003487863@qq.com>>, <Reply-To: GitLab <noreply@39.97.187.87>>, <To: 1003487863@qq.com>, <Message-ID: <5ceb9825445e3_3d873ff6a9dd65f0390e9@iZ2ze9m7ocdxc43mxwv5uwZ.mail>>, <Subject: 标题党>, <Mime-Version: 1.0>, <Content-Type: text/html; charset=UTF-8>, <Content-Transfer-Encoding: 7bit>, <Auto-Submitted: auto-generated>, <X-Auto-Response-Suppress: All>>

irb(main):002:0> exit()

[root@iZ2ze9m7ocdxc43mxwv5uwZ ~]#
5.现在创建用户就会发送邮件
centos 安装gitlab的更多相关文章
- CentOS安装gitlab,gerrit,jenkins并配置ci流程
CentOS安装gitlab,gerrit,jenkins并配置ci流程 By Wenbin juandx@163.com 2016/4/9 这是我参考了网上很多的文档,配置了这三个软件在一个机器上, ...
- CentOS安装gitLab服务器
首先利用gitlab-install-el6.sh安装,比较简单: (出处:http://www.linuxidc.com/Linux/2013-06/85754.htm) 1:如果有条件,提供一台全 ...
- centos安装gitlab成果
centos安装gitlab成果 开始之前 在开始之前请先查看官方的刚需文档: https://github.com/gitlabhq/gitlabhq/blob/master/doc/install ...
- CentOS 安装 Gitlab
源地址 https://mirror.tuna.tsinghua.edu.cn/gitlab-ce/ # 清华源 https://mirrors.tuna.tsinghua.edu.cn/help/g ...
- 转载:centos安装gitlab详解
原文地址:http://blog.csdn.net/jiangtao_st/article/details/73612298 一, 服务器快速搭建gitlab方法 可以参考gitlab中文社区 的教程 ...
- centos安装gitlab及汉化
GitLab 是一个用于仓库管理系统的开源项目,使用Git作为代码管理工具,并在此基础上搭建起来的web服务.今天,就记录一下centos部署gitlab及其汉化的操作方法. 1.下载安装 下载地址: ...
- 腾讯云Centos安装gitlab
参考了网上很多人写的安装教程,结果并不好,最后阅读了官方的英文api,才安装成功,这里记录下来,方便以后使用.我的安装环境为腾讯云主机Centos7.3 64bit gitlab官方api地址点我试试 ...
- Centos 安装 GitLab 8.5.1 版本管理
GitLab版本管理 GitLab是利用 Ruby on Rails 一个开源的版本管理系统,实现一个自托管的Git项目仓库,可通过Web界面进行访问公开的或者私人项目.它拥有与Github类似的功能 ...
- centos安装gitlab
原文链接: http://www.centoscn.com/image-text/install/2015/0320/4929.html http://www.01happy.com/centos-6 ...
随机推荐
- 2019年最新阿里Java工程师面试题
一.单选题(共10题,每题5分) 1 关于设计模式遵循的原则,说法错误的是? A.组合优于继承 B.针对实现编程 C.对扩展开放,对修改关闭 D.降低对象之间的耦合 参考答案:B 答案解析: 设计 ...
- 弹指间,网页灰飞烟灭——Google灭霸彩蛋实现
不知道大家有没有看这段时间最火的一部电影<复仇者联盟4:终局之战>,作为漫威迷的我还没看,为什么呢?因为太贵了,刚上映的那周,一张IMAX厅的票价已经达到了299的天价,作为搬砖民工是舍不 ...
- 【带着canvas去流浪(9)】粒子动画
目录 一. 粒子特效 二. 开发中遇到的问题 2.1 卡顿 2.2 轨迹 2.3 复位 2.4 防护层 2.5 二维向量类 三. 实现讲解 3.1 粒子类的update方法 3.2 粒子群的绘制 3. ...
- Spring3:spring的事务操作
三.事务操作 1.导包 2. jdbc模板与开源连接池(DBCP与C3P0) 2.1DBCP 2.2C3P0 :: 2.3.抽取配置到属性文件 定义一个属性文件 在Spring的配置文件中引入属 ...
- 谁说程序员不浪漫?Python导出微信聊天记录生成爱的词云图
明天又双叒叕是一年一度的七夕恋爱节了! 又是一波绝好的机会!恩爱秀起来! 购物车清空!礼物送起来!朋友圈晒起来! 等等! 什么?! 你还没准备好七夕礼物么? 但其实你不知道要送啥? 原来又双叒叕要 ...
- ElementUI项目中怎样引用Jquery
场景 使用ElementUI的快速开始的项目模板搭建Element项目后, 要在vue页面中使用jquery的语法. 这里直接使用$.ajax会提示$找不到. 注: 博客:https://blog.c ...
- System.InvalidOperationException:This.NpgsqlTransaction has completed;it is no longer usable. at Npgsql.NpgsqlTransaction.CheckCompleted() in ...
关于报此异常,原因是事务不能循环提交,一个方法中事务只能提交一次. System.InvalidOperationException:This.NpgsqlTransaction has comple ...
- gor实现线上HTTP流量复制压测引流
一.使用背景 gor 是一款go语言实现的简单的http流量复制工具,它的主要目的是使你的生产环境HTTP真实流量在测试环境和预发布环境重现.只需要在 代理例如nginx入口服务器上执行一个进程,就可 ...
- Windows应急日志常用的几个事件ID
Windows应急日志常用的几个事件ID点击站内没有搜索到,可能搜索姿势不对,发一下吧,应急时可能会用到,根据日志时间点判断入侵 日志路径:C:\Windows\System32\winevt\Log ...
- Android Studio中无法找到android.os.SystemProperties解决办法
这个SystemProperties类主要是在这个jar包中layoutlib.jar,所以现在的办法就是让这个 jar包加载到 android studio中 下面讲解如何添加: 1.找到对应项目的 ...