springmvc学习笔记三:整合JDBC,简单案例==数据库事务配置(切面)
1.Spring管理事务配置案例:
方式1:编码式(了解):
1.将核心事务管理器配置到spring容器,在applicationContext中配置如下代码:
    <!-- 事务核心管理器,封装了所有事务操作. 依赖于连接池 -->

    <bean name="transactionManager" class="org.springframework.jdbc.datasource.DataSourceTransactionManager">

        <property name="dataSource" ref="dataSource"></property>

    </bean>
2.配置TransactionTemplate模板,在applicationContext中配置如下代码:
   <!--事务模板对象-->

    <bean class="org.springframework.transaction.support.TransactionTemplate">

        <property name="transactionManager" ref="transactionManager"></property>

    </bean>
3.将事务模板注入Service
    <!-- 3.Service-->

    <bean name="accountService" class="com.yyb.service.AccountServiceImpl">

        <property name="ad" ref="accountDao"></property>

        <property name="tt" ref="transactionTemplate"></property>

    </bean>
4.在Service中调用模板
package com.yyb.service;

import com.yyb.dao.AccountDao;

import org.springframework.transaction.TransactionStatus;

import org.springframework.transaction.support.TransactionCallbackWithoutResult;

import org.springframework.transaction.support.TransactionTemplate;

public class AccountServiceImpl implements AccountService {

    private AccountDao ad;

    private TransactionTemplate tt;

    //匿名内部类访问外部变量得加final

    @Override

    public void transfer(final Integer from,final Integer to, Double money) {

        tt.execute(new TransactionCallbackWithoutResult() {

            @Override

            protected void doInTransactionWithoutResult(TransactionStatus transactionStatus) {

                //减钱

                ad.decreaseMoney(from,money);

                //int i=1/0;

                //加钱

                ad.increaseMoney(to,money);

            }

        });

    }

    public void setAd(AccountDao ad) {

        this.ad = ad;

    }

    public void setTt(TransactionTemplate tt) {

        this.tt = tt;

    }

}
方式2:xml配置(aop)
简单理解就是把通知织入到目标对象中,形成一个代理对象。比如通知要进行事务管理,目标对象要进行业务处理。那么代理对象则把事务管理和业务处理合到了一起。SpringAOP给我们准备了一个事务通知,目标对象即我们的service。所以只需要配置一下就可以了。
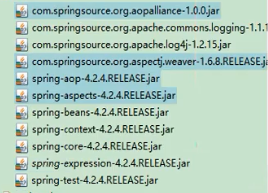
1、需要导包aop、aspect、aop联盟、weaving织入包
2.导入新的约束(tx)
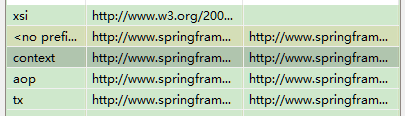
beans: 最基本约束;context:读取properties配置约束;aop:配置aop约束;tx:配置事务通知约束
3.配置通知和配置将通知织入目标:
<?xml version="1.0" encoding="UTF-8"?>

<beans xmlns="http://www.springframework.org/schema/beans"

xmlns:xsi="http://www.w3.org/2001/XMLSchema-instance" xmlns:aop="http://www.springframework.org/schema/aop"

xmlns:context="http://www.springframework.org/schema/context" xmlns:tx="http://www.springframework.org/schema/tx"

xsi:schemaLocation="http://www.springframework.org/schema/beans

http://www.springframework.org/schema/beans/spring-beans.xsd

http://www.springframework.org/schema/aop

http://www.springframework.org/schema/aop/spring-aop.xsd

http://www.springframework.org/schema/context

http://www.springframework.org/schema/context/spring-context.xsd

http://www.springframework.org/schema/tx

http://www.springframework.org/schema/tx/spring-tx.xsd">

<!-- 指定spring读取db.properties配置 -->

<context:property-placeholder location="classpath:db.properties" />

<!-- 1.将连接池放入spring容器 -->

<bean name="dataSource" class="com.mchange.v2.c3p0.ComboPooledDataSource" >

<property name="jdbcUrl" value="${jdbc.jdbcUrl}" ></property>

<property name="driverClass" value="${jdbc.driverClass}" ></property>

<property name="user" value="${jdbc.user}" ></property>

<property name="password" value="${jdbc.password}" ></property>

</bean>

<!--2.将JDBCTemplate放入spring容器-->

<!--<bean name="jdbcTemplate" class="org.springframework.jdbc.core.JdbcTemplate" >-->

<!--<property name="dataSource" ref="dataSource" ></property>-->

<!--</bean>-->

<!-- 3.将UserDao放入spring容器 -->

<bean name="userDao" class="cn.itcast.a_jdbctemplate.UserDaoImpl" >

<!-- <property name="jt" ref="jdbcTemplate" ></property> --> <!-- 如果 UserDaoImpl继承了JdbcDaoSupport,就不需要在生产一个dataSource的bean-->

<property name="dataSource" ref="dataSource" ></property>

</bean>

<!-- 2.Dao-->

<bean name="accountDao" class="com.yyb.dao.AccountDaoImpl">

<property name="dataSource" ref="dataSource"></property>

</bean>

<!-- 3.Service-->

<bean name="accountService" class="com.yyb.service.AccountServiceImpl">

<property name="ad" ref="accountDao"></property>

</bean>

<!-- 事务核心管理器,封装了所有事务操作. 依赖于连接池 -->

<bean name="transactionManager" class="org.springframework.jdbc.datasource.DataSourceTransactionManager">

<property name="dataSource" ref="dataSource"></property>

</bean>

<!-- 配置事务通知 -->

<tx:advice id="txAdvice" transaction-manager="transactionManager" >

<tx:attributes>

<!-- 以方法为单位,指定方法应用什么事务属性:isolation:隔离级别 propagation:传播行为 read-only:是否只读-->

<tx:method name="transfer" isolation="DEFAULT" propagation="REQUIRED" read-only="false"/>

<!--上面的方式只适用单个方法,当我们业务有很多个方法都要操作事务时,则要配置很多个,可以使用下面的通配符配置方式-->

<tx:method name="save*" isolation="REPEATABLE_READ" propagation="REQUIRED" read-only="false" />

<tx:method name="persist*" isolation="REPEATABLE_READ" propagation="REQUIRED" read-only="false" />

<tx:method name="update*" isolation="REPEATABLE_READ" propagation="REQUIRED" read-only="false" />

<tx:method name="modify*" isolation="REPEATABLE_READ" propagation="REQUIRED" read-only="false" />

<tx:method name="delete*" isolation="REPEATABLE_READ" propagation="REQUIRED" read-only="false" />

<tx:method name="remove*" isolation="REPEATABLE_READ" propagation="REQUIRED" read-only="false" />

<tx:method name="get*" isolation="REPEATABLE_READ" propagation="REQUIRED" read-only="true" />

<tx:method name="find*" isolation="REPEATABLE_READ" propagation="REQUIRED" read-only="true" />

</tx:attributes>

</tx:advice>

<!--配置织入-->

<aop:config>

<aop:pointcut id="txPc" expression="execution(* com.yyb.service..*(..))"/>

<!--配置切面-->

<aop:advisor pointcut-ref="txPc" advice-ref="txAdvice" />

</aop:config>

<!-- 开启事务注解驱动-->

<tx:annotation-driven transaction-manager="transactionManager" />

</beans>
方式3:注解配置(aop):
1.导包(同上)
2.导入新的约束(tx),同上
3.开启注解管理事务
<?xml version="1.0" encoding="UTF-8"?>

<beans xmlns:xsi="http://www.w3.org/2001/XMLSchema-instance" xmlns="http://www.springframework.org/schema/beans"

       xmlns:context="http://www.springframework.org/schema/context"

       xmlns:aop="http://www.springframework.org/schema/aop" xmlns:tx="http://www.springframework.org/schema/tx"

       xsi:schemaLocation="http://www.springframework.org/schema/beans http://www.springframework.org/schema/beans/spring-beans-4.2.xsd http://www.springframework.org/schema/context http://www.springframework.org/schema/context/spring-context-4.2.xsd http://www.springframework.org/schema/aop http://www.springframework.org/schema/aop/spring-aop-4.2.xsd http://www.springframework.org/schema/tx http://www.springframework.org/schema/tx/spring-tx-4.2.xsd ">

    <!-- 指定spring读取db.properties配置 -->

    <context:property-placeholder location="classpath:db.properties"/>

    <!-- 事务核心管理器,封装了所有事务操作. 依赖于连接池 -->

    <bean name="transactionManager" class="org.springframework.jdbc.datasource.DataSourceTransactionManager">

        <property name="dataSource" ref="dataSource"></property>

    </bean>

    <!--开启使用注解管理aop事务-->

    <tx:annotation-driven/>

    <!-- 1.连接池 -->

    <bean name="dataSource" class="com.mchange.v2.c3p0.ComboPooledDataSource">

        <property name="jdbcUrl" value="${jdbc.jdbcUrl}"></property>

        <property name="driverClass" value="${jdbc.driverClass}"></property>

        <property name="user" value="${jdbc.user}"></property>

        <property name="password" value="${jdbc.password}"></property>

    </bean>

    <!-- 2.Dao-->

    <bean name="accountDao" class="com.yyb.dao.AccountDaoImpl">

        <property name="dataSource" ref="dataSource"></property>

    </bean>

    <!-- 3.Service-->

    <bean name="accountService" class="com.yyb.service.AccountServiceImpl">

        <property name="ad" ref="accountDao"></property>

    </bean>

</beans>
4.使用注解
    @Transactional(isolation = Isolation.REPEATABLE_READ,propagation = Propagation.REQUIRED,readOnly = false)

    public void transfer(Integer from,Integer to, Double money) {
在方法上加注解,如果方法太多,嫌麻烦的话,可以在类上加,如果某个方法不适应,再在方法上写一份即可。

package com.yyb.service;

import com.yyb.dao.AccountDao;

import org.springframework.transaction.annotation.Isolation;

import org.springframework.transaction.annotation.Propagation;

import org.springframework.transaction.annotation.Transactional;

@Transactional(isolation = Isolation.REPEATABLE_READ,propagation = Propagation.REQUIRED,readOnly = false)

public class AccountServiceImpl implements AccountService {

    private AccountDao ad;

    @Override

    @Transactional(isolation = Isolation.DEFAULT,propagation = Propagation.REQUIRED,readOnly = false)

    public void transfer(Integer from,Integer to, Double money) {

        //减钱

        ad.decreaseMoney(from,money);

        //int i=1/0;

        //加钱

        ad.increaseMoney(to,money);

    }

    public void setAd(AccountDao ad) {

        this.ad = ad;

    }

}
springmvc学习笔记三:整合JDBC,简单案例==数据库事务配置(切面)的更多相关文章
- SpringMVC学习笔记三 整合jdbc和事务
spring整合JDBC spring提供了很多模板整合Dao技术,用于简化编程. 引入相关jar包 spring中提供了一个可以操作数据库的对象,JDBCTemplate(JDBC模板对象).对象封 ...
- SpringMVC:学习笔记(10)——整合Ckeditor且实现图片上传
SpringMVC:学习笔记(10)——整合Ckeditor且实现图片上传 配置CKEDITOR 精简文件 解压之后可以看到ckeditor/lang下面有很多语言的js,如果不需要那么多种语言的,可 ...
- Activiti工作流学习笔记(三)——自动生成28张数据库表的底层原理分析
原创/朱季谦 我接触工作流引擎Activiti已有两年之久,但一直都只限于熟悉其各类API的使用,对底层的实现,则存在较大的盲区. Activiti这个开源框架在设计上,其实存在不少值得学习和思考的地 ...
- SpringMVC学习笔记(三)
一.SpringMVC使用注解完成 1.首先,导入SpringMVC需要的jar包. 2.添加Web.xml配置文件中关于SpringMVC的配置 <!--configure the setti ...
- springMVC学习笔记三
十三.springMVC和spring集成 配置文件,spring的配置路径applicationContext.xml 在默认的web-inf下面 strut的配置文件默认在src下面 用了什么框架 ...
- SpringMVC 学习笔记(三)数据的校验
34. 尚硅谷_佟刚_SpringMVC_数据绑定流程分析.avi 例如:在jsp中输入一个String字符串类型,需要转换成Date类型的流程如下 convertservice对传入的数据进行转换 ...
- SpringMVC学习笔记三:拦截器
一:拦截器工作原理 类比Struts2的拦截器,通过拦截器可以实现在调用controller的方法前.后进行一些操作. 二:拦截器实现 1:实现拦截器类 实现HandlerInterceptor 接口 ...
- SpringMVC学习笔记三:Controller的返回值
springMVC的返回值有ModelAndView,String,void,Object类型 项目目录树: 该项目是在前面项目的基础上修改的,这里的pom.xml文件需要加入使用到的包,应为@Res ...
- 【Python学习笔记三】一个简单的python爬虫
这里写爬虫用的requests插件 1.一般那3.x版本的python安装后都带有相应的安装文件,目录在python安装目录的Scripts中,如下: 2.将scripts的目录配置到环境变量pa ...
随机推荐
- ETCD:运行时重新配置设计
原文地址:the runtime configuration design 运行时重新配置是分布式系统中最难,最容易出错的部分,尤其是在基于共识(像etcd)的系统中. 阅读并学习关于etcd的运行时 ...
- javaWeb核心技术第六篇之BootStrap
概述: Bootstrap 是最受欢迎的 HTML.CSS 和 JS 框架,用于开发响应式布局.移动设备优先的 WEB 项目. 作用: 开发响应式的页面 响应式:就是一个网站能够兼容多个终端 节约开发 ...
- java简单实现用语音读txt文档
最近比较无聊,随便翻着博客,无意中看到了有的人用VBS读文本内容,也就是读几句中文,emmm,挺有趣的,实现也很简单,都不需要安装什么环境,直接新建txt文件,输入一些简单的vbs读文本的代码,然后将 ...
- 大话Git系列之初识版本控制系统(2)
本次接着上次的来介绍版本控制系统,这个讲到的将是Git与Github,说一下什么是Git,什么是GitHub?他们之间的关系是什么? 1.Git 是代码管理的工具 2.GitHub 是基于Git实现的 ...
- BIM工程信息管理新系统- 系统管理模块
系统管理模块 1.实体类 public partial class T_Role { public string RoleId { get; set; } public string RoleName ...
- innodb存储引擎监控
innodb存储引擎监控分为四种,表监控,表空间监控,锁监控,状态监控.可以在mysql客户端开启监控选项,然后信息将会输出在mysql的错误日志内.innodb_monitor和innodb_loc ...
- 默认VS 下machine.config的位置
- vi 中按了 Ctrl+S 后死机不能动怎么办?
我们下意识想保存文档时,会不知觉地按下 Ctrl+S 组合键.但如果是正在 Linux 的 Shell 中使用 vi 编辑文本,这么按就糟了,会直接出现卡住.不能动.卡死的现象. 不过,后来我搞明白了 ...
- 201871010113-刘兴瑞《面向对象程序设计(java)》第十四周学习总结
项目 内容 这个作业属于哪个课程 <任课教师博客主页链接>https://www.cnblogs.com/nwnu-daizh/ 这个作业的要求在哪里 <作业链接地址>http ...
- echars line 底部图例强制不换行(滚动),修改图例样式
{ grid: { left: '5px', right: '10px', top: '10px', bottom: '40px', containLabel: true }, tooltip: { ...