
Spark集群安装与配置
一、Scala安装
1.https://www.scala-lang.org/download/2.11.12.html下载并复制到/home/jun下解压
[jun@master ~]$ cd scala-2.12./

[jun@master scala-2.12.]$ ls -l

total

drwxrwxr-x.  jun jun  Apr  : bin

drwxrwxr-x.  jun jun   Apr  : doc

drwxrwxr-x.  jun jun  Apr  : lib

drwxrwxr-x.  jun jun   Apr  : man
2.启动Scala并使用Scala Shell
[jun@master scala-2.12.]$ bin/scala

Welcome to Scala 2.12. (Java HotSpot(TM) -Bit Server VM, Java 1.8.0_171).

Type in expressions for evaluation. Or try :help.

scala> println("hello,world")

hello,world

scala> *

res1: Int =

scala> *res1

res2: Int =

scala> :help

All commands can be abbreviated, e.g., :he instead of :help.

:completions <string>    output completions for the given string

:edit <id>|<line>        edit history

:help [command]          print this summary or command-specific help

:history [num]           show the history (optional num is commands to show)

:h? <string>             search the history

:imports [name name ...] show import history, identifying sources of names

:implicits [-v]          show the implicits in scope

:javap <path|class>      disassemble a file or class name

:line <id>|<line>        place line(s) at the end of history

:load <path>             interpret lines in a file

:paste [-raw] [path]     enter paste mode or paste a file

:power                   enable power user mode

:quit                    exit the interpreter

:replay [options]        reset the repl and replay all previous commands

:require <path>          add a jar to the classpath

:reset [options]         reset the repl to its initial state, forgetting all session entries

:save <path>             save replayable session to a file

:sh <command line>       run a shell command (result is implicitly => List[String])

:settings <options>      update compiler options, if possible; see reset

:silent                  disable/enable automatic printing of results

:type [-v] <expr>        display the type of an expression without evaluating it

:kind [-v] <type>        display the kind of a type. see also :help kind

:warnings                show the suppressed warnings from the most recent line which had any

scala> :quit
3.将Scala安装包复制到slave节点
二、Spark集群的安装与配置
采用Hadoop Yarn模式安装Spark
1.http://spark.apache.org/downloads.html下载spark-2.3.1-bin-hadoop2.7.tgz.gz并赋值到/home/jun下解压
[jun@master ~]$ cd spark-2.3.-bin-hadoop2./

[jun@master spark-2.3.-bin-hadoop2.]$ ls -l

total

drwxrwxr-x.  jun jun   Jun   : bin

drwxrwxr-x.  jun jun    Jun   : conf

drwxrwxr-x.  jun jun     Jun   : data

drwxrwxr-x.  jun jun     Jun   : examples

drwxrwxr-x.  jun jun  Jun   : jars

drwxrwxr-x.  jun jun     Jun   : kubernetes

-rw-rw-r--.  jun jun  Jun   : LICENSE

drwxrwxr-x.  jun jun   Jun   : licenses

-rw-rw-r--.  jun jun  Jun   : NOTICE

drwxrwxr-x.  jun jun    Jun   : python

drwxrwxr-x.  jun jun     Jun   : R

-rw-rw-r--.  jun jun   Jun   : README.md

-rw-rw-r--.  jun jun    Jun   : RELEASE

drwxrwxr-x.  jun jun   Jun   : sbin

drwxrwxr-x.  jun jun     Jun   : yarn
2.配置Linux环境变量
#spark

export HADOOP_CONF_DIR=$HADOOP_HOME/etc/hadoop

export HDFS_CONF_DIR=$HADOOP_HOME/etc/hadoop

export YARN_CONF_DIR=$HADOOP_HOME/etc/hadoop
3.配置spark-env.sh环境变量,注意三个计算机上都必须要这样配置才行
复制默认配置文件并使用gedit打开
[jun@master conf]$ cp ~/spark-2.3.-bin-hadoop2./conf/spark-env.sh.template   ~/spark-2.3.-bin-hadoop2./conf/spark-env.sh

[jun@master conf]$ gedit ~/spark-2.3.-bin-hadoop2./conf/spark-env.sh
增加下面的配置
export SPARK_MASTER_IP=192.168.1.100

export JAVA_HOME=/usr/java/jdk1..0_171/

export SCALA_HOME=/home/jun/scala-2.12./
4.修改Spark的slaves文件
使用gedit打开文件
[jun@master conf]$ cp ~/spark-2.3.-bin-hadoop2./conf/slaves.template slaves

[jun@master conf]$ gedit ~/spark-2.3.-bin-hadoop2./conf/slaves
删除默认的localhost并增加下面的配置
# A Spark Worker will be started on each of the machines listed below.

slave0

slave1
5.将Spark复制到Slave节点
三、Spark集群的启动与验证
1.启动Spark集群
首先确保Hadoop集群处于启动状态,然后执行启动脚本
[jun@master conf]$ /home/jun/spark-2.3.-bin-hadoop2./sbin/start-all.sh

starting org.apache.spark.deploy.master.Master, logging to /home/jun/spark-2.3.-bin-hadoop2./logs/spark-jun-org.apache.spark.deploy.master.Master--master.out

slave0: starting org.apache.spark.deploy.worker.Worker, logging to /home/jun/spark-2.3.-bin-hadoop2./logs/spark-jun-org.apache.spark.deploy.worker.Worker--slave0.out

slave1: starting org.apache.spark.deploy.worker.Worker, logging to /home/jun/spark-2.3.-bin-hadoop2./logs/spark-jun-org.apache.spark.deploy.worker.Worker--slave1.out
2.验证启动状态
(1)通过jps查看进程,可以看到master节点上增加了Master进程,而slave节点上增加了Worker进程
[jun@master conf]$ jps

 ResourceManager

 SecondaryNameNode

 Master

 NameNode

 Jps

[jun@slave0 ~]$ jps

 DataNode

 Worker

 NodeManager

 Jps

[jun@slave1 ~]$ jps

 DataNode

 Worker

 NodeManager

 Jps
(2)通过Web查看系统状态,输入http://master:8080
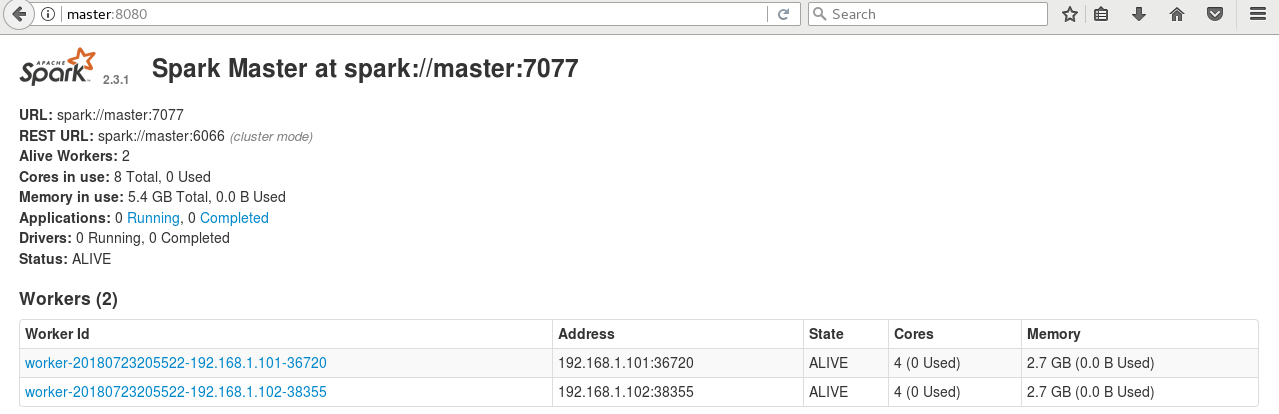
(3)通过终端命令行向Spark集群提交计算程序
为了直接在目录下加载jar包,先将示例程序jar包复制到Spark主安装目录下
[jun@master conf]$ cp /home/jun/spark-2.3.-bin-hadoop2./examples/jars/spark-examples_2.-2.3..jar /home/jun/spark-2.3.-bin-hadoop2./
执行SparkPi程序
[jun@master spark-2.3.-bin-hadoop2.]$ bin/spark-submit --class org.apache.spark.examples.SparkPi --master yarn-cluster --num-executors --driver-memory 512m --executor-memory 512m --executor-cores spark-examples_2.-2.3..jar
这个时候报了一个错误,意思就是container要用2.3G内存,而实际的虚拟内存只有2.1G。Yarn默认的虚拟内存和物理内存比例是2.1,也就是说虚拟内存是2.1G,小于了需要的内存2.2G。解决的办法是把拟内存和物理内存比例增大,在yarn-site.xml中增加一个设置:
diagnostics: Application application_1532350446978_0001 failed  times due to AM Container for appattempt_1532350446978_0001_000002 exited with  exitCode: -

Failing this attempt.Diagnostics: Container [pid=,containerID=container_1532350446978_0001_02_000001] is running beyond virtual memory limits. Current usage: 289.7 MB of  GB physical memory used; 2.3 GB of 2.1 GB virtual memory used. Killing container.
关闭Yarn然后在配置文件中增加下面的配置,然后重启Yarn
    <property>

        <name>yarn.nodemanager.vmem-pmem-ratio</name>

        <value>2.5</value>

    </property>
再次运行SparkPi程序,在final status可以看到运行成功!
-- :: INFO  Client: -

     client token: N/A

     diagnostics: N/A

     ApplicationMaster host: 192.168.1.101

     ApplicationMaster RPC port:

     queue: default

     start time:

     final status: SUCCEEDED

     tracking URL: http://master:18088/proxy/application_1532352327714_0001/

     user: jun

-- :: INFO  ShutdownHookManager: - Shutdown hook called

-- :: INFO  ShutdownHookManager: - Deleting directory /tmp/spark-1ed5bee9-1aa7--b3ec-80ff2b153192

-- :: INFO  ShutdownHookManager: - Deleting directory /tmp/spark-7349a4e3--4d09-91ff-e1e48cb59b46
在tracking URL上右键然后选择open link即可在浏览器看到运行状态
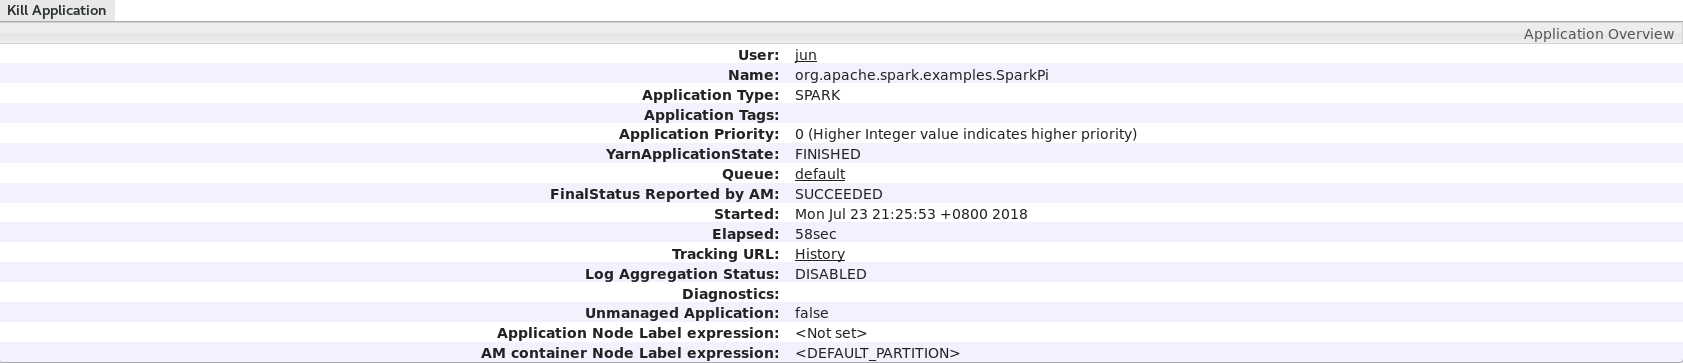

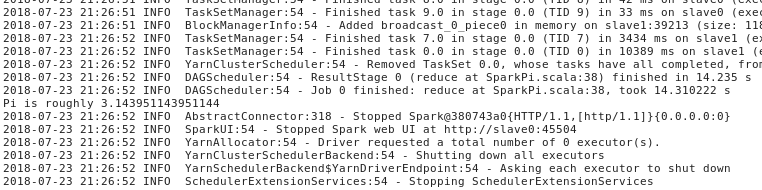
点击logs,然后点击stdout,可以看到运行结果Pi is roughly 3.143951143951144
Spark集群安装与配置的更多相关文章
- spark集群安装配置
spark集群安装配置 一. Spark简介 Spark是一个通用的并行计算框架,由UCBerkeley的AMP实验室开发.Spark基于map reduce 算法模式实现的分布式计算,拥有Hadoo ...
- [bigdata] spark集群安装及测试
在spark安装之前,应该已经安装了hadoop原生版或者cdh,因为spark基本要基于hdfs来进行计算. 1. 下载 spark: http://mirrors.cnnic.cn/apache ...
- 大数据技术之_19_Spark学习_01_Spark 基础解析 + Spark 概述 + Spark 集群安装 + 执行 Spark 程序
第1章 Spark 概述1.1 什么是 Spark1.2 Spark 特点1.3 Spark 的用户和用途第2章 Spark 集群安装2.1 集群角色2.2 机器准备2.3 下载 Spark 安装包2 ...
- CentOS6安装各种大数据软件 第十章:Spark集群安装和部署
相关文章链接 CentOS6安装各种大数据软件 第一章:各个软件版本介绍 CentOS6安装各种大数据软件 第二章:Linux各个软件启动命令 CentOS6安装各种大数据软件 第三章:Linux基础 ...
- spark集群安装并集成到hadoop集群
前言 最近在搞hadoop+spark+python,所以就搭建了一个本地的hadoop环境,基础环境搭建地址hadoop2.7.7 分布式集群安装与配置 本篇博客主要说明,如果搭建spark集群并集 ...
- hadoop2.7.7 分布式集群安装与配置
环境准备 服务器四台: 系统信息 角色 hostname IP地址 Centos7.4 Mster hadoop-master-001 10.0.15.100 Centos7.4 Slave hado ...
- Spark入门:第2节 Spark集群安装:1 - 3;第3节 Spark HA高可用部署:1 - 2
三. Spark集群安装 3.1 下载spark安装包 下载地址spark官网:http://spark.apache.org/downloads.html 这里我们使用 spark-2.1.3-bi ...
- 3 Spark 集群安装
第3章 Spark集群安装 3.1 Spark安装地址 1.官网地址 http://spark.apache.org/ 2.文档查看地址 https://spark.apache.org/docs/2 ...
- Springboot 2.0.x 集成基于Centos7的Redis集群安装及配置
Redis简介 Redis是一个基于C语言开发的开源(BSD许可),开源高性能的高级内存数据结构存储,用作数据库.缓存和消息代理.它支持数据结构,如 字符串.散列.列表.集合,带有范围查询的排序集,位 ...
随机推荐
- zookeeper 都有哪些使用场景?
面试题 zookeeper 都有哪些使用场景? 面试官心理分析 现在聊的 topic 是分布式系统,面试官跟你聊完了 dubbo 相关的一些问题之后,已经确认你对分布式服务框架/RPC框架基本都有一些 ...
- Vsftp服务-实战案例
Vsftp 实验案例一:(本地用户) 试验版本:Linux7.X版本 公司内部现在有一台FTP 和WEB 服务器,FTP 的功能主要用于维护公司的网站内容,包括上传文 件.创建目录.更新网页等等.公司 ...
- layDate——初步使用
layui系列中layDate的使用教程网址 https://www.layui.com/laydate/ 我这里简单举例: 1.引入js <script type="text/jav ...
- 详解Java多线程锁之synchronized
synchronized是Java中解决并发问题的一种最常用的方法,也是最简单的一种方法. synchronized的四种使用方式 修饰代码块:被修饰的代码块称为同步语句块,其作用的范围是大括号{}括 ...
- dede tag标签静态化
看回那2个文件夹即可,txt说明书我已经修改过. 下面说一下tag标签静态化之后在内容页.列表页中如何使用. 内容页中沿用之前的方法即可: {dede:tag sort='new' getall='0 ...
- Spring Boot 2.X(一):入门篇
什么是 Spring Boot Spring Boot 是由 Pivotal 团队提供的全新框架,其设计目的是用来简化新 Spring 应用的初始搭建以及开发过程.该框架遵循"约定优于配置& ...
- css3:bacground-size
个人博客: https://chenjiahao.xyz CSS3之背景尺寸Background-size是CSS3中新加的一个有关背景的属性,这个属性是改变背景尺寸的通过各种不同是属性值改变背景尺寸 ...
- Jmeter Json List Element Assertion使用详解
使用背景: jmeter4.0本身提供json Assertion断言,但当我们想要对返回的json list中的多个字段进行断言的时候,我们就会感到很无力.那么此时我们就可以通过Json List ...
- 如何去除CFormView的Scrollbar
第一种方法: 重载 OnSize(UINT nType, int cx, int cy) 在CFormView::OnSize(nType, cx, cy)下面添加一句 ShowScrollBar(S ...
- mpvue 签字组件
<template> <div > <canvas class='firstCanvas' canvas-id="firstCanvas" @touc ...