
安装v2sora@y
v2r@y安装
1. 安装nginx
这儿使用tengine进行安装, 可以看以前的博客
1.1) 注意带 http_v2 编译
./configure --with-http_v2_module
不然会报错
此时安装的openresty配置http2会报错 the "http2" parameter requires ngx_http_v2_module
如果已经安装的ginx, 可以使用 nginx -v查看编译参数, 然后加上上述参数重新编译, 之后make, 不执行 make install , 然后将编译后的nginx进行替换现有的.
cp /usr/local/nginx/sbin/nginx /usr/local/nginx/sbin/nginx.bak

cp objs/nginx /usr/local/nginx/sbin/nginx
1.2). 配置文件
1.2.1) /usr/local/nginx/conf/nginx.conf
user root;

worker_processes  1;

worker_rlimit_nofile    652144;

error_log  /usr/local/nginx/logs/error.log crit;

pid /run/nginx.pid;

events {

    use epoll;

    multi_accept on;

    worker_connections  1024;

}

http {

    include /usr/local/nginx/conf/mime.types;

    client_max_body_size 1m;

    sendfile     on;

    tcp_nopush   on;

    access_log   off;

    keepalive_timeout  60;

    proxy_ignore_client_abort on;

    limit_req_zone $binary_remote_addr zone=allips:200m rate=90r/m;

    upstream vr_server {

        server 127.0.0.1:18181;

        keepalive 1000;

    }

    include conf.d/*.conf;

}
1.2.2) /usr/local/nginx/conf/conf.d/default.conf
server {

        listen       80;

        server_name  vr.xxx.cn;

        location / {

            root   html;

            index  index.html index.htm;

        }

        error_page   500 502 503 504  /50x.html;

        location = /50x.html {

            root   html;

        }

        location ~/.well-known {

          allow all;

        }

    		return 301 https://$server_name$request_uri;

}
注意上面配置中的 location ~/.well-konw, 这个在使用certbot的时候使用的
1.2.3) /usr/local/nginx/conf/conf.d/v2r@y.conf
server {

    listen 443 ssl http2 default_server;

    listen [::]:443 ssl http2 default_server;

    ssl_certificate /etc/letsencrypt/live/vr.xxxxxxxx.cn/fullchain.pem;     #生成的密钥对 #你的ssl证书, 如果第一次,可能还需要自签一下

    ssl_certificate_key /etc/letsencrypt/live/vr.xxxxxxxx.cn/privkey.pem;   #生成的密钥对, 你的ssl key

    server_name vr.xxxxxxxx.cn;

    ssl_protocols   TLSv1 TLSv1.1 TLSv1.2; #使用的协议

    ssl_ciphers HIGH:!aNULL:!MD5;#使用的加密算法

    root /usr/local/nginx/html;

    # Add index.php to the list if you are using PHP

    index index.html index.htm index.nginx-debian.html;

    location /bronk {

        proxy_redirect off;

        proxy_pass http://vr_server;

        proxy_http_version 1.1;

        proxy_set_header Upgrade $http_upgrade;

        proxy_set_header Connection "upgrade";

        proxy_set_header Host $http_host;

    }

}
1.2.4) 将80端口所有的http服务转到https
我没试验这个
server {

    listen 80;

    server_name linuxstory.org www.linuxstory.org;

    return 301 https://$server_name$request_uri;

}
1.2.5) 开放防火墙端口
system-cmd --zone=public --add-port=80/tcp --permanent

system-cmd --zone=public --add-port=443/tcp --permanent
2. 安装certbot
需要自己注册域名, 并且域名指向自己的服务器, 服务器的443和80端口都开着
1.1) 服务器应具有的环境
$ yum -y install yum-utils

$ yum-config-manager --enable rhui-REGION-rhel-server-extras rhui-REGION-rhel-server-optional
1.2) 针对nginx环境
yum install certbot python2-certbot-nginx
1.3) 准备location
cerbot 签名有两种方式 一种是 --webroot 一种是 --Standalone 在网上看到的区别是 第一种不需要停现在的服务 第二种需要停掉服务 那好 我需要的是第一种 :)
然后确认下你要签名的域名 是否已经指向你自己的服务器了 还有云服务的话 要记得看下安全组 443端口有没有开 总之就是要确认你的准备工作是没问题的
 location ~ /.well-known {

            allow all;

 }
看到另外一种方式, 没有实验
location ^~ /.well-known/acme-challenge/ {

   default_type "text/plain";

   root     /home/wwwroot/linuxstory.org/;

}

location = /.well-known/acme-challenge/ {

   return 404;

}
1.4) 生成证书
certbot certonly --webroot -w /usr/local/nginx/html -d vr.xxx.cn --email xxx@hotmail.com
- Webroot: webroot 模式
- w: nginx服务器的html目录(80端口所在的目录)
- -d: 域名
- —email: 用于接收过期信息
服务器输出如下信息, 证明生成正确, 注意其中的目录地址
IMPORTANT NOTES:
- Congratulations! Your certificate and chain have been saved at:
/etc/letsencrypt/live/vr.xxxxxxxx.cn/fullchain.pem
Your key file has been saved at:
/etc/letsencrypt/live/vr.xxxxxxxx.cn/privkey.pem
Your cert will expire on 2019-09-12. To obtain a new or tweaked
version of this certificate in the future, simply run certbot
again. To non-interactively renew all of your certificates, run
"certbot renew"- If you like Certbot, please consider supporting our work by:
Donating to ISRG / Let's Encrypt: https://letsencrypt.org/donate
Donating to EFF: https://eff.org/donate-le
/etc/letsencrypt/live/你的域名/ 下存放的就是密钥
1.5) 在nginx的443端口下使用https证书
参照nginx下的v2r@y.conf 文件的配置
1.6) 设置过期自动生成新证书
crontab -e之后进行编辑
0 0 15 */3 * /usr/bin/certbot renew # 3,6,9,12月的15号零点进行更新
参考: http简介及ssl工具
3. 安装v2r@y
3.1) linux提供一键安装脚本
bash <(curl -L -s https://install.direct/go.sh)
此脚本会自动安装如下文件
/usr/bin/v2r@y/v2r@y:v2r@y 程序;
/usr/bin/v2r@y/v2ctl:v2r@y 工具;
/etc/v2r@y/config.json:配置文件;
/usr/bin/v2r@y/geoip.dat:IP 数据文件
/usr/bin/v2r@y/geosite.dat:域名数据文件 此脚本会配置自动运行脚本。自动运行脚本会在系统重启之后,自动运行 v2r@y。目前自动运行脚本只支持带有 Systemd 的系统,以及 Debian / Ubuntu 全系列。
运行脚本位于系统的以下位置:
/etc/systemd/system/v2r@y.service: Systemd/etc/init.d/v2r@y: SysV
3.2) 启动
systemctl start|stop|status|reload|restart|force-reload v2@ray
3.3) 配置文件
3.3.1) 服务端配置文件
/etc/v2@ray/config.json
更改配置文件
{

  "log" : {

    "access": "/var/log/v2r@y/access.log",

    "error": "/var/log/v2r@y/error.log",

    "loglevel": "warning"

  },

  "inbound": {

    "port": 10000, //(此端口与nginx配置相关)

    "listen": "127.0.0.1",

    "protocol": "vmess",

    "settings": {

      "clients": [

        {

          "id": "xxxxxxd1f-687c-4188-9abc-80073a618ca3", //你的UUID, 此ID需与客户端保持一致

          "level": 1,

          "alterId": 64 //此ID也需与客户端保持一致

        }

      ]

    },

   "streamSettings":{

      "network": "ws",

      "wsSettings": {

           "path": "/ray" //与nginx配置相关

      }

   }

  },

  "outbound": {

    "protocol": "freedom",

    "settings": {}

  },

  "outboundDetour": [

    {

      "protocol": "blackhole",

      "settings": {},

      "tag": "blocked"

    }

  ],

  "routing": {

    "strategy": "rules",

    "settings": {

      "rules": [

        {

          "type": "field",

          "ip": [

            "0.0.0.0/8",

            "10.0.0.0/8",

            "100.64.0.0/10",

            "127.0.0.0/8",

            "169.254.0.0/16",

            "172.16.0.0/12",

            "192.0.0.0/24",

            "192.0.2.0/24",

            "192.168.0.0/16",

            "198.18.0.0/15",

            "198.51.100.0/24",

            "203.0.113.0/24",

            "::1/128",

            "fc00::/7",

            "fe80::/10"

          ],

          "outboundTag": "blocked"

        }

      ]

    }

  }

}
3.3.2). 客户端配置文件
{

  "log": {

    "loglevel": "warning"

  },

  "inbound": {

    "port": 1080,

    "listen": "127.0.0.1",

    "protocol": "socks",

    "settings": {

      "auth": "noauth",

      "udp": false

    }

  },

  "inboundDetour": [

    {

        "port": 8123,

        "listen": "127.0.0.1",

        "protocol": "http",

        "settings": {}

    }

  ],

  "outbound": {

    "protocol": "vmess",

    "settings": {

      "vnext": [{

        "address": "test.v2r@y.com", // 服务器地址,请修改为你自己的服务器 ip 或域名

        "port": 443,  // 服务器端口

        "users": [{

            "id": "4xxxxxxf-687c-4188-9abc-80073a618ca3", //你的UUID, 此ID需与服务端保持一致

            "level": 1,

            "alterId": 64,  //此ID也需与客户端保持一致

            "security": "aes-128-gcm"

        }]

      }]

    },

    "streamSettings":{

        "network": "ws",

        "security": "tls",

        "tlsSettings": {

            "serverName": "test.v2r@y.com" //此域名是你服务器的域名

        },

        "wsSettings": {

            "path": "/ray" //与服务器配置及nginx配置相关

        }

    },

    "tag": "forgin"

  },

  "outboundDetour": [

    {

        "protocol": "freedom",

        "settings": {},

        "tag": "direct"

    }

  ],

  "routing": { //此路由配置是自动分流, 国内IP和网站直连

    "strategy": "rules",

    "settings": {

        "domainStrategy": "IPIfNonMatch",

        "rules": [

            {

                "type": "chinaip",

                "outboundTag": "direct"

            },

            {

                "type": "chinasites",

                "outboundTag": "direct"

            },

            {

                "type": "field",

                "ip": [

                    "0.0.0.0/8",

                    "10.0.0.0/8",

                    "100.64.0.0/10",

                    "127.0.0.0/8",

                    "169.254.0.0/16",

                    "172.16.0.0/12",

                    "192.0.0.0/24",

                    "192.0.2.0/24",

                    "192.168.0.0/16",

                    "198.18.0.0/15",

                    "198.51.100.0/24",

                    "203.0.113.0/24",

                    "::1/128",

                    "fc00::/7",

                    "fe80::/10"

                ],

                "outboundTag": "direct"

            }

        ]

    }

  },

  "policy": {

    "levels": {

      "0": {"uplinkOnly": 0}

    }

  }

}
3.4) window连接
下载客户端, (下载地址)[https://pan.laod.cc/download/]
v2r@yN
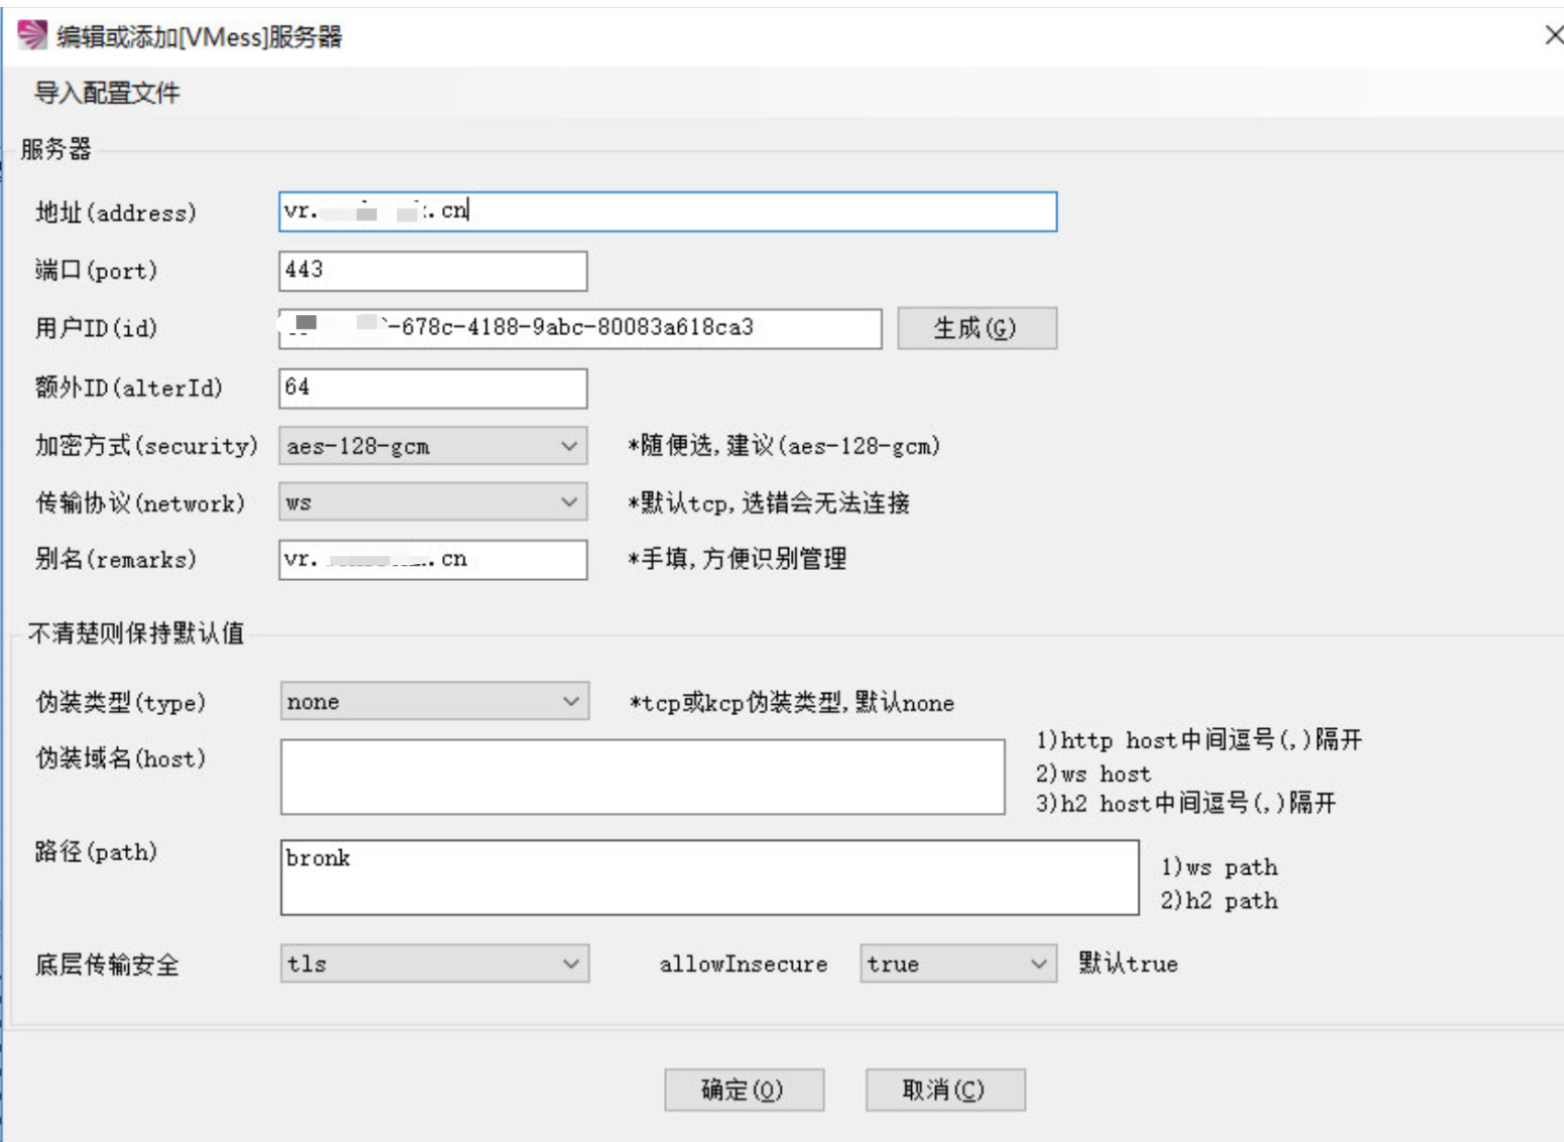
注意uuid 和服务端一致
3.5) mac连接
使用v2r@yX 连接不上, 后使用v2r@yU进行连接的

4. 启用google的BBR加速
wget -N --no-check-certificate "https://raw.githubusercontent.com/chiakge/Linux-NetSpeed/master/tcp.sh" && chmod +x tcp.sh && ./tcp.sh
先选择2, 重启后选择7, 即可
5. 异常
碰到一个异常
rejected v2r@y.com/core/proxy/vmess/encoding: invalid user
是因为v2r@y 的uuid或者服务器时间和本地的不一致
更改服务器时区
timedatectl set-timezone Asia/Shanghai
如果服务器有ipv6, 那么使用全局模式可以自动ipv6
安装v2sora@y的更多相关文章
- 安装v2ra y
说明 全文中所有的‘删掉我’,都请忽略,如果不这么做,那么您将看不到这篇文章 ssr已经不行了,现在大家都以v2ra y为主 安装服务端 运行一键安装脚本,之后进入脚本界面,选“1”安装: bash ...
- Linux网卡驱动安装、防火墙原理
安装网卡驱动程序: 需要检查是否安装kernel依赖包: rpm –q kernel-devel #检查kernel依赖包是否安装 yum –y install kernel-devel 检查gcc和 ...
- centos6.5下使用yum完美搭建LNMP环境(php5.6) 无脑安装
准备工作 配置防火墙,开启80端口.3306端口删除原有的 iptables , 添加合适的配置 rm -rf /etc/sysconfig/iptables vi /etc/sysconfig/ip ...
- centos编译安装mysql
groupadd mysql #添加mysql组useradd -g mysql -s /sbin/nologin mysql #创建用户mysql并加入到mysql组,不允许mysql用户直接登录系 ...
- centos7 安装lnmp环境
准备工作 一.配置防火墙 vim /etc/sysconfig/iptables 开启80端口.3306.22端口 -A INPUT -m state --state NEW -m tcp -p tc ...
- yum---Linux软件安装与管理
查询: yum list #查询所有可用的软件包列表 yum search keywords #搜索服务器上所有和关键字相关的软件包 安装: yum -y install 包名 options: in ...
- 在centos 7.0上利用yum一键安装mono
首先我们需要先配置一下yum源中mono的引用说明: 第一步: vi /etc/yum.repos.d/mono.repo 第二步:在刚打开的文件中编辑如下内容 [mono]name=monobase ...
- Ubuntu 安装php+mysql 环境
新系统安装完毕后,首先运行apt-get update 更新apt库. 然后安装ssh,输入apt-get install openssh-server,安装ssh是为了可以远程操作,不然坐在机房实在 ...
- CentOS7 NTP 安装配置
NTP 网络时间协议用来同步网络上不同主机的系统时间.你管理的所有主机都可以和一个指定的被称为 NTP 服务器的时间服务器同步它们的时间.而另一方面,一个 NTP 服务器会将它的时间和任意公共 NTP ...
随机推荐
- 初学Elasticsearch
首先启动elasticsearch.bat,然后安装node.js为了支持elasticsearch-head-master插件,之后在在该插件的目录打开命令行窗口,输入grunt server即可S ...
- Cocos2d-x项目编译为Android应用——命令行方式
配置: 相关工具:Cocos2d-x 3.2 + Ant 1.9.4 + Android NDK r9d + Android SDK 运行平台:OS X 10.9.4+ Xcode 6 前言:笔者使用 ...
- 小程序之--动态设置页面标题 wx.setNavigationBarTitle
参考地址 http://www.yilingsj.com/xwzj/2018-11-26/weixin-navigationbartitletext.html 页面最初是[在线教研] 可以在这个页面的 ...
- Httpclient4.5.*HttpClient请求,对于新建httpclient实例时保持会话
package net.bill99.httpconsel; import java.io.IOException; import java.util.*; import java.util.Map. ...
- Python:requests库、BeautifulSoup4库的基本使用(实现简单的网络爬虫)
Python:requests库.BeautifulSoup4库的基本使用(实现简单的网络爬虫) 一.requests库的基本使用 requests是python语言编写的简单易用的HTTP库,使用起 ...
- Logstash Multiple Pipelines
作为生产者和消费者之间数据流的一个中心组件,需要一个 Logstash 实例负责驱动多个并行事件流的情况.默认情况下,这样的使用场景的配置让人并不太开心,使用者会遭遇所谓的条件地狱(Condition ...
- vue介绍以及相关概念理解大全
1.什么是vue 以官网的解释来说,vue是渐进式javascript框架.Vue (读音 /vjuː/,类似于 view) 是一套用于构建用户界面的渐进式框架.与其它大型框架不同的是,Vue 被设计 ...
- IT兄弟连 HTML5教程 CSS3揭秘 CSS3属性2
3 背景属性 在CSS3中提供了多个背景属性,这里只介绍两个比较常用的属性,其他属性可以从手册中获取帮助.在CSS3中,通过background-image或者background属性可以为一个容器 ...
- Linux CentOS上安装 MySQL 8.0.16
前言: 因为我需要在我新安装的Linux CentOS系统服务器中安装和配置MySQL服务器,然而对于我们这种Linux使用小白而言在Linux系统中下载,解压,配置MySQL等一系列的操作还是有些耗 ...
- Servlet、Jsp
一.Servlet 1.什么是Servlet? (1)由sun公司(被oracle公司收购)制定的一种用来扩展web服务器功能的组件规范.简单的讲就是一种用来开发动态Web的技术. 扩展web服务器功 ...