Ansible 介绍和安装
Ansible 介绍
运维工具分类:
- agent: puppet, func
这类都需要在客户端上安装agent客户端
- agentless: ansible, fabric
这类是不需要在客户端上安装agent,只需要知道客户端的用户密码或者是秘钥验证就可以管理。
Ansible 特性:
- Minimal learning curve, auditability
入门很平滑,简单
- No bootstrapping
无需在客户端安装agent
- No DAG ordering, Fails Fast
无序,只需要按照自定义设定即可
- No agents (other than sshd) - 0 resourcee consumption when not in use
- No server
没有代理同时也没有服务器端,用户只需要手动发起命令来运行就可以了。
- No additional PKI
因为依赖于SSH工作,所以无序SSL证书的功能,
- Modules in any language
- SSH by default
模块化工作,模块可以是任何语言来编写,只需要遵循ansible的调用风格就可以。
- YAML, NOT code
简化的html或者json格式来定义文档或文本格式,非常容易学习
- Strong multi-tier solution
支持非常强大的多级的解决方案
Ansible的架构
下图:
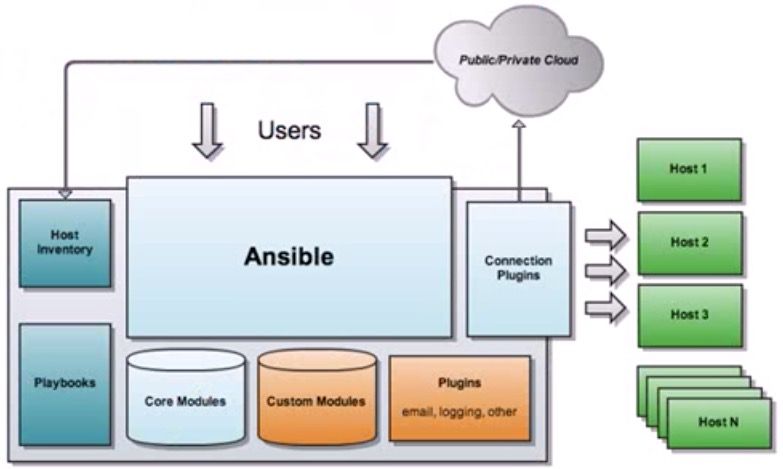
Ansible工作原理
- ANSIBLE:
- 组合INVENTORY、 API、 MODULES、PLUGINS的绿框,可以理解为是ansible命令工具,其为核心执行工具
- PLAYBOOKS:
- 任务剧本(任务集),编排定义Ansible任务集的配置文件,由Ansible顺序依次执行,通常是JSON格式的YML文件
- INVENTORY:
- Ansible管理主机的清单/etc/anaible/hosts
- MODULES:
- Ansible执行命令的功能模块,多数为内置的核心模块,也可自定义,ansible-doc –l 可查看模块
- PLUGINS:
- 模块功能的补充,如连接类型插件、循环插件、变量插件、过滤插件等,该功能不常用
- API:
- 供第三方程序调用的应用程序编程接口
Ansible 特性:
- 基于Python语言实现,由Paramiko库实现连接管理主机,PyYAML和Jinjia2 三个关键模块。
- 部署简单,被管理节点无需安装agent
- 默认使用SSH协议
- 1 能够让管理机能够通过秘钥认证到每一台被管理的主机上
- 2 可以在inventory文件中指定被管理的用户密码,要确保该文件的安全
- 支持自定义模块: 支持各种编程语言
- 支持Playbook
- 基于“模块”完成各种“任务”
tasks
环境准备
| 系统版本 | 内核版本 | IP地址 |
|---|---|---|
| Centos 7.5 | 4.18.9-1.el7.elrepo.x86_64 | 10.0.0.3 |
| 角色 | IP | 用户 | 密码 |
|---|---|---|---|
| 管理节点 | 10.0.0.9 | root | 123456 |
| node-1 | 10.0.0.65 | root | 123456 |
| node-2 | 10.0.0.66 | root | 123456 |
备注 该系统采用MINI最小化安装,安装之后对系统进行了最基础的优化操作,操作过程点击这里
Ansible安装
可以使用编译安装和yum安装,本次使用较为简洁的yum安装,需要有
epel源,没有的可以在mirrors.aliyun.com上使用阿里云的epel源
在管理节点上操作
[root@node01 ~]# yum install ansible -y

...

Installed:

  ansible.noarch 0:2.7.0-1.el7

Dependency Installed:

  PyYAML.x86_64 0:3.10-11.el7            libtomcrypt.x86_64 0:1.17-26.el7            libtommath.x86_64 0:0.42.0-6.el7                             libyaml.x86_64 0:0.1.4-11.el7_0

  python-babel.noarch 0:0.9.6-8.el7      python-backports.x86_64 0:1.0-8.el7         python-backports-ssl_match_hostname.noarch 0:3.5.0.1-1.el7   python-cffi.x86_64 0:1.6.0-5.el7

  python-enum34.noarch 0:1.0.4-1.el7     python-httplib2.noarch 0:0.9.2-1.el7        python-idna.noarch 0:2.4-1.el7                               python-ipaddress.noarch 0:1.0.16-2.el7

  python-jinja2.noarch 0:2.7.2-2.el7     python-keyczar.noarch 0:0.71c-2.el7         python-markupsafe.x86_64 0:0.11-10.el7                       python-paramiko.noarch 0:2.1.1-4.el7

  python-ply.noarch 0:3.4-11.el7         python-pycparser.noarch 0:2.14-1.el7        python-setuptools.noarch 0:0.9.8-7.el7                       python-six.noarch 0:1.9.0-2.el7

  python2-crypto.x86_64 0:2.6.1-15.el7   python2-cryptography.x86_64 0:1.7.2-2.el7   python2-jmespath.noarch 0:0.9.0-3.el7                        python2-pyasn1.noarch 0:0.1.9-7.el7

  sshpass.x86_64 0:1.06-2.el7

Complete!

[root@node02 ~]# yum info ansible

Loaded plugins: fastestmirror

Loading mirror speeds from cached hostfile

 * base: mirrors.aliyun.com

 * extras: mirrors.aliyun.com

 * updates: mirrors.aliyun.com

Available Packages

Name        : ansible

Arch        : noarch

Version     : 2.7.0

Release     : 1.el7

Size        : 11 M

Repo        : epel/x86_64

Summary     : SSH-based configuration management, deployment, and task execution system

URL         : http://ansible.com

License     : GPLv3+

Description : Ansible is a radically simple model-driven configuration management,

            : multi-node deployment, and remote task execution system. Ansible works

            : over SSH and does not require any software or daemons to be installed

            : on remote nodes. Extension modules can be written in any language and

            : are transferred to managed machines automatically.
可以看到按装的ansible的版本是 2.7的版本
| 文件名 | 说明 |
|---|---|
| /etc/ansible/ansible.cfg | 主配置文件,配置ansible工作特性 |
| /etc/ansible/hosts | Inventory 被管理节点配置文件,主机清单 |
| /etc/ansible/roles | 存放角色的目录 |
| /usr/bin/ansible | 主程序,临时命令执行工具 |
| /etc/ansible/ansible-doc | 查看配置文档,模块功能查看工具 |
| /usr/bin/ansible-galaxy | 下载/上传优秀代码或Roles模块的官网平台 |
| /etc/ansible/ansible-playbook | 定制自动化任务,编排剧本工具 |
| /usr/bin/ansible-pull | 远程执行命令的工具 |
| /usr/bin/ansible-vault | 文件加密工具 |
配置秘钥管理
在管理节点上操作
生成密钥对,然后copy到node1 和nodde2 上使能够秘钥登陆
[root@node01 ~]# ssh-keygen -t rsa -P "" -f ~/.ssh/id_rsa

Generating public/private rsa key pair.

Created directory '/root/.ssh'.

Your identification has been saved in /root/.ssh/id_rsa.

Your public key has been saved in /root/.ssh/id_rsa.pub.

The key fingerprint is:

SHA256:llhKseNPXM5O8O3M6lbz1sCj1p0eXtfED8d7Wrn/hRg root@node01

The key's randomart image is:

+---[RSA 2048]----+

|      .          |

|       o         |

|      + o .      |

|     o * B .   o |

|      + S = E.. =|

|       + o +oo+==|

|        . ..==.OX|

|          ..o =+X|

|         oo. .o+=|

+----[SHA256]-----+

[root@node01 ~]# ls -l .ssh/

total 8

-rw------- 1 root root 1675 Oct 15 13:27 id_rsa

-rw-r--r-- 1 root root  393 Oct 15 13:27 id_rsa.pub
[root@node01 ~]# ssh-copy-id root@10.0.0.65

/usr/bin/ssh-copy-id: INFO: Source of key(s) to be installed: "/root/.ssh/id_rsa.pub"

The authenticity of host '10.0.0.65 (10.0.0.65)' can't be established.

ECDSA key fingerprint is SHA256:Vu10B9+4iuvebISnNca1EPQtAaBJUjquSXY7AmfhRnc.

ECDSA key fingerprint is MD5:a8:a0:32:f3:0a:07:25:1d:aa:0d:95:ec:cd:a8:c5:a0.

Are you sure you want to continue connecting (yes/no)? yes

/usr/bin/ssh-copy-id: INFO: attempting to log in with the new key(s), to filter out any that are already installed

/usr/bin/ssh-copy-id: INFO: 1 key(s) remain to be installed -- if you are prompted now it is to install the new keys

root@10.0.0.65's password:

Number of key(s) added: 1

Now try logging into the machine, with:   "ssh 'root@10.0.0.65'"

and check to make sure that only the key(s) you wanted were added.
[root@node01 ~]# ssh-copy-id root@10.0.0.66

/usr/bin/ssh-copy-id: INFO: Source of key(s) to be installed: "/root/.ssh/id_rsa.pub"

The authenticity of host '10.0.0.66 (10.0.0.66)' can't be established.

ECDSA key fingerprint is SHA256:Vu10B9+4iuvebISnNca1EPQtAaBJUjquSXY7AmfhRnc.

ECDSA key fingerprint is MD5:a8:a0:32:f3:0a:07:25:1d:aa:0d:95:ec:cd:a8:c5:a0.

Are you sure you want to continue connecting (yes/no)? yes

/usr/bin/ssh-copy-id: INFO: attempting to log in with the new key(s), to filter out any that are already installed

/usr/bin/ssh-copy-id: INFO: 1 key(s) remain to be installed -- if you are prompted now it is to install the new keys

root@10.0.0.66's password:

Number of key(s) added: 1

Now try logging into the machine, with:   "ssh 'root@10.0.0.66'"

and check to make sure that only the key(s) you wanted were added.
# 测试连接10.0.0.65

[root@node01 ~]# ssh root@10.0.0.65

Last login: Fri Oct 12 14:15:30 2018 from 10.0.0.9

[root@node02 ~]# ip a | grep -w inet | tail -1 | awk '{print $2}'

10.0.0.65/24
# 测试连接10.0.0.66

[root@node01 ~]# ssh root@10.0.0.66

Last login: Fri Oct 12 14:15:29 2018 from 10.0.0.9

[root@node03 ~]# ip a | grep -w inet | tail -1 | awk '{print $2}'

10.0.0.66/24
配置Inventory文件
在/etc/ansible/hosts文件中,我们把65 和66 的两台机器配置成两个组
[root@node01 ~]# cd /etc/ansible/

[root@node01 ansible]# ls

ansible.cfg  apache.yml  cond.yml  hosts  nginx.retry  nginx.yaml  roles  test.yml

[root@node01 ansible]# cp hosts hosts.bak

[root@node01 ansible]# cat hosts

# This is the default ansible 'hosts' file.

#

# It should live in /etc/ansible/hosts

#

#   - Comments begin with the '#' character

#   - Blank lines are ignored

#   - Groups of hosts are delimited by [header] elements

#   - You can enter hostnames or ip addresses

#   - A hostname/ip can be a member of multiple groups

[webservs]

10.0.0.65

[dbservs]

10.0.0.66
这样,Inverteroy文件就配置完成
简单测试连通性
下面使用ansible演示连通性的测试
[root@node01 ansible]# ansible all -m ping

10.0.0.65 | SUCCESS => {

    "changed": false,

    "ping": "pong"

}

10.0.0.66 | SUCCESS => {

    "changed": false,

    "ping": "pong"

}
上面显示SUCCESS,表示都正常
Ansible 介绍和安装的更多相关文章
- 自动化运维工具之 Ansible 介绍及安装使用
一.初识Ansible 介绍: Absible 使用 模块(Modules)来定义配置任务.模块可以用标准脚本语言(Python,Bash,Ruby,等等)编写,这是一个很好的做法,使每个模块幂等.A ...
- ansible介绍和安装
ansible是由 Python 编写的强大的配置管理解决方案,ansible 的特点就在于它的简洁与高效率 ansible与其他的配置管理工具不同点在于:不需要你在想要配置的每个节点上安装自己的组件 ...
- Ansible介绍及安装部署
本节内容: 运维工具 Ansible特性 Ansible架构图和核心组件 安装Ansible 演示使用示例 一.运维工具 作为一个Linux运维人员,需要了解大量的运维工具,并熟知这些工具的差异,能够 ...
- ansible入门一(Ansible介绍及安装部署)
本节内容: 运维工具 Ansible特性 Ansible架构图和核心组件 安装Ansible 演示使用示例 一.运维工具 作为一个Linux运维人员,需要了解大量的运维工具,并熟知这些工具的差异,能够 ...
- ansible介绍与安装
一.什么是ansible ansible是python中一套模块,系统中的一套自动化工具,可以用来作系统管理.自动化命令等任务. 二.ansible优势 .ansible是Python中一套完整的自动 ...
- ansible介绍、安装与配置
一.ansible简介 (1)简介: Ansible是近年越来越火的一款自动化运维工具,其主要的功能是帮助运维实现IT工作的自动化,降低人为操作失误.提高业务自动化率,常用于软件部署.配置自动化.管理 ...
- Ansible第一篇:介绍及安装
Ansible介绍 Ansible是个什么东西呢?官方的title是"Ansible is Simple IT Automation"--简单的自动化IT工具.ansible基于P ...
- 1、Ansible初识简要介绍及安装
1.Ansible简介 1.1 Ansible介绍 Ansible 是一个简单的自动化运维管理工具,基于Python开发,集合了众多运维工具(puppet.cfengine.chef.func.fab ...
- Linux centosVMware 自动化运维Ansible介绍、Ansible安装、远程执行命令、拷贝文件或者目录、远程执行脚本、管理任务计划、安装rpm包/管理服务、 playbook的使用、 playbook中的循环、 playbook中的条件判断、 playbook中的handlers、playbook实战-nginx安装、管理配置文件
一.Ansible介绍 不需要安装客户端,通过sshd去通信 基于模块工作,模块可以由任何语言开发 不仅支持命令行使用模块,也支持编写yaml格式的playbook,易于编写和阅读 安装十分简单,ce ...
随机推荐
- Security整合spring boot
Security整合spring boot 1.基础概念 Spring Security是一个能够为基于Spring的企业应用系统提供声明式的安全访问控制解决方案的安全框架.它提供了一组可以在Spri ...
- python uiautomator,比 appium 更简单的 app 测试工具
1,场景 在 app 测试的蛮荒时代,如果要进行 app 自动化测试非常麻烦.张大胖如果想做安卓自动化测试,首先必须要学 Java.因为安卓自动化测试都绕不开 google 自己研发的自动化测试框架, ...
- Linux系统 multitail 同时跟踪查看多个日志文件
一.问题描述: 平时我们在排查问题的时候往往需要查看日志文件来定位问题,有些程序可能关联的多个程序,因此需要打开多个窗口使用 tailf 或者tail -f 方式查看日志 但是需要不停的切换窗口来看不 ...
- 学习笔记07axps页面
apsx分前台文件和后台文件,前台文件(子类)是继承了后 台的aspx.cs(父类), 1.在aspx中,使用<% %>能执行一段C#代码使用<%=C#代码%>,就是直接向前台 ...
- SasS 设计原则十二因素
Heroku 是业内知名的云应用平台,从对外提供服务以来,他们已经有上百万应用的托管和运营经验.其创始人 Adam Wiggins 根据这些经验,发布了一个“十二要素应用宣言(The Twelve-F ...
- C# - VS2019 通过DataGridView实现对Oracle数据表的增删改查
前言 通过VS2019建立WinFrm应用程序,搭建桌面程序后,通过封装数据库操作OracleHelper类和业务逻辑操作OracleSQL类,进而通过DataGridView实现对Oracle数据表 ...
- 算法编程题积累(1)——网易笔试"工程师工作安排“问题
首先理解题目意思:每个人只能做工作序号表里的一件工作且两个人不能同时做一件工作.AC思路:采用暴力枚举每种可能的分配方案,子问题的解决逐步向上解决了母问题,最终原问题得解. 标程作者:NotDeep( ...
- iOS蓝牙--CoreBluetooth基本使用
蓝牙使用步骤: 1. 扫描外设 2. 连接外设 3. 连上外设后,获取指定外设的服务 4. 获取服务后,遍历服务的特征,得到可读,可写等特征,然后与中心管理者进行数据交互 附上代码 一:导入框架 #i ...
- PHP读取Excel内的图片
今天接到了一个从Excel内读取图片的需求,在网上查找了一些资料,基本实现了自己的需求,不过由于查到的一些代码比较久远,不能直接移植到自己的项目里,需要稍加改动一下. 这里介绍一下分别使用phpspr ...
- 【Error】Maven Dependency 下载失败问题
原文 前言 在使用Maven私服Sonatype Nexus的时候,经常会出现依赖包找不到的问题. 此时通过浏览器去私服页面查看,发现依赖包坐标是存在的,对应的文件(比如jar文件). 或者私服上面也 ...