
Spring Cloud Config实现集群配置中心
Spring Cloud Config为分布式系统提供了配置服务器和配置客户端,可以管理集群中的配置文件。
使用Git、SVN等版本管理系统存放配置文件,配置服务器会到版本管理系统获取配置,集群中的配置客户端再到配置服务器中获取配置。
开发工具:IntelliJ IDEA 2019.2.2
一、创建配置服务器
1、SVN服务器添加项目和配置文件
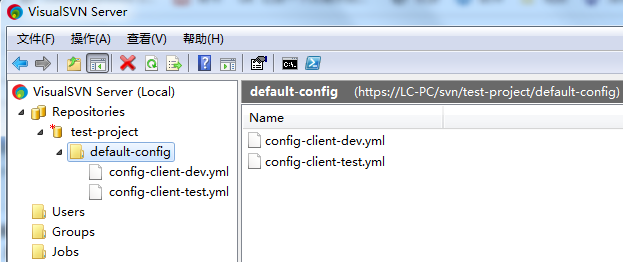
config-client-dev.yml内容:
server:

  port: 8092

test:

  user:

    name: aa
config-client-test.yml
server:

  port: 8093

test:

  user:

    name: bb
2、创建项目
IDEA中创建一个新的SpringBoot项目,名称为“spring-config-server”,SpringBoot版本选择2.1.10,在选择Dependencies(依赖)的界面勾选Spring Cloud Config -> Config Server。
pom.xml会引入spring-cloud-config-server依赖项,再在pom.xml中加入org.tmatesoft.svnkit依赖项,pom.xml完整内容如下:
<?xml version="1.0" encoding="UTF-8"?>

<project xmlns="http://maven.apache.org/POM/4.0.0" xmlns:xsi="http://www.w3.org/2001/XMLSchema-instance"

         xsi:schemaLocation="http://maven.apache.org/POM/4.0.0 https://maven.apache.org/xsd/maven-4.0.0.xsd">

    <modelVersion>4.0.0</modelVersion>

    <parent>

        <groupId>org.springframework.boot</groupId>

        <artifactId>spring-boot-starter-parent</artifactId>

        <version>2.1.10.RELEASE</version>

        <relativePath/> <!-- lookup parent from repository -->

    </parent>

    <groupId>com.example</groupId>

    <artifactId>spring-config-server</artifactId>

    <version>0.0.1-SNAPSHOT</version>

    <name>spring-config-server</name>

    <description>Demo project for Spring Boot</description>

    <properties>

        <java.version>1.8</java.version>

        <spring-cloud.version>Greenwich.SR4</spring-cloud.version>

    </properties>

    <dependencies>

        <dependency>

            <groupId>org.springframework.cloud</groupId>

            <artifactId>spring-cloud-config-server</artifactId>

        </dependency>

        <dependency>

            <groupId>org.tmatesoft.svnkit</groupId>

            <artifactId>svnkit</artifactId>

            <version>1.10.1</version>

        </dependency>

        <dependency>

            <groupId>org.springframework.boot</groupId>

            <artifactId>spring-boot-starter-test</artifactId>

            <scope>test</scope>

        </dependency>

    </dependencies>

    <dependencyManagement>

        <dependencies>

            <dependency>

                <groupId>org.springframework.cloud</groupId>

                <artifactId>spring-cloud-dependencies</artifactId>

                <version>${spring-cloud.version}</version>

                <type>pom</type>

                <scope>import</scope>

            </dependency>

        </dependencies>

    </dependencyManagement>

    <build>

        <plugins>

            <plugin>

                <groupId>org.springframework.boot</groupId>

                <artifactId>spring-boot-maven-plugin</artifactId>

            </plugin>

        </plugins>

    </build>

</project>
3、修改配置application.yml
spring-cloud-config-server提供了4种配置,可以通过不同名字来激活:
(1)git:默认值,表示去Git仓库读取配置文件;
(2)subversion:表示去SVN仓库读取配置文件;
(3)native:表示去本地文件系统读取配置文件;
(4)vault:表示去Vault(一种资源控制工具)中读取配置文件;
server:

  port: 8091

spring:

  application:

    name: config-server

  profiles:

    active: subversion

  cloud:

    config:

      server:

        svn:

          uri: https://localhost/svn/test-project

          username: abc

          password: 123456

        default-label: default-config
4、修改启动类代码
增加注解@EnableConfigServer
package com.example.springconfigserver;

import org.springframework.boot.SpringApplication;

import org.springframework.boot.autoconfigure.SpringBootApplication;

import org.springframework.cloud.config.server.EnableConfigServer;

@SpringBootApplication

@EnableConfigServer

public class SpringConfigServerApplication {

    public static void main(String[] args) {

        SpringApplication.run(SpringConfigServerApplication.class, args);

    }

}
可以使用Config Server的端点获取配置文件的内容,端点与配置文件的映射规则如下:
/{application}/{profile}[/{label}]

/{application}-{profile}.yml

/{label}/{application}-{profile}.yml

/{application}-{profile}.properties

/{label}/{application}-{profile}.properties
{application} 是应用名称,对应配置文件的名称部分,本例是config-client。
{profile} 是配置文件的版本,本例是dev和test。
{label} 表示分支,如果是git则默认是master分支。
启动服务,浏览器访问(把下面test换为dev,结果类似)下面地址,分别输出如下:
http://localhost:8091/config-client/test
{"name":"config-client","profiles":["test"],"label":null,"version":"6","state":null,"propertySources":[{"name":"https://localhost/svn/test-project/default-config/config-client-test.yml","source":{"server.port":8093,"test.user.name":"bb"}}]}
http://localhost:8091/config-client/test/default-config
{"name":"config-client","profiles":["test"],"label":"default-config","version":"6","state":null,"propertySources":[{"name":"https://localhost/svn/test-project/default-config/config-client-test.yml","source":{"server.port":8093,"test.user.name":"bb"}}]}
http://localhost:8091/config-client-test.yml
server:

  port: 8093

test:

  user:

    name: bb
http://localhost:8091/default-config/config-client-test.yml
server:

  port: 8093

test:

  user:

    name: bb
二、配置客户端读取SVN配置
1、创建项目
IDEA中创建一个新的SpringBoot项目,名称为“spring-config-client”,SpringBoot版本选择2.1.10,在选择Dependencies(依赖)的界面勾选Web -> Spring Web,Spring Cloud Config -> Config Client。
pom.xml会引入spring-boot-starter-web和spring-cloud-starter-config依赖项,pom.xml完整内容如下:
<?xml version="1.0" encoding="UTF-8"?>

<project xmlns="http://maven.apache.org/POM/4.0.0" xmlns:xsi="http://www.w3.org/2001/XMLSchema-instance"

         xsi:schemaLocation="http://maven.apache.org/POM/4.0.0 https://maven.apache.org/xsd/maven-4.0.0.xsd">

    <modelVersion>4.0.0</modelVersion>

    <parent>

        <groupId>org.springframework.boot</groupId>

        <artifactId>spring-boot-starter-parent</artifactId>

        <version>2.1.10.RELEASE</version>

        <relativePath/> <!-- lookup parent from repository -->

    </parent>

    <groupId>com.example</groupId>

    <artifactId>spring-config-client</artifactId>

    <version>0.0.1-SNAPSHOT</version>

    <name>spring-config-client</name>

    <description>Demo project for Spring Boot</description>

    <properties>

        <java.version>1.8</java.version>

        <spring-cloud.version>Greenwich.SR4</spring-cloud.version>

    </properties>

    <dependencies>

        <dependency>

            <groupId>org.springframework.boot</groupId>

            <artifactId>spring-boot-starter-web</artifactId>

        </dependency>

        <dependency>

            <groupId>org.springframework.cloud</groupId>

            <artifactId>spring-cloud-starter-config</artifactId>

        </dependency>

        <dependency>

            <groupId>org.springframework.boot</groupId>

            <artifactId>spring-boot-starter-test</artifactId>

            <scope>test</scope>

        </dependency>

    </dependencies>

    <dependencyManagement>

        <dependencies>

            <dependency>

                <groupId>org.springframework.cloud</groupId>

                <artifactId>spring-cloud-dependencies</artifactId>

                <version>${spring-cloud.version}</version>

                <type>pom</type>

                <scope>import</scope>

            </dependency>

        </dependencies>

    </dependencyManagement>

    <build>

        <plugins>

            <plugin>

                <groupId>org.springframework.boot</groupId>

                <artifactId>spring-boot-maven-plugin</artifactId>

            </plugin>

        </plugins>

    </build>

</project>
2、修改启动类代码
增加测试方法
package com.example.springconfigclient;

import org.springframework.beans.factory.annotation.Autowired;

import org.springframework.boot.SpringApplication;

import org.springframework.boot.autoconfigure.SpringBootApplication;

import org.springframework.core.env.Environment;

import org.springframework.web.bind.annotation.RequestMapping;

import org.springframework.web.bind.annotation.RestController;

@SpringBootApplication

@RestController

public class SpringConfigClientApplication {

    @Autowired

    private Environment env;

    public static void main(String[] args) {

        SpringApplication.run(SpringConfigClientApplication.class, args);

    }

    @RequestMapping("/")

    public String home(){

        return env.getProperty("test.user.name");

    }

}
3、添加配置bootstrap.yml
spring:

  application:

    name: config-client

  cloud:

    config:

      uri: http://localhost:8091

      profile: dev
设置了应用名称config-client,使用spring.cloud.config.uri来设置配置服务器的地址,使用spring.cloud.config.profile来读取指定的配置。最终,配置客户端会到SVN服务器的test-project/default-config目录下读取config-client-dev.yml(.properties)。
启动服务,浏览器访问:http://localhost:8092/(这里端口8092在config-client-dev.yml中已指定),页面输出:aa
也可以使用spring.cloud.config.name代替spring.application.name,结果一样。
spring:

  cloud:

    config:

      uri: http://localhost:8091

      profile: dev

      name: config-client
如果spring.cloud.config.name和spring.application.name都不提供,则默认读取application-dev.yml。
在SVN的test-project/default-config目录下新增文件application-dev.yml,内容
server:

  port: 8092

test:

  user:

    name: cc
启动服务,浏览器访问:http://localhost:8092/,页面输出:cc
可以设置spring.client.config.label来覆盖服务器的default-lable属性,另外上面profile也可改为下面写法。
spring:

  application:

    name: config-client

  cloud:

    config:

      uri: http://localhost:8091

      lable: default-config

      name: config-client

  profiles:

    active: dev
三、使用/refresh端点手动刷新配置
1、在上面配置客户端的pom.xml中添加依赖
        <dependency>

            <groupId>org.springframework.boot</groupId>

            <artifactId>spring-boot-starter-actuator</artifactId>

        </dependency>
2、application.yml(或bootstrap.yml)添加配置
management:

  endpoints:

    web:

      exposure:

        include: "*"
3、在Controller上添加注解@RefreshScope
package com.example.springconfigclient;

import org.springframework.beans.factory.annotation.Autowired;

import org.springframework.boot.SpringApplication;

import org.springframework.boot.autoconfigure.SpringBootApplication;

import org.springframework.cloud.context.config.annotation.RefreshScope;

import org.springframework.core.env.Environment;

import org.springframework.web.bind.annotation.RequestMapping;

import org.springframework.web.bind.annotation.RestController;

@SpringBootApplication

@RestController

@RefreshScope

public class SpringConfigClientApplication {

   @Autowired

    private Environment env;

    public static void main(String[] args) {

        SpringApplication.run(SpringConfigClientApplication.class, args);

    }

    @RequestMapping("/")

    public String home(){

        return env.getProperty("test.user.name");

    }

}
4、修改SVN服务器上config-client-dev.yml内容
把name的值由aa修改为aa11,提交SVN修改。
5、/refresh只支持POST请求,发送POST请求到http://localhost:8092/actuator/refresh
使用Postman发送POST请求,如果SVN没有修改,返回[],如果有修改,返回结果如下:

刷新浏览器地址:http://localhost:8092/,结果已由aa,变成了aa11。
四、使用Spring Cloud Bus自动刷新配置
上面使用/refresh端点手动刷新配置只是刷新一个客户端的配置,如果有很多微服务的客户端,则需要一个个需要手动刷新。
使用Spring Cloud Bus可以实现刷新一个客户端配置后,自动刷新其余的客户端配置。
Spring Cloud Bus使用消息代理(RabbitMQ、Kafka等)连接分布式系统的客户端,广播传播状态的更改或其他的管理指令。
Spring Cloud Bus的结构图如下,所有客户端通过消息总线连接到了一起,每个客户端会订阅配置更新事件,当其中一个客户端的actuator/bus-refresh被请求时,会向消息总线发送一个配置更新事件,其他客户端获得该事件后也会更新配置。

使用实例:
1、SVN服务器只保留config-client-dev.yml,内容如下:
test:

  user:

    name: aa
2、上面客户端项目“spring-config-client”的pom.xml加入依赖项
<dependency>

    <groupId>org.springframework.boot</groupId>

    <artifactId>spring-boot-starter-actuator</artifactId>

</dependency>
3、application.yml添加配置(如果rabbitmq服务器在本机,端口和账号没改的话,下面也可不添加)
Spring:

  rabbitmq:

    host: localhost

    port: 5672

    username: guest

    password: guest
4、修改启动类代码,支持启动时输入端口号
IDEA 配置可以启动多次:IDEA -> Edit Configurations -> Run/Debug Configuration -> 勾选Allow parallel run
package com.example.springconfigclient;

import org.springframework.beans.factory.annotation.Autowired;

import org.springframework.boot.autoconfigure.SpringBootApplication;

import org.springframework.boot.builder.SpringApplicationBuilder;

import org.springframework.cloud.context.config.annotation.RefreshScope;

import org.springframework.core.env.Environment;

import org.springframework.web.bind.annotation.RequestMapping;

import org.springframework.web.bind.annotation.RestController;

import java.util.Scanner;

@SpringBootApplication

@RestController

@RefreshScope

public class SpringConfigClientApplication {

   @Autowired

    private Environment env;

    public static void main(String[] args) {

        //SpringApplication.run(SpringConfigClientApplication.class, args);

        Scanner scan = new Scanner(System.in);

        String port = scan.nextLine();

        new SpringApplicationBuilder(SpringConfigClientApplication.class).properties("server.port=" + port).run(args);

    }

    @RequestMapping("/")

    public String home(){

        return env.getProperty("test.user.name");

    }

}
5、测试
(1)客户端项目配置可以启动多次:IDEA -> Edit Configurations -> Run/Debug Configuration -> 勾选Allow parallel run
(2)启动启动端spring-config-client,输入端口号9001,浏览器访问http://localhost:9001/,页面显示aa
(3)再次启动启动端spring-config-client,输入端口号9002,浏览器访问http://localhost:9002/,页面显示aa
(4)修改SVN的config-client-dev.yml的name值为aa123
(5)使用Postman发送POST请求到http://localhost:9001/actuator/bus-refresh
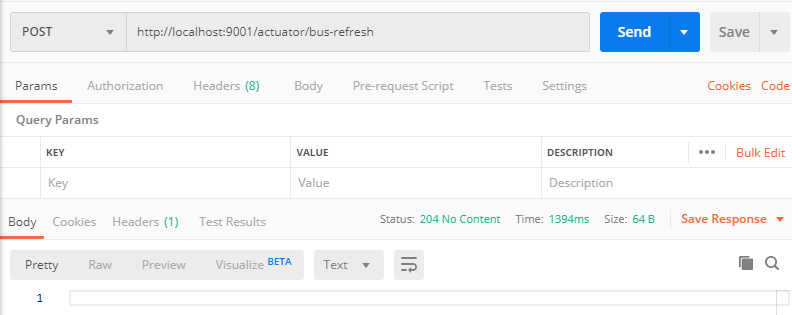
(6)浏览器访问http://localhost:9001/和http://localhost:9002/,两个页面都已显示aa123。
Spring Cloud Config实现集群配置中心的更多相关文章
- Spring Cloud config之一:分布式配置中心入门介绍
Spring Cloud Config为服务端和客户端提供了分布式系统的外部化配置支持.配置服务器为各应用的所有环境提供了一个中心化的外部配置.它实现了对服务端和客户端对Spring Environm ...
- Spring Cloud Config 1 (分布式配置中心)
spring cloud config是spring cloud团队创建的一个全新的项目,用来为分布式系统中的基础设施和微服务应用提供集中化的外部配置支持,它分为服务端和客户端两部分. 服务端也被称为 ...
- Spring Cloud Eureka的集群配置(六)
1.再次创建2个Eureka工程 工程名:microservicecloud-eureka-7002 工程名:microservicecloud-eureka-7003 2.pom.xml文件 < ...
- Spring Cloud(Dalston.SR5)--Config 集群配置中心
Spring Cloud Config 是一个全新的项目,用来为分布式系统中的基础设施和微服务应用提供集中化的外部配置支持,他分为服务端和客户端两个部分.服务端也称为分布式配置中心,是一个独立的微服务 ...
- Spring Cloud(八):配置中心(服务化与高可用)【Finchley 版】
Spring Cloud(八):配置中心(服务化与高可用)[Finchley 版] 发表于 2018-04-19 | 更新于 2018-04-26 | 本文接之前的<Spring Clou ...
- Spring Cloud(七):配置中心(Git 版与动态刷新)【Finchley 版】
Spring Cloud(七):配置中心(Git 版与动态刷新)[Finchley 版] 发表于 2018-04-19 | 更新于 2018-04-24 | Spring Cloud Confi ...
- Spring Cloud Alibaba | Nacos集群部署
目录 Spring Cloud Alibaba | Nacos集群部署 1. Nacos支持三种部署模式 2. 集群模式下部署Nacos 2.1 架构图 2.2 下载源码或者安装包 2.3 配置集群配 ...
- Spring Cloud第十一篇 | 分布式配置中心高可用
本文是Spring Cloud专栏的第十一篇文章,了解前十篇文章内容有助于更好的理解本文: Spring Cloud第一篇 | Spring Cloud前言及其常用组件介绍概览 Spring Cl ...
- Spring Cloud(九):配置中心(消息总线)【Finchley 版】
Spring Cloud(九):配置中心(消息总线)[Finchley 版] 发表于 2018-04-19 | 更新于 2018-05-07 | 我们在 Spring Cloud(七):配置中心 ...
随机推荐
- python网络爬虫之自动化测试工具selenium[二]
目录 前言 一.获取今日头条的评论信息(request请求获取json) 1.分析数据 2.获取数据 二.获取今日头条的评论信息(selenium请求获取) 1.分析数据 2.获取数据 房源案例(仅供 ...
- overflow属性值
overflow属性的可取值有四种:visible.hidden.scroll.auto visible:不裁剪溢出的内容.浏览器把溢出来的内容呈现在其内容元素的显示区域以外的地方,全部内容在浏览器的 ...
- day20191104笔记
MyBatis笔记: 一.MyBatis半自动ORM映射框架, 将数据库中的数据和程序中的数据进行自动映射的前提条件 1. 数据库中的字段必须和程序中的属性保持一致 2. 程序中属性的数据类型必须是基 ...
- 使用WireMock进行更好的集成测试
无论您是遵循传统的测试金字塔还是采用诸如"测试蜂窝"这样的较新方法,都应该在开发过程中的某个时候开始编写集成测试用例. 您可以编写不同类型的集成测试.从持久性测试开始,您可以检查组 ...
- 10-kubernetes serveraccount RBAC
目录 认证安全 serviceAccountName 和 userAccount serviceaccount 创建 使用admin 的SA 测试 URL访问kubernetes资源 APIserve ...
- 能避开很多坑的mysql面试题,你知道吗?
最近有一些朋友问我一些mysql相关的面试题,有一些比较基础,有些比较偏.这里就总结一些常见的mysql面试题吧,都是自己平时工作的总结以及经验.大家看完,能避开很多坑.而且很多问题,都是面试中也经常 ...
- pod install/update速度慢或失败的解决方案实践
本文基于 https://www.cnblogs.com/dabaomo/p/9634727.html 声明 坚决拥护党的领导,本文章所用技术乃出于工作需要,敬请谅解. 正文 可以先过去快速浏览一遍再 ...
- 一文读懂Python web框架和web服务器之间的关系
我们都知道 Python 作为一门强大的语言,能够适应快速原型和较大项目的制作,因此被广泛用于 web 应用程序的开发中. 在面试的过程中,大家或多或少都被问到过这样一个问题:一个请求从浏览器发出到数 ...
- Chrome快捷键吐血整理
Chrom是平时开发过程中最常用到的浏览器,使用快捷键操作Chrome能提高我们的使用效率,而且可以脱离鼠标进行操作.本篇博客就对平时我们常用的Chrome快捷键做一个整理总结.大家拿走不谢,哈哈~~ ...
- iOS 基本控件的使用以及系统层次架构(1)
User Interface iOS系统架构层次图 -CocoaTouch UI相关 -媒体层(Media) 音频.视频.图形.动画 -核心服务层(Core services) 内存.网络.文件.线 ...