android界面布局
(一)LinearLayout界面编排模式
他的格式是按照线性顺序,由上往下或右左往右,逐一排列界面组件。
layout_width:中的“match_parent”表示要填满他所在的外框,而“wrap_content”表示它的大小只要满足内部所包含的界面组件即可。
android:orientation:“horizontal”表示排列方式为水平,而“vertical”表示排列方式为垂直
LinearLayout标签可以想象成一个外框,我们可以在其里面加入另外一个LinearLayout标签
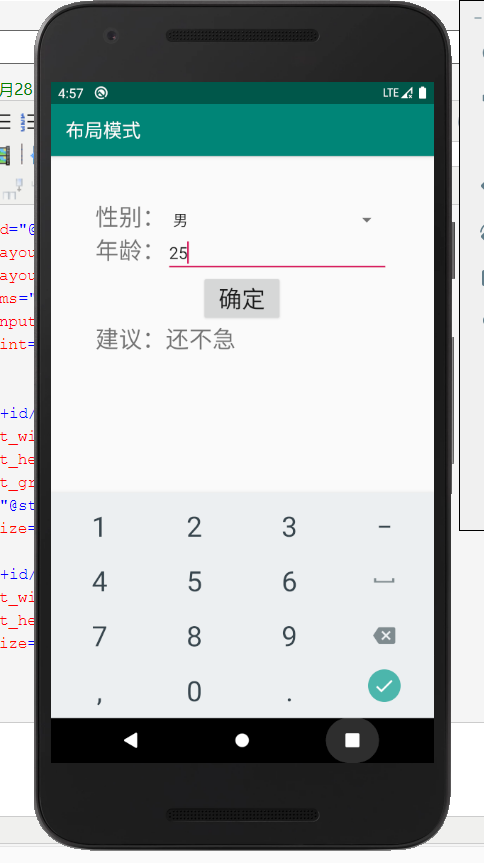
我们将之前的婚姻建议程序改良一下,换成以下格式
第一层布局还是LinearLayout垂直布局,里面嵌套了一个LinearLayout水平布局,在该布局中包括性别TextView,和Spinner性别选择下拉框
再在第一层上嵌套一个LinearLayout水平布局,在该布局中包含年龄TextView和输入年龄框EditText
最后在第一层的布局上加入Button确定按钮和建议TextView
界面布局:
<?xml version="1.0" encoding="utf-8"?>

<LinearLayout xmlns:android="http://schemas.android.com/apk/res/android"

    xmlns:app="http://schemas.android.com/apk/res-auto"

    xmlns:tools="http://schemas.android.com/tools"

    android:layout_width="match_parent"

    android:layout_height="match_parent"

    android:orientation="vertical"

    android:padding="@android:dimen/app_icon_size"

    tools:context=".MainActivity">

    <LinearLayout

        android:orientation="horizontal"

        android:layout_width="match_parent"

        android:layout_height="wrap_content">

        <TextView

            android:layout_width="wrap_content"

            android:layout_height="wrap_content"

            android:text="@string/sex"

            android:textSize="25sp" />

        <Spinner

            android:id="@+id/spnSex"

            android:layout_width="match_parent"

            android:layout_height="wrap_content"

            android:entries="@array/sex_list"

            android:spinnerMode="dialog"

            android:prompt="@string/spn_sex_list_prompt" />

    </LinearLayout>

    <LinearLayout

        android:orientation="horizontal"

        android:layout_width="match_parent"

        android:layout_height="wrap_content">

        <TextView

            android:layout_width="wrap_content"

            android:layout_height="wrap_content"

            android:text="@string/age"

            android:textSize="25sp" />

        <EditText

            android:id="@+id/edtAge"

            android:layout_width="match_parent"

            android:layout_height="wrap_content"

            android:ems="10"

            android:inputType="number"

            android:hint="@string/edt_age_hint" />

    </LinearLayout>

    <Button

        android:id="@+id/btnOk"

        android:layout_width="wrap_content"

        android:layout_height="wrap_content"

        android:layout_gravity="center_horizontal"

        android:text="@string/btn_ok"

        android:textSize="25sp" />

    <TextView

        android:id="@+id/txtR"

        android:layout_width="wrap_content"

        android:layout_height="wrap_content"

        android:textSize="25sp" />

</LinearLayout>
页面截图:
(二)TableLayout界面布局
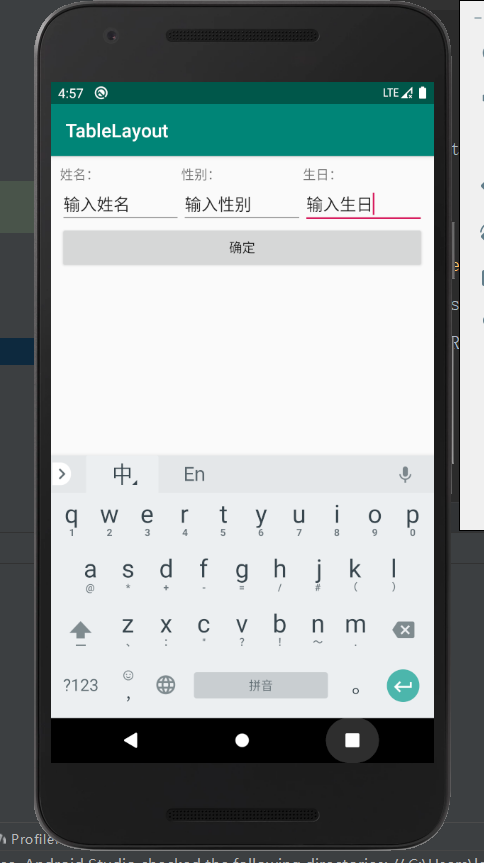
顾名思义,tabel就是按照表格的形式来进行排列,也就是由上往下一行接着一行,而且每一个字段都上下对齐
每一行用标签用TableRow标签包裹起来,如果想让一个TableRow中的足见按照比例使用整个Table的宽度,可以借助android:layout_weight属性
例如:
<?xml version="1.0" encoding="utf-8"?>

<TableLayout xmlns:android="http://schemas.android.com/apk/res/android"

    xmlns:app="http://schemas.android.com/apk/res-auto"

    xmlns:tools="http://schemas.android.com/tools"

    android:layout_width="match_parent"

    android:layout_height="match_parent"

    android:layout_gravity="center_horizontal"

    android:layout_margin="10dp"

    tools:context=".MainActivity">

    <TableRow>

        <TextView

            android:text="姓名:"

            android:layout_weight="1"/>

        <TextView android:text="性别:"

            android:layout_weight="1"/>

        <TextView android:text="生日:"

            android:layout_weight="1"/>

    </TableRow>

    <TableRow>

        <EditText android:text="输入姓名"

            android:layout_weight="1"/>

        <EditText android:text="输入性别"

            android:layout_weight="1"/>

        <EditText android:text="输入生日"

            android:layout_weight="1"/>

    </TableRow>

    <Button android:text="确定"/>

</TableLayout>
程序截屏:
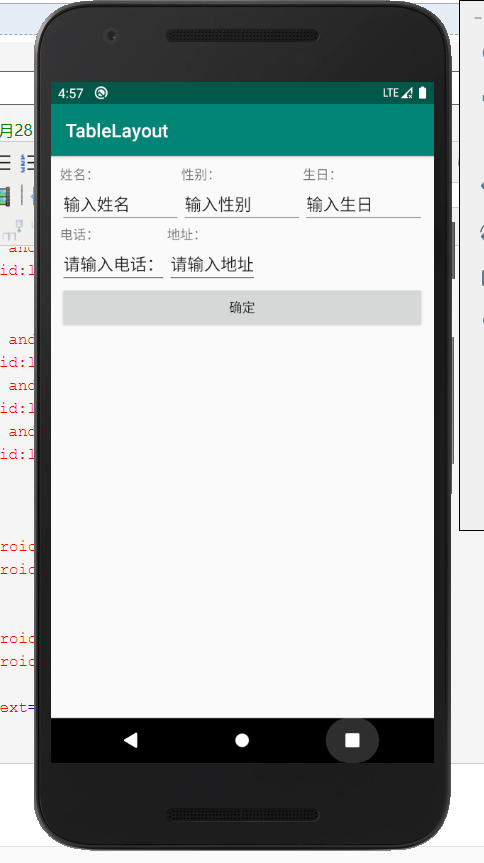
TableRow中的组件和上一个组件对齐,无法错开,就会形成如下图:

那么我们想要错开可以使用,在TableLayout标签中再增加一个TableLayout标签,这样就可以让不同行的字段错开
<?xml version="1.0" encoding="utf-8"?>

<TableLayout xmlns:android="http://schemas.android.com/apk/res/android"

    xmlns:app="http://schemas.android.com/apk/res-auto"

    xmlns:tools="http://schemas.android.com/tools"

    android:layout_width="match_parent"

    android:layout_height="match_parent"

    android:layout_gravity="center_horizontal"

    android:layout_margin="10dp"

    tools:context=".MainActivity">

    <TableLayout

        android:layout_width="match_parent"

        android:layout_height="wrap_content">

        <TableRow>

            <TextView

                android:text="姓名:"

                android:layout_weight="1"/>

            <TextView android:text="性别:"

                android:layout_weight="1"/>

            <TextView android:text="生日:"

                android:layout_weight="1"/>

        </TableRow>

        <TableRow>

            <EditText android:text="输入姓名"

                android:layout_weight="1"/>

            <EditText android:text="输入性别"

                android:layout_weight="1"/>

            <EditText android:text="输入生日"

                android:layout_weight="1"/>

        </TableRow>

    </TableLayout>

    <TableRow>

        <TextView android:text="电话:" />

        <TextView android:text="地址:" />

    </TableRow>

    <TableRow>

        <EditText android:text="请输入电话:"/>

        <EditText android:text="请输入地址"/>

    </TableRow>

    <Button android:text="确定"/>

</TableLayout>
应用截图:
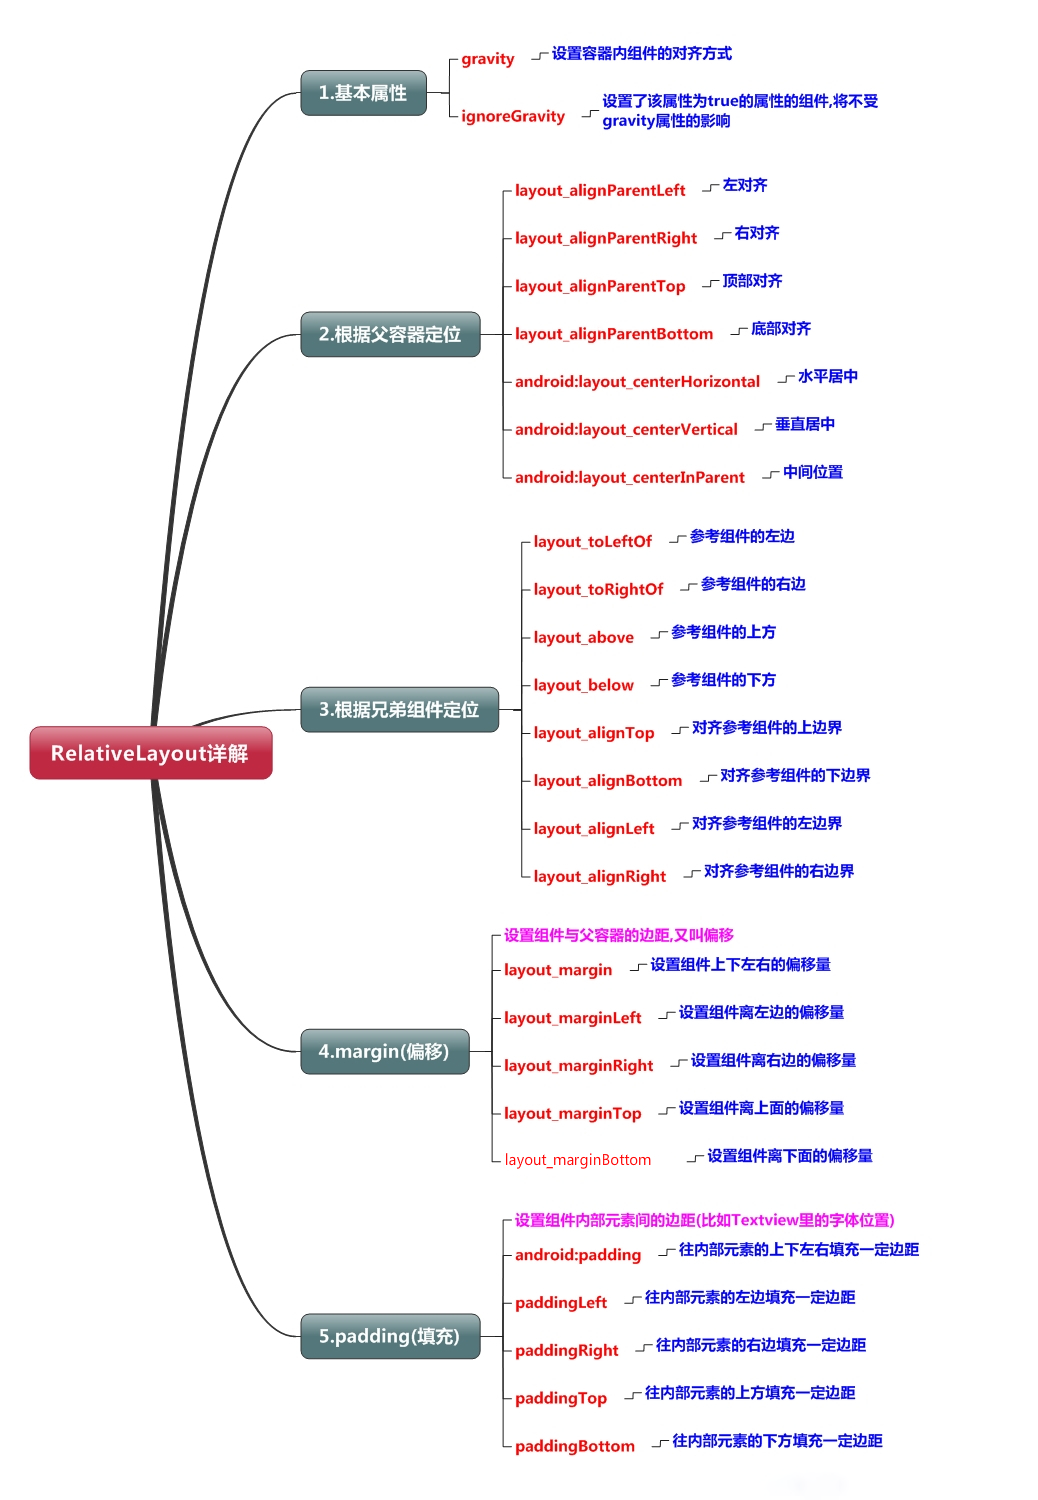
(三)RelativeLayout界面编排
先做个小案例试试手:
<?xml version="1.0" encoding="utf-8"?>

<RelativeLayout xmlns:android="http://schemas.android.com/apk/res/android"

    xmlns:app="http://schemas.android.com/apk/res-auto"

    xmlns:tools="http://schemas.android.com/tools"

    android:layout_width="match_parent"

    android:layout_height="match_parent"

    android:layout_gravity="center_horizontal"

    tools:context=".MainActivity">

    <TextView

        android:id="@+id/txt1"

        android:layout_width="wrap_content"

        android:layout_height="wrap_content"

        android:text="txt1" />

    <TextView

        android:id="@+id/txt2"

        android:layout_width="wrap_content"

        android:layout_height="wrap_content"

        android:text="txt2"

        android:layout_toRightOf="@+id/txt1" />

    <EditText

        android:id="@+id/edt1"

        android:layout_width="wrap_content"

        android:layout_height="wrap_content"

        android:text="edt1"

        android:layout_below="@+id/txt1" />

    <EditText

        android:id="@+id/edt2"

        android:layout_width="wrap_content"

        android:layout_height="wrap_content"

        android:text="edt2"

        android:layout_toRightOf="@+id/edt1" />

    <Button

        android:id="@+id/btn1"

        android:layout_width="wrap_content"

        android:layout_height="wrap_content"

        android:text="btn1"

        android:layout_below="@+id/edt1" />

</RelativeLayout>
程序截图:
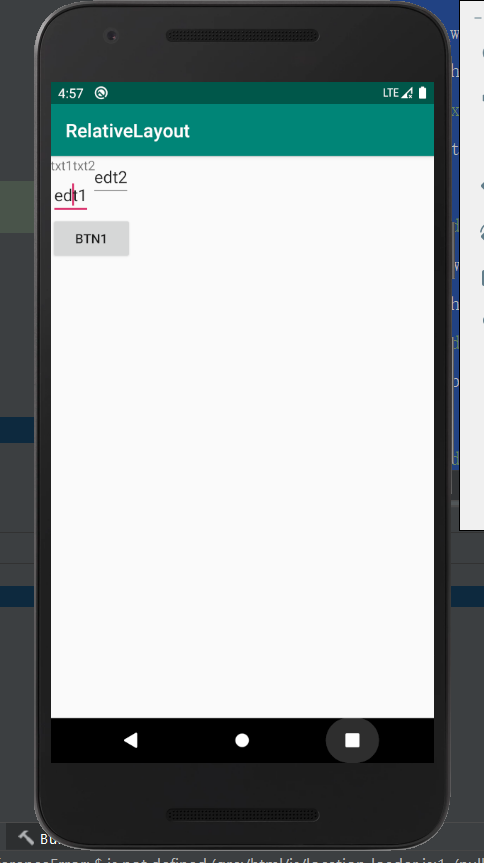
可以看到两个EditText出现一高一低,没有对齐。因此我们需要给edt2加上:android:layout_alighTop="@+id/edt1"
我们重新对其编排一下

<?xml version="1.0" encoding="utf-8"?>

<RelativeLayout xmlns:android="http://schemas.android.com/apk/res/android"

    xmlns:app="http://schemas.android.com/apk/res-auto"

    xmlns:tools="http://schemas.android.com/tools"

    android:layout_height="match_parent"

    android:layout_width="400dp"

    android:layout_gravity="center_horizontal"

    tools:context=".MainActivity">

    <TextView

        android:id="@+id/txt1"

        android:layout_width="wrap_content"

        android:layout_height="wrap_content"

        android:text="txt1" />

    <TextView

        android:id="@+id/txt2"

        android:layout_width="wrap_content"

        android:layout_height="wrap_content"

        android:text="txt2"

        android:layout_above="@+id/edt2"

        android:layout_alignLeft="@+id/edt2" />

    <EditText

        android:id="@+id/edt1"

        android:layout_width="wrap_content"

        android:layout_height="wrap_content"

        android:text="edt1"

        android:layout_below="@+id/txt1" />

    <EditText

        android:id="@+id/edt2"

        android:layout_width="wrap_content"

        android:layout_height="wrap_content"

        android:text="edt2"

        android:layout_toRightOf="@+id/edt1"

        android:layout_alignTop="@+id/edt1" />

    <Button

        android:id="@+id/btn1"

        android:layout_width="wrap_content"

        android:layout_height="wrap_content"

        android:text="btn1"

        android:layout_below="@+id/edt1" />

</RelativeLayout>
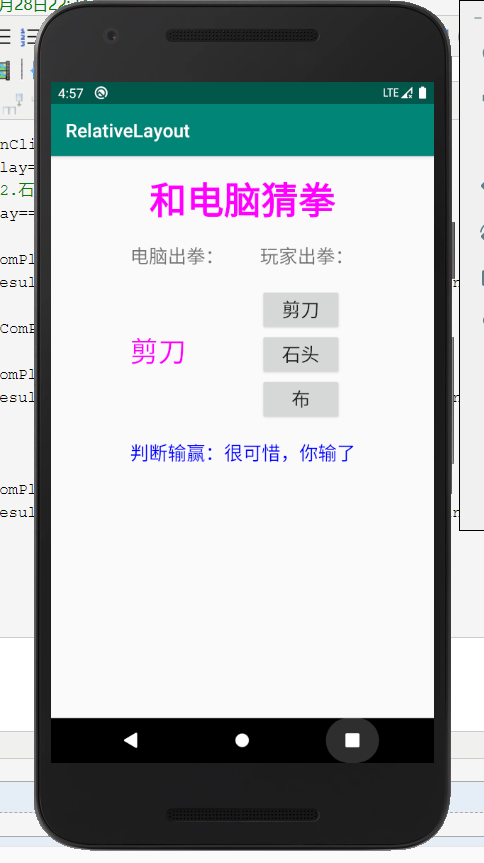
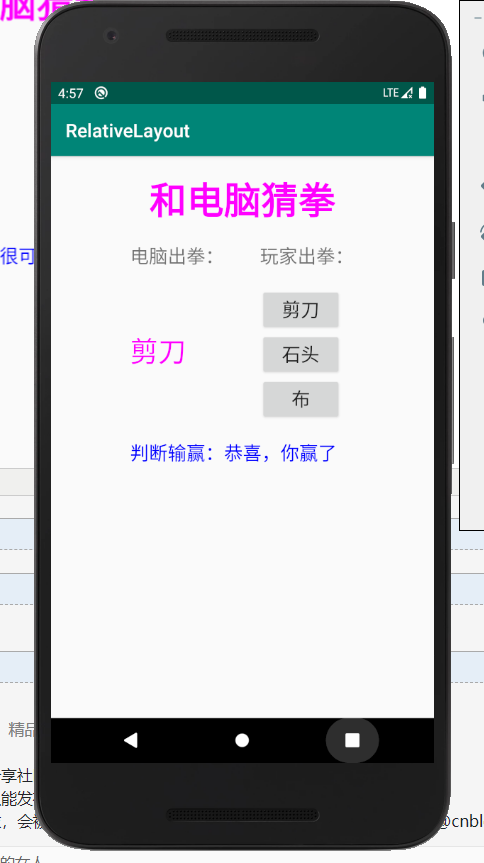
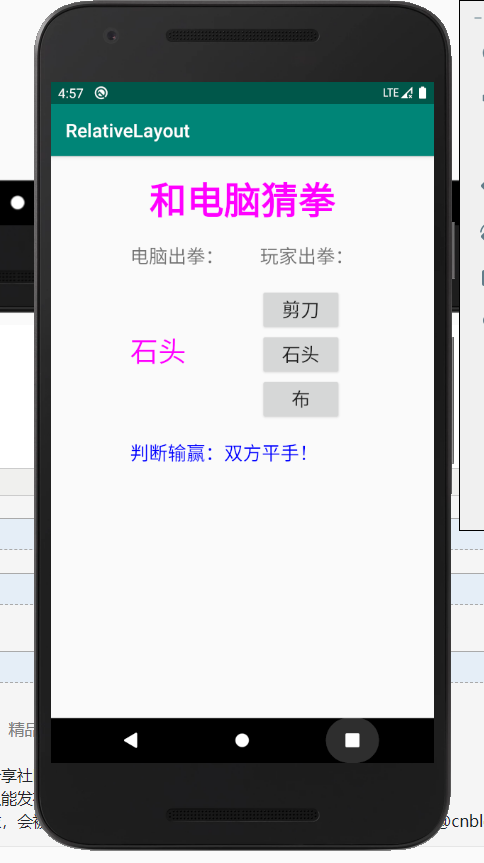
猜拳游戏:
界面布局文件:
<?xml version="1.0" encoding="utf-8"?>

<RelativeLayout xmlns:android="http://schemas.android.com/apk/res/android"

    xmlns:app="http://schemas.android.com/apk/res-auto"

    xmlns:tools="http://schemas.android.com/tools"

    android:layout_height="match_parent"

    android:layout_width="400dp"

    android:layout_gravity="center_horizontal"

    tools:context=".MainActivity">

    <TextView

        android:id="@+id/txtTitle"

        android:layout_width="wrap_content"

        android:layout_height="wrap_content"

        android:text="@string/prompt_title"

        android:textColor="#FF00FF"

        android:textSize="40sp"

        android:textStyle="bold"

        android:layout_centerHorizontal="true"

        android:paddingLeft="20dp"

        android:paddingRight="20dp"

        android:layout_marginTop="20dp"

        android:layout_marginBottom="20dp"/>

    <TextView

        android:id="@+id/txtCom"

        android:layout_width="wrap_content"

        android:layout_height="wrap_content"

        android:text="@string/prompt_com_play"

        android:layout_below="@+id/txtTitle"

        android:layout_alignLeft="@+id/txtTitle"

        android:textSize="20sp"

        android:layout_marginBottom="20dp"

        android:layout_alignStart="@+id/txtTitle" />

    <TextView

        android:id="@+id/txtMyPlay"

        android:layout_width="wrap_content"

        android:layout_height="wrap_content"

        android:text="@string/prompt_my_play"

        android:layout_below="@id/txtTitle"

        android:layout_alignRight="@id/txtTitle"

        android:textSize="20sp"

        android:layout_marginBottom="20dp"

        android:layout_alignEnd="@id/txtTitle" />

    <Button

        android:id="@+id/btnScissors"

        android:layout_width="wrap_content"

        android:layout_height="wrap_content"

        android:text="@string/play_scissors"

        android:layout_below="@+id/txtMyPlay"

        android:layout_alignLeft="@+id/txtMyPlay"

        android:textSize="20sp"

        android:paddingLeft="15dp"

        android:paddingRight="15dp"

        android:layout_alignStart="@+id/txtMyPlay" />

    <TextView

        android:id="@+id/txtComPlay"

        android:layout_width="wrap_content"

        android:layout_height="wrap_content"

        android:layout_below="@+id/btnScissors"

        android:layout_alignLeft="@+id/txtCom"

        android:textSize="30sp"

        android:textColor="#FF00FF"

        android:layout_alignStart="@+id/txtCom" />

    <Button

        android:id="@+id/btnStone"

        android:layout_width="wrap_content"

        android:layout_height="wrap_content"

        android:text="@string/play_stone"

        android:layout_below="@id/btnScissors"

        android:layout_alignLeft="@id/btnScissors"

        android:textSize="20sp"

        android:paddingLeft="15dp"

        android:paddingRight="15dp"

        android:layout_alignStart="@id/btnScissors" />

    <Button

        android:id="@+id/btnPaper"

        android:layout_width="wrap_content"

        android:layout_height="wrap_content"

        android:text="@string/play_paper"

        android:layout_below="@id/btnStone"

        android:layout_alignLeft="@id/btnStone"

        android:textSize="20sp"

        android:paddingLeft="25dp"

        android:paddingRight="25dp"

        android:layout_alignStart="@id/btnStone" />

    <TextView

        android:id="@+id/txtResult"

        android:layout_width="wrap_content"

        android:layout_height="wrap_content"

        android:text="@string/result"

        android:layout_below="@id/btnPaper"

        android:layout_alignLeft="@id/txtCom"

        android:textSize="20sp"

        android:textColor="#0000FF"

        android:layout_marginTop="20dp"

        android:layout_alignStart="@id/txtCom" />

</RelativeLayout>
字符串资源文件:
<resources>

    <string name="app_name">RelativeLayout</string>

    <string name="prompt_com_play">电脑出拳:</string>

    <string name="prompt_my_play">玩家出拳:</string>

    <string name="play_scissors">剪刀</string>

    <string name="play_stone">石头</string>

    <string name="play_paper">布</string>

    <string name="player_win">恭喜,你赢了</string>

    <string name="player_lose">很可惜,你输了</string>

    <string name="player_draw">双方平手!</string>

    <string name="prompt_title">和电脑猜拳</string>

    <string name="result">判断输赢:</string>

</resources>
程序文件:
package com.example.relativelayout;

import androidx.appcompat.app.AppCompatActivity;

import android.os.Bundle;

import android.view.View;

import android.widget.Button;

import android.widget.TextView;

import org.w3c.dom.Text;

public class MainActivity extends AppCompatActivity {

    private TextView mTxtComPlay,mTxtResult;

    private Button mBtnScissors,mBtnStone,mBtnPaper;

    @Override

    protected void onCreate(Bundle savedInstanceState) {

        super.onCreate(savedInstanceState);

        setContentView(R.layout.activity_main);

        mTxtComPlay=(TextView)findViewById(R.id.txtComPlay);

        mTxtResult=(TextView)findViewById(R.id.txtResult);

        mBtnScissors=(Button)findViewById(R.id.btnScissors);

        mBtnPaper=(Button)findViewById(R.id.btnPaper);

        mBtnStone=(Button)findViewById(R.id.btnStone);

        mBtnScissors.setOnClickListener(btnScissorsOnClick);

        mBtnStone.setOnClickListener(btnStoneOnClick);

        mBtnPaper.setOnClickListener(btnPaperOnClick);

    }

    private Button.OnClickListener btnScissorsOnClick=new Button.OnClickListener(){

        @Override

        public void onClick(View v) {

            int iComPlay=(int)(Math.random()*3+1);

            //1.剪刀,2.石头,3.布

            if(iComPlay==1)

            {

                mTxtComPlay.setText(R.string.play_scissors);

                mTxtResult.setText(getString(R.string.result)+getString(R.string.player_draw));

            }

            else if(iComPlay==2)

            {

                mTxtComPlay.setText(R.string.play_stone);

                mTxtResult.setText(getString(R.string.result)+getString(R.string.player_lose));

            }

            else

            {

                mTxtComPlay.setText(R.string.play_paper);

                mTxtResult.setText(getString(R.string.result)+getString(R.string.player_win));

            }

        }

    };

    private Button.OnClickListener btnStoneOnClick=new Button.OnClickListener(){

        @Override

        public void onClick(View v) {

            int iComPlay=(int)(Math.random()*3+1);

            //1.剪刀,2.石头,3.布

            if(iComPlay==1)

            {

                mTxtComPlay.setText(R.string.play_scissors);

                mTxtResult.setText(getString(R.string.result)+getString(R.string.player_win));

            }

            else if(iComPlay==2)

            {

                mTxtComPlay.setText(R.string.play_stone);

                mTxtResult.setText(getString(R.string.result)+getString(R.string.player_draw));

            }

            else

            {

                mTxtComPlay.setText(R.string.play_paper);

                mTxtResult.setText(getString(R.string.result)+getString(R.string.player_lose));

            }

        }

    };

    private Button.OnClickListener btnPaperOnClick=new Button.OnClickListener(){

        @Override

        public void onClick(View v) {

            int iComPlay=(int)(Math.random()*3+1);

            //1.剪刀,2.石头,3.布

            if(iComPlay==1)

            {

                mTxtComPlay.setText(R.string.play_scissors);

                mTxtResult.setText(getString(R.string.result)+getString(R.string.player_lose));

            }

            else if(iComPlay==2)

            {

                mTxtComPlay.setText(R.string.play_stone);

                mTxtResult.setText(getString(R.string.result)+getString(R.string.player_win));

            }

            else

            {

                mTxtComPlay.setText(R.string.play_paper);

                mTxtResult.setText(getString(R.string.result)+getString(R.string.player_draw));

            }

        }

    };

}
程序截图:
android界面布局的更多相关文章
- Android界面布局基本知识简述
Android手机操作系统在模拟器中进行相关的编写,可以帮助我们实现各种功能需求.尤其是在界面的操作方面显得更为突出.在这里我们就可以对Android界面布局的相关操作来对这方面的知识进行一个深入的了 ...
- iOS中xib与storyboard原理,与Android界面布局的异同
用文本标记语言来进行布局,用的最多的应该是HTML语言.HTML能够理解为有一组特殊标记的XML语言. 一.iOS中xib与storyboard显示原理 在iOS中基本的布置界面的方式有3种:代码.x ...
- Android界面布局学习总结
参考文章: http://blog.csdn.net/shakespeare001/article/details/7843460 http://www.cnblogs.com/w-y-f/p/412 ...
- 初识android界面布局
1.活动 活动是android开发中最基本的概念,也是最容易吸引用户的地方,是一种可以包含用户界面的组件. Activity类中定义了7个回调方法,覆盖了活动生命周期的每一个环节.具体如下: (1)o ...
- 解决Android界面布局添加EditText组件后界面无法预览
错误报告: Exception raised during rendering: java.lang.System.arraycopy([CI[CII)V Exception details are ...
- Android界面布局基本属性
在 android 中我们常用的布局方式有这么几种:1.LinearLayout ( 线性布局 ) :(里面只可以有一个控件,并且不能设计这个控件的位置,控件会放到左上角) ...
- 【android学习3】解决Android界面布局添加EditView之后无法预览问题
在设计登陆界面时,拖入一个EditView之后发现界面无法预览 问题分析: 进入xml源文件里发现一个警告,提示添加inputType或者hint元素,添加后界面仍然无法预览... 仔细查看了当前使用 ...
- android 界面布局 很好的一篇总结[转]
1.LinearLayout ( 线性布局 ) :(里面只可以有一个控件,并且不能设计这个控件的位置,控件会放到左上角) 线性布局分为水平线性和垂直线性二者的属性分别为:android:orienta ...
- android 界面布局
一.LinearLayout LinearLayout 又称作线性布局,是一种非常常用的布局,它所包含的控件在线性方向上依次排列. android:orientation="horizont ...
随机推荐
- TCP/IP协议-为什么说TCP是可靠连接
我们平常经常说UDP是不可靠连接,TCP是可靠连接,然而TCP为什么是可靠的呢 1. TCP和UDP的优缺点TCP 缺点: [1] 三次握手四次挥手,传输更多包,浪费一些带宽[2] 为了进行可靠通信, ...
- 题解 【Codeforces387B】George and Round
以下选自官方题解: 考虑困难的需求数量,我们将覆盖这些困难, 然后我们将提出新的问题,并准备新的问题来覆盖其他需求. 很明显,如果我们决定满足从n中抽取i的要求,那么最好采用那些复杂性最小的要求. 让 ...
- 大白话Web三大组件之一Servlet
很多学习到Servlet这里的童鞋,听到那么多专业名词解释这个Servlet,相信都是很蒙圈的,在这里我先不跟大家扯Servlet的大概念,先跟大家探讨一下关于Servlet的作用 相信MVC这个概念 ...
- shiro登录认证过程讲解
先粘出登录的代码 1. 可以看到已经获取到了username和password ,为了接下来的认证过程,我们需要获取subject对象,也就是代表当前登录用户,并且要将username和passw ...
- Docker 基本命令和使用
Docker 基本命令 systemctl start docker : 启动 Docker systemctl stop docker : 停止 Docker systemctl restart d ...
- Git 常用命令总结,掌握这些,轻松驾驭版本管理
原创 最近公司的代码管理工具要从SVN转到Git上,因此虽然之前用过Git,但是都是一些简单的推送提交,因此还是有必要进行一些系统的学习,这里做一下笔记,以备后询,且不定期更新. 关于SVN和Git的 ...
- python中使用graphviz环境配置
去官网下载graphviz,并下一步安装 配置graphviz的bin目录到path环境变量下 python相关包: 使用conda注意:conda install graphviz 可能没用,要使用 ...
- django项目日志
接口中,写一条日志: 日志工具文件如下:
- 题解【POJ1651】Multiplication Puzzle
Description The multiplication puzzle is played with a row of cards, each containing a single positi ...
- 关于AutoCompleteTextView的用法:根据输入的自动匹配关键词