使用UIBezierPath绘制图形
当需要画图时我们一般创建一个UIView子类, 重写其中的drawRect方法
再drawRect方法中利用UIBezierPath添加画图
UIBezierPath的使用方法:
#import "BezierView.h"

@implementation BezierView

- (void)drawRect:(CGRect)rect {

    // Drawing code

    //设置线条颜色

    UIColor *color = [UIColor redColor];

    [color set];

    //创建UIBezierPath

    UIBezierPath *apath = ({

        UIBezierPath *path = [UIBezierPath bezierPath];

        path.lineWidth     = 5.0f;              //设置线条宽度

        path.lineCapStyle  = kCGLineCapRound;   //设置拐角

        path.lineJoinStyle = kCGLineCapRound;  //终点处理

        //设置起始点

        [path moveToPoint:CGPointMake(, )];

        //增加线条

        [path addLineToPoint:CGPointMake(, )];

        [path addLineToPoint:CGPointMake(, )];

        [path addLineToPoint:CGPointMake(, )];

        [path addLineToPoint:CGPointMake(, )];

        //关闭路径

        [path closePath];

        path;

    });

    //根据坐标连线

    [apath stroke];

}
然后把自定义的View添加到Controller中
#import "ViewController.h"

#import "BezierView.h"

#define SCREEN_WIDTH [UIScreen mainScreen].bounds.size.width

#define SCREEN_HEIGHT [UIScreen mainScreen].bounds.size.height

@interface ViewController ()

@end

@implementation ViewController

- (void)viewDidLoad {

    [super viewDidLoad];

    BezierView *beView     = [[BezierView alloc] initWithFrame:\

                                CGRectMake(, , SCREEN_WIDTH, SCREEN_HEIGHT)];

    beView.backgroundColor = [UIColor whiteColor];

    [self.view addSubview:beView];

}

@end
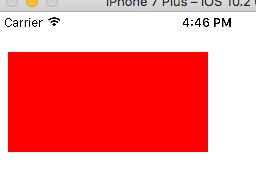
运行结果能看到一个多边形

如果把drawRect中最后一句话改为[apath fill];运行结果就是实心图

我们可以用UIBezierPath的bezierPathWithRect:CGRect(rect)方法来画矩形, 代码如下
- (void)drawRect:(CGRect)rect {

    // Drawing code

    //设置线条颜色

    UIColor *color = [UIColor redColor];

    [color set];

    //创建UIBezierPath

    UIBezierPath *apath = [UIBezierPath bezierPathWithRect:CGRectMake(, , , )];

    //更具坐标连线

    [apath fill];

}
运行结果:
我们可以用UIBezierPath的bezierPathWithOvallInRect:CGRect(rect)方法来画圆形和椭圆, 代码如下
- (void)drawRect:(CGRect)rect {

    // Drawing code

    //设置线条颜色

    UIColor *color = [UIColor redColor];

    [color set];

    //创建UIBezierPath

    UIBezierPath *apath = [UIBezierPath bezierPathWithOvalInRect:CGRectMake(, , , )];

    apath.lineWidth     = 5.0f;

    apath.lineCapStyle  = kCGLineCapRound;

    apath.lineJoinStyle = kCGLineCapRound;

    //更具坐标连线

    [apath stroke];

}
运行结果:

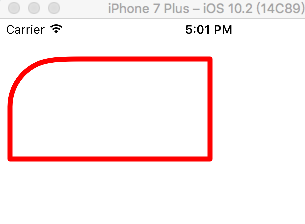
用下面这个方法画带指定远角的矩形
+ (instancetype)bezierPathWithRoundedRect:(CGRect)rect byRoundingCorners:(UIRectCorner)corners cornerRadii:(CGSize)cornerRadii;
上代码:
- (void)drawRect:(CGRect)rect {

    // Drawing code

    //设置线条颜色

    UIColor *color = [UIColor redColor];

    [color set];

    //创建UIBezierPath

    UIBezierPath *apath = [UIBezierPath bezierPathWithRoundedRect:CGRectMake(, , , )

                                                byRoundingCorners:UIRectCornerTopLeft

                                                      cornerRadii:CGSizeMake(, )];

    apath.lineWidth     = 5.0f;

    apath.lineCapStyle  = kCGLineCapRound;

    apath.lineJoinStyle = kCGLineCapRound;

    //更具坐标连线

    [apath stroke];

}
运行结果:
如果要设置多个圆角的话就给byRoundingCorners多设置几个角度, 角度可选如下
typedef NS_OPTIONS(NSUInteger, UIRectCorner) {

    UIRectCornerTopLeft     =  << ,

    UIRectCornerTopRight    =  << ,

    UIRectCornerBottomLeft  =  << ,

    UIRectCornerBottomRight =  << ,

    UIRectCornerAllCorners  = ~0UL

};
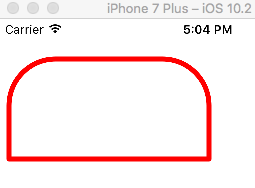
例如:
UIBezierPath *apath = [UIBezierPath bezierPathWithRoundedRect:CGRectMake(, , , )

                                                byRoundingCorners:UIRectCornerTopLeft | UIRectCornerTopRight

                                                      cornerRadii:CGSizeMake(, )];
就有两个圆角
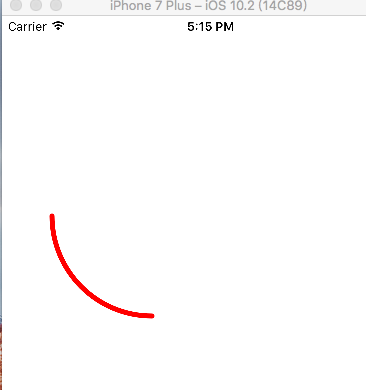
也可以用下面这个方法画圆弧
+ (instancetype)bezierPathWithArcCenter:(CGPoint)center //圆心坐标
radius:(CGFloat)radius //半径
startAngle:(CGFloat)startAngle //弧形开始的角度
endAngle:(CGFloat)endAngle //弧形结束的角度
clockwise:(BOOL)clockwise; //正向还是反向画弧
上代码:
- (void)drawRect:(CGRect)rect {

    // Drawing code

    //设置线条颜色

    UIColor *color = [UIColor redColor];

    [color set];

    //创建UIBezierPath

    UIBezierPath *apath = [UIBezierPath bezierPathWithArcCenter:CGPointMake(, )

                                                         radius: startAngle:M_PI /

                                                       endAngle:M_PI

                                                      clockwise:YES];

    apath.lineWidth     = 5.0f;

    apath.lineCapStyle  = kCGLineCapRound;

    apath.lineJoinStyle = kCGLineCapRound;

    //更具坐标连线

    [apath stroke];

}
运行结果如下
还可以直接在path中添加圆形段
[path addArcWithCenter:CGPointMake(, )

                        radius: startAngle:M_PI /

                      endAngle:M_PI clockwise:YES];
最后附上UIBezierPath画圆弧时段坐标系

另外UIBezierPath可以画贝赛尔曲线
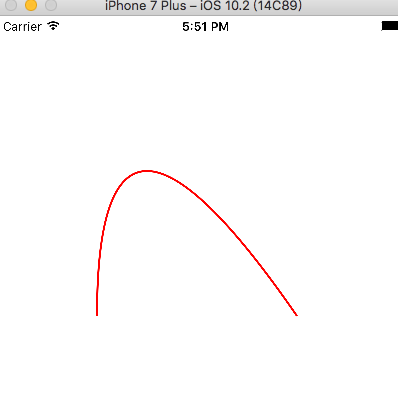
下面是添加二次贝赛尔曲线的方法
- (void)addQuadCurveToPoint:(CGPoint)endPoint controlPoint:(CGPoint)controlPoint;
上代码:
- (void)drawRect:(CGRect)rect {

    // Drawing code

    //设置线条颜色

    UIColor *color = [UIColor redColor];

    [color set];

    //创建UIBezierPath

    UIBezierPath *apath = ({

        UIBezierPath *path = [UIBezierPath bezierPath];

        path.lineWidth     = 2.0f;              //设置线条宽度

        //path.lineCapStyle = kCGLineCapRound;   //设置拐角

        //绘制二次贝赛尔曲线

        //设置起始点

        [path moveToPoint:CGPointMake(, )];

        //设置EndPoint & Control Point

        [path addQuadCurveToPoint:CGPointMake(, ) controlPoint:CGPointMake(, )];

        path;

    });

    //更具坐标连线

    [apath stroke];

}
运行结果为:
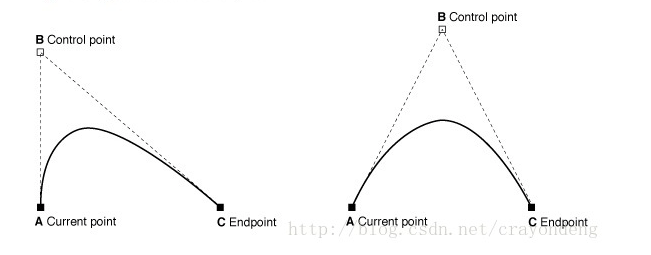
可以参照下面这张图看看每个点的定义
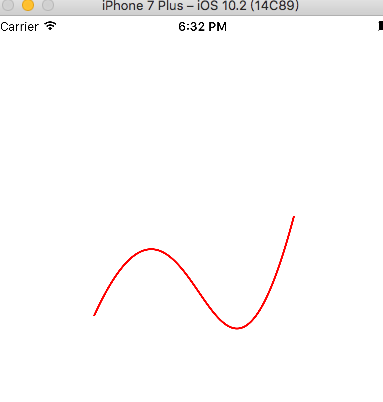
三次贝赛尔曲线会有2个控制点
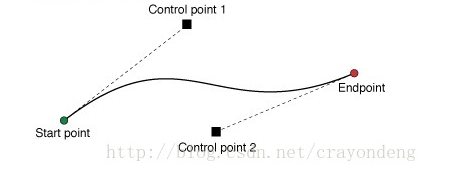
上代码:
- (void)drawRect:(CGRect)rect {

    // Drawing code

    //设置线条颜色

    UIColor *color = [UIColor redColor];

    [color set];

    //创建UIBezierPath

    UIBezierPath *apath = ({

        UIBezierPath *path = [UIBezierPath bezierPath];

        path.lineWidth     = 2.0f;              //设置线条宽度

        //绘制三次贝赛尔曲线

        //设置起始点

        [path moveToPoint:CGPointMake(, )];

        //设置EndPoint & Control Point

        [path addCurveToPoint:CGPointMake(, )

                controlPoint1:CGPointMake(, )

                controlPoint2:CGPointMake(, )];

        path;

    });

    //更具坐标连线

    [apath stroke];

}
运行结果:
使用UIBezierPath绘制图形的更多相关文章
- 11-UIKit(Storyboard、View的基本概念、绘制图形、UIBezierPath)
目录: 1. Storyboard 2. Views 3. View的基本概念介绍 4. 绘制图形 5. UIBezierPath 回到顶部 1. Storyboard 1.1 静态表视图 1)Sec ...
- CSS 魔法系列:纯 CSS 绘制图形(心形、六边形等)
<CSS 魔法系列>继续给大家带来 CSS 在网页中以及图形绘制中的使用.这篇文章给大家带来的是纯 CSS 绘制五角星.六角形.五边形.六边形.心形等等. 我们的网页因为 CSS 而呈现千 ...
- html5 Canvas绘制图形入门详解
html5,这个应该就不需要多作介绍了,只要是开发人员应该都不会陌生.html5是「新兴」的网页技术标准,目前,除IE8及其以下版本的IE浏览器之外,几乎所有主流浏览器(FireFox.Chrome. ...
- html5 canvas 笔记一(基本用法与绘制图形)
<canvas> 元素 <canvas id="tutorial" width="150" height="150"> ...
- WPF2D绘制图形方法
我们先看看效果如何: xaml文件: <Window x:Class="WPF2D绘制图形方法.MainWindow" xmlns="http://schemas. ...
- HTML5—canvas绘制图形(1)
1.canvas基础知识 canvas元素是HTML5中新增的一个重要的元素,专门用来绘制图形,不过canvas本身不具备画图的能力,在页面中放置了canvas元素,就相当于在页面中放置了一块矩形的“ ...
- 【canvas学习笔记二】绘制图形
上一篇我们已经讲述了canvas的基本用法,学会了构建canvas环境.现在我们就来学习绘制一些基本图形. 坐标 canvas的坐标原点在左上角,从左到右X轴坐标增加,从上到下Y轴坐标增加.坐标的一个 ...
- HTML5使用Canvas来绘制图形
一.Canvas标签: 1.HTML5<canvas>元素用于图形的绘制,通过脚本(通常是javascript)来完成. 2.<canvas>标签只是图形容器,必须使用脚本来绘 ...
- canvas 绘制图形
canvas 绘制图形: 注意: canvas 的宽高设置在行内,否则会使画布(canvas)产生扭曲,绘图变形: <!DOCTYPE html> <html lang=" ...
随机推荐
- setTimeout 的黑魔法
setTimeout,前端工程师必定会打交道的一个函数.它看上去非常的简单,朴实.有着一个很不平凡的名字--定时器.让年少的我天真的以为自己可以操纵未来.却不知朴实之中隐含着惊天大密.我还记得我第一次 ...
- 透过WinDBG的视角看String
摘要 : 最近在博客园里面看到有人在讨论 C# String的一些特性. 大部分情况下是从CODING的角度来讨论String. 本人觉得非常好奇, 在运行时态, String是如何与这些特性联系上的 ...
- SASS教程sass超详细教程
SASS安装及使用(sass教程.详细教程) 采用SASS开发CSS,可以提高开发效率. SASS建立在Ruby的基础之上,所以得先安装Ruby. Ruby的安装: 安装 rubyinstaller- ...
- Android 获取系统相册中的所有图片
Android 提供了API可获取到系统相册中的一些信息,主要还是通过ContentProvider 来获取想要的内容. 代码很简单,只要熟悉ContentProvider 就可以了. public ...
- 一篇文章看懂TPCx-BB(大数据基准测试工具)源码
TPCx-BB是大数据基准测试工具,它通过模拟零售商的30个应用场景,执行30个查询来衡量基于Hadoop的大数据系统的包括硬件和软件的性能.其中一些场景还用到了机器学习算法(聚类.线性回归等).为了 ...
- Xamarin+Prism开发详解一:PCL跨平台类库与Profile的关系
在[Xamarin+Prism小试牛刀:定制跨平台Outlook邮箱应用]中提到过以下错误,不知道大伙还记得不: 无法安装程序包"Microsoft.Identity.Client 1.0. ...
- 简约之美Jodd-http--深入源码理解http协议
Jodd 是一个开源的 Java 工具集, 包含一些实用的工具类和小型框架.简单,却很强大! jodd-http是一个轻巧的HTTP客户端.现在我们以一个简单的示例从源码层看看是如何实现的? Http ...
- 使用 Android Studio 检测内存泄漏与解决内存泄漏问题
本文在腾讯技术推文上 修改 发布. http://wetest.qq.com/lab/view/63.html?from=ads_test2_qqtips&sessionUserType=BF ...
- Asp.net Core 初探(发布和部署Linux)
前言 俗话说三天不学习,赶不上刘少奇.Asp.net Core更新这么长时间一直观望,周末帝都小雨,宅在家看了下Core Web App,顺便搭建了个HelloWorld环境来尝尝鲜,第一次看到.Ne ...
- PHP之Memcache缓存详解
Mem:memory缩写(内存):内存缓存 1. 断电或者重启服务器内存数据即消失,即临时数据: Memcache默认端口:11211 存入方式:key=>>value ...