Hibernate框架简介(二)基本使用增、删、改、查
一、Hibernate框架简介
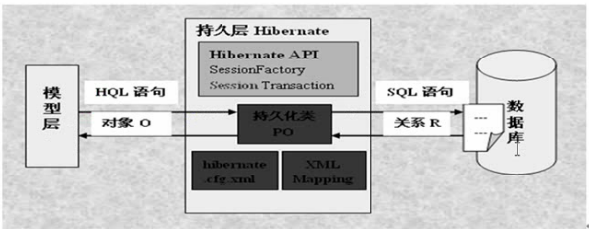
Hibernate是一个优秀的Java持久化层解决方案,是当今主流的对象-关系映射(ORM,ObjectRelationalMapping)工具
1.1、理解持久化
- 瞬时状态:在程序运行的时候,有些程序数据是保存在内存中,当程序退出后,这些数据就不复存在了,所以称这些数据的状态为瞬时状态
- 持久状态:在使用一此软件的时候,有些数据,在程序退出后,还以文件等形式保存在硬盘或者数据库中,称这些数据的状态是持久状态
- 持久化:持久化就是将程序中的数据在瞬时状态和持久状态之间转换的机制。(如:JDBC)
1.2、对象-关系映射(ORM)
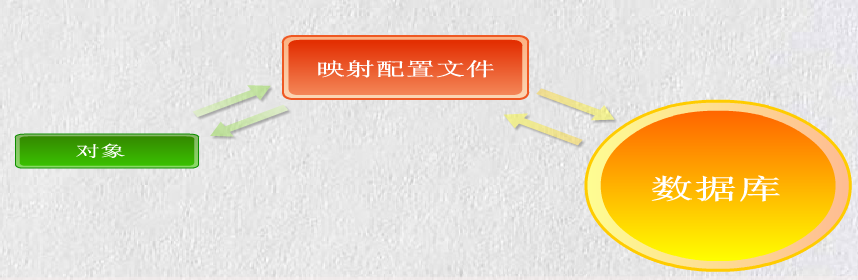
Java是一种面象对象的设计语言。在程序运行时的数据是以对象形式存在内存中,而保存数据时,又要以对象的形式存在关系型数据库中。
ORM简单讲:就是能在对象和关系型数据库两者之间进行数据转换的机制。Hibernate就是这样一个中间的解决方案。关系如下图
1.3、ORM框架综述
ORM:对象关系映射(Object Relation Mapping)
Hibernate框架:能够实现ORM框架
Hibernate是一个优秀的Java持久化层解决方案,是当今主流的对象-关系映射(ORM,ObjectRelationalMap
Hibernate框架对JDBC时行和封装,简化了数据访问层。可应用在任何使用JDBC的场合如:Servlet、JSP的WEB应用,JAVA客户端等。
二、Hibernate下载
官网:http://sourceforge.net/projects/hibernate/files/hibernate3/
这里下载的是3.3.2GA,
解压后,将根目录下的hibernate3.jar和将lib目录下全部的jar导入项目中
同时将数据库驱动也导入这里使用Oracle 11g
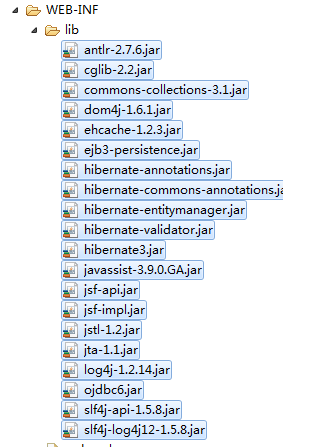 其中加入了一些其它的jar包如:JSTL包
当然也可以用MyEclipse完全集成,不用下载
三、Hibernate配置
3.1、创建hibernate.cfg.xml文件.
这是配置文件默认名.一般放在src目录下:作用指定数据库连接的信息及映射文件路径
获取配置文件进行修改。当然如果记得了就全写也可以。在下载的Hibernate解压目录下就有配置文件模板
hibernate-distribution-3.3.2.GA-dist\hibernate-distribution-3.3.2.GA\project\tutorials\web\src\main\resources此目录下就有,将其复制到src目录下进行修改
<?xml version='1.0' encoding='utf-8'?>

<!DOCTYPE hibernate-configuration PUBLIC

        "-//Hibernate/Hibernate Configuration DTD 3.0//EN"

        "http://hibernate.sourceforge.net/hibernate-configuration-3.0.dtd">

<hibernate-configuration>

    <session-factory>

        <!-- Database connection settings -->

        <!-- 数据库驱动 不同的数据库不一样-->

        <property name="connection.driver_class">oracle.jdbc.driver.OracleDriver</property>

        <!-- 数据库访问url 不同的数据库不一样-->

        <property name="connection.url">jdbc:oracle:thin:@localhost:1521:orcl</property>

        <!-- 数据库连接用户名 -->

        <property name="connection.username">sa</property>

        <!--数据库连接用户名的密码  -->

        <property name="connection.password"></property>

        <!-- JDBC connection pool (use the built-in) -->

        <!--数据库连接池默认连接数量  -->

        <property name="connection.pool_size">2</property>

        <!-- SQL dialect -->

        <!--方言,不同的数据不同的版都有所不同  -->

        <property name="dialect">org.hibernate.dialect.HSQLDialect</property>

        <!-- Enable Hibernate's current session context -->

        <!-- Session设置 -->

        <property name="current_session_context_class">org.hibernate.context.ManagedSessionContext</property>

        <!-- Disable the second-level cache  -->

        <!--二级缓存  -->

        <property name="cache.provider_class">org.hibernate.cache.NoCacheProvider</property>

        <!-- Echo all executed SQL to stdout -->

        <!-- 在执行数据操作时,是不是在控制台显示SQL语句,true为显示 -->

        <property name="show_sql">true</property>

        <!-- Drop and re-create the database schema on startup -->

        <!--根据数据库表得到类,根据类到表  -->

        <property name="hbm2ddl.auto">create</property>

        <!--对类的配置文件映射  -->

        <mapping resource="org/hibernate/tutorial/domain/Event.hbm.xml"/>

        <mapping resource="org/hibernate/tutorial/domain/Person.hbm.xml"/>

    </session-factory>

</hibernate-configuration>
这里暂时只做数据库的连接配置Oracle的
<?xml version='1.0' encoding='utf-8'?>

<!DOCTYPE hibernate-configuration PUBLIC

        "-//Hibernate/Hibernate Configuration DTD 3.0//EN"

        "http://hibernate.sourceforge.net/hibernate-configuration-3.0.dtd">

<hibernate-configuration>

    <session-factory>

        <!-- Database connection settings -->

        <!-- 数据库驱动 不同的数据库不一样-->

        <property name="connection.driver_class">oracle.jdbc.driver.OracleDriver</property>

        <!-- 数据库访问url 不同的数据库不一样-->

        <property name="connection.url">jdbc:oracle:thin:@localhost:1521:orcl</property>

        <!-- 数据库连接用户名 -->

        <property name="connection.username">accp</property>

        <!--数据库连接用户名的密码  -->

        <property name="connection.password">accp</property>

    </session-factory>

</hibernate-configuration>
3.2、创建持久化类和映射文件
也就是创建实体类的配置文件如:Login.hbm.xml(Login为类名),并在hibernate.cfg.xml文件下方</session-factory>前面中添加映射文件路径
1、在数据库中创建一张表
create table login

(

       username   varchar2(20)  primary key,

       password   varchar2(20)

);
2、创建Login实体类
package com.pb.entity;

/*

 * 登录实体类

 */

public class Login {

        private String username;

        private String password;

        public String getUsername() {

            return username;

        }

        public void setUsername(String username) {

            this.username = username;

        }

        public String getPassword() {

            return password;

        }

        public void setPassword(String password) {

            this.password = password;

        }

}
3、在实体类的同一个包下创建实体类的配置文件
<?xml version='1.0' encoding='utf-8'?>

 <!-- 这里与hibernate.cfg.xml配置文件不一样注意 -->

<!DOCTYPE hibernate-mapping PUBLIC

        "-//Hibernate/Hibernate Configuration DTD 3.0//EN"

        "http://hibernate.sourceforge.net/hibernate-mapping-3.0.dtd"> <!-- 这里与hibernate.cfg.xml配置文件不一样注意 -->

<hibernate-mapping>

 <!--类名和数据库中的表名相对应 哪个用户 -->

    <class name="com.pb.entity.Login" table="LOGIN" schema="accp">

      <!-- id代表主键  column列表 type代表数据类型-->

        <!-- 类中的属性 -->

        <id name="username" type="java.lang.String">

         <!-- 表中哪一个字段或者是列名 -->

            <column name="USERNAME" length="20" />

            <!--生成的方式  assigned代表由外部外部程序负责生成,在 save() 之前必须指定一个-->

        <!--  native由hibernate根据使用的数据库自行判断采用identity、hilo、sequence其中一种作为主键生成方式,灵活性很强。如果能支持identity则使用identity,如果支持sequence则使用sequence。-->

            <generator class="assigned" />

        </id>

        <!-- 密码段设置 -->

        <!--类中的名字和数据类型  -->

        <property name="password" type="java.lang.String">

        <!-- 表中的字段名,长度可心不要,是不为空true为不能为空,false是可以为空 -->

            <column name="PASSWORD" length="20" not-null="true"/>

        </property>

        <!--如果还有其它的属性,设置方式与password一样设置  -->

    </class>

</hibernate-mapping>
在src下的配置文件中添加映射
<?xml version='1.0' encoding='utf-8'?>

<!DOCTYPE hibernate-configuration PUBLIC

        "-//Hibernate/Hibernate Configuration DTD 3.0//EN"

        "http://hibernate.sourceforge.net/hibernate-configuration-3.0.dtd">

<hibernate-configuration>

    <session-factory>

        <!-- Database connection settings -->

        <!-- 数据库驱动 不同的数据库不一样-->

        <property name="connection.driver_class">oracle.jdbc.driver.OracleDriver</property>

        <!-- 数据库访问url 不同的数据库不一样-->

        <property name="connection.url">jdbc:oracle:thin:@localhost:1521:orcl</property>

        <!-- 数据库连接用户名 -->

        <property name="connection.username">accp</property>

        <!--数据库连接用户名的密码  -->

        <property name="connection.password">accp</property>

        <!--为实体类配置文件添加映射  -->

        <mapping resource="com/pb/entity/Login.hbm.xml"/>

    </session-factory>

</hibernate-configuration>
3.3、创建Hibernate连接工具类
Hibernater主要接口和类:
Configuration
SessionFactory:DriverManager
Session:Connection
Transaction
Query:Statement和PreparedStatement
在下载的包中有提供好的一个比较简单的工具类
package com.pb.until;

import org.hibernate.SessionFactory;

import org.hibernate.cfg.Configuration;

public class HibernateUtil {

    private static final SessionFactory sessionFactory;

    static {

        try {

            // Create the SessionFactory from hibernate.cfg.xml

            sessionFactory = new Configuration().configure().buildSessionFactory();

        } catch (Throwable ex) {

            // Make sure you log the exception, as it might be swallowed

            System.err.println("Initial SessionFactory creation failed." + ex);

            throw new ExceptionInInitializerError(ex);

        }

    }

    public static SessionFactory getSessionFactory() {

        return sessionFactory;

    }

}
这个比较,也可以增加一功能
相比较MyEclipse提供的一个比较完美
package com.pb.until;

import org.hibernate.HibernateException;

import org.hibernate.Session;

import org.hibernate.cfg.Configuration;

/**

 * Configures and provides access to Hibernate sessions, tied to the

 * current thread of execution.  Follows the Thread Local Session

 * pattern, see {@link http://hibernate.org/42.html }.

 */

public class HibernateSessionFactory {

    /**

     * Location of hibernate.cfg.xml file.

     * Location should be on the classpath as Hibernate uses

     * #resourceAsStream style lookup for its configuration file.

     * The default classpath location of the hibernate config file is

     * in the default package. Use #setConfigFile() to update

     * the location of the configuration file for the current session.

     */

    private static String CONFIG_FILE_LOCATION = "/hibernate.cfg.xml";

    private static final ThreadLocal<Session> threadLocal = new ThreadLocal<Session>();

    private  static Configuration configuration = new Configuration();

    private static org.hibernate.SessionFactory sessionFactory;

    private static String configFile = CONFIG_FILE_LOCATION;

    static {

        try {

            configuration.configure(configFile);

            sessionFactory = configuration.buildSessionFactory();

        } catch (Exception e) {

            System.err

                    .println("%%%% Error Creating SessionFactory %%%%");

            e.printStackTrace();

        }

    }

    private HibernateSessionFactory() {

    }

    /**

     * Returns the ThreadLocal Session instance.  Lazy initialize

     * the <code>SessionFactory</code> if needed.

     *

     *  @return Session

     *  @throws HibernateException

     */

    public static Session getSession() throws HibernateException {

        Session session = (Session) threadLocal.get();

        if (session == null || !session.isOpen()) {

            if (sessionFactory == null) {

                rebuildSessionFactory();

            }

            session = (sessionFactory != null) ? sessionFactory.openSession()

                    : null;

            threadLocal.set(session);

        }

        return session;

    }

    /**

     *  Rebuild hibernate session factory

     *

     */

    public static void rebuildSessionFactory() {

        try {

            configuration.configure(configFile);

            sessionFactory = configuration.buildSessionFactory();

        } catch (Exception e) {

            System.err

                    .println("%%%% Error Creating SessionFactory %%%%");

            e.printStackTrace();

        }

    }

    /**

     *  Close the single hibernate session instance.

     *

     *  @throws HibernateException

     */

    public static void closeSession() throws HibernateException {

        Session session = (Session) threadLocal.get();

        threadLocal.set(null);

        if (session != null) {

            session.close();

        }

    }

    /**

     *  return session factory

     *

     */

    public static org.hibernate.SessionFactory getSessionFactory() {

        return sessionFactory;

    }

    /**

     *  return session factory

     *

     *    session factory will be rebuilded in the next call

     */

    public static void setConfigFile(String configFile) {

        HibernateSessionFactory.configFile = configFile;

        sessionFactory = null;

    }

    /**

     *  return hibernate configuration

     *

     */

    public static Configuration getConfiguration() {

        return configuration;

    }

}
根据需要选择
四、Hibernate的持久化操作的步骤
4.1、读取并散板配置文件
Configuration config=new Configuration().configure();
4.2、读取并解析映射信息,创建SessionFactory
SessionFactory factory=config.buildSessionFactory();
4.3、打开session
Session session=factory.openSessin();
4.4、开始一个事务(增、删、改操作必须,查询操作可选)
Transaction tran=session.beginTransaction();
4.5、操作化操作
session.save(对象);

session.update(对象);

session.delete(对象);

session.get(主键之类的);
4.6、提交事务
tran.commit();
4.7、关闭session
session.close();
五、Hibernate使用
实现增、删、改、查的类
package com.pb.LoginDao;

import java.util.List;

import org.hibernate.HibernateException;

import org.hibernate.Query;

import org.hibernate.Session;

import org.hibernate.Transaction;

import com.pb.entity.Login;

import com.pb.until.HibernateSessionFactory;

import com.pb.until.HibernateUtil;

public class LoginDao {

    /*

     * 增加

     */

    public void save(Login login) {

        // 得到Session

        Session session = HibernateUtil.getSessionFactory().openSession();

        Transaction tran = null;

        // 也可以

        // Session session=new

        // Configuration().configure().buildSessionFactory().openSession();

        try {

            // 打开事务

            tran = session.beginTransaction();

            // 执行数据添加

            session.save(login);

            // 提交事务

            tran.commit();

            System.out.println("用户信息添加成功");

        } catch (HibernateException e) {

            // 事务回滚

            tran.rollback();

            e.printStackTrace();

            System.out.println("用户信息添加失败");

        } finally {

            // 关闭session

            session.close();

        }

    }

    /*

     * 修改根据用户名

     */

    public void update(Login login) {

        // 得到Session

        Session session = HibernateUtil.getSessionFactory().openSession();

        Transaction tran = null;

        // 也可以

        // Session session=new

        // Configuration().configure().buildSessionFactory().openSession();

        try {

            // 打开事务

            tran = session.beginTransaction();

            // 执行数据添加

            session.update(login);

            // 提交事务

            tran.commit();

            System.out.println("用户信息修改成功");

        } catch (HibernateException e) {

            // 事务回滚

            tran.rollback();

            e.printStackTrace();

            System.out.println("用户信息修改失败");

        } finally {

            // 关闭session

            session.close();

        }

    }

    /*

     * 修改根据用户名修改密码

     */

    public void delte(Login login) {

        // 得到Session

        Session session = HibernateUtil.getSessionFactory().openSession();

        Transaction tran = null;

        // 也可以

        // Session session=new

        // Configuration().configure().buildSessionFactory().openSession();

        try {

            // 打开事务

            tran = session.beginTransaction();

            // 执行数据添加

            session.delete(login);

            // 提交事务

            tran.commit();

            System.out.println("用户信息删除成功");

        } catch (HibernateException e) {

            // 事务回滚

            tran.rollback();

            e.printStackTrace();

            System.out.println("用户信息删除失败");

        } finally {

            // 关闭session

            session.close();

        }

    }

    /*

     * 查询一查询全部用户

     */

    public List<Login> QueryALL() {

        // 使用myeclipse提供的工具类来得到session

        Session session = HibernateSessionFactory.getSession();

        // 建立查询

        Query query = session.createQuery("from Login");

        // 查询重到List集合

        List<Login> list = query.list();

        // 关闭session

        session.close();

        // 返回结果集合

        return list;

    }

    /*

     * 查询二 查询指定的用户名的

     */

    public Login QueryByName(String username) {

        // 使用myeclipse提供的工具类来得到session

        Session session = HibernateSessionFactory.getSession();

        // 建立查询

        Query query = session.createQuery("from Login l where l.username=?");

        // 占位

        query.setString(0, username);

        // 查询返回唯一

        Login login = (Login) query.uniqueResult();

        // 关闭session

        session.close();

        // 返回结果集合

        return login;

    }

    /*

     * 查询三,模糊查询

     */

    public List<Login> QueryLikeName(String username) {

        // 使用myeclipse提供的工具类来得到session

        Session session = HibernateSessionFactory.getSession();

        // 建立查询

        Query query = session

                .createQuery("from Login l where l.username like ?");

        // 占位

        query.setString(0, "%" + username + "%");

        // 查询重到List集合

        List<Login> list = query.list();

        // 关闭session

        session.close();

        // 返回结果集合

        return list;

    }

}
测试类:
package com.pb.test;

import java.util.List;

import com.pb.LoginDao.LoginDao;

import com.pb.entity.Login;

public class Test {

    public static void main(String[] args) {

        //声明LoginDao对象

        LoginDao loginDao=new LoginDao();

//声明对象并赋初始值

        Login login=new Login();

        login.setUsername("Jack");

        login.setPassword("blue");

        //执行添加

        loginDao.save(login);

        //执行修改

        login.setUsername("Jack");

        login.setPassword("while");

        loginDao.update(login);

        //执行删除

        loginDao.delte(login);

        System.out.println("=========查询全部========");

        //查询全部

        List<Login> list=loginDao.QueryALL();

        for (Login log : list) {

            System.out.println("用户名:"+log.getUsername()+"    密码:"+log.getPassword());

        }

        System.out.println("=========精确查询========");

        //查询一个用户

        Login lg=loginDao.QueryByName("ffff");

        if(lg!=null){

            System.out.println("用户名:"+lg.getUsername()+"   密码:"+lg.getPassword());

        }else{

            System.out.println("没有此用户");

        }

        System.out.println("=========模糊查询========");

        //模糊查询

        List<Login> likelist=loginDao.QueryLikeName("t");

        for (Login lo : likelist) {

            System.out.println("用户名:"+ lo.getUsername()+"    密码:"+ lo.getPassword());

        }

    }

}
Hibernate框架简介(二)基本使用增、删、改、查的更多相关文章
- 好用的SQL TVP~~独家赠送[增-删-改-查]的例子
以前总是追求新东西,发现基础才是最重要的,今年主要的目标是精通SQL查询和SQL性能优化. 本系列主要是针对T-SQL的总结. [T-SQL基础]01.单表查询-几道sql查询题 [T-SQL基础] ...
- iOS FMDB的使用(增,删,改,查,sqlite存取图片)
iOS FMDB的使用(增,删,改,查,sqlite存取图片) 在上一篇博客我对sqlite的基本使用进行了详细介绍... 但是在实际开发中原生使用的频率是很少的... 这篇博客我将会较全面的介绍FM ...
- iOS sqlite3 的基本使用(增 删 改 查)
iOS sqlite3 的基本使用(增 删 改 查) 这篇博客不会讲述太多sql语言,目的重在实现sqlite3的一些基本操作. 例:增 删 改 查 如果想了解更多的sql语言可以利用强大的互联网. ...
- django ajax增 删 改 查
具于django ajax实现增 删 改 查功能 代码示例: 代码: urls.py from django.conf.urls import url from django.contrib impo ...
- MVC EF 增 删 改 查
using System;using System.Collections.Generic;using System.Linq;using System.Web;//using System.Data ...
- ADO.NET 增 删 改 查
ADO.NET:(数据访问技术)就是将C#和MSSQL连接起来的一个纽带 可以通过ADO.NET将内存中的临时数据写入到数据库中 也可以将数据库中的数据提取到内存中供程序调用 ADO.NET所有数据访 ...
- python基础中的四大天王-增-删-改-查
列表-list-[] 输入内存储存容器 发生改变通常直接变化,让我们看看下面列子 增---默认在最后添加 #append()--括号中可以是数字,可以是字符串,可以是元祖,可以是集合,可以是字典 #l ...
- Go语言之进阶篇mysql增 删 改 查
一.mysql操作基本语法 1.创建名称nulige的数据库 CREATE DATABASE nulige DEFAULT CHARSET utf8 COLLATE utf8_general_ci; ...
- oracle 11g 建库 建表 增 删 改 查 约束
一.建库 1.(点击左上角带绿色+号的按钮) 2.(进入这个界面,passowrd为密码.填写完后点击下面一排的Test按钮进行测试,无异常就点击Connect) 二.建表 1-1. create t ...
随机推荐
- MVC基类控制器的会话丢失重新登录权限过滤
SSOController.cs请查看以下代码: public class SSOController : Controller { public const string Token = " ...
- git push时提示"Everything up-to-date"
从github上git clone下的项目,添加或修改文件后,git push时出现"Everything up-to-date" , 即“一切都是最新的'. 通过 git s ...
- oracle 存储过程循环体中的return和exit区别:
oracle 存储过程循环体中的return和exit区别: (1) return 跳出整个循环,终止该循环, 后面的不再执行. 相当于 Java 中的break; (2) exit ...
- HDOJ 4876 ZCC loves cards
枚举组合,在不考虑连续的情况下推断能否够覆盖L...R,对随机数据是一个非常大的减枝. 通过检測的暴力计算一遍 ZCC loves cards Time Limit: 4000/2000 MS (Ja ...
- Detecting Underlying Linux Distro
If you are the owner of the system, then you know which Linux is installed and running. This article ...
- lucene.net 3.0.3、结合盘古分词进行搜索的小例子(分页功能)
转自:http://blog.csdn.net/pukuimin1226/article/details/17558247 添加:2013-12-25 更新:2013-12-26 新增分页功能. 更新 ...
- delphi win64 DEBUG不能进预设断点的问题
delphi win64 DEBUG不能进预设断点的问题 delphi win64,debug模式下运行,如果含有中文路径,不能进断点,音频跟踪.而同样的代码,DELPHI WIN32却没有这个问题 ...
- Nginx 作为反向Proxy 的优化要点
原文地址:http://my.oschina.net/hyperichq/blog/405421 常用优化要点 当nginx用于反向代理时,每个客户端将使用两个连接: 一个用于响应客户端的请求,另一个 ...
- @selector 如何调用在另一个类中的静态函数?
可以在同一个类的methodName这个函数中再调用另一个类中的静态方法
- 算法:快速排序(Quick Sort)
算法定义 目前学习是五种排序(冒泡.插入.选择.合并.快速)中,快速排序是最让我喜欢的算法(因为我想不到),其定义如下: 随机的从数组中选择一个元素,如:item. 对数组进行分区,将小于等于 ite ...