python 神经网络包 NeuroLab
neurolab模块相当于Matlab的神经网络工具箱(NNT)
neurolab模块支持的网络类型:
- 单层感知机(single layer perceptron)
- 多层前馈感知机(Multilayer feed forward perceptron)
- 竞争层(Kohonen Layer)
- 学习向量量化(Learning Vector Quantization)
- Elman循环网络(Elman recurrent network)
- Hopfield循环网络(Hopfield recurrent network)
- 卷边循环网络(Hemming recurrent network)
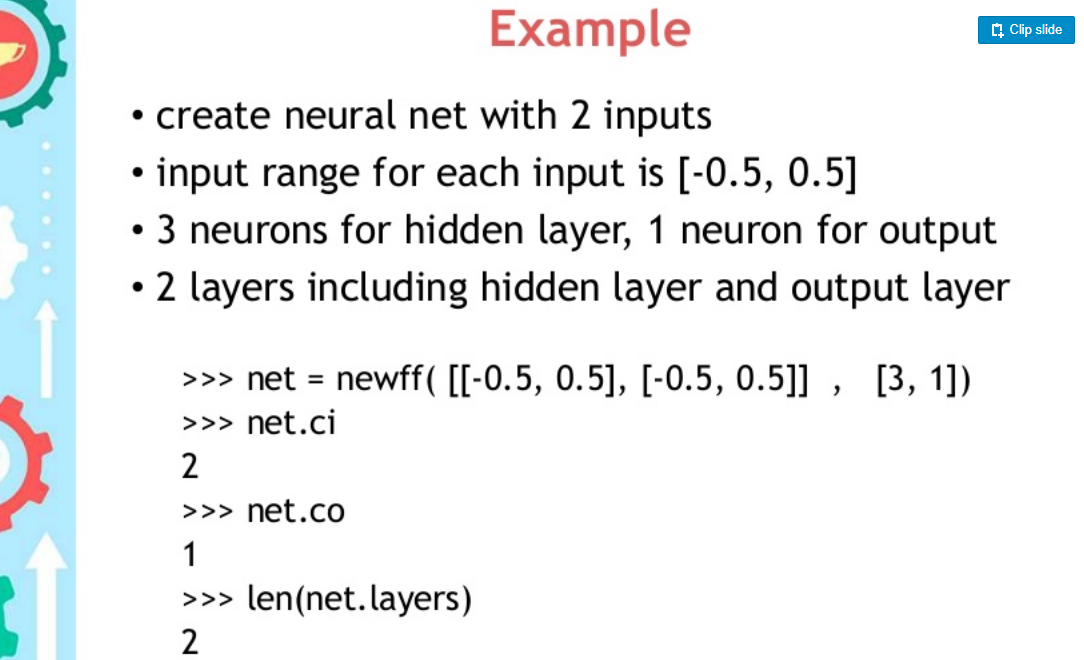
这里以多层前馈网络为例:neurolab.net.newff(minmax, size, transf=None)
| Parameters: |
|
|---|
minmax:列表的列表,外层列表表示输入层的神经元个数,内层列表必须包含两个元素:max和min
size:列表的长度等于出去输入层的网络的层数,列表的元素对应于各层的神经元个数
transf:激活函数,默认为TanSig。
举例2:
perceptron = nl.net.newp([[0, 2],[0, 2]], 1)

第一个参数列表的长度表示输出的节点的个数,列表中得每一个元素包含两个值:最大值和最小值。

第二个参数:The value “1” indicates that there is a single neuron in this network.

error = perceptron.train(input_data, output, epochs=50, show=15, lr=0.01)

epochs:表示迭代训练的次数,show:表示终端输出的频率,lr:表示学习率
举例3:
import numpy as np

import neurolab as nl

input = np.random.uniform(0, 0.1, (1000, 225))

output = input[:,:10] + input[:,10:20]

# 2 layers with 225 inputs 50 neurons in hidden\input layer and 10 in output

# for 3 layers use some thet: nl.net.newff([[0, .1]]*225, [50, 40, 10])

net = nl.net.newff([[0, .1]]*225, [50, 10])

net.trainf = nl.train.train_bfgs

e = net.train(input, output, show=1, epochs=100, goal=0.0001)
举例4:
import neurolab as nl
import numpy as np
# Create train samples
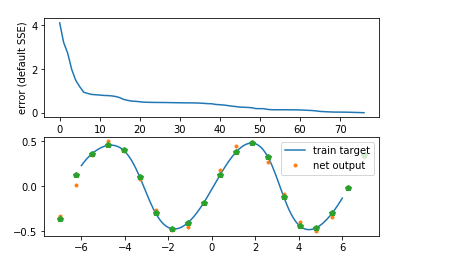
x = np.linspace(-7, 7, 20)
y = np.sin(x) * 0.5 size = len(x) inp = x.reshape(size,1)
tar = y.reshape(size,1) # Create network with 2 layers and random initialized
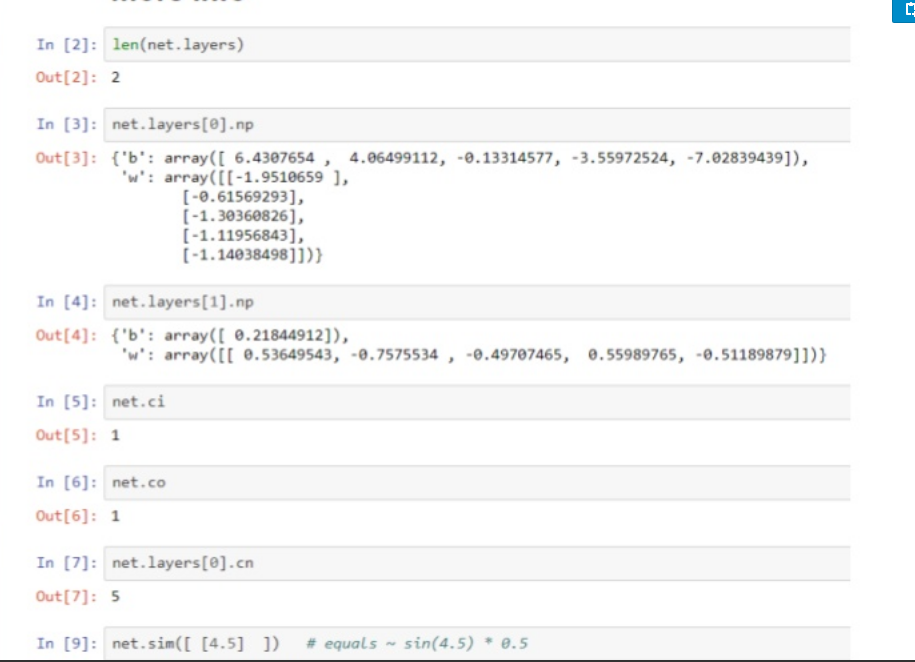
net = nl.net.newff([[-7, 7]],[5, 1]) # Train network
error = net.train(inp, tar, epochs=500, show=100, goal=0.02) # Simulate network
out = net.sim(inp) # Plot result
import pylab as pl
pl.subplot(211)
pl.plot(error)
pl.xlabel('Epoch number')
pl.ylabel('error (default SSE)') x2 = np.linspace(-6.0,6.0,150)
y2 = net.sim(x2.reshape(x2.size,1)).reshape(x2.size)
print(len(y2))
y3 = out.reshape(size)
pl.subplot(212)
pl.plot(x2, y2, '-',x , y, '.', x, y3, 'p')
pl.legend(['train target', 'net output'])
pl.show()
资料还有很多,以后继续补充
重点参考:官网
资料
python 神经网络包 NeuroLab的更多相关文章
- 搭建基于python +opencv+Beautifulsoup+Neurolab机器学习平台
搭建基于python +opencv+Beautifulsoup+Neurolab机器学习平台 By 子敬叔叔 最近在学习麦好的<机器学习实践指南案例应用解析第二版>,在安装学习环境的时候 ...
- 【转】pybrain的使用——一个开源的python神经网络工具包
原文地址 http://lavimo.blog.163.com/blog/static/2149411532013911115316263/ 昨天的主要活动内容是找一个神经网络的包....= =这 ...
- LFD,非官方的Windows二进制文件的Python扩展包
LFD,非官方的Windows二进制文件的Python扩展包 LFD,非官方版本.32和64位.Windows.二进制文件.科学开源.Python扩展包 克里斯托夫·戈尔克(by Christoph ...
- python库包大全(转)
python 库资源大全 转自: Python 资源大全中文版 环境管理 管理 Python 版本和环境的工具 p:非常简单的交互式 python 版本管理工具.官网 pyenv:简单的 Python ...
- TensorFlow常用Python扩展包
TensorFlow常用Python扩展包 TensorFlow 能够实现大部分神经网络的功能.但是,这还是不够的.对于预处理任务.序列化甚至绘图任务,还需要更多的 Python 包. 下面列出了一些 ...
- 机器学习常用Python扩展包
在Ubuntu下安装Python模块通常有3种方法:1)使用apt-get:2)使用pip命令(推荐);3)easy_instal 可安装方法参考:[转]linux和windows下安装python集 ...
- Python的包管理工具Pip (zz )
Python的包管理工具Pip 接触了Ruby,发现它有个包管理工具RubyGem很好用,并且有很完备的文档系统http://rdoc.info 发现Python下也有同样的工具,包括easy_ins ...
- 简易安装python统计包
PythonCharm简易安装python统计包及 本文介绍使用pythonCharm IDE 来安装Python统计包或一些packages的简单过程,基本无任何技术难度,顺便提一提笔者在安装过程中 ...
- 安装python 的 包 paramiko
安装python 的 包 paramiko 安装 依赖 yum -y install gcc python-devel 获取安装 pycryptowget https://pypi.python.or ...
随机推荐
- Raft 一致性算法论文译文
本篇博客为著名的 RAFT 一致性算法论文的中文翻译,论文名为<In search of an Understandable Consensus Algorithm (Extended Vers ...
- Castle ActiveRecord学习(四)延迟加载、分页查询、where条件
一.延迟加载 //用户发布的主题,一对多:Table:外键表:ColumnKey:外键:Lazy:延迟加载:Cascade:级联操作(级联删除) [HasMany(typeof(ThemeInfo), ...
- stl学习记录(2)
#include <iostream> #include <utility> #include <tuple> #include <complex> # ...
- 分组取前N记录
分组取前N记录 经常看到问题,如何取出每组的前N条记录.方便大家参考于是便把常见的几种解法列出于下. 问题:有表 如下,要求取出各班前两名(允许并列第二)Table1+----+------+-- ...
- phalApi框架打印SQL语句
http://demo.phalapi.net/?service=User.getBaseInfo&user_id=1&__sql__=1
- Django介绍(2)
https://www.cnblogs.com/yuanchenqi/articles/5658455.html
- Docker 技巧:删除 Docker 容器和镜像
默认安装完 docker 后,每次执行 docker 都需要运行 sudo 命令,非常浪费时间影响效率.如果不跟 sudo,直接执行 docker images 命令会有如下问题: Get http: ...
- 数据库面试sql
问题一:.有三张表,学生表S,课程表C,学生课程表SC 01:写出建表语句 答: create table s(id integer primary key,name varchar(20)); cr ...
- generate
一:generate Verilog-2001添加了generate循环,允许产生module和primitive的多个实例化,同时也可以产生多个variable,net,task,function, ...
- (二)swagger-springmvc
如何入门 1. 我在 http://mvnrepository.com/ 上搜索 swagger-springmvc 2. 我找到一个具体版本 http://mvnrepository.com/art ...