
android Dialog官方demo
1.普通的Dialog
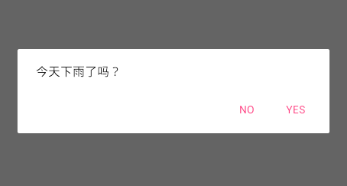
AlertDialog.Builder builder = new AlertDialog.Builder(this);

        builder.setMessage("今天下雨了吗?")

                .setPositiveButton("yes", new DialogInterface.OnClickListener() {

                    public void onClick(DialogInterface dialog, int id) {

                        Toast.makeText(Demo7Activity.this,"你点击了yes",Toast.LENGTH_SHORT).show();

                    }

                })

                .setNegativeButton("no", new DialogInterface.OnClickListener() {

                    public void onClick(DialogInterface dialog, int id) {

                        Toast.makeText(Demo7Activity.this,"你点击了no",Toast.LENGTH_SHORT).show();

                    }

                });

        builder.show();
2.单选Dialog
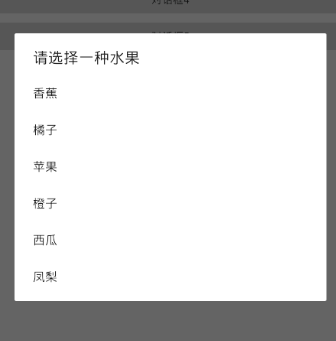
 final String []str = {"香蕉","橘子","苹果","橙子","西瓜","凤梨"};

        AlertDialog.Builder builder = new AlertDialog.Builder(this);

        builder.setTitle("请选择一种水果")

                .setItems(str, new DialogInterface.OnClickListener() {

                    public void onClick(DialogInterface dialog, int which) {

                        Toast.makeText(Demo7Activity.this,"你喜欢"+str[which]+"水果",Toast.LENGTH_SHORT).show();

                    }

                });

        builder.show();
3.多选Dialog
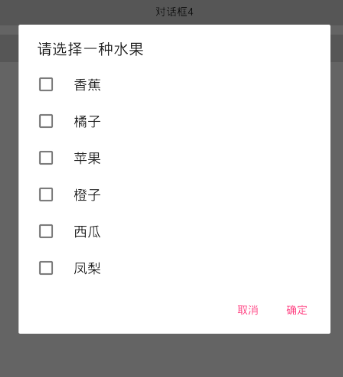
final String []str = {"香蕉","橘子","苹果","橙子","西瓜","凤梨"};

        final ArrayList<String>mSelectedItems = new ArrayList<String>();

        AlertDialog.Builder builder = new AlertDialog.Builder(this);

        // Set the dialog title

        builder.setTitle("请选择一种水果")

                // Specify the list array, the items to be selected by default (null for none),

                // and the listener through which to receive callbacks when items are selected

                .setMultiChoiceItems(str, null,

                        new DialogInterface.OnMultiChoiceClickListener() {

                            @Override

                            public void onClick(DialogInterface dialog, int which,

                                                boolean isChecked) {

                                if (isChecked) {

                                    // If the user checked the item, add it to the selected items

                                    mSelectedItems.add(str[which]);

                                } else if (mSelectedItems.contains(which)) {

                                    // Else, if the item is already in the array, remove it

                                    mSelectedItems.remove(str[which]);

                                }

                            }

                        })

                // Set the action buttons

                .setPositiveButton("确定", new DialogInterface.OnClickListener() {

                    @Override

                    public void onClick(DialogInterface dialog, int id) {

                        if(mSelectedItems.size() <= 0){

                            Toast.makeText(Demo7Activity.this,"你没有喜欢的水果",Toast.LENGTH_SHORT).show();

                            return;

                        }

                        StringBuffer buffer = new StringBuffer();

                        for (int i=0;i<mSelectedItems.size();i++){

                            buffer.append(mSelectedItems.get(i)+" ");

                        }

                        Toast.makeText(Demo7Activity.this,"你喜欢的水果有"+buffer.toString(),Toast.LENGTH_SHORT).show();

                    }

                })

                .setNegativeButton("取消", new DialogInterface.OnClickListener() {

                    @Override

                    public void onClick(DialogInterface dialog, int id) {

                        Toast.makeText(Demo7Activity.this,"你取消了选择",Toast.LENGTH_SHORT).show();

                    }

                });

        builder.show();
4. 自定义Dialog
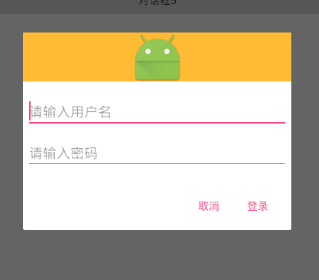
demo7_custom_alert_view.xml代码
<?xml version="1.0" encoding="utf-8"?>

<LinearLayout xmlns:android="http://schemas.android.com/apk/res/android"

    android:orientation="vertical"

    android:layout_width="wrap_content"

    android:layout_height="wrap_content">

    <ImageView

        android:src="@drawable/ic_launcher"

        android:layout_width="match_parent"

        android:layout_height="64dp"

        android:scaleType="center"

        android:background="#FFFFBB33"

        android:contentDescription="@string/app_name" />

    <EditText

        android:id="@+id/username"

        android:inputType="textEmailAddress"

        android:layout_width="match_parent"

        android:layout_height="wrap_content"

        android:layout_marginTop="16dp"

        android:layout_marginLeft="4dp"

        android:layout_marginRight="4dp"

        android:layout_marginBottom="4dp"

        android:hint="请输入用户名" />

    <EditText

        android:id="@+id/password"

        android:inputType="textPassword"

        android:layout_width="match_parent"

        android:layout_height="wrap_content"

        android:layout_marginTop="4dp"

        android:layout_marginLeft="4dp"

        android:layout_marginRight="4dp"

        android:layout_marginBottom="16dp"

        android:fontFamily="sans-serif"

        android:hint="请输入密码"/>

</LinearLayout>
主要代码:
 AlertDialog.Builder builder = new AlertDialog.Builder(this);

        // Get the layout inflater

        LayoutInflater inflater = this.getLayoutInflater();

        // Inflate and set the layout for the dialog

        // Pass null as the parent view because its going in the dialog layout

        builder.setView(inflater.inflate(R.layout.demo7_custom_alert_view, null))

                // Add action buttons

                .setPositiveButton("登录", new DialogInterface.OnClickListener() {

                    @Override

                    public void onClick(DialogInterface dialog, int id) {

                        Toast.makeText(Demo7Activity.this,"登录",Toast.LENGTH_SHORT).show();

                    }

                })

                .setNegativeButton("取消", new DialogInterface.OnClickListener() {

                    public void onClick(DialogInterface dialog, int id) {

                        Toast.makeText(Demo7Activity.this,"取消",Toast.LENGTH_SHORT).show();

                    }

                });

        builder.show();
与之相对:ProgressDialog
方式一:new Dialog
    final ProgressDialog dialog = new ProgressDialog(this);

    dialog.show();
方式二:使用静态方式创建并显示,这种进度条只能是圆形条,设置title和Message提示内容
ProgressDialog dialog2 = ProgressDialog.show(this, "提示", "正在登陆中");
// 方式三 使用静态方式创建并显示,这种进度条只能是圆形条,这里最后一个参数boolean indeterminate设置是否是不明确的状态

    ProgressDialog dialog3 = ProgressDialog

            .show(this, "提示", "正在登陆中", false);
// 方式四 使用静态方式创建并显示,这种进度条只能是圆形条,这里最后一个参数boolean cancelable 设置是否进度条是可以取消的

    ProgressDialog dialog4 = ProgressDialog.show(this, "提示", "正在登陆中",

            false, true);
// 方式五 使用静态方式创建并显示,这种进度条只能是圆形条,这里最后一个参数 DialogInterface.OnCancelListener

    // cancelListener用于监听进度条被取消

    ProgressDialog dialog5 = ProgressDialog.show(this, "提示", "正在登陆中", true,

            true, cancelListener);
private OnCancelListener cancelListener = new OnCancelListener() {

    @Override

    public void onCancel(DialogInterface dialog) {

        // TODO Auto-generated method stub

        Toast.makeText(MainActivity.this, "进度条被取消", Toast.LENGTH_LONG)

                .show();

    }

};
ProgressDialog dialog = new ProgressDialog(this);

        dialog.setProgressStyle(ProgressDialog.STYLE_SPINNER);// 设置进度条的形式为圆形转动的进度条

        dialog.setCancelable(true);// 设置是否可以通过点击Back键取消

        dialog.setCanceledOnTouchOutside(false);// 设置在点击Dialog外是否取消Dialog进度条

        dialog.setIcon(R.drawable.ic_launcher);//

        // 设置提示的title的图标,默认是没有的,如果没有设置title的话只设置Icon是不会显示图标的

        dialog.setTitle("提示");
android Dialog官方demo的更多相关文章
- 解决Android微信支付官方demo运行失败
Android微信支付官方demo运行失败,在此简单记录一下解决步骤 1.httpclient错误 官方给的demo是eclipse的,打开之后提示httpclient的错误,我知道在as下解决htt ...
- android 官方demo地址
android官方demo地址都放在了github上:https://github.com/googlesamples
- android开源项目之OTTO事件总线(二)官方demo解说
官方demo见 https://github.com/square/otto 注意自己该编译版本为2.3以上,默认的1.6不支持match_parent属性,导致布局文件出错. 另外需要手动添加an ...
- React Native官方DEMO
官方给我们提供了UIExplorer项目,这里边包含React Native的基本所有组件的使用介绍和方法. 运行官方DEMO步骤如下 安装react native环境 React Native项目源 ...
- Android组件化demo实现以及遇坑分享
首先贴出demo的github地址:GitHub - TenzLiu/TenzModuleDemo: android组件化demo 作者:TenzLiu原文链接:https://www.jianshu ...
- weex官方demo weex-hackernews代码解读(上)
一.介绍 weex 是阿里出品的一个类似RN的框架,可以使用前端技术来开发移动应用,实现一份代码支持H5,IOS和Android.最新版本的weex已默认将vue.js作为前端框架,而weex-hac ...
- Android蓝牙联机Demo解析
写在前面: 手游的双人对战实现方式有很多,比如: 联网对战(需要一个服务器负责转发客户端请求,各种大型手游的做法) 分屏对战(手机上下分屏,典型的例子就是切水果的双人对战) 蓝牙联机对战(通过蓝牙联机 ...
- 订餐系统之微信支付,踩了官方demo的坑
最近一个项目要增加微信支付的功能,想来这个东西出来这么久了,按微信提供的应该可以很快搞定的,结果提供的demo( JS API网页支付)中各种坑,咨询他们的客服,态度倒是非常好,就是解决不了问 ...
- TensorFlow 在android上的Demo(1)
转载时请注明出处: 修雨轩陈 系统环境说明: ------------------------------------ 操作系统 : ubunt 14.03 _ x86_64 操作系统 内存: 8GB ...
随机推荐
- Kafka学习之一深度解析
背景介绍 Kafka简介 Kafka是一种分布式的,基于发布/订阅的消息系统.主要设计目标如下: 以时间复杂度为O(1)的方式提供消息持久化能力,即使对TB级以上数据也能保证常数时间的访问性能 高吞吐 ...
- C#委托和事件定义和使用
委托 定义委托的语法和定义方法比较相似,只是比方法多了一个关键字delegate ,我们都知道方法就是将类型参数化,所谓的类型参数化就是说该方法接受一个参数,而该参数是某种类型的参数,比如int.st ...
- 电脑开机提示 NTLDR is missing
电脑开机,黑屏并提示NTLDR is missing Press Ctrl+Alt+Del to restart,并且反复重启都不行,这是怎么回事呢?首先我们来分析下这段英语的含义:NTLDR是指NT ...
- windows,cmd中,如何切换到磁盘的根目录下
需求描述: 在windows的cmd中操作,有的时候也会遇到切换了很多的目录,然后需要切换到根目录的情况 操作过程: 1.通过cd \的方式,切换回当前磁盘的根目录下 备注:未切换之前,在Driver ...
- centos6.5 开发环境部署(nignx1.7.10+php5.4.38+mysql+ftp)
一些命令和规则以及准备 本次流程再 DigitalOcean上的vps上通过 查看是否已经安装 rpm -qa | grep nginx 删除安装 #普通删除模式 rpm -e nginx #强力删除 ...
- hdu 4849 最短路 西安邀请赛 Wow! Such City!
http://acm.hdu.edu.cn/showproblem.php?pid=4849 会有非常多奇怪的Wa的题.当初在西安就不知道为什么wa,昨晚做了,由于一些Sb错误也wa了非常久.这会儿怎 ...
- 超全面的JavaWeb笔记day05<xml&dtd&jaxp>
0.表单提交方式(*****) button提交 超链接提交 事件 1.xml简介和应用(了解) 2.xml文档声明和乱码解决(*****) 文档声明 必须放在第一行第一列 设置xml编码和保存编码一 ...
- shell基础篇(五)条件判断
写脚本时:有时要判断字符串是否相等,数字测试.这对后面学习的shell语句,循环,条件语句做好基础. 条件判断格式 1. test condition : test命令 2. [ conditio ...
- 【RF库Collections测试】Insert Into List
Name:Insert Into ListSource:Collections <test library>Arguments:[ list_ | index | value ]Inser ...
- Python 入门(一)定义字符串+raw字符串与多行字符串
定义字符串 前面我们讲解了什么是字符串.字符串可以用''或者""括起来表示. 如果字符串本身包含'怎么办?比如我们要表示字符串 I'm OK ,这时,可以用" " ...