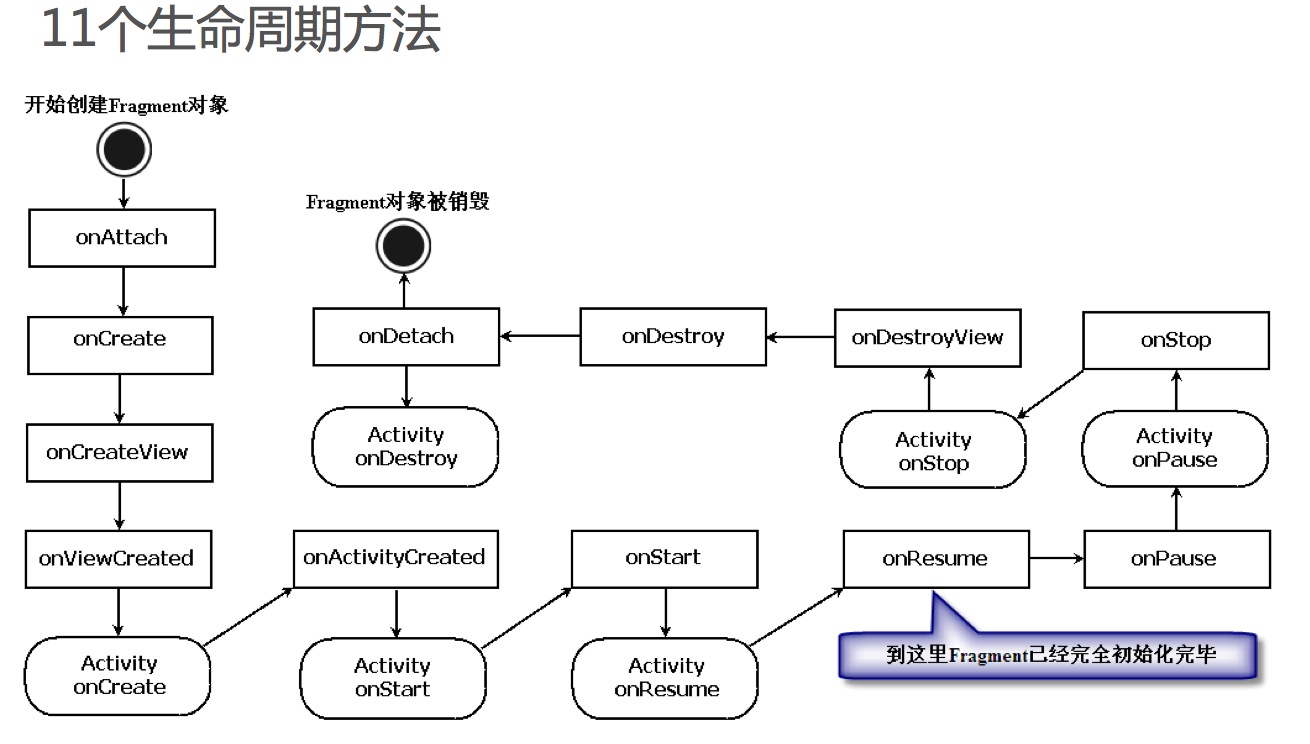
5. Fragment详解
onCreateView是Fragment生命周期方法中最重要的一个。因为在该 方法中会创建在Fragment中显示的View。
public View onCreateView(LayoutInflater inflater, ViewGroup container,Bundle savedInstanceState){
// 装载布局文件
View view = inflater.inflate(R.layout.my_fragment, null); TextView textview =
(TextView)view.findViewById(R.id.textview);
testview.setText("Fragment Test");
return view;
}
Fragment与Activity之间可以通过Fragment.setArguments方法向 Fragment传递参数值,并且可以通过Fragment.getArguments方法获取 这些传递的参数值。
范例1:第一个Fragment程序。
 import android.app.Activity;

 import android.os.Bundle;

 public class FirstFragmentActivity extends Activity {

     @Override

     public void onCreate(Bundle savedInstanceState) {

         super.onCreate(savedInstanceState);

         setContentView(R.layout.activity_first_fragment);

     }

 }
 <LinearLayout xmlns:android="http://schemas.android.com/apk/res/android"

     android:layout_width="match_parent"

     android:layout_height="match_parent" >

     <fragment

         android:id="@+id/titles"

         android:layout_width="match_parent"

         android:layout_height="match_parent"

        class="cn.eoe.first.fragment.LeftFragment" />

 </LinearLayout>
 package cn.eoe.first.fragment;

 import java.io.InputStream;

 import android.app.Fragment;

 import android.content.Intent;

 import android.os.Bundle;

 import android.view.LayoutInflater;

 import android.view.View;

 import android.view.ViewGroup;

 import android.widget.AdapterView;

 import android.widget.AdapterView.OnItemClickListener;

 import android.widget.ArrayAdapter;

 import android.widget.ListView;

 import android.widget.TextView;

 public class LeftFragment extends Fragment implements OnItemClickListener {

     private String[] data = new String[] { "灵魂战车2", "变形金刚3:月黑之时", "敢死队2" };

     private ListView listView;

     @Override

     public View onCreateView(LayoutInflater inflater, ViewGroup container,

             Bundle savedInstanceState) {

         View view = inflater.inflate(R.layout.left_fragment, null);

         listView = (ListView) view.findViewById(R.id.listview_movie_list);

         listView.setOnItemClickListener(this);

         ArrayAdapter<String> arrayAdapter = new ArrayAdapter<String>(

                 getActivity(), android.R.layout.simple_list_item_activated_1,

                 data);

         listView.setAdapter(arrayAdapter);

         listView.setChoiceMode(ListView.CHOICE_MODE_SINGLE);

         return view;

     }

     @Override

     public void onItemClick(AdapterView<?> parent, View view, int position,

             long id) {

         try {

             TextView textView = (TextView) getActivity().findViewById(

                     R.id.textview_detail);

             InputStream is = getActivity().getResources().getAssets()

                     .open("m" + position);

             byte[] buffer = new byte[1024];

             int count = is.read(buffer);

             String detail = new String(buffer, 0, count, "utf-8");

             if (textView == null) {

                 Intent intent = new Intent(getActivity(), DetailActivity.class);

                 intent.putExtra("detail", detail);

                 startActivity(intent);

             } else {

                 textView.setText(detail);

             }

             is.close();

         } catch (Exception e) {

             // TODO: handle exception

         }

     }

 }
 public class DetailActivity extends Activity {

     @Override

     public void onCreate(Bundle savedInstanceState) {

         super.onCreate(savedInstanceState);

         setContentView(R.layout.activity_detail);

         TextView detail = (TextView) findViewById(R.id.textview_detail);

         detail.setText(getIntent().getExtras().getString("detail"));

     }

 }
 <RelativeLayout xmlns:android="http://schemas.android.com/apk/res/android"

     android:layout_width="match_parent"

     android:layout_height="match_parent" >

     <fragment

         android:id="@+id/details"

         android:layout_width="match_parent"

         android:layout_height="match_parent"

         class="cn.eoe.first.fragment.RightFragment" />

 </RelativeLayout>
 public class RightFragment extends Fragment {

     @Override

     public View onCreateView(LayoutInflater inflater, ViewGroup container,

             Bundle savedInstanceState) {

         View view = inflater.inflate(R.layout.right_fragment, null);

         return view;

     }

 }
范例2:向Fragment传递数据,并获取传递数据的值
activity_fragment_argument.xml
 <LinearLayout xmlns:android="http://schemas.android.com/apk/res/android"

     android:layout_width="match_parent"

     android:layout_height="match_parent"

     android:orientation="vertical" >

     <Button

         android:layout_width="match_parent"

         android:layout_height="wrap_content"

         android:layout_marginBottom="10dp"

         android:onClick="onClick_SendData"

         android:text="向Fragment传递数据" />

     <FrameLayout

         android:id="@+id/fragment_container1"

         android:layout_width="match_parent"

         android:layout_height="wrap_content" />

 </LinearLayout>
 import android.app.Activity;

 import android.app.FragmentManager;

 import android.app.FragmentTransaction;

 import android.os.Bundle;

 import android.view.View;

 import android.widget.EditText;

 import android.widget.Toast;

 public class FragmentArgumentActivity extends Activity {

     @Override

     protected void onCreate(Bundle savedInstanceState) {

         super.onCreate(savedInstanceState);

         setContentView(R.layout.activity_fragment_argument);

     }

     // 向Fragment传递数据

     public void onClick_SendData(View view) {

         // 获取传递的数据(页面)

         MyFragment fragment = new MyFragment();

         Bundle bundle = new Bundle();

         bundle.putString("name", "Hello Fragment1");

         fragment.setArguments(bundle);

         FragmentManager fragmentManager = getFragmentManager();

         FragmentTransaction fragmentTransaction = fragmentManager

                 .beginTransaction();

         fragmentTransaction.add(R.id.fragment_container1, fragment, "fragment");

         fragmentTransaction.commit();

         Toast.makeText(this, "数据已成功传递.", Toast.LENGTH_LONG).show();

     }

     // 获取传递的数据

     public void onClick_ShowArgument(View view) {

         EditText editText = (EditText) findViewById(R.id.edittext);

         String name = getFragmentManager().findFragmentByTag("fragment")

                 .getArguments().getString("name");

         editText.setText(name);

     }

 }
 import android.app.Fragment;

 import android.os.Bundle;

 import android.util.Log;

 import android.view.LayoutInflater;

 import android.view.View;

 import android.view.ViewGroup;

 public class MyFragment extends Fragment {

     @Override

     public View onCreateView(LayoutInflater inflater, ViewGroup container,

             Bundle savedInstanceState) {

         View view = inflater.inflate(R.layout.my_fragment, container, false);

         return view;

     }

     @Override

     public void onDestroyView() {

         Log.d("name", getArguments().getString("name"));

         super.onDestroyView();

     }

 }
 <LinearLayout xmlns:android="http://schemas.android.com/apk/res/android"

     android:layout_width="match_parent"

     android:layout_height="match_parent"

     android:orientation="vertical" >

     <EditText

         android:id="@+id/edittext"

         android:layout_width="match_parent"

         android:layout_height="wrap_content" />

     <Button

         android:layout_width="match_parent"

         android:layout_height="wrap_content"

         android:onClick="onClick_ShowArgument"

         android:text="获取传递的数据" />

 </LinearLayout>
5. Fragment详解的更多相关文章
- Fragment详解之三——管理Fragment(1)
相关文章: 1.<Fragment详解之一--概述>2.<Fragment详解之二--基本使用方法>3.<Fragment详解之三--管理Fragment(1)>4 ...
- android——fragment详解
在android开发过程中,如果使用到了导航栏.那么不可避免的就需要使用fragment来处理界面.闲着没事,就详解一下Framgent的使用方法吧. 难得写一次.本人 shoneworn shone ...
- Android面试收集录4 Fragment详解
1.什么是Fragment? 你可以简单的理解为,Fragment是显示在Activity中的Activity. 它可以显示在Activity中,然后它也可以显示出一些内容. 因为它拥有自己的生命周期 ...
- Android 开发 之 Fragment 详解
本文转载于 : http://blog.csdn.net/shulianghan/article/details/38064191 本博客代码地址 : -- 单一 Fragment 示例 : http ...
- Android Fragment详解
一.什么是Fragment Android在3.0中引入了fragments的概念,主要目的是用在大屏幕设备上--例如平板电脑上,支持更加动态和灵活的UI设计.平板电脑的屏幕要比手机的大得多,有更多的 ...
- Fragment详解
1 Fragment简介 1.1 Fragment的设计初衷 Android3.0引入Fragment的初衷是为大屏幕的设备提供更加灵活的动态UI设计,由于大屏设备可以容纳更多的UI组件,且这些UI组 ...
- Android Fragment 详解(一)
Android从3.0开始引入fragment,主要是为了支持更动态更灵活的界面设计,比如在平板上的应用.平板机上拥有比手机更大的屏幕空间来组合和交互界面组件们.Fragment使你在做那样的设计时, ...
- Android Fragment详解(二):Fragment创建及其生命周期
Fragments的生命周期 每一个fragments 都有自己的一套生命周期回调方法和处理自己的用户输入事件. 对应生命周期可参考下图: 创建片元(Creating a Fragment) To c ...
- Android Fragment详解(一):概述
Fragment是activity的界面中的一部分或一种行为.你可以把多个Fragment们组合到一个activity中来创建一个多面界面并且你可以在多个activity中重用一个Fragment.你 ...
随机推荐
- Sqoop详细介绍包括:sqoop命令,原理,流程
一简介 Sqoop是一个用来将Hadoop和关系型数据库中的数据相互转移的工具,可以将一个关系型数据库(例如 : MySQL ,Oracle ,Postgres等)中的数据导进到Hadoop的HDFS ...
- C编译器剖析PDF文档及UCC编译器162.3
http://blog.csdn.net/sheisc/article/details/42387857 http://blog.csdn.net/sheisc/article/details/455 ...
- Qt 显示图片 放大 缩小 移动(都是QT直接提供的功能)
本文章原创于www.yafeilinux.com 转载请注明出处. 现在我们来实现在窗口上显示图片,并学习怎样将图片进行平移,缩放,旋转和扭曲.这里我们是利用QPixmap类来实现图片显示的. 一.利 ...
- SQL Server 使用日志传送
参考文献: http://msdn.microsoft.com/en-us/library/ms187103.aspx 概述 SQL Server 使用日志传送,您可以自动将“主服务器”实例上“主数据 ...
- JVM垃圾回收机制总结(3) :按代垃圾收集器
为什么要分代 分代的垃圾回收策略,是基于这样一个事实:不同的对象的生命周期是不一样的 . 因此,不同生命周期的对象可以采取不同的收集方式,以便提高回收效率. 在Java程序运行的过程中,会产生大量的对 ...
- Jquery中用offset().top和offsetTop的比较
今天,想测试一个div与顶部的距离,用的是.offsetTop,但是offsetTop获得的值,怎么都打印不出来.折腾了半天,打印的结果都是undefined,虽然网上很多资料都说返回的是数值.虽然这 ...
- ubuntu 12.10无法用apt-get安装软件 Err http://us.archive.ubuntu.com quantal-updates/main Sources 404 Not
之前执行apt-get 不管是什么软件或apt-get update都会遇到fail to fetch http://us.archive.ubuntu.com quantal-updates/ma ...
- 石阶 VS 石像
山庙有尊雕刻精美的佛像,前来拜佛的人络绎不绝. 铺在山路上的石阶开始抱怨:“大家同是石头,凭什么我被人蹬来踩去,你却被人供在殿堂?” 佛像笑了笑:“当年你只挨六刀,做了一方石阶,而我经历了千刀万凿之后 ...
- open_binary_frm
参数uchar* head 是已经分配好内存的64个字节的地址 http://mysql.taobao.org/monthly/2015/08/07/ /** *先从.frm文件读取64字节 *第28 ...
- Qt之等待提示框(QPropertyAnimation)
简述 之前分享过QLabel可以通过QMovie播放gif图片,可以实现等待提示框,今天主要使用动画QPropertyAnimation来进行实现! 数据加载的时候,往往都需要后台线程进行数据请求,而 ...