Nanoframework 操作单片机蓝牙配置WIFI的案例
Nanoframework 操作单片机蓝牙配置WIFI的案例
通过Nanoframework的蓝牙配置Wifi的名称和密码
下面是基本需要的工具
ESP32设备一个 需要支持蓝牙和wifi,一般情况的ESP32都支持wifi和蓝牙,当前教程使用的ESP32的接口是
Type-C
设备实物图片:
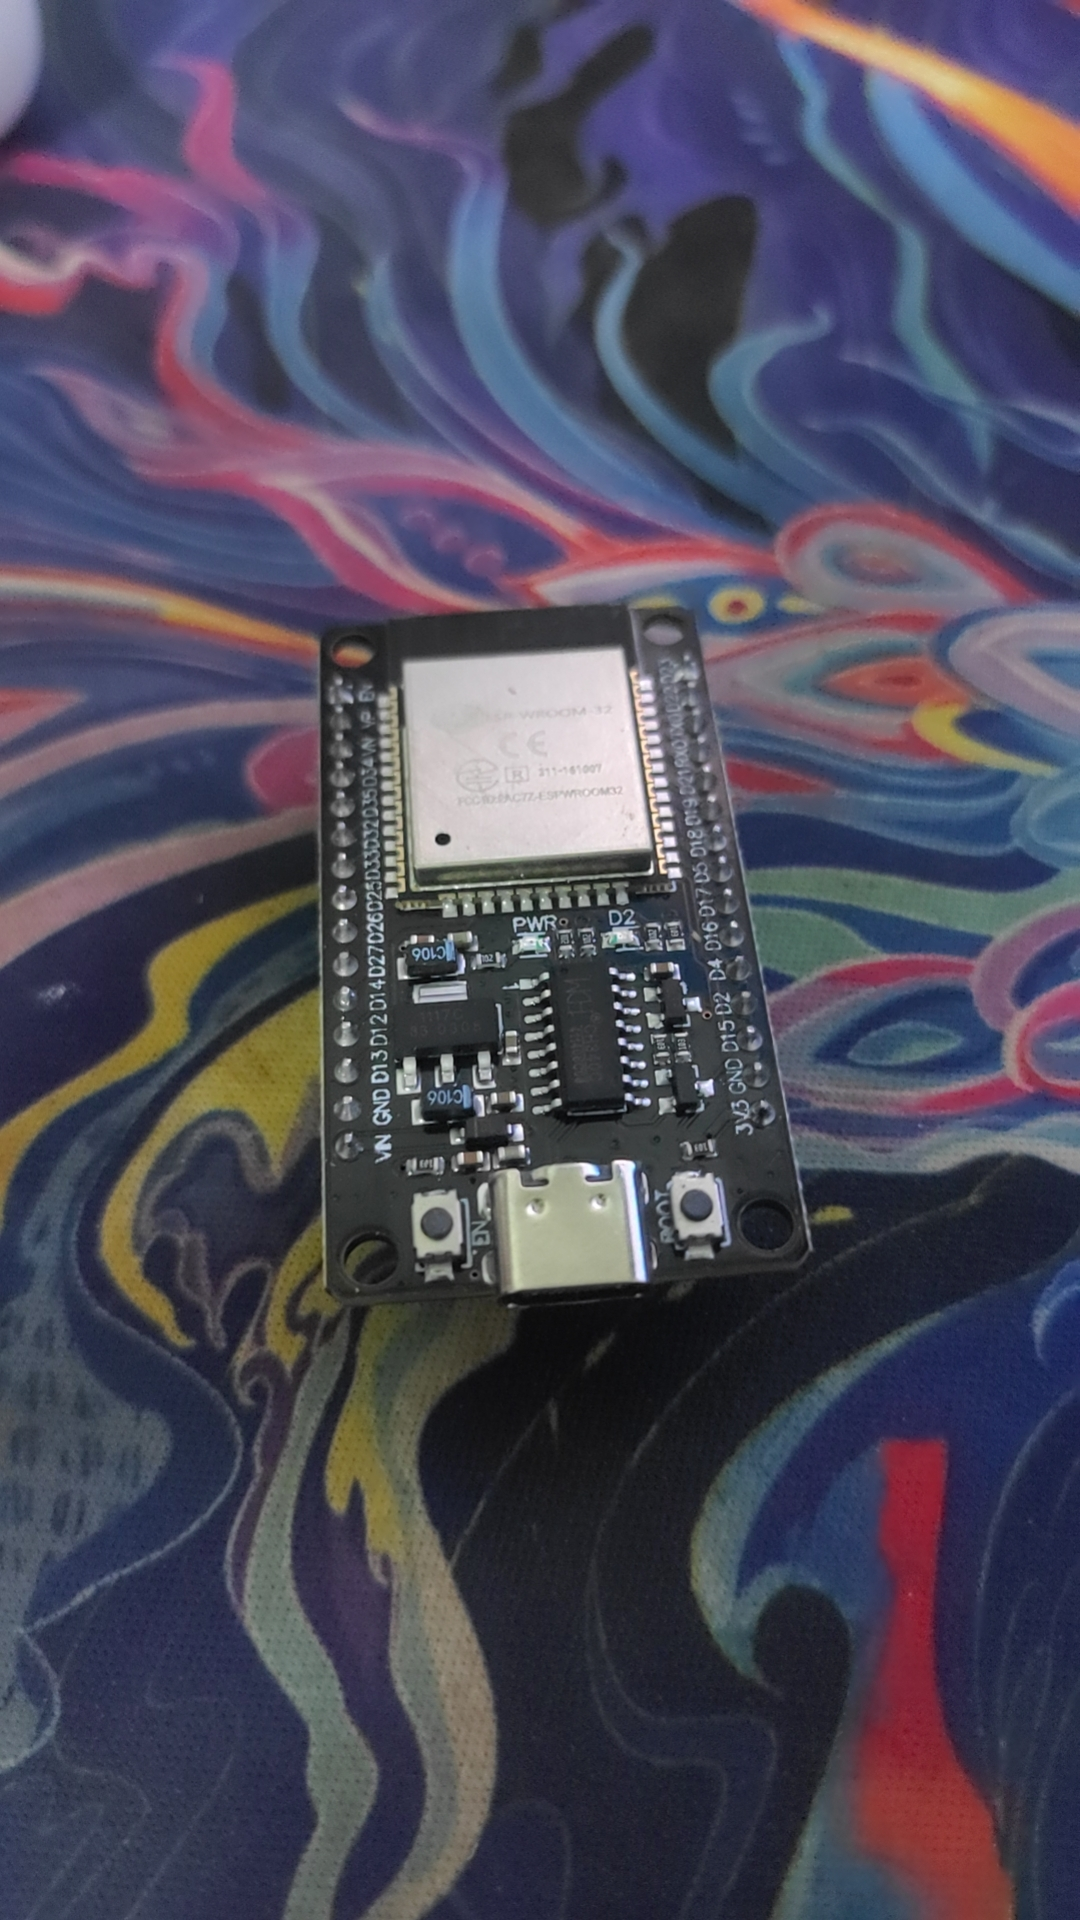
部署好的
ESP32的NanoFramework环境刷支持蓝牙的固件
nanoff --update --target ESP32_BLE_REV0 --serialport COM5 --fwversion 1.8.1.292 --baud 1500000
VS扩展安装好
NanoFramework扩展准备好手机下载蓝牙调试APP,我用的是这个

实现通过蓝牙配置单片机的WIFI
using nanoFramework.Device.Bluetooth;
using nanoFramework.Device.Bluetooth.GenericAttributeProfile;
using nanoFramework.Networking;
using System;
using System.Diagnostics;
using System.IO;
using System.Text;
using System.Threading;
using static Gotrays.Program;
namespace Gotrays
{
public class Program
{
static GattLocalCharacteristic _readCharacteristic;
static GattLocalCharacteristic _readWriteCharacteristic;
// Read/Write Characteristic value
static byte _redValue = 128;
static byte _greenValue = 128;
static byte _blueValue = 128;
public static void Main()
{
var wifi = ConfigHelper.GetWifi();
// 如果存在wifi配置尝试链接wifi
if (wifi.Password != null)
{
try
{
CancellationTokenSource cs = new(60000);
var success = WifiNetworkHelper.ConnectDhcp(wifi.Name, wifi.Password, requiresDateTime: true, token: cs.Token);
}
catch (Exception)
{
Debug.WriteLine("尝试链接WiFi失败");
}
}
// BluetoothLEServer是一个单例对象,因此获得它的实例。对象是在您第一次访问它时创建的
// 可以释放内存。
BluetoothLEServer server = BluetoothLEServer.Instance;
// 给设备命名
server.DeviceName = "TokenIOT";
// 定义一些自定义uid
Guid serviceUuid = new Guid("A7EEDF2C-DA87-4CB5-A9C5-5151C78B0057");
Guid readCharUuid = new Guid("A7EEDF2C-DA88-4CB5-A9C5-5151C78B0057");
Guid readStaticCharUuid = new Guid("A7EEDF2C-DA89-4CB5-A9C5-5151C78B0057");
Guid readWriteCharUuid = new Guid("A7EEDF2C-DA8A-4CB5-A9C5-5151C78B0057");
// GattServiceProvider用于创建和发布主服务定义。
// 将自动创建一个额外的设备信息服务。
GattServiceProviderResult result = GattServiceProvider.Create(serviceUuid);
if (result.Error != BluetoothError.Success)
{
return;
}
GattServiceProvider serviceProvider = result.ServiceProvider;
// 从提供者处创建主服务
GattLocalService service = serviceProvider.Service;
#region Static read characteristic
// 现在我们给服务添加一个特性
//如果读取值不会改变,那么你可以使用Static值
DataWriter sw = new DataWriter();
sw.WriteString("这是蓝牙示例1");
GattLocalCharacteristicResult characteristicResult = service.CreateCharacteristic(readStaticCharUuid,
new GattLocalCharacteristicParameters()
{
CharacteristicProperties = GattCharacteristicProperties.Read,
UserDescription = "我的静态特性",
StaticValue = sw.DetachBuffer()
});
if (characteristicResult.Error != BluetoothError.Success)
{
// An error occurred.
return;
}
#endregion
#region Create Characteristic for dynamic Reads
// 对于变更为业务的数据,增加“读特性”
// 我们还希望连接的客户端在值改变时得到通知,所以我们添加了notify属性
characteristicResult = service.CreateCharacteristic(readCharUuid,
new GattLocalCharacteristicParameters()
{
CharacteristicProperties = GattCharacteristicProperties.Read | GattCharacteristicProperties.Notify,
UserDescription = "我的阅读特点"
});
if (characteristicResult.Error != BluetoothError.Success)
{
// An error occurred.
return;
}
// 查阅我们的read特性
_readCharacteristic = characteristicResult.Characteristic;
// 每次从客户端请求该值时,都会调用此事件
_readCharacteristic.ReadRequested += ReadCharacteristic_ReadRequested;
#endregion
#region Create Characteristic for RGB read/write
characteristicResult = service.CreateCharacteristic(readWriteCharUuid,
new GattLocalCharacteristicParameters()
{
CharacteristicProperties = GattCharacteristicProperties.Read | GattCharacteristicProperties.Write,
UserDescription = "My Read/Write Characteristic"
});
if (characteristicResult.Error != BluetoothError.Success)
{
// An error occurred.
return;
}
// 查阅我们的read特性
_readWriteCharacteristic = characteristicResult.Characteristic;
//每次从客户端请求该值时,都会调用此事件
_readWriteCharacteristic.WriteRequested += _readWriteCharacteristic_WriteRequested;
_readWriteCharacteristic.ReadRequested += _readWriteCharacteristic_ReadRequested;
#endregion
#region Start Advertising
// 一旦所有的特征已经创建,你需要广告的服务,所以
// 其他设备可以看到它。这里我们也说设备也可以连接
// 设备可以看到它。
serviceProvider.StartAdvertising(new GattServiceProviderAdvertisingParameters()
{
IsConnectable = true,
IsDiscoverable = true
});
#endregion
Thread.Sleep(Timeout.Infinite);
}
/// <summary>
/// 读取特性的事件处理程序。
/// </summary>
/// <param name="sender">GattLocalCharacteristic object</param>
/// <param name="ReadRequestEventArgs"></param>
private static void ReadCharacteristic_ReadRequested(GattLocalCharacteristic sender, GattReadRequestedEventArgs ReadRequestEventArgs)
{
GattReadRequest request = ReadRequestEventArgs.GetRequest();
// Get Buffer with hour/minute/second
//request.RespondWithValue(GetTimeBuffer());
}
/// <summary>
/// 读/写特性的读事件处理程序。
/// </summary>
/// <param name="sender"></param>
/// <param name="ReadRequestEventArgs"></param>
private static void _readWriteCharacteristic_ReadRequested(GattLocalCharacteristic sender, GattReadRequestedEventArgs ReadRequestEventArgs)
{
GattReadRequest request = ReadRequestEventArgs.GetRequest();
DataWriter dw = new DataWriter();
dw.WriteByte((Byte)_redValue);
dw.WriteByte((Byte)_greenValue);
dw.WriteByte((Byte)_blueValue);
request.RespondWithValue(dw.DetachBuffer());
Debug.WriteLine($"RGB read");
}
/// <summary>
/// 读写特性的写处理程序。
/// </summary>
/// <param name="sender"></param>
/// <param name="WriteRequestEventArgs"></param>
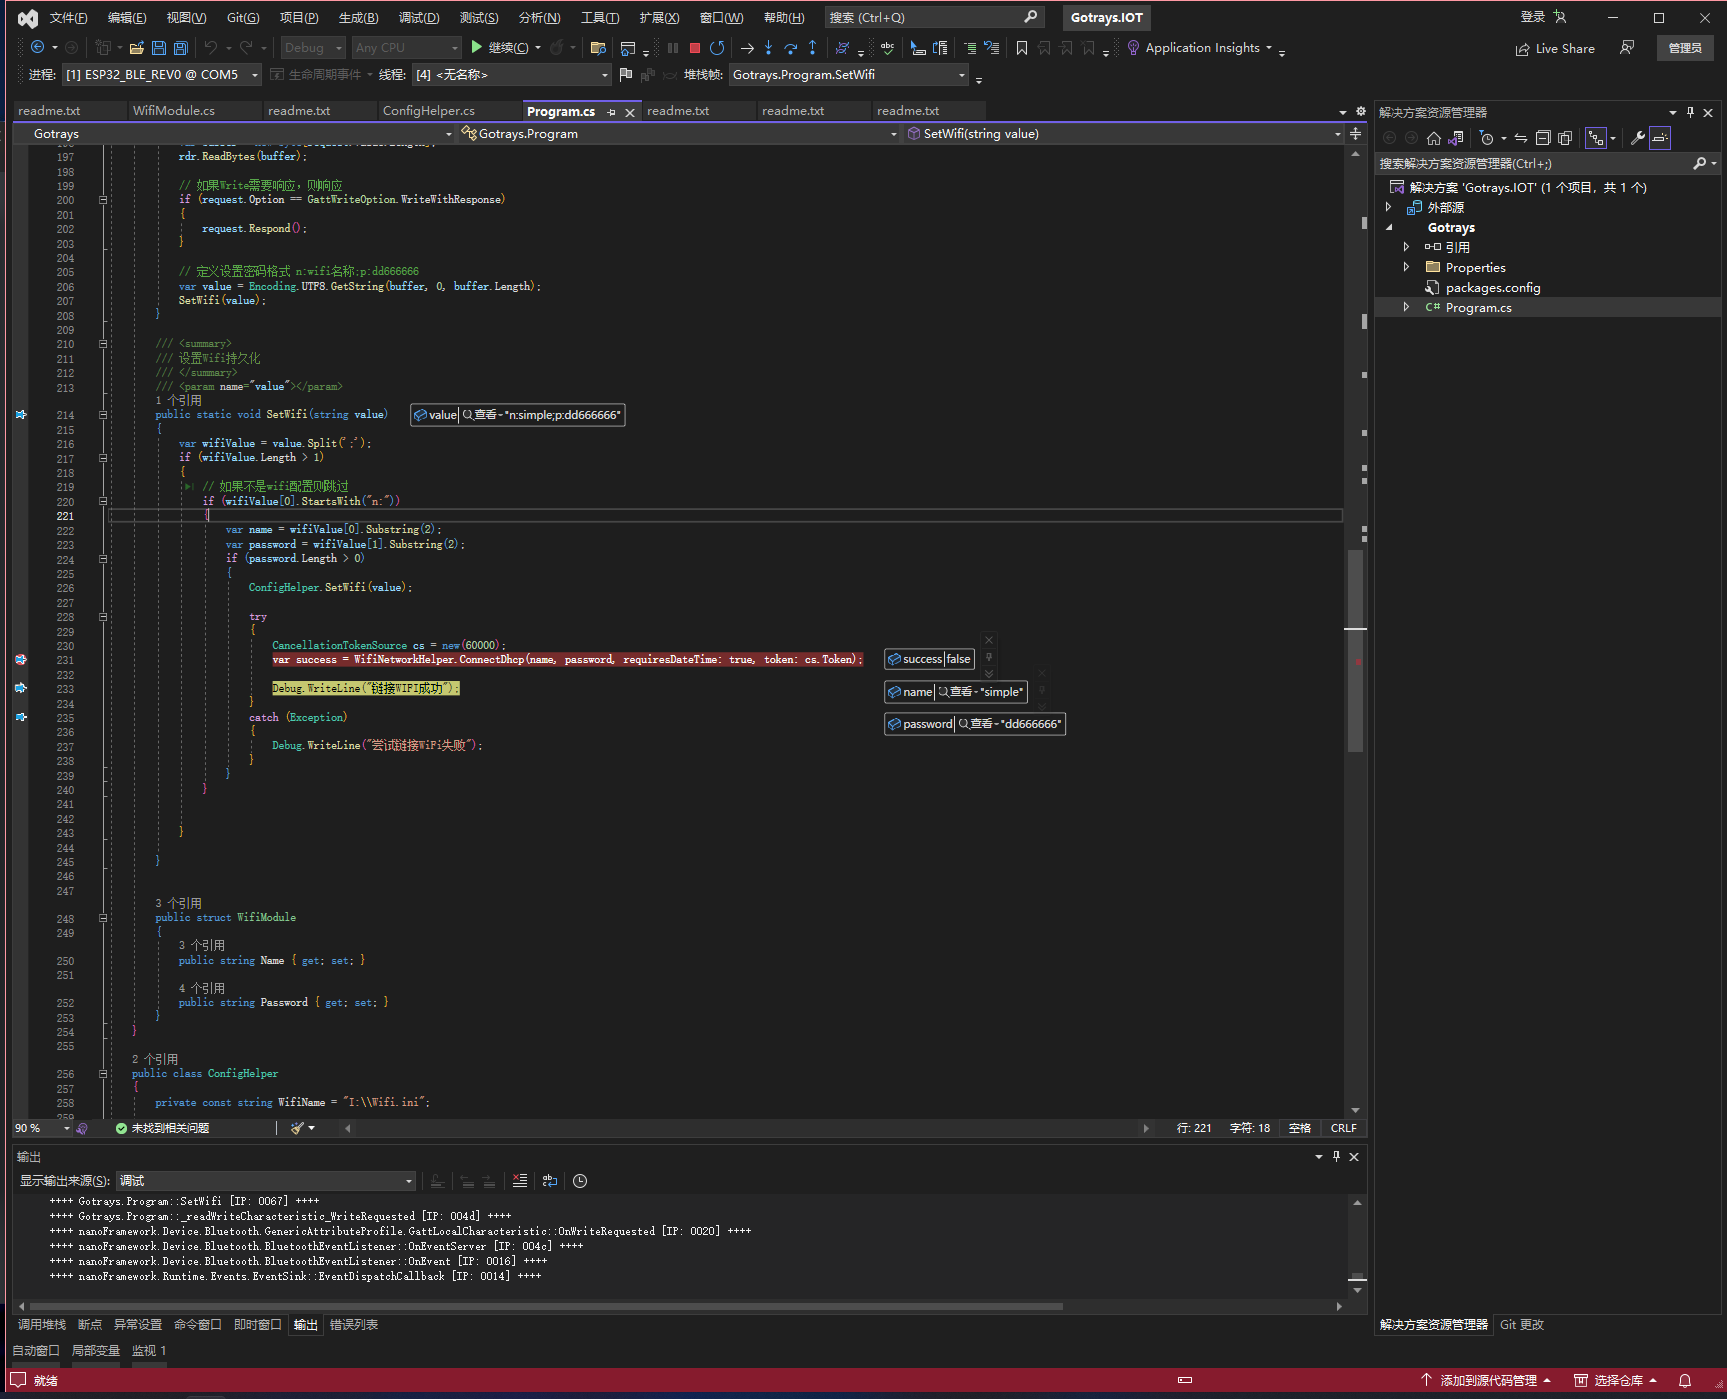
private static void _readWriteCharacteristic_WriteRequested(GattLocalCharacteristic sender, GattWriteRequestedEventArgs WriteRequestEventArgs)
{
GattWriteRequest request = WriteRequestEventArgs.GetRequest();
var size = request.Value.Length;
// 从缓冲区解包数据
DataReader rdr = DataReader.FromBuffer(request.Value);
var buffer = new byte[request.Value.Length];
rdr.ReadBytes(buffer);
// 如果Write需要响应,则响应
if (request.Option == GattWriteOption.WriteWithResponse)
{
request.Respond();
}
// 定义设置密码格式 n:wifi名称;p:dd666666
var value = Encoding.UTF8.GetString(buffer, 0, buffer.Length);
SetWifi(value);
}
/// <summary>
/// 设置Wifi持久化
/// </summary>
/// <param name="value"></param>
public static void SetWifi(string value)
{
var wifiValue = value.Split(';');
if (wifiValue.Length > 1)
{
// 如果不是wifi配置则跳过
if (wifiValue[0].StartsWith("n:"))
{
var name = wifiValue[0].Substring(2);
var password = wifiValue[1].Substring(2);
if (password.Length > 0)
{
ConfigHelper.SetWifi(value);
try
{
CancellationTokenSource cs = new(60000);
var success = WifiNetworkHelper.ConnectDhcp(name, password, requiresDateTime: true, token: cs.Token);
Debug.WriteLine("链接WIFI成功");
}
catch (Exception)
{
Debug.WriteLine("尝试链接WiFi失败");
}
}
}
}
}
public struct WifiModule
{
public string Name { get; set; }
public string Password { get; set; }
}
}
public class ConfigHelper
{
private const string WifiName = "I:\\Wifi.ini";
public static void SetWifi(string value)
{
var buffer = Encoding.UTF8.GetBytes(value);
var file = File.Exists(WifiName) ? new FileStream(WifiName, FileMode.Open, FileAccess.Write) : File.Create(WifiName);
file.Write(buffer, 0, buffer.Length);
file.Close();
}
public static WifiModule GetWifi()
{
if (File.Exists(WifiName))
{
var file = new FileStream(WifiName, FileMode.Open, FileAccess.Read);
if (file.Length > 0)
{
var bytes = new byte[file.Length];
file.Read(bytes, 0, bytes.Length);
file.Close();
var value = Encoding.UTF8.GetString(bytes, 0, bytes.Length);
var wifiValue = value.Split(';');
if (wifiValue.Length > 1)
{
var name = wifiValue[0].Substring(2);
var password = wifiValue[1].Substring(2);
return new WifiModule
{
Name = name,
Password = password,
};
}
}
file.Close();
}
return new WifiModule { Name = null, Password = null };
}
}
}
上面是所有的代码,下面将一步一步的讲解
当我们接收到信息的时候会触发_readWriteCharacteristic_WriteRequested的事件_readWriteCharacteristic_WriteRequested的代码如下,第一步先读取数据,然后接收读,在得到数据转换字符串,通过调用SetWifi方法去解析设置WIFI
            GattWriteRequest request = WriteRequestEventArgs.GetRequest();

            var size = request.Value.Length;

            // 从缓冲区解包数据

            DataReader rdr = DataReader.FromBuffer(request.Value);

            var buffer = new byte[request.Value.Length];

            rdr.ReadBytes(buffer);

            // 如果Write需要响应,则响应

            if (request.Option == GattWriteOption.WriteWithResponse)

            {

                request.Respond();

            }

            // 定义设置密码格式 n:wifi名称;p:dd666666

            var value = Encoding.UTF8.GetString(buffer, 0, buffer.Length);

            SetWifi(value);
SetWifi,这里是用于解析数据格式并且处理持久化和链接WIFI,wifi的格式也是规范好的n:wifi名称;p:WiFi密码,不使用json格式从而减少包的依赖。
        /// <summary>

        /// 设置Wifi持久化

        /// </summary>

        /// <param name="value"></param>

        public static void SetWifi(string value)

        {

            var wifiValue = value.Split(';');

            if (wifiValue.Length > 1)

            {

                // 如果不是wifi配置则跳过

                if (wifiValue[0].StartsWith("n:"))

                {

                    var name = wifiValue[0].Substring(2);

                    var password = wifiValue[1].Substring(2);

                    if (password.Length > 0)

                    {

                        ConfigHelper.SetWifi(value);

                        try

                        {

                            CancellationTokenSource cs = new(60000);

                            var success = WifiNetworkHelper.ConnectDhcp(name, password, requiresDateTime: true, token: cs.Token);

                            Debug.WriteLine("链接WIFI成功");

                        }

                        catch (Exception)

                        {

                            Debug.WriteLine("尝试链接WiFi失败");

                        }

                    }

                }

            }

        }
ConfigHelper则是操作文件将wifi的配置持久化,nanoframework的文件系统默认是I,文件路径则是I:\\Wifi.ini这样就可以将数据持久化了。
    public class ConfigHelper

    {

        private const string WifiName = "I:\\Wifi.ini";

        public static void SetWifi(string value)

        {

            var buffer = Encoding.UTF8.GetBytes(value);

            var file = File.Exists(WifiName) ? new FileStream(WifiName, FileMode.Open, FileAccess.Write) : File.Create(WifiName);

            file.Write(buffer, 0, buffer.Length);

            file.Close();

        }

        public static WifiModule GetWifi()

        {

            if (File.Exists(WifiName))

            {

                var file = new FileStream(WifiName, FileMode.Open, FileAccess.Read);

                if (file.Length > 0)

                {

                    var bytes = new byte[file.Length];

                    file.Read(bytes, 0, bytes.Length);

                    file.Close();

                    var value = Encoding.UTF8.GetString(bytes, 0, bytes.Length);

                    var wifiValue = value.Split(';');

                    if (wifiValue.Length > 1)

                    {

                        var name = wifiValue[0].Substring(2);

                        var password = wifiValue[1].Substring(2);

                        return new WifiModule

                        {

                            Name = name,

                            Password = password,

                        };

                    }

                }

                file.Close();

            }

            return new WifiModule { Name = null, Password = null };

        }

    }
下面是程序运行的效果
效果
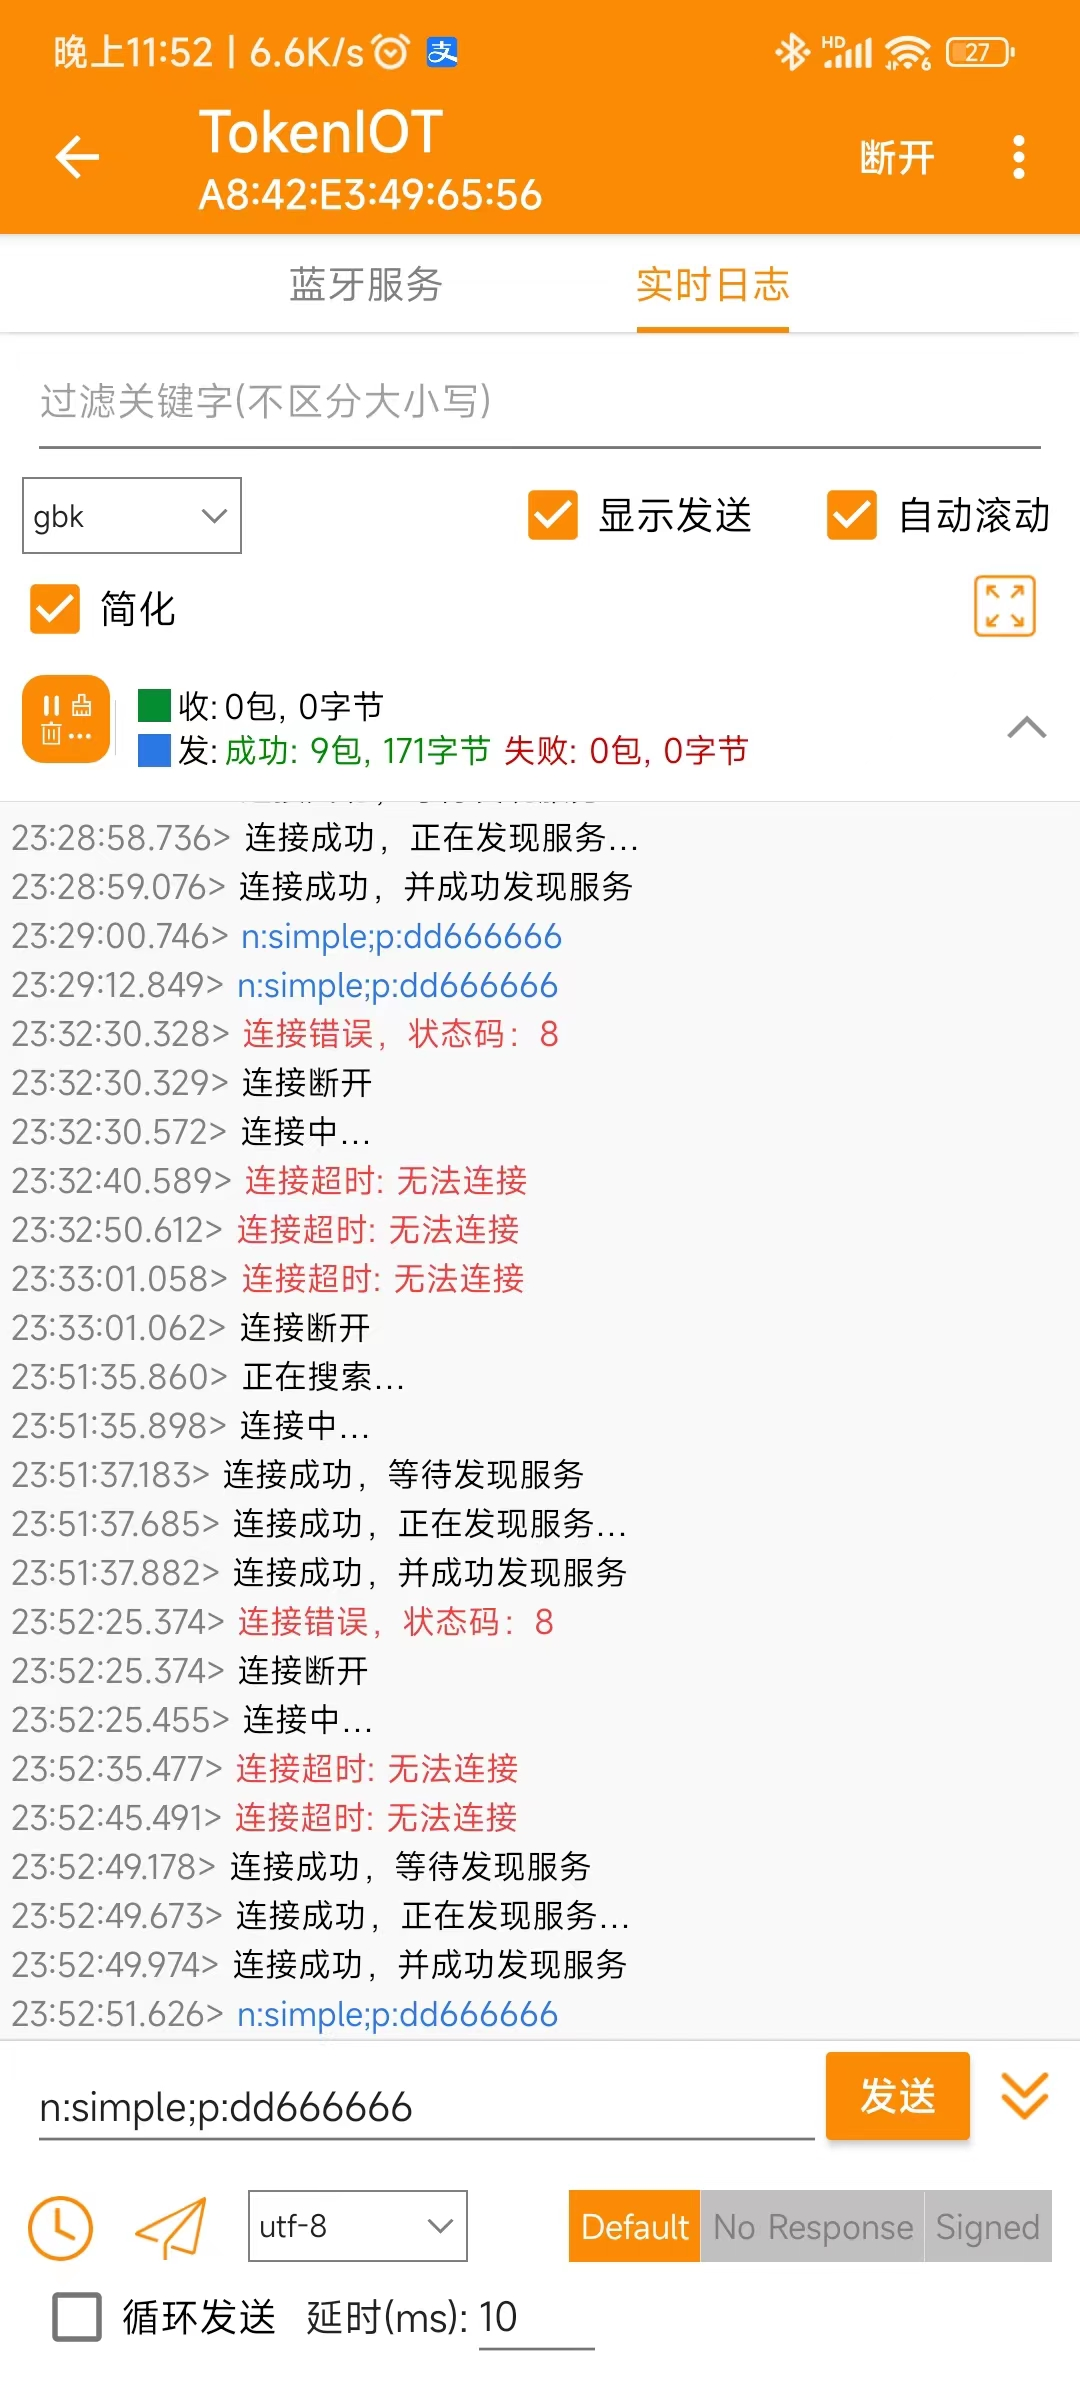
这样就可以动态配置WIFI了,也可以用蓝牙做设备的初始化。
介绍Nanoframework
.NET nanoFramework是一个免费且开源的平台,可以用于编写针对受限嵌入式设备的托管代码应用程序。它适用于多种类型的项目,包括物联网传感器、可穿戴设备、学术概念验证、机器人技术、爱好者/创客创作甚至复杂的工业设备。它通过为嵌入式开发人员提供桌面应用程序开发人员使用的现代技术和工具,使这些平台的开发更加简单、快速和成本更低。
开发人员可以利用强大且熟悉的Microsoft Visual Studio集成开发环境和他们对.NET C#的了解,快速编写代码,无需担心微控制器的底层硬件细节。桌面.NET开发人员将感到“如在家中”,并能够在嵌入式系统开发中运用他们的技能,扩大合格的嵌入式开发人员的队伍。
它包括了.NET通用语言运行时(CLR)的精简版本,并配备了.NET基类库的子集,以及包含在.NET IoT中的最常用API,允许从.NET IoT应用程序中重用代码、数以千计的代码示例和开源项目。使用Microsoft Visual Studio,开发人员可以直接在真实硬件上部署和调试代码。
.NET nanoFramework平台在.NET Micro Framework的基础上进行了扩展,并使用了其中的一些构建模块。许多原始组件被完全重写,其他组件得到改进,还有一些组件被简单地重用。进行了大量的代码清理和改进,使.NET nanoFramework适应未来发展!
技术交流
如果你也对Nanoframework感兴趣的话可以联系wx:wk28u9123456789并且备注Nanoframework就可以加入Nanoframework中文社区交流群,由于群人数过多不能使用二维码加入敬请谅解!
来自token的分享
Nanoframework 操作单片机蓝牙配置WIFI的案例的更多相关文章
- 树莓派3启动wifi并且配置wifi
概述 树莓派3内置了wifi和蓝牙模块,我们不用像以前的版本那样,再去购买一个外接的模块练到raspberry上. 当我们第一次启动了树莓派的时候,必然使用了网线,但是之后的每一次使用,我们当然更希望 ...
- ESP32那些事儿(六):功能开发之蓝牙及WiFi功能
蓝牙和WIFI是ESP32的核心功能,蓝牙和wifi的共存也是esp32的独门武功,但时候后续也会发现共存的时候会有很多问题.不管怎样,蓝牙和wifi在esp-idf中有很多的例子,大家都可以参考.本 ...
- 移植wpa_supplicant2.5及界面配置wifi(原创)
JP5G开发机上需要图形界面配置 wifi网络,为此移植了wpa_supplicant2.5. 1.参考wpa_supplicant-2.5移植与使用l http://blog.csdn.net/hk ...
- vim常用操作技巧与配置
vi是linux与unix下的常用文本编辑器,其运行稳定,使用方便,本文将分两部分对其常用操作技巧和配置进行阐述,其中参考了网上的一些文章,对作者表示感谢 PART1 操作技巧 说明: 以下的例子中 ...
- linux配置wifi连接并通过ssh代理开启socks代理
1, 命令行配置连接wifi具体我是用的cubieboard2上Debian主机,其中配置wifi的命令行有wpa_cli,具体用法步骤如下.wpa_cli 命令行执行需要root权限,详细用法请见 ...
- LVS+Keepalived实现MySQL从库读操作负载均衡配置
转载于osyunwei 说明: 操作系统:CentOS 5.X 64位 MySQL主服务器:192.168.21.126 MySQL从服务器:192.168.21.127,192.168.21.128 ...
- 用rfkill命令管理蓝牙和wifi
rfkill是一个内核级别的管理工具,可以打开和关闭设备的蓝牙和wifi. #列出所有可用设备rfkill list 输出如下:0: phy0: Wireless LAN Soft blocke ...
- #51单片机#蓝牙模块(ATK-SPP-HC06从机串口)的使用方法
#include <AT89X51.H> #include <intrins.h> // 函数原形定义 #define uchar unsigned char #define ...
- Arduino 基于 ESP8266 配置WIFI模块
Arduino 基于 ESP8266 配置WIFI模块 使用ESP8266作为服务器,使用浏览器访问该服务器,从而控制LED灯 选择 [文件]->[示例]->[ESP8266WIFI]-& ...
- linux 配置网卡、远程拷贝文件、建立软硬链接、打包/解包、压缩/解压缩、包操作、yum配置使用、root密码忘记
目录 一.配置网卡 二.xshell连接 三.远程拷贝文件 四.建立软硬连接 五.打包/解包和压缩/解压缩 六.包操作 七.配置yum源 配置yum源 配置阿里云源 常用命令 yum其他命令 八.重置 ...
随机推荐
- VUE零碎小技巧1
1.回顾 创建项目 vue create myapp 准备 scss 库 修改了页面的主结构 App.vue 构建页面的基本结构 分离页面主结构,创建各个页面组件 views views/home/i ...
- mongo操作数据库
1.回顾 2.node + mongodb 2.1 安装mongodb 项目中既可以使用mongodb,但是推荐使用mongoose cnpm i mongoose@4 -S 2.2 连接数据库 一定 ...
- Android APP开机启动,安卓APP开发自启动,安卓启动后APP自动启动 Android让程序开机自动运行APP 全开源下载
让APP在安卓系统启动自动运行可以带来以下几个好处:用户方便:当用户打开设备时,自动启动所需的APP可以让用户更方便地使用设备,不必手动打开APP.提高用户黏性:自动启动APP可以让用户更快地开始使用 ...
- 二进制安装Kubernetes(k8s) v1.24.1 IPv4/IPv6双栈 --- Ubuntu版
二进制安装Kubernetes(k8s) v1.24.1 IPv4/IPv6双栈 --- Ubuntu版本 Kubernetes 开源不易,帮忙点个star,谢谢了 介绍 kubernetes二进制安 ...
- [设计模式/网络/WebServer/Nginx]设计模式之代理模式(网络代理 : 正向代理与反向代理)【7】
1 代理模式 1.1 模式定义 代理模式(Proxy Pattern):为其他对象提供一种代理服务以对这个被代理的对象进行控制访问.[ 设计模式.面向对象程序设计思想的鼻祖----GoF] Subje ...
- Rust中的into函数和from函数
1.Rust中的into函数和from函数是做什么用的? into函数是Rust语言中的一个转换函数,它属于Into trait.它可以将一个类型转换为另一个类型.实现了From trait的类型会自 ...
- ARouter源码分析
源码看过好几遍了,但是总是会忘记,特此记录下 先从注解处理器开始 BaseProcessor是其他三个注解处理器的抽象类,子类去实现process方法.在其中的init方法中会获取我们的module模 ...
- Ubuntu18搭建vue3
第一步我们可以先更新源(我所有的步骤都在root账户下操作的) sudo apt-get update 然后安装node sudo apt-get install nodejs 安装成功后可以查看版本 ...
- 【LeetCode动态规划#10】完全背包问题实战,其三(单词拆分,涉及集合处理字符串)
单词拆分 力扣题目链接(opens new window) 给定一个非空字符串 s 和一个包含非空单词的列表 wordDict,判定 s 是否可以被空格拆分为一个或多个在字典中出现的单词. 说明: 拆 ...
- js中 call()与apply()方法 和 bind()方法
call与apply都属于Function.prototype(即原型对象身上的方法)的一个方法,所以每个function实例都有call.apply属性: call()和apply() 是静态方法, ...