pydensecrf的inference.py代码的学习
https://github.com/lucasb-eyer/pydensecrf/blob/master/examples/inference.py
1.运行
先运行看看实现的结果:
(deeplearning) userdeMBP:examples user$ python inference.py im1.png anno1.png out1.png

Found a full-black pixel in annotation image, assuming it means 'unknown' label, and will thus not be present in the output!

If  is an actual label for you, consider writing your own code, or simply giving your labels only non-zero values.

  labels  plus "unknown" :  {, , }

Using generic 2D functions

KL-divergence at : -543957.3854815669

KL-divergence at : -890605.7866870646

KL-divergence at : -919933.3682610085

KL-divergence at : -921683.1852052805

KL-divergence at : -922674.4361045817
im1.png和anno1.png是输入图片,out1.png为进行crf处理后的输出图片
im1.png和anno1.png为:
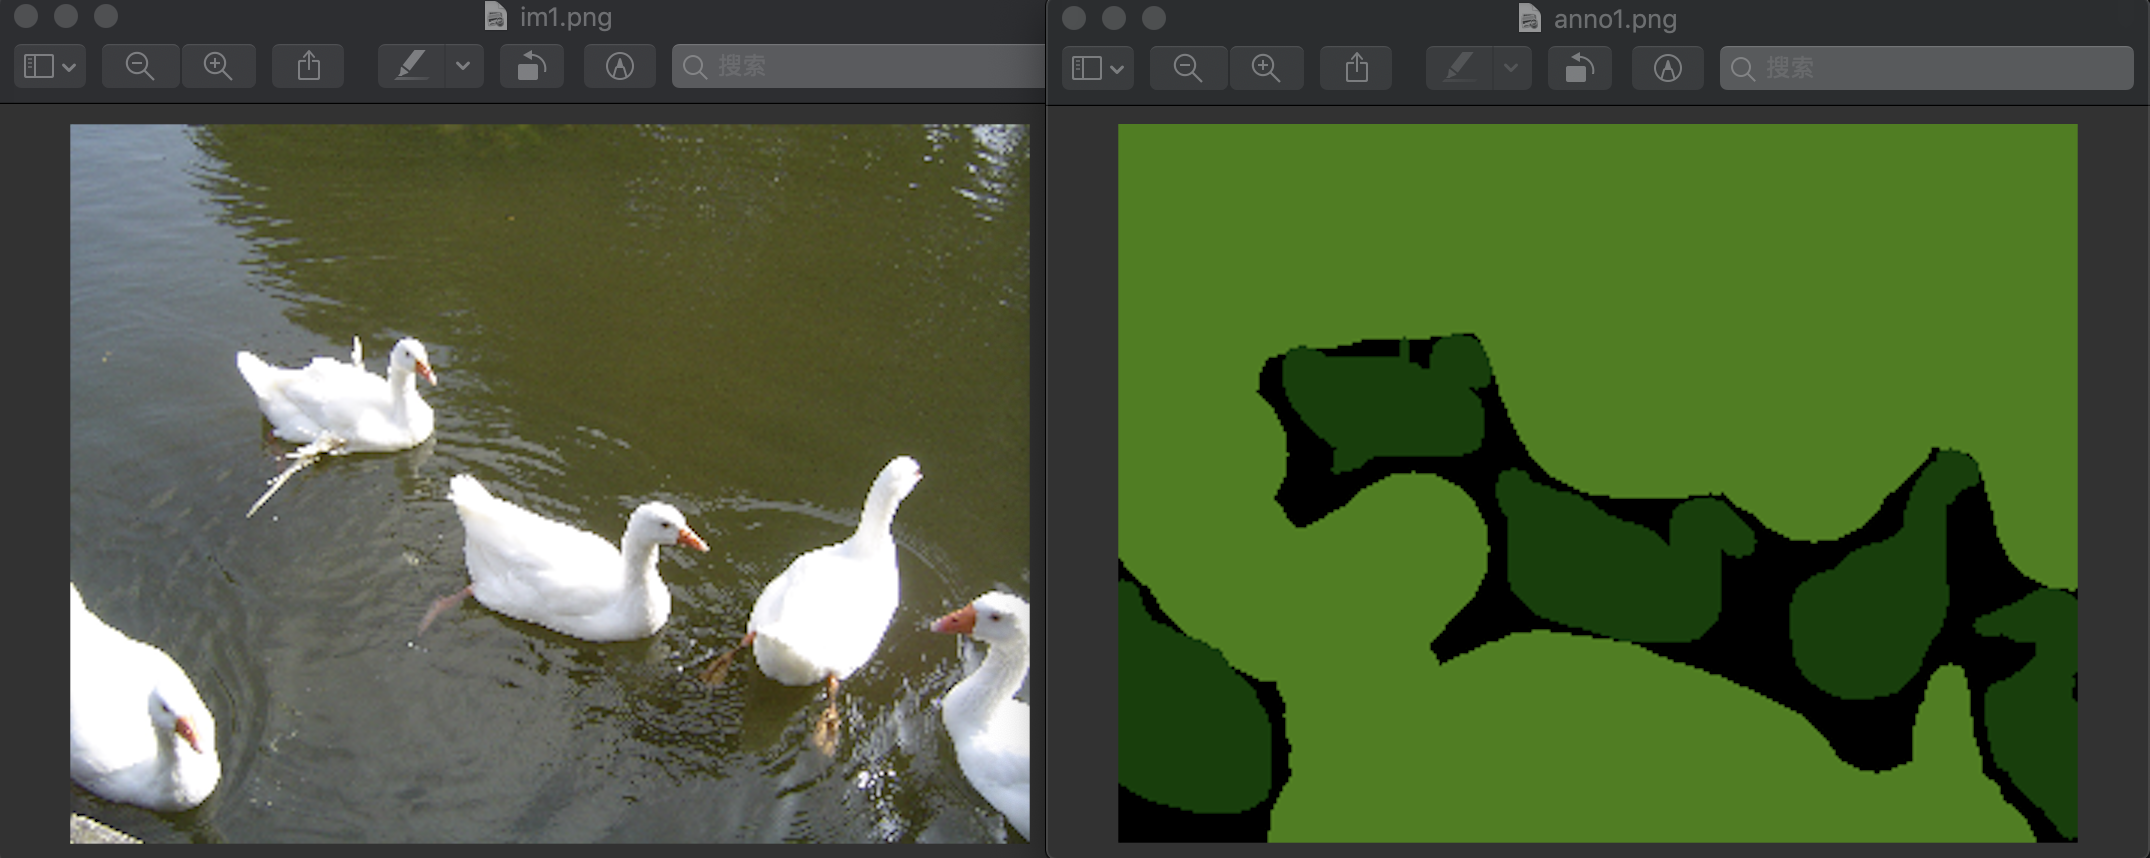
得到的输出结果是:
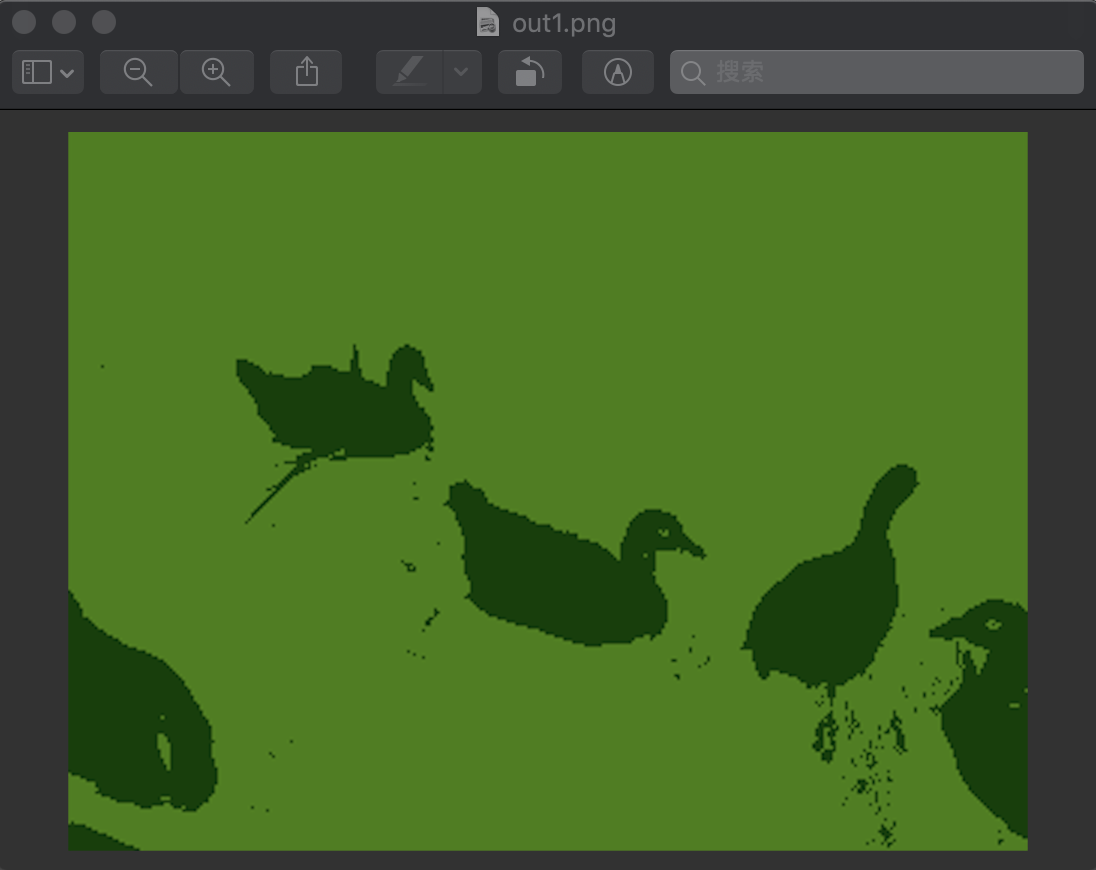
可见效果变得很好
2.代码分析
"""

Adapted from the inference.py to demonstate the usage of the util functions.

"""

import sys

import numpy as np

import pydensecrf.densecrf as dcrf

# Get im{read,write} from somewhere.

try:

    from cv2 import imread, imwrite

except ImportError:

    # Note that, sadly, skimage unconditionally import scipy and matplotlib,

    # so you'll need them if you don't have OpenCV. But you probably have them.

    from skimage.io import imread, imsave

    imwrite = imsave

    # TODO: Use scipy instead.

from pydensecrf.utils import unary_from_labels, create_pairwise_bilateral, create_pairwise_gaussian

if len(sys.argv) != :

    print("Usage: python {} IMAGE ANNO OUTPUT".format(sys.argv[]))

    print("")

    print("IMAGE and ANNO are inputs and OUTPUT is where the result should be written.")

    print("If there's at least one single full-black pixel in ANNO, black is assumed to mean unknown.")

    sys.exit()

fn_im = sys.argv[]#输入的图片

print(fn_im)

fn_anno = sys.argv[]#输入的图片fn_im经过训练后的网络进行预测得到的结果

print(fn_anno)

fn_output = sys.argv[]#指定进行crf处理后的结果输出

print(fn_output)

##############################################################

### Read images and annotation读取输入的两个图片fn_im和fn_anno###

##############################################################

img = imread(fn_im)

# Convert the annotation's RGB color to a single 32-bit integer color 0xBBGGRR

#将fn_anno的三个uint8表示的RGB像素值放到一个uint32像素值中表示

#[,]位为R层的值,[,]为G层的值,[,]为B层的值

anno_rgb = imread(fn_anno).astype(np.uint32)#shape为(, , )

anno_lbl = anno_rgb[:,:,] + (anno_rgb[:,:,] << ) + (anno_rgb[:,:,] << )#shape变为了(, )

# Convert the 32bit integer color to , , ... labels.

# Note that all-black, i.e. the value  for background will stay .

# np.unique该函数是去除数组中的重复数字,并进行排序之后输出

# 这就得到了整张图中有的像素值序列

# #colors返回为[,,],说明图片fn_anno只有这三种像素值

# labels的shape为(,),其为anno_lbl中所有的像素值标上了对应的label

# 在这里color=0时,对应的label为0;color=16384时,对应的label为1;color=4227072时,对应的label为2

# 黑色的像素值为0

colors, labels = np.unique(anno_lbl, return_inverse=True)

# But remove the all- black, that won't exist in the MAP!

# 移除像素值为0,即黑色的值

HAS_UNK =  in colors#若0存在于colors中,则HAS_UNK为True

#在annotation图像中的黑色像素,即color=0的像素,被假设为label='unknown',不会在output中输出

#如果0是一个对你来说有意义的label,那么更改你的代码,或者尽量让你的label为非0的数值

if HAS_UNK:

    print("Found a full-black pixel in annotation image, assuming it means 'unknown' label, and will thus not be present in the output!")

    print("If 0 is an actual label for you, consider writing your own code, or simply giving your labels only non-zero values.")

    colors = colors[:]#然后将color=0从数组中移除

#else:

#    print("No single full-black pixel found in annotation image. Assuming there's no 'unknown' label!")

# And create a mapping back from the labels to 32bit integer colors.

# np.empty()返回一个随机元素的矩阵,值类型为uint8,大小按照参数定义,这里

colorize = np.empty((len(colors), ), np.uint8)#colorize.shape为(,)

#下面将之前合并成0xBBGGRR格式的像素值又分成三层,得到各层像素值的值

colorize[:,] = (colors & 0x0000FF)#得到R层的值,为[,], dtype=uint8

colorize[:,] = (colors & 0x00FF00) >> #得到G层的值,为[ , ], dtype=uint8

colorize[:,] = (colors & 0xFF0000) >> #得到B层的值,[ , ]

# Compute the number of classes in the label image.

# We subtract one because the number shouldn't include the value 0 which stands

# for "unknown" or "unsure".

# set(labels.flat)返回{, , }

# flat将数组变为一个迭代器,可以用for访问数组每一个元素,可以使用索引labels.flat[]来访问第一个元素

# set(迭代对象) 函数创建一个无序不重复元素集,可进行关系测试,删除重复数据

n_labels = len(set(labels.flat)) - int(HAS_UNK) #返回2,得到除去了label=0后还有两个label

print(n_labels, " labels", (" plus \"unknown\" 0: " if HAS_UNK else ""), set(labels.flat))

###########################

### Setup the CRF model ###

###########################

#上面处理完图片fn_anno,得到labels和colors

#接下来就是设置CRF模型了

use_2d = False #是否使用二维指定函数DenseCRF2D,这里设置为False,则说明使用的是一般函数DenseCRF

# use_2d = True

if use_2d:

    print("Using 2D specialized functions")

    # Example using the DenseCRF2D code

    d = dcrf.DenseCRF2D(img.shape[], img.shape[], n_labels)

    # get unary potentials (neg log probability)

    U = unary_from_labels(labels, n_labels, gt_prob=0.7, zero_unsure=HAS_UNK)

    d.setUnaryEnergy(U)

    # This adds the color-independent term, features are the locations only.

    # 创建颜色无关特征,这里只有位置特征,并添加到CRF中

    d.addPairwiseGaussian(sxy=(, ), compat=, kernel=dcrf.DIAG_KERNEL,

                          normalization=dcrf.NORMALIZE_SYMMETRIC)

    # This adds the color-dependent term, i.e. features are (x,y,r,g,b).

    # 根据原始图像img创建颜色相关特征和位置相关并添加到CRF中,特征为(x,y,r,g,b)

    d.addPairwiseBilateral(sxy=(, ), srgb=(, , ), rgbim=img,

                           compat=,

                           kernel=dcrf.DIAG_KERNEL,

                           normalization=dcrf.NORMALIZE_SYMMETRIC)

else:

    print("Using generic 2D functions")

    # Example using the DenseCRF class and the util functions

    # 使用DenseCRF类和util函数

    # n_labels为2,从上面对fn_anno的分析可知有两个label

    d = dcrf.DenseCRF(img.shape[] * img.shape[], n_labels)

    # get unary potentials (neg log probability)

    # 得到一元势(即去负对数),labels为对所有像素值标注label后的数组,label类型n_labels=,

    U = unary_from_labels(labels, n_labels, gt_prob=0.7, zero_unsure=HAS_UNK) #U.shape为(, ),即(n_labels,len(labels))

    d.setUnaryEnergy(U) #将一元势添加到CRF中

    # This creates the color-independent features and then add them to the CRF

    # 创建颜色无关特征,这里只有位置特征,并添加到CRF中

    feats = create_pairwise_gaussian(sdims=(, ), shape=img.shape[:]) #shape为(, )

    d.addPairwiseEnergy(feats, compat=,

                        kernel=dcrf.DIAG_KERNEL,

                        normalization=dcrf.NORMALIZE_SYMMETRIC)

    # This creates the color-dependent features and then add them to the CRF

    # 根据原始图像img创建颜色相关和位置相关特征并添加到CRF中,特征为(x,y,r,g,b)

    feats = create_pairwise_bilateral(sdims=(, ), schan=(, , ),

                                      img=img, chdim=)

    d.addPairwiseEnergy(feats, compat=,

                        kernel=dcrf.DIAG_KERNEL,

                        normalization=dcrf.NORMALIZE_SYMMETRIC)

####################################

### Do inference and compute MAP ###

####################################

#上面就将相应的CRF构建好了

#然后要做的就是对img根据fn_anno得到的label和colors结果进行CRF推理

#然后得到输出值fn_output了

# Run five inference steps.迭代5次

Q = d.inference()

# Find out the most probable class for each pixel.

# 找出每个像素最可能的类

# np.argmax取出Q元素中最大的值对应的索引,axis=0按列查找

MAP = np.argmax(Q, axis=)

# MAP,MAP.shape返回

# (array([, , , ..., , , ]), (,))

# 将MAP(标签)转换回相应的颜色并保存图像。

#注意,这里不再有“unknown”标签,不管我们一开始拥有什么。

#colorize返回两个label的color[,]对应的RGB的值

#16384对应[  ,  ,   ],4227072对应[  , ,  ]

#array([[  ,  ,   ],

#       [  , ,  ]], dtype=uint8)

#MAP中1值对应的是4227072即[  , ,  ]

MAP = colorize[MAP,:] #MAP.shape为(, ),这就是最后的结果

#将MAP转成img相同的大小,就能够得到最后的结果了

imwrite(fn_output, MAP.reshape(img.shape))

# Just randomly manually run inference iterations

# 这里是手动实现迭代推理

Q, tmp1, tmp2 = d.startInference()

for i in range():

    print("KL-divergence at {}: {}".format(i, d.klDivergence(Q)))

    d.stepInference(Q, tmp1, tmp2)
pydensecrf的inference.py代码的学习的更多相关文章
- PHP代码安全学习笔记V1.0
PHP代码安全学习笔记V1.0http://www.docin.com/p-778369487.html
- Delphi之通过代码示例学习XML解析、StringReplace的用法(异常控制 good)
*Delphi之通过代码示例学习XML解析.StringReplace的用法 这个程序可以用于解析任何合法的XML字符串. 首先是看一下程序的运行效果: 以解析这样一个XML的字符串为例: <? ...
- 转【面向代码】学习 Deep Learning(二)Deep Belief Nets(DBNs)
[面向代码]学习 Deep Learning(二)Deep Belief Nets(DBNs) http://blog.csdn.net/dark_scope/article/details/9447 ...
- 20155207 《网络对抗》exp4 恶意代码分析 学习总结
20155207 <网络对抗> 恶意代码分析 学习总结 实践目标 1.是监控你自己系统的运行状态,看有没有可疑的程序在运行. 2.是分析一个恶意软件,就分析Exp2或Exp3中生成后门软件 ...
- 【tensorflow使用笔记二】:tensorflow中input_data.py代码有问题的解决方法
由于input_data网页打不开,因此从博客找到代码copy: https://blog.csdn.net/weixin_43159628/article/details/83241345 将代码放 ...
- 从别人的代码中学习golang系列--01
自己最近在思考一个问题,如何让自己的代码质量逐渐提高,于是想到整理这个系列,通过阅读别人的代码,从别人的代码中学习,来逐渐提高自己的代码质量.本篇是这个系列的第一篇,我也不知道自己会写多少篇,但是希望 ...
- 从别人的代码中学习golang系列--03
这篇博客还是整理从https://github.com/LyricTian/gin-admin 这个项目中学习的golang相关知识. 作者在项目中使用了 github.com/casbin/casb ...
- 编写我的第一个CGI代码——python学习
在编程学习网站学习Python语言,学习到cgi编程章节遇到了一些小问题,课程介绍的为linux环境的Apache配置方法,具体如下: [linux环境配置方法:] 在进行CGI编程前,确保您的Web ...
- Python 框架化代码的学习
1 def 1: 2 pass 3 4 def 2: 5 pass 6 7 def 3: 8 pass 从Python初学我们习惯的风格就是如上图,把函数方法直接放到全局来写,这的确是最简单易懂的方式 ...
随机推荐
- ThreadLocal使用和原理简析
1. 解决共享资源冲突 对于并发工作,需要某种方式来防止两个任务同时访问相同的资源,至少在关键阶段不能出现这种冲突情况. 方法之一就是当资源被一个任务使用时,在其上加锁.第一个访问某项资源的任务必须锁 ...
- github访问很慢解决方案
首先要解决的就是这个访问速度的问题: 获取Github相关网站的ip 访问https://www.ipaddress.com,拉下来,找到页面中下方的“IP Address Tools – Quick ...
- 克拉克拉(KilaKila):大规模实时计算平台架构实战
克拉克拉(KilaKila):大规模实时计算平台架构实战 一.产品背景:克拉克拉(KilaKila)是国内专注二次元.主打年轻用户的娱乐互动内容社区软件.KilaKila推出互动语音直播.短视频配音. ...
- Centos 7 Puppet之foreman介绍安装测试
一.简介 1.前言(引用一下网上的资料) 随着企业的 Linux 系统数量越来越多,管理问题便成为一个相对麻烦并需要急 迫解决的问题,这里有 2 个 Key Message:1)统一管控体系非常重要, ...
- javascript基础修炼(9)——MVVM中双向数据绑定的基本原理
开发者的javascript造诣取决于对[动态]和[异步]这两个词的理解水平. 一. 概述 1.1 MVVM模型 MVVM模型是前端单页面应用中非常重要的模型之一,也是Single Page Appl ...
- MySQL 笔记整理(2) --日志系统,一条SQL查询语句如何执行
笔记记录自林晓斌(丁奇)老师的<MySQL实战45讲> 2) --日志系统,一条SQL查询语句如何执行 MySQL可以恢复到半个月内任意一秒的状态,它的实现和日志系统有关.上一篇中记录了一 ...
- Python判断相等
判断相等方法有好几个:== .is . isinstance .issubclass .operator 模块. == :两个对象内容是否相等. >>> a = [22,44]> ...
- python学习笔记(六)、类
Python与java.c++等都被视为一种面向对象的语言.通过创建自定义类,用于处理各种业务逻辑.面向对象有封装.继承.多态三个特征,这也是面子对象语言的通用特征. 1 封装 封装,是值向外部隐藏内 ...
- django项目环境搭建
本文转载自: https://blog.csdn.net/xiaogeldx/article/details/89038299 在码云平台创建项目 版本控制的种类 主要使用github(最主流) 国内 ...
- 转:从输入url到显示网页发生了什么
在浏览器中输入url到显示网页主要包含两个部分: 网络通信和页面渲染 互联网内各网络设备间的通信都遵循TCP/IP协议,利用TCP/IP协议族进行网络通信时,会通过分层顺序与对方进行通信.分层由高到低 ...