linux---网络相关配置,ssh服务,bash命令及优先级,元字符
-
二:临时配置网络(ip,网关,dns)+永久配置
临时配置:
|
[root@nfs-server ~]# ens32: inet inet6 ether RX RX TX TX lo: inet inet6 loop RX RX TX TX [root@nfs-server ~]# [root@nfs-server ~]# route Kernel IP routing table Destination 192.168.152.0 [root@nfs-server ~]# route [root@nfs-server ~]# route Kernel IP routing table Destination 0.0.0.0 192.168.152.0 [root@nfs-server ~]# cat # Generated by search localdomain nameserver 192.168.152.2 nameserver 202.106.0.20 |
永久配置:
|
[root@nfs-server ~]# cat TYPE=Ethernet BOOTPROTO=dhcp IPADDR=192.168.152.134 NETMASK=255.255.255.0 GATEWAY=192.168.152.2 DNS1=192.168.152.2 DNS2=202.106.0.20 DEFROUTE=yes PEERDNS=yes PEERROUTES=yes IPV4_FAILURE_FATAL=no IPV6INIT=yes IPV6_AUTOCONF=yes IPV6_DEFROUTE=yes IPV6_PEERDNS=yes IPV6_PEERROUTES=yes IPV6_FAILURE_FATAL=no IPV6_ADDR_GEN_MODE=stable-privacy NAME=ens32 UUID=9eff3909-2614-4df9-80c9-a6a7d9f1be28 DEVICE=ens32 ONBOOT=yes [root@nfs-server ~]# |
三:为集群内的机器设定主机名,利用/etc/hosts文件来解析自己的集群中所有的主机名,相应的,集群的配置应该改成使用主机名的方式
修改主机名:
hostname python_web1
cat /etc/hostname
python_web1
修改host文件:
[root@python_web1 ~]# cat /etc/hosts
192.168.2.3 python_web1
[root@python_web1 ~]# ping python_web1
四:ssh登录,scp上传、下载,ssh秘钥登录,修改ssh
server端的端口为8888然后进行登录和scp测试
SSH登录:
|
[root@proxy-nfs ~]# scp The authenticity of ECDSA key Are you sure you want Warning: Permanently root@web01's password: hosts [root@proxy-nfs ~]# scp root@web01's password: hosts [root@proxy-nfs ~]# ls -l -rw-r--r-- 1 root root 274 |
秘钥登录:
|
[root@proxy-nfs ~]# Generating public/private rsa Enter Enter passphrase Enter same passphrase Your identification has Your public key The key 29:90:f7:3a:24:0a:e2:f9:22:ec:f4:07:75:7c:10:6b The key's randomart +--[ RSA 2048]----+ | | . | o | |o o + |o..o o |.+. . |ooo . |o..o. +-----------------+ [root@proxy-nfs ~]# /usr/bin/ssh-copy-id: INFO: /usr/bin/ssh-copy-id: INFO: root@web01's password: Number of key(s) added: 1 Now try logging into the and check to make sure that [root@proxy-nfs ~]# [root@proxy-nfs ~]# The authenticity of ECDSA key Are you sure you want to continue connecting /usr/bin/ssh-copy-id: INFO: /usr/bin/ssh-copy-id: INFO: root@web02's password: Number of key(s) added: 1 Now try logging into the and check to make sure that [root@proxy-nfs ~]# The authenticity of host 'web03 ECDSA key Are you sure you want /usr/bin/ssh-copy-id: INFO: /usr/bin/ssh-copy-id: INFO: root@web03's password: Number of key(s) added: 1 Now try logging into the and check to make sure that # 修改SSH端口 [root@proxy-nfs ~]# ssh Last login: Tue Mar 21 [root@web01 ~]# sed -i [root@web01 ~]# grep 8888 Port 8888 [root@web01 ~]# exit logout Connection to web01 closed. [root@proxy-nfs ~]# ssh Last login: Tue Mar 21 [root@web02 ~]# sed -i [root@web02 ~]# grep 8888 Port 8888 [root@web02 ~]# exit logout Connection to web02 closed. [root@proxy-nfs ~]# ssh Last login: Tue Mar 21 [root@web03 ~]# sed -i [root@web03 ~]# grep 8888 Port 8888 [root@web03 ~]# exit logout Connection to web03 closed. [root@proxy-nfs ~]# # SCP 远程拷贝文件 [root@proxy-nfs ~]# touch [root@proxy-nfs ~]# scp oldgirl.txt [root@proxy-nfs ~]# scp passwd |
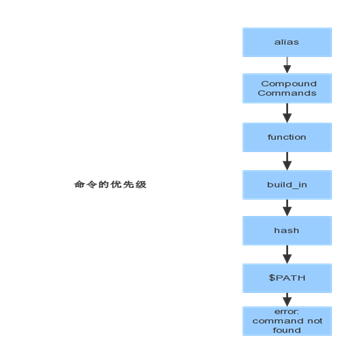
五:整理bash命令类型,验证寻找一个命令的优先级
# 以ls命令为例
命令分为:
==> alias
==> Compound Commands
==> function
==> build_in
==> hash
==> $PATH
==> error: command not found
获取一个命令会按照上述优先级取寻找,先找同名的alias命令,再找compound命令。。。
linux---网络相关配置,ssh服务,bash命令及优先级,元字符的更多相关文章
- Linux网络相关配置
一.修改网卡相关配置 Linux网络参数是在/etc/sysconfig/network-scripts/ifcfg-eth0中设置,其中ifcfg-eth0表示是第一个网卡,如果还有另外一块网卡,则 ...
- Linux网络属性配置命令和管理详解
一.Linux网络属性配置 1.Linux主机接入到网络方式 IP/NETMASK:实现本地网络通信 路由(网关):可以进行跨网络通信 DNS服务器地址:基于主机名的通信,Linux可以有三个DNS地 ...
- Linux下安装并配置SSH服务
一.使用命令检测Linux系统上是否已经安装了SSH服务:(命令:rpm -qa |grep ssh) 二.如果没有安装SSH软件包,可以通过yum 或rpm安装包进行安装(命令:yum instal ...
- Linux 网络相关命令 Cheat Sheet
以下漫画形式呈现的常用 Linux 网络相关命令速查表来自 twitter -
- 10.11 Linux网络相关 10.12 firewalld和netfilter 10.13 netfilter5表5链介绍 10.14 iptables语法
Linux网络相关 ifocnfig 查看网卡ip(yum install net-tools) ip add 查看网卡 ip add = ifocnfig ifconfig 不显示down掉的网卡, ...
- Linux网络基础配置
这是看itercast视频的笔记 Linux网络基础配置 以太网连接 在Linux中,以太网接口被命令为:eth0, eth1等, 0,1代表网卡编号 通过lspci命令可以查看网上硬件信息(如果是u ...
- Linux入门-6 Linux网络基本配置
1. 网络基础知识 网络编址 IP编址 子网掩码 同一网络主机之间通信--MAC地址 不同网络之间的通信 路由 域名 DNS 基本网络参数 2. Linux网络基础配置 以太网连接 配置网络信息 网络 ...
- Linux网络相关、firewalld和netfilter、netfilter5表5链介绍、iptables语法 使用介绍
第7周第3次课(5月9日) 课程内容: 10.11 Linux网络相关10.12 firewalld和netfilter10.13 netfilter5表5链介绍10.14 iptables语法 扩展 ...
- CentOS7系列--2.2CentOS7中配置SSH服务
CentOS7配置SSH服务 1. SSH配置 1.1. 使用SSH服务更加安全 [root@centos7 ~]# vi /etc/ssh/sshd_config 设置如下 PermitRootLo ...
- Linux centos7 Linux网络相关、firewalld和netfilter、netfilter5表5链介绍、iptables语法
一. Linux网络相关 yum install net-tools ifconfig查看网卡ip ifup ens33开启网卡 ifdown ens33关闭网卡 设定虚拟网卡ens33:0 mii- ...
随机推荐
- WebBrowser自动填充打开文件对话框
WebBrowser自动填充打开文件对话框 在使用WebBrowser编写自动表单填写软件的时候,不知道大家是否遇到国填写文件选择表单的情况.遇到这种情况的时候,无法直接队Html元素赋值,必须模 ...
- SSH查看Linux系统是32位还是64位?
Linux下如何明确地查看操作系统的位数 如何知晓操作系统是32位还是64位?这里介绍一种简单的方式: [root@localhost mysql-5.1.57]# getconf LONG_BI ...
- JQuery点击标题实现div的收缩
<!DOCTYPE html> <html xmlns="http://www.w3.org/1999/xhtml"> <head> <m ...
- __new__方法以及TypeError: object() takes no parameters的处理
一些python书或博客将类中的__init__方法称为构造函数,而实际上这种说法是不严格的,因为创建实例的方法是__new__,实例初始化的方法是__init__.__new__方法会返回一个实例, ...
- 基于EasyUI 快速搭建权限管理平台
前言: 一.用户角色权限设计思路: <1>不同职责的人员,对于系统操作的权限应该是不同;<2>可以对“组”进行权限分配;<3>权限管理系统应该是可扩展的;<4 ...
- java的接口为什么不能实例化
java的接口为什么不能实例化呢?首先,我们需要明白实例化的含义.实例化实际意义是在jvm的堆中开辟出一块内存空间,比如Student s = new Student();此处声明Student对象s ...
- QML学习之浅谈Window
转载地址:http://blog.csdn.net/kanchuan1905/article/details/53762788 在Qt Quick的世界里,Window对象用于创建一个与操作系统相关 ...
- Ubuntu16.04桌面版 连接到ftp服务器
Ftp服务器在不同的网段,需要临时添加网段 不同网段临时添加方法: root@xzrs:/home/rxf# ip addr add 10.1.2.127/24 dev enp0s25 电脑左侧“连接 ...
- [Face++]Face初探——人脸检测
经过了强烈的思想斗争才把自己拖到图书馆做毕设T^T anyway, 因为毕设里面有人脸识别的部分,所以就想找个现成的api先玩玩,于是就找到最近很火的face++:http://www.faceplu ...
- 20145303刘俊谦 《Java程序设计》第十周学习总结
教材学习内容总结 网络编程 就是在两个或两个以上的设备(例如计算机)之间传输数据.程序员所作的事情就是把数据发送到指定的位置,或者接收到指定的数据,这个就是狭义的网络编程范畴.在发送和接收数据时,大部 ...