
aws上传文件、删除文件、图像识别
aws的上传、删除s3文件以及图像识别文字功能
准备工作
安装aws cli
根据自己的操作系统,下载相应的安装包安装。安装过程很简单,在此不再赘述。
在安装完成之后,运行以下两个命令来验证AWS CLI是否安装成功。参考以下示例,在MacOS上打开Terminal程序。如果是Windows系统,打开cmd。
- where aws / which aws 查看AWS CLI安装路径
- aws --version 查看AWS CLI版本
zonghan@MacBook-Pro ~ % aws --version

aws-cli/2.0.30 Python/3.7.4 Darwin/21.6.0 botocore/2.0.0dev34

zonghan@MacBook-Pro ~ % which aws

/usr/local/bin/aws
初始化配置AWS CLI
在使用AWS CLI前,可使用aws configure命令,完成初始化配置。
zonghan@MacBook-Pro ~ % aws configure

AWS Access Key ID [None]: AKIA3GRZL6WIQEXAMPLE

AWS Secret Access Key [None]: k+ci5r+hAcM3x61w1example

Default region name [None]: ap-east-1

Default output format [None]: json
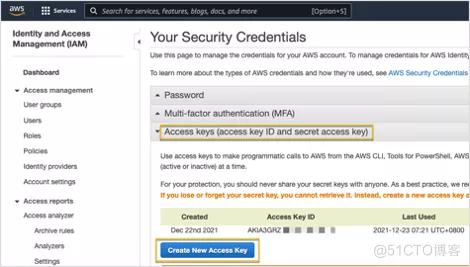
AWS Access Key ID 及AWS Secret Access Key可在AWS管理控制台获取,AWS CLI将会使用此信息作为用户名、密码连接AWS服务。
点击AWS管理控制台右上角的用户名 --> 选择Security Credentials
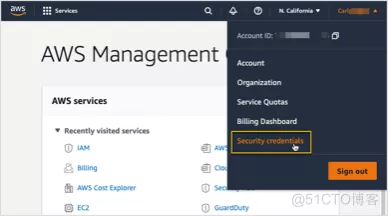
- 点击Create New Access Key以创建一对Access Key ID 及Secret Access Key,并保存(且仅能在创建时保存)
- Default region name,用以指定要连接的AWS 区域代码。每个AWS区域对应的代码可通过 此链接查找。
- Default output format,用以指定命令行输出内容的格式,默认使用JSON作为所有输出的格式。也可以使用以下任一格式:
JSON(JavaScript Object Notation)
YAML: 仅在 AWS CLI v2 版本中可用
Text
Table
更多详细的配置请看该文章
s3存储桶开通
该电脑配置的认证用户在aws的s3上有权限访问一个s3的存储桶,这个一般都是管理员给你开通
图像识别文字功能开通
该电脑配置的认证用户在aws的Amazon Textract的权限,这个一般都是管理员给你开通
aws的sdk
import boto3

from botocore.exceptions import ClientError, BotoCoreError
安装上述boto3的模块,一般会同时安装botocore模块
上传文件
方法一
使用upload_file方法来上传文件
import logging

import boto3

from botocore.exceptions import ClientError

import os

def upload_file(file_path, bucket, file_name=None):

    """Upload a file to an S3 bucket

    :param file_name: File to upload

    :param bucket: Bucket to upload to

    :param object_name: S3 object name. If not specified then file_name is used

    :return: True if file was uploaded, else False

    """

    # If S3 object_name was not specified, use file_name

    if object_name is None:

        object_name = os.path.basename(file_name)

    # Upload the file

    s3_client = boto3.client('s3')

    # s3 = boto3.resource('s3')

    try:

        response = s3_client.upload_file(file_path, bucket, file_name)

        # response = s3.Bucket(bucket).upload_file(file_name, object_name)

    except ClientError as e:

        logging.error(e)

        return False

    return True
方法二
使用PutObject来上传文件
import logging

import os

import boto3

from botocore.exceptions import ClientError, BotoCoreError

from django.conf import settings

from celery import shared_task

logger = logging.getLogger(__name__)

def upload_file_to_aws(file_path, bucket, file_name=None):

    """Upload a file to an S3 bucket

    :param file_path: File to upload

    :param file_name: S3 object name. If not specified then file_path is used

    :return: True if file was uploaded, else False

    """

    # If S3 object_name was not specified, use file_name

    if file_name is None:

        file_name = os.path.basename(file_path)

    # Upload the file

    s3 = boto3.resource('s3')

    try:

        with open(file_path, 'rb') as f:

            data = f.read()

        obj = s3.Object(bucket, file_name)

        obj.put(

            Body=data

        )

    except BotoCoreError as e:

        logger.info(e)

        return False

    return True
删除文件
def delete_aws_file(file_name, bucket):

    try:

        s3_client = boto3.client("s3")

        s3_client.delete_object(Bucket=bucket, Key=file_name)

    except Exception as e:

        logger.info(e)
图像识别文字
识别发票、账单这种key,value的形式
def get_labels_and_values(result, field):

    if "LabelDetection" in field:

        key = field.get("LabelDetection")["Text"]

        value = field.get("ValueDetection")["Text"]

        if key and value:

            if key.endswith(":"):

                key = key[:-1]

            result.append({key: value})

def process_text_detection(bucket, document):

    try:

        client = boto3.client("textract", region_name="ap-south-1")

        response = client.analyze_expense(

            Document={"S3Object": {"Bucket": bucket, "Name": document}}

        )

    except Exception as e:

        logger.info(e)

        raise "An unknown error occurred on the aws service"

    result = {}

    for expense_doc in response["ExpenseDocuments"]:

        for line_item_group in expense_doc["LineItemGroups"]:

            for line_items in line_item_group["LineItems"]:

                for expense_fields in line_items["LineItemExpenseFields"]:

                    get_labels_and_values(result, expense_fields)

        for summary_field in expense_doc["SummaryFields"]:

            get_labels_and_values(result, summary_field)

    return result

def get_extract_info(bucket, document):

    return process_text_detection(bucket, document)
单纯的识别文字
#Analyzes text in a document stored in an S3 bucket. Display polygon box around text and angled text

import boto3

import io

from io import BytesIO

import sys

import math

from PIL import Image, ImageDraw, ImageFont

def ShowBoundingBox(draw,box,width,height,boxColor):

    left = width * box['Left']

    top = height * box['Top']

    draw.rectangle([left,top, left + (width * box['Width']), top +(height * box['Height'])],outline=boxColor)

def ShowSelectedElement(draw,box,width,height,boxColor):

    left = width * box['Left']

    top = height * box['Top']

    draw.rectangle([left,top, left + (width * box['Width']), top +(height * box['Height'])],fill=boxColor)

# Displays information about a block returned by text detection and text analysis

def DisplayBlockInformation(block):

    print('Id: {}'.format(block['Id']))

    if 'Text' in block:

        print('    Detected: ' + block['Text'])

    print('    Type: ' + block['BlockType'])

    if 'Confidence' in block:

        print('    Confidence: ' + "{:.2f}".format(block['Confidence']) + "%")

    if block['BlockType'] == 'CELL':

        print("    Cell information")

        print("        Column:" + str(block['ColumnIndex']))

        print("        Row:" + str(block['RowIndex']))

        print("        Column Span:" + str(block['ColumnSpan']))

        print("        RowSpan:" + str(block['ColumnSpan']))

    if 'Relationships' in block:

        print('    Relationships: {}'.format(block['Relationships']))

    print('    Geometry: ')

    print('        Bounding Box: {}'.format(block['Geometry']['BoundingBox']))

    print('        Polygon: {}'.format(block['Geometry']['Polygon']))

    if block['BlockType'] == "KEY_VALUE_SET":

        print ('    Entity Type: ' + block['EntityTypes'][0])

    if block['BlockType'] == 'SELECTION_ELEMENT':

        print('    Selection element detected: ', end='')

        if block['SelectionStatus'] =='SELECTED':

            print('Selected')

        else:

            print('Not selected')

    if 'Page' in block:

        print('Page: ' + block['Page'])

    print()

def process_text_analysis(bucket, document):

    #Get the document from S3

    s3_connection = boto3.resource('s3')

    s3_object = s3_connection.Object(bucket,document)

    s3_response = s3_object.get()

    stream = io.BytesIO(s3_response['Body'].read())

    image=Image.open(stream)

    # Analyze the document

    client = boto3.client('textract')

    image_binary = stream.getvalue()

    response = client.analyze_document(Document={'Bytes': image_binary},

        FeatureTypes=["TABLES", "FORMS"])

    ### Alternatively, process using S3 object ###

    #response = client.analyze_document(

    #    Document={'S3Object': {'Bucket': bucket, 'Name': document}},

    #    FeatureTypes=["TABLES", "FORMS"])

    ### To use a local file ###

    # with open("pathToFile", 'rb') as img_file:

        ### To display image using PIL ###

    #    image = Image.open()

        ### Read bytes ###

    #    img_bytes = img_file.read()

    #    response = client.analyze_document(Document={'Bytes': img_bytes}, FeatureTypes=["TABLES", "FORMS"])

    #Get the text blocks

    blocks=response['Blocks']

    width, height =image.size

    draw = ImageDraw.Draw(image)

    print ('Detected Document Text')

    # Create image showing bounding box/polygon the detected lines/text

    for block in blocks:

        DisplayBlockInformation(block)

        draw=ImageDraw.Draw(image)

        if block['BlockType'] == "KEY_VALUE_SET":

            if block['EntityTypes'][0] == "KEY":

                ShowBoundingBox(draw, block['Geometry']['BoundingBox'],width,height,'red')

            else:

                ShowBoundingBox(draw, block['Geometry']['BoundingBox'],width,height,'green')

        if block['BlockType'] == 'TABLE':

            ShowBoundingBox(draw, block['Geometry']['BoundingBox'],width,height, 'blue')

        if block['BlockType'] == 'CELL':

            ShowBoundingBox(draw, block['Geometry']['BoundingBox'],width,height, 'yellow')

        if block['BlockType'] == 'SELECTION_ELEMENT':

            if block['SelectionStatus'] =='SELECTED':

                ShowSelectedElement(draw, block['Geometry']['BoundingBox'],width,height, 'blue')

            #uncomment to draw polygon for all Blocks

            #points=[]

            #for polygon in block['Geometry']['Polygon']:

            #    points.append((width * polygon['X'], height * polygon['Y']))

            #draw.polygon((points), outline='blue')

    # Display the image

    image.show()

    return len(blocks)

def main():

    bucket = ''

    document = ''

    block_count=process_text_analysis(bucket,document)

    print("Blocks detected: " + str(block_count))

if __name__ == "__main__":

    main()
aws上传文件、删除文件、图像识别的更多相关文章
- github 上传或删除 文件 命令
git clone https://github.com/onionhacker/bananaproxy.git cd ~/../.. git config --global user.email & ...
- java 通过sftp服务器上传下载删除文件
最近做了一个sftp服务器文件下载的功能,mark一下: 首先是一个SftpClientUtil 类,封装了对sftp服务器文件上传.下载.删除的方法 import java.io.File; imp ...
- 通过代码链接ftp上传下载删除文件
因为我的项目是Maven项目,首先要导入一个Maven库里的包:pom.xml <dependency> <groupId>com.jcraft</ ...
- 七牛云-上传、删除文件,工具类(Day49)
要求: 1. java1.8以上 2. Maven: 这里的version指定了一个版本范围,每次更新pom.xml的时候会尝试去下载7.5.x版本中的最新版本,你可以手动指定一个固定的版本. < ...
- github上传和删除文件(三)
上传文件: git init git add * git commit -m "description" //git remote rm origin 或查看当前 git remo ...
- java FTP 上传下载删除文件
在JAVA程序中,经常需要和FTP打交道,比如向FTP服务器上传文件.下载文件,本文简单介绍如何利用jakarta commons中的FTPClient(在commons-net包中)实现上传下载文件 ...
- 使用eclipse-hadoop插件无法再eclipse操作(上传、删除文件)
再conf中的hdfs-site.xml添加如下配置: <property><name>dfs.permissions</name><value>fal ...
- FastDfs java客户端上传、删除文件
#配置文件 connect_timeout = 2 network_timeout = 30 charset = UTF-8 http.tracker_http_port = 9090 http.an ...
- Struts2 文件上传,下载,删除
本文介绍了: 1.基于表单的文件上传 2.Struts 2 的文件下载 3.Struts2.文件上传 4.使用FileInputStream FileOutputStream文件流来上传 5.使用Fi ...
随机推荐
- python3.7爬虫:使用Selenium带Cookie登录并且模拟进行表单上传文件
原文转载自「刘悦的技术博客」https://v3u.cn/a_id_142 前文再续,书接上一回,之前一篇文章我们尝试用百度api智能识别在线验证码进行模拟登录:Python3.7爬虫:实时api(百 ...
- 新型MPP的Doris数据库:数据模型和数据分区使用详解
Apache Doris是一个现代化的MPP分析性数据库产品.是一个由百度开源,在2018年贡献给Apache基金会,成为有顶级开源项目.仅需要亚秒级响应时间即可获得查询结果,可以有效地支持实时数据分 ...
- docker容器技术基础入门
目录 docker容器技术基础入门 容器(Container) 传统虚拟化与容器的区别 Linux容器技术 Linux Namespaces CGroups LXC docker基本概念 docker ...
- 技术分享 | load data导致主键丢失的神秘问题
欢迎来到 GreatSQL社区分享的MySQL技术文章,如有疑问或想学习的内容,可以在下方评论区留言,看到后会进行解答 GreatSQL社区原创内容未经授权不得随意使用,转载请联系小编并注明来源. 1 ...
- WorkflowAsCode 来了,Apache DolphinScheduler 2.0.2 惊喜发布
文章目录 前言 01 新功能 1 WorkflowAsCode 2 企业微信告警方式支持群聊消息推送 02 优化 1 简化元数据初始化流程 2 删除补数日期中的"+1"(天) 03 ...
- DolphinScheduler 荣获 2021 中国开源云联盟优秀开源项目奖!
点击上方 蓝字关注我们 好消息,中国开源云联盟(China Open Source Cloud League,简称"COSCL")于近日公布 2021 杰出开源贡献者.优秀开源项目 ...
- 新一代大数据任务调度系统 - Apache DolphinScheduler 1.3.4 发布,推荐下载
| 本文编辑:朱桐 新一代大数据任务调度 - Apache DolphinScheduler(incubator) 在经过社区 30 多位小伙伴的贡献与努力下于发布了 1.3.4 版本,1.3.4 作 ...
- SP104 Highways (矩阵树,高斯消元)
矩阵树定理裸题 //#include <iostream> #include <cstdio> #include <cstring> #include <al ...
- ABP vNext系列文章03---依赖注入
一.依赖注入的类型注册 ABP的依赖注入系统是基于Microsoft的依赖注入扩展库(Microsoft.Extensions.DependencyInjection nuget包)开发的.因此,它的 ...
- Taurus.MVC WebAPI 入门开发教程8:WebAPI文档与自动化测试。
系列目录 1.Taurus.MVC WebAPI 入门开发教程1:框架下载环境配置与运行. 2.Taurus.MVC WebAPI 入门开发教程2:添加控制器输出Hello World. 3.Tau ...