
linux系统引导过程
linux系统引导过程
linux-0.11引导时,将依次运行BIOS程序、bootsect.s、setup.s和head.s,完成引导过程后进入到main函数运行。BIOS完成硬件的检查与初始化等工作后,从硬盘的MBR中读取bootsect代码;bootsect程序主要用于读取setup和system模块(包含head.s)代码到内存中,然后跳转到setup执行;setup首先读取内存、硬盘等设备参数到内存中供后续程序使用,然后设置gdt、idt表后,最后设置机器进入保护模式并跳转到head继续执行;head首先进一步完善gdt、idt表的设置,然后构建页目录和页表并启动分页内存管理,最后跳转到main函数执行。
BIOS
BIOS主要过程:
- 当电脑的电源开启后,BIOS程序会从主板的ROM芯片运行;
- BIOS进行加电自检(POST),测试和初始化CPU、RAM、DMA、芯片组、键盘、软盘、硬盘等设备;
- BIOS从引导设备(硬盘、软盘、光盘等)的主引导记录(MBR)中加载引导程序,再由引导程序加载操纵系统。
BIOS中断调用:
BIOS还为操作系统提供了运行时服务,即BIOS中断调用,中断可通过汇编int指令调用。操作系统依赖BIOS提供的中断调用(输出/输出中断调用)加载内核,然后由内核将系统从16位实模式转换到32位保护模式运行。
BIOS中断向量表:
| 中断 | 描述 |
|---|---|
| INT 00h | CPU:除零错,或商不合法时触发 |
| INT 01h | CPU:单步陷阱,TF标记为打开状态时,每条指令执行后触发 |
| INT 02h | CPU:非可屏蔽中断,如引导自我测试时发生内存错误。 |
| INT 03h | CPU:第一个未定义的中断向量,约定俗成仅用于调试程序 |
| INT 04h | CPU:算数溢出。通常由INTO指令在置溢出位时触发。 |
| INT 05h | 在按下Shift-Print Screen或BOUND指令检测到范围异常时触发。 |
| INT 06h | CPU:非法指令。 |
| INT 07h | CPU:没有数学协处理器时尝试执行浮点指令触发。 |
| INT 08h | IRQ0:可编程中断控制器每 55 毫秒触发一次,即每秒 18.2 次。 |
| INT 09h | IRQ1:每次键盘按下、按住、释放。 |
| INT 0Ah | IRQ2: |
| INT 0Bh | IRQ3:COM2/COM4。 |
| INT 0Ch | IRQ4:COM1/COM3。 |
| INT 0Dh | IRQ5:硬盘控制器(PC/XT 下)或 LPT2。 |
| INT 0Eh | IRQ6:需要时由软盘控制器调用。 |
| INT 0Fh | IRQ7:LPT1。 |
| INT 10h | 显示服务 - 由BIOS或操作系统设定以供软件调用。AH=00h设定显示模式AH=01h设定游标形态AH=02h设置光标位置AH=03h获取光标位置与形态AH=04h获取光标位置AH=05h设置显示页AH=06h清除或滚动栏画面(上)AH=07h清除或滚动栏画面(下)AH=08h读取游标处字符与属性AH=09h更改游标处字符与属性AH=0Ah更改游标处字符AH=0Bh设定边界颜色AH=0Eh在TTY模式下写字符AH=0Fh获取目前显示模式AH=13h写字符串 |
| INT 11h | 返回设备列表。 |
| INT 12h | 获取常规内存容量。 |
| INT 13h | 低端磁盘服务。AH=00h复位磁盘驱动器。AH=01h检查磁盘驱动器状态。AH=02h读扇区。AH=03h写扇区。AH=04h校验扇区。AH=05h格式化磁道。AH=08h获取驱动器参数。AH=09h初始化硬盘驱动器参数。AH=0Ch寻道。AH=0Dh复位硬盘控制器。AH=15h获取驱动器类型。AH=16h获取软驱中盘片的状态。 |
| INT 14h | 串口通信例程。AH=00h初始化串口。AH=01h写出字符。AH=02h读入字符。AH=03h状态。 |
| INT 15h | 其它(系统支持例程)。AH=4FH键盘拦截。AH=83H事件等待。AH=84H读游戏杆。AH=85HSysRq 键。AH=86H等待。AH=87H块移动。AH=88H获取扩展内存容量。AH=C0H获取系统参数。AH=C1H获取扩展 BIOS 数据区块。AH=C2H指针设备功能。AH=E8h, AL=01h (AX = E801h)获取扩展内存容量(自从 1994 年引入的新功能),可获取到 64MB 以上的内存容量。AH=E8h, AL=20h (AX = E820h)查询系统地址映射。该功能取代了 AX=E801h 和 AH=88h。 |
| INT 16h | 键盘通信例程。AH=00h读字符。AH=01h读输入状态。AH=02h读 Shift 键(修改键)状态。AH=10h读字符(增强版)。AH=11h读输入状态(增强版)。AH=12h读 Shift 键(修改键)状态(增强版)。 |
| INT 17h | 打印服务。AH=00h打印字符。AH=01h初始化打印机。AH=02h检查打印机状态。 |
| INT 18h | 执行磁带上的 BASIC 程序:“真正的”IBM 兼容机在 ROM 里内置 BASIC 程序,当引导失败时由 BIOS 调用此例程解释执行。(例:打印“Boot disk error. Replace disk and press any key to continue...”这类提示信息) |
| INT 19h | 加电自检之后加载操作系统。 |
| INT 1Ah | 实时钟服务。AH=00h读取实时钟。AH=01h设置实时钟。AH=02h读取实时钟时间。AH=03h设置实时钟时间。AH=04h读取实时钟日期。AH=05h设置实时钟日期。AH=06h设置实时钟闹铃。AH=07h重置实时钟闹铃。 |
| INT 1Bh | Ctrl+Break,由 IRQ 9 自动调用。 |
| INT 1Ch | 预留,由 IRQ 8 自动调用。 |
| INT 1Dh | 不可调用:指向视频参数表(包含视频模式的数据)的指针。 |
| INT 1Eh | 不可调用:指向软盘模式表(包含关于软驱的大量信息)的指针。 |
| INT 1Fh | 不可调用:指向视频图形字符表(包含从 80h 到 FFh 的 ASCII 字符的数据)的信息。 |
| INT 41h | 地址指针:硬盘参数表(第一硬盘)。 |
| INT 46h | 地址指针:硬盘参数表(第二硬盘)。 |
| INT 4Ah | 实时钟在闹铃时调用。 |
| INT 70h | IRQ8:由实时钟调用。 |
| INT 74h | IRQ12:由鼠标调用 |
| INT 75h | IRQ13:由数学协处理器调用。 |
| INT 76h | IRQ14:由第一个 IDE 控制器所调用 |
| INT 77h | IRQ15:由第二个 IDE 控制器所调用 |
bootsect.s
bootsect主要过程:
- bootsect被bios-startup加载到0x7c00内存处,然后bois-start跳转到bootsect.s开始执行;
- bootsect将自身代码从0x7c00复制到0x90000处,并跳转到复制后的地址处继续往下执行;
- bootsect读取setup到0x90200处,读取system到0x10000处;
- bootsect跳转到setup执行
bootsect代码:
!

! SYS_SIZE is the number of clicks (16 bytes) to be loaded.

! 0x3000 is 0x30000 bytes = 196kB, more than enough for current

! versions of linux

!

SYSSIZE = 0x3000

!

!	bootsect.s		(C) 1991 Linus Torvalds

!

! bootsect.s is loaded at 0x7c00 by the bios-startup routines, and moves

! iself out of the way to address 0x90000, and jumps there.

!

! It then loads 'setup' directly after itself (0x90200), and the system

! at 0x10000, using BIOS interrupts.

!

! NOTE! currently system is at most 8*65536 bytes long. This should be no

! problem, even in the future. I want to keep it simple. This 512 kB

! kernel size should be enough, especially as this doesn't contain the

! buffer cache as in minix

!

! The loader has been made as simple as possible, and continuos

! read errors will result in a unbreakable loop. Reboot by hand. It

! loads pretty fast by getting whole sectors at a time whenever possible.

.globl begtext, begdata, begbss, endtext, enddata, endbss

.text

begtext:

.data

begdata:

.bss

begbss:

.text

SETUPLEN = 4				! nr of setup-sectors

BOOTSEG  = 0x07c0			! original address of boot-sector

INITSEG  = 0x9000			! we move boot here - out of the way

SETUPSEG = 0x9020			! setup starts here

SYSSEG   = 0x1000			! system loaded at 0x10000 (65536).

ENDSEG   = SYSSEG + SYSSIZE		! where to stop loading

! ROOT_DEV:	0x000 - same type of floppy as boot.

!		0x301 - first partition on first drive etc

ROOT_DEV = 0x306

entry start

start:

	mov	ax,#BOOTSEG

	mov	ds,ax

	mov	ax,#INITSEG

	mov	es,ax

	mov	cx,#256

	sub	si,si

	sub	di,di

	rep

	movw

	jmpi	go,INITSEG

go:	mov	ax,cs

	mov	ds,ax

	mov	es,ax

! put stack at 0x9ff00.

	mov	ss,ax

	mov	sp,#0xFF00		! arbitrary value >>512

! load the setup-sectors directly after the bootblock.

! Note that 'es' is already set up.

load_setup:

	mov	dx,#0x0000		! drive 0, head 0

	mov	cx,#0x0002		! sector 2, track 0

	mov	bx,#0x0200		! address = 512, in INITSEG

	mov	ax,#0x0200+SETUPLEN	! service 2, nr of sectors

	int	0x13			! read it

	jnc	ok_load_setup		! ok - continue

	mov	dx,#0x0000

	mov	ax,#0x0000		! reset the diskette

	int	0x13

	j	load_setup

ok_load_setup:

! Get disk drive parameters, specifically nr of sectors/track

	mov	dl,#0x00

	mov	ax,#0x0800		! AH=8 is get drive parameters

	int	0x13

	mov	ch,#0x00

	seg cs

	mov	sectors,cx

	mov	ax,#INITSEG

	mov	es,ax

! Print some inane message

	mov	ah,#0x03		! read cursor pos

	xor	bh,bh

	int	0x10

	mov	cx,#24

	mov	bx,#0x0007		! page 0, attribute 7 (normal)

	mov	bp,#msg1

	mov	ax,#0x1301		! write string, move cursor

	int	0x10

! ok, we've written the message, now

! we want to load the system (at 0x10000)

	mov	ax,#SYSSEG

	mov	es,ax		! segment of 0x010000

	call	read_it

	call	kill_motor

! After that we check which root-device to use. If the device is

! defined (!= 0), nothing is done and the given device is used.

! Otherwise, either /dev/PS0 (2,28) or /dev/at0 (2,8), depending

! on the number of sectors that the BIOS reports currently.

	seg cs

	mov	ax,root_dev

	cmp	ax,#0

	jne	root_defined

	seg cs

	mov	bx,sectors

	mov	ax,#0x0208		! /dev/ps0 - 1.2Mb

	cmp	bx,#15

	je	root_defined

	mov	ax,#0x021c		! /dev/PS0 - 1.44Mb

	cmp	bx,#18

	je	root_defined

undef_root:

	jmp undef_root

root_defined:

	seg cs

	mov	root_dev,ax

! after that (everyting loaded), we jump to

! the setup-routine loaded directly after

! the bootblock:

	jmpi	0,SETUPSEG

! This routine loads the system at address 0x10000, making sure

! no 64kB boundaries are crossed. We try to load it as fast as

! possible, loading whole tracks whenever we can.

!

! in:	es - starting address segment (normally 0x1000)

!

sread:	.word 1+SETUPLEN	! sectors read of current track

head:	.word 0			! current head

track:	.word 0			! current track

read_it:

	mov ax,es

	test ax,#0x0fff

die:	jne die			! es must be at 64kB boundary

	xor bx,bx		! bx is starting address within segment

rp_read:

	mov ax,es

	cmp ax,#ENDSEG		! have we loaded all yet?

	jb ok1_read

	ret

ok1_read:

	seg cs

	mov ax,sectors

	sub ax,sread

	mov cx,ax

	shl cx,#9

	add cx,bx

	jnc ok2_read

	je ok2_read

	xor ax,ax

	sub ax,bx

	shr ax,#9

ok2_read:

	call read_track

	mov cx,ax

	add ax,sread

	seg cs

	cmp ax,sectors

	jne ok3_read

	mov ax,#1

	sub ax,head

	jne ok4_read

	inc track

ok4_read:

	mov head,ax

	xor ax,ax

ok3_read:

	mov sread,ax

	shl cx,#9

	add bx,cx

	jnc rp_read

	mov ax,es

	add ax,#0x1000

	mov es,ax

	xor bx,bx

	jmp rp_read

read_track:

	push ax

	push bx

	push cx

	push dx

	mov dx,track

	mov cx,sread

	inc cx

	mov ch,dl

	mov dx,head

	mov dh,dl

	mov dl,#0

	and dx,#0x0100

	mov ah,#2

	int 0x13

	jc bad_rt

	pop dx

	pop cx

	pop bx

	pop ax

	ret

bad_rt:	mov ax,#0

	mov dx,#0

	int 0x13

	pop dx

	pop cx

	pop bx

	pop ax

	jmp read_track

/*

 * This procedure turns off the floppy drive motor, so

 * that we enter the kernel in a known state, and

 * don't have to worry about it later.

 */

kill_motor:

	push dx

	mov dx,#0x3f2

	mov al,#0

	outb

	pop dx

	ret

sectors:

	.word 0

msg1:

	.byte 13,10

	.ascii "Loading system ..."

	.byte 13,10,13,10

.org 508

root_dev:

	.word ROOT_DEV

boot_flag:

	.word 0xAA55

.text

endtext:

.data

enddata:

.bss

endbss:
setup.s
setup主要过程:
- 获取光标位置、扩展内存大小、显卡页参数、等参数,并保存在内存0x90000-0x901FF处,以供内核相关程序使用。保存的参数如下:
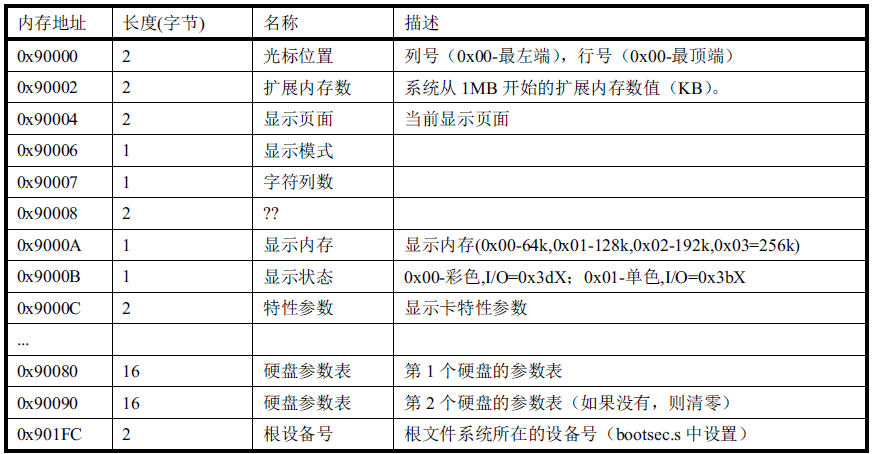
- 将system代码从内存0x10000-0x8ffff处移动到0x00000-0x7ffff处。(system代码不超过512KB)
- 加载idt(中断描述符表)与gdt(全局描述符表),开启20位地址线;然后将机器的CR0控制寄存器的PE位置为1,使机器进入保护模式,并跳转到gdt表代码段的0偏移处运行,即运行System代码模块的head.s。
在setup执行阶段,gdt表中定义了一个代码段和一个数据段,两个段地址空间完全重叠,段地址基址为0x00000;ldt表未定义任何段。
setup.s代码:
!

!	setup.s		(C) 1991 Linus Torvalds

!

! setup.s is responsible for getting the system data from the BIOS,

! and putting them into the appropriate places in system memory.

! both setup.s and system has been loaded by the bootblock.

!

! This code asks the bios for memory/disk/other parameters, and

! puts them in a "safe" place: 0x90000-0x901FF, ie where the

! boot-block used to be. It is then up to the protected mode

! system to read them from there before the area is overwritten

! for buffer-blocks.

!

! NOTE! These had better be the same as in bootsect.s!

INITSEG  = 0x9000	! we move boot here - out of the way

SYSSEG   = 0x1000	! system loaded at 0x10000 (65536).

SETUPSEG = 0x9020	! this is the current segment

.globl begtext, begdata, begbss, endtext, enddata, endbss

.text

begtext:

.data

begdata:

.bss

begbss:

.text

entry start

start:

! ok, the read went well so we get current cursor position and save it for

! posterity.

	mov	ax,#INITSEG	! this is done in bootsect already, but...

	mov	ds,ax

	mov	ah,#0x03	! read cursor pos

	xor	bh,bh

	int	0x10		! save it in known place, con_init fetches

	mov	[0],dx		! it from 0x90000.

! Get memory size (extended mem, kB)

	mov	ah,#0x88

	int	0x15

	mov	[2],ax

! Get video-card data:

	mov	ah,#0x0f

	int	0x10

	mov	[4],bx		! bh = display page

	mov	[6],ax		! al = video mode, ah = window width

! check for EGA/VGA and some config parameters

	mov	ah,#0x12

	mov	bl,#0x10

	int	0x10

	mov	[8],ax

	mov	[10],bx

	mov	[12],cx

! Get hd0 data

	mov	ax,#0x0000

	mov	ds,ax

	lds	si,[4*0x41]

	mov	ax,#INITSEG

	mov	es,ax

	mov	di,#0x0080

	mov	cx,#0x10

	rep

	movsb

! Get hd1 data

	mov	ax,#0x0000

	mov	ds,ax

	lds	si,[4*0x46]

	mov	ax,#INITSEG

	mov	es,ax

	mov	di,#0x0090

	mov	cx,#0x10

	rep

	movsb

! Check that there IS a hd1 :-)

	mov	ax,#0x01500

	mov	dl,#0x81

	int	0x13

	jc	no_disk1

	cmp	ah,#3

	je	is_disk1

no_disk1:

	mov	ax,#INITSEG

	mov	es,ax

	mov	di,#0x0090

	mov	cx,#0x10

	mov	ax,#0x00

	rep

	stosb

is_disk1:

! now we want to move to protected mode ...

	cli			! no interrupts allowed !

! first we move the system to it's rightful place

	mov	ax,#0x0000

	cld			! 'direction'=0, movs moves forward

do_move:

	mov	es,ax		! destination segment

	add	ax,#0x1000

	cmp	ax,#0x9000

	jz	end_move

	mov	ds,ax		! source segment

	sub	di,di

	sub	si,si

	mov 	cx,#0x8000

	rep

	movsw

	jmp	do_move

! then we load the segment descriptors

end_move:

	mov	ax,#SETUPSEG	! right, forgot this at first. didn't work :-)

	mov	ds,ax

	lidt	idt_48		! load idt with 0,0

	lgdt	gdt_48		! load gdt with whatever appropriate

! that was painless, now we enable A20

	call	empty_8042

	mov	al,#0xD1		! command write

	out	#0x64,al

	call	empty_8042

	mov	al,#0xDF		! A20 on

	out	#0x60,al

	call	empty_8042

! well, that went ok, I hope. Now we have to reprogram the interrupts :-(

! we put them right after the intel-reserved hardware interrupts, at

! int 0x20-0x2F. There they won't mess up anything. Sadly IBM really

! messed this up with the original PC, and they haven't been able to

! rectify it afterwards. Thus the bios puts interrupts at 0x08-0x0f,

! which is used for the internal hardware interrupts as well. We just

! have to reprogram the 8259's, and it isn't fun.

	mov	al,#0x11		! initialization sequence

	out	#0x20,al		! send it to 8259A-1

	.word	0x00eb,0x00eb		! jmp $+2, jmp $+2

	out	#0xA0,al		! and to 8259A-2

	.word	0x00eb,0x00eb

	mov	al,#0x20		! start of hardware int's (0x20)

	out	#0x21,al

	.word	0x00eb,0x00eb

	mov	al,#0x28		! start of hardware int's 2 (0x28)

	out	#0xA1,al

	.word	0x00eb,0x00eb

	mov	al,#0x04		! 8259-1 is master

	out	#0x21,al

	.word	0x00eb,0x00eb

	mov	al,#0x02		! 8259-2 is slave

	out	#0xA1,al

	.word	0x00eb,0x00eb

	mov	al,#0x01		! 8086 mode for both

	out	#0x21,al

	.word	0x00eb,0x00eb

	out	#0xA1,al

	.word	0x00eb,0x00eb

	mov	al,#0xFF		! mask off all interrupts for now

	out	#0x21,al

	.word	0x00eb,0x00eb

	out	#0xA1,al

! well, that certainly wasn't fun :-(. Hopefully it works, and we don't

! need no steenking BIOS anyway (except for the initial loading :-).

! The BIOS-routine wants lots of unnecessary data, and it's less

! "interesting" anyway. This is how REAL programmers do it.

!

! Well, now's the time to actually move into protected mode. To make

! things as simple as possible, we do no register set-up or anything,

! we let the gnu-compiled 32-bit programs do that. We just jump to

! absolute address 0x00000, in 32-bit protected mode.

	mov	ax,#0x0001	! protected mode (PE) bit

	lmsw	ax		! This is it!

	jmpi	0,8		! jmp offset 0 of segment 8 (cs)

! This routine checks that the keyboard command queue is empty

! No timeout is used - if this hangs there is something wrong with

! the machine, and we probably couldn't proceed anyway.

empty_8042:

	.word	0x00eb,0x00eb

	in	al,#0x64	! 8042 status port

	test	al,#2		! is input buffer full?

	jnz	empty_8042	! yes - loop

	ret

gdt:

	.word	0,0,0,0		! dummy

	.word	0x07FF		! 8Mb - limit=2047 (2048*4096=8Mb)

	.word	0x0000		! base address=0

	.word	0x9A00		! code read/exec

	.word	0x00C0		! granularity=4096, 386

	.word	0x07FF		! 8Mb - limit=2047 (2048*4096=8Mb)

	.word	0x0000		! base address=0

	.word	0x9200		! data read/write

	.word	0x00C0		! granularity=4096, 386

idt_48:

	.word	0			! idt limit=0

	.word	0,0			! idt base=0L

gdt_48:

	.word	0x800		! gdt limit=2048, 256 GDT entries

	.word	512+gdt,0x9	! gdt base = 0X9xxxx

.text

endtext:

.data

enddata:

.bss

endbss:
head.s
head.s被编译生成目标文件后,会内核其它程序一起被链接为system模块,head.s代码位于system模块最开始的部分,也是system模块最先执行的程序代码。system代码被bootsect程序加载到0x10000地址处,并由setup程序移动到0地址处,因此,head.s代码位于0地址处。setup执行完后,将机器设置位保护模式,并跳转到head.s代码处执行,head.s是32位程序。
head主要过程:
- 设置idt:为idt表设置256个表项,每个表项被初始化指向默认的中断处理过程(ignore_int)。ignore_int过程不执行任何具有实际意义的操作,相当于空过程。后续执行的内核程序可根据需要在idt表中注册中断门、陷阱门或系统门。
- 设置gdt:为gdt表设置256个表项,为使用的表项初始为0值。gdt表象可指向代码段、数据段、LDT,以及任务状态段。后续执行的内核程序可根据需要在gdt中设置相关段。
- 设置页目录和页表:页目录和页表被放置在0地址处,然后将页目录表地址写入CR3寄存器,并置CR0寄存器的PG位为1,PG位为1意为启用分页管理机制。
- 跳转到mian函数执行
head.s代码:
/*

 *  linux/boot/head.s

 *

 *  (C) 1991  Linus Torvalds

 */

/*

 *  head.s contains the 32-bit startup code.

 *

 * NOTE!!! Startup happens at absolute address 0x00000000, which is also where

 * the page directory will exist. The startup code will be overwritten by

 * the page directory.

 */

.text

.globl _idt,_gdt,_pg_dir,_tmp_floppy_area

_pg_dir:

startup_32:

	movl $0x10,%eax

	mov %ax,%ds

	mov %ax,%es

	mov %ax,%fs

	mov %ax,%gs

	lss _stack_start,%esp

	call setup_idt

	call setup_gdt

	movl $0x10,%eax		# reload all the segment registers

	mov %ax,%ds		# after changing gdt. CS was already

	mov %ax,%es		# reloaded in 'setup_gdt'

	mov %ax,%fs

	mov %ax,%gs

	lss _stack_start,%esp

	xorl %eax,%eax

1:	incl %eax		# check that A20 really IS enabled

	movl %eax,0x000000	# loop forever if it isn't

	cmpl %eax,0x100000

	je 1b

/*

 * NOTE! 486 should set bit 16, to check for write-protect in supervisor

 * mode. Then it would be unnecessary with the "verify_area()"-calls.

 * 486 users probably want to set the NE (#5) bit also, so as to use

 * int 16 for math errors.

 */

	movl %cr0,%eax		# check math chip

	andl $0x80000011,%eax	# Save PG,PE,ET

/* "orl $0x10020,%eax" here for 486 might be good */

	orl $2,%eax		# set MP

	movl %eax,%cr0

	call check_x87

	jmp after_page_tables

/*

 * We depend on ET to be correct. This checks for 287/387.

 */

check_x87:

	fninit

	fstsw %ax

	cmpb $0,%al

	je 1f			/* no coprocessor: have to set bits */

	movl %cr0,%eax

	xorl $6,%eax		/* reset MP, set EM */

	movl %eax,%cr0

	ret

.align 2

1:	.byte 0xDB,0xE4		/* fsetpm for 287, ignored by 387 */

	ret

/*

 *  setup_idt

 *

 *  sets up a idt with 256 entries pointing to

 *  ignore_int, interrupt gates. It then loads

 *  idt. Everything that wants to install itself

 *  in the idt-table may do so themselves. Interrupts

 *  are enabled elsewhere, when we can be relatively

 *  sure everything is ok. This routine will be over-

 *  written by the page tables.

 */

setup_idt:

	lea ignore_int,%edx

	movl $0x00080000,%eax

	movw %dx,%ax		/* selector = 0x0008 = cs */

	movw $0x8E00,%dx	/* interrupt gate - dpl=0, present */

	lea _idt,%edi

	mov $256,%ecx

rp_sidt:

	movl %eax,(%edi)

	movl %edx,4(%edi)

	addl $8,%edi

	dec %ecx

	jne rp_sidt

	lidt idt_descr

	ret

/*

 *  setup_gdt

 *

 *  This routines sets up a new gdt and loads it.

 *  Only two entries are currently built, the same

 *  ones that were built in init.s. The routine

 *  is VERY complicated at two whole lines, so this

 *  rather long comment is certainly needed :-).

 *  This routine will beoverwritten by the page tables.

 */

setup_gdt:

	lgdt gdt_descr

	ret

/*

 * I put the kernel page tables right after the page directory,

 * using 4 of them to span 16 Mb of physical memory. People with

 * more than 16MB will have to expand this.

 */

.org 0x1000

pg0:

.org 0x2000

pg1:

.org 0x3000

pg2:

.org 0x4000

pg3:

.org 0x5000

/*

 * tmp_floppy_area is used by the floppy-driver when DMA cannot

 * reach to a buffer-block. It needs to be aligned, so that it isn't

 * on a 64kB border.

 */

_tmp_floppy_area:

	.fill 1024,1,0

after_page_tables:

	pushl $0		# These are the parameters to main :-)

	pushl $0

	pushl $0

	pushl $L6		# return address for main, if it decides to.

	pushl $_main

	jmp setup_paging

L6:

	jmp L6			# main should never return here, but

				# just in case, we know what happens.

/* This is the default interrupt "handler" :-) */

int_msg:

	.asciz "Unknown interrupt\n\r"

.align 2

ignore_int:

	pushl %eax

	pushl %ecx

	pushl %edx

	push %ds

	push %es

	push %fs

	movl $0x10,%eax

	mov %ax,%ds

	mov %ax,%es

	mov %ax,%fs

	pushl $int_msg

	call _printk

	popl %eax

	pop %fs

	pop %es

	pop %ds

	popl %edx

	popl %ecx

	popl %eax

	iret

/*

 * Setup_paging

 *

 * This routine sets up paging by setting the page bit

 * in cr0. The page tables are set up, identity-mapping

 * the first 16MB. The pager assumes that no illegal

 * addresses are produced (ie >4Mb on a 4Mb machine).

 *

 * NOTE! Although all physical memory should be identity

 * mapped by this routine, only the kernel page functions

 * use the >1Mb addresses directly. All "normal" functions

 * use just the lower 1Mb, or the local data space, which

 * will be mapped to some other place - mm keeps track of

 * that.

 *

 * For those with more memory than 16 Mb - tough luck. I've

 * not got it, why should you :-) The source is here. Change

 * it. (Seriously - it shouldn't be too difficult. Mostly

 * change some constants etc. I left it at 16Mb, as my machine

 * even cannot be extended past that (ok, but it was cheap :-)

 * I've tried to show which constants to change by having

 * some kind of marker at them (search for "16Mb"), but I

 * won't guarantee that's all :-( )

 */

.align 2

setup_paging:

	movl $1024*5,%ecx		/* 5 pages - pg_dir+4 page tables */

	xorl %eax,%eax

	xorl %edi,%edi			/* pg_dir is at 0x000 */

	cld;rep;stosl

	movl $pg0+7,_pg_dir		/* set present bit/user r/w */

	movl $pg1+7,_pg_dir+4		/*  --------- " " --------- */

	movl $pg2+7,_pg_dir+8		/*  --------- " " --------- */

	movl $pg3+7,_pg_dir+12		/*  --------- " " --------- */

	movl $pg3+4092,%edi

	movl $0xfff007,%eax		/*  16Mb - 4096 + 7 (r/w user,p) */

	std

1:	stosl			/* fill pages backwards - more efficient :-) */

	subl $0x1000,%eax

	jge 1b

	xorl %eax,%eax		/* pg_dir is at 0x0000 */

	movl %eax,%cr3		/* cr3 - page directory start */

	movl %cr0,%eax

	orl $0x80000000,%eax

	movl %eax,%cr0		/* set paging (PG) bit */

	ret			/* this also flushes prefetch-queue */

.align 2

.word 0

idt_descr:

	.word 256*8-1		# idt contains 256 entries

	.long _idt

.align 2

.word 0

gdt_descr:

	.word 256*8-1		# so does gdt (not that that's any

	.long _gdt		# magic number, but it works for me :^)

	.align 3

_idt:	.fill 256,8,0		# idt is uninitialized

_gdt:	.quad 0x0000000000000000	/* NULL descriptor */

	.quad 0x00c09a0000000fff	/* 16Mb */

	.quad 0x00c0920000000fff	/* 16Mb */

	.quad 0x0000000000000000	/* TEMPORARY - don't use */

	.fill 252,8,0			/* space for LDT's and TSS's etc */
相关知识
设备号
linux0.11程序中的硬盘设备命名方式为主设备号+次设备号,常见的主设备号有:1-内存、2-磁盘、3-硬盘、4-ttyx、5-tty、6-并行口、7-非命名管道1。由于1个硬盘中可以有1—4个分区,因此1,硬盘还依据分区的不同用次设备号进行指定分区。因此硬盘的逻辑设备号由以下方式构成:设备号=主设备号*256+次设备号。
分段内存管理
32位保护模式下,linux-0.11使用分段管理内存。数据段和代码段描述信息被保存在gdt/ldt中,段描述信息称为段描述符,包含段基址、段限长、读写保护等信息。代码运行时,gdt/ldt表地址会被保存在GDTR/LDTR寄存器中。访问段时,可通过段寄存器中保存的段选择符(包含段的索引信息)访问gdt/ldt中的段描述符,读取段基址信息。获取段基址后,使用段基址加上偏移地址可计算出实际访问的内存地址。
程序代码段和数据段的描述符格式
主要信息包括段基址、段限长、描述符特权级(DPL)、读写访问保护等。
- 描述符特权级(DPL):描述了访问段需要的请求特权等级(RPL),当RPL<=DPL时,代码才可以访问段内容。
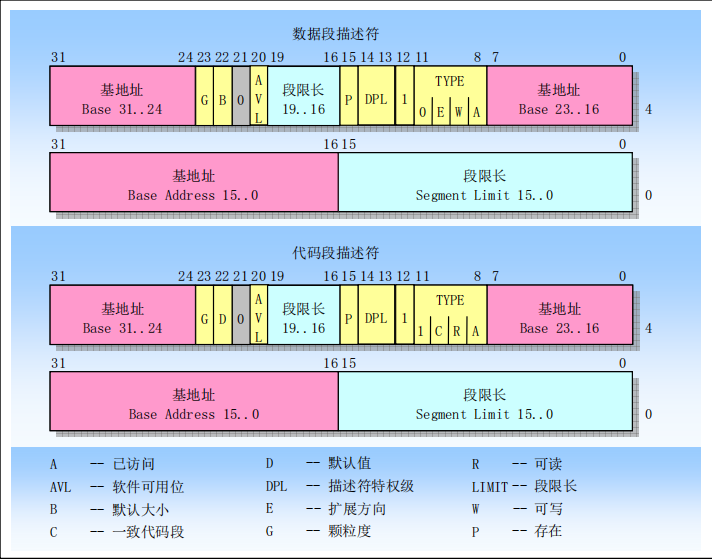
段选择符格式
包含描述符索引、表指示器(TI位)和请求者特权级(RPL位)。
- 描述符索引:GDT/LDT表的表项索引号。
- 表指示器(TI位):指定选择符引用的描述符表,值为0表示指定GDT表,值为1表示指定LDT表。
- 请求者特权级(RPL位):用于保护机制,Linux中有两个特权级,较高特权级的内核(RPL=0)代码和较低特权级的用户代码(RPL=3)。

相关寄存器
CR0:CR0中的PE位,指示是否启用保护模式,启用保护模式时,使用分段内存管理。
GDTR/LDTR:保存GDT/LDT表地址,使用lgdt/lldt指令加载GDT/LDT表地址到GDTR/LDTR寄存器中。
分页内存管理
保护模式下,启动分页内存管理后,经过分段机制计算得到的地址不再是物理地址,而是虚拟地址,拟地址由几个部分构成:虚拟地址=页目录项索引+页表项索引+页内偏移构成。根据页目录项索引和页表项索引查询页目录和页表后可获得物理页号,进一步可计算物理地址:物理地址=物理页号+业内偏移。
页目录与页表
页目录:存储包括页表地址在内的页表描述信息,每个页表描述信息为一个页目录项。
页表:存储包括物理页地址在内的物理页描述信息,每个页表描述信息为一个页表项。
线性地址到物理地址之间的变换
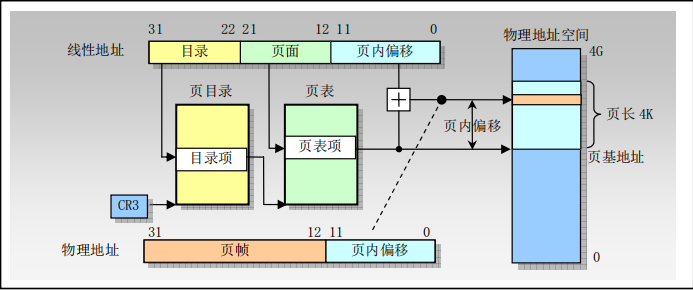
相关寄存器
CR0:CR0中的PG位指示是否开启分页机制。
CR3:存储页目录地址。
内存管理单元(MMU)
内存管理单元可以完成虚拟地址到物理地址的转换,是一种硬件实现。
[参考资料]
《linux内核完全注释》
linux系统引导过程的更多相关文章
- Linux系统引导过程及排除启动故障
一.Linux操作系统引导过程二.系统初始化进程1.init进程2.Systemd3.Systemd单元类型三.排除启动类故障[1].修复MBR扇区故障(含实验过程)[2].修复GRUB引导故障●方法 ...
- 【Linux系统引导过程】
*** 第一步 开机自检 根据主板BIOS中的启动顺序,移交系统控制权. 当你打开计算机电源,计算机会首先加载BIOS信息,BIOS信息是如此的重要,以至于计算机必须在最开始就找到它. 这是因为BIO ...
- Linux系统——引导过程与服务控制
一.Linux开机启动原理(十步) (1)开机自检BIOS 开机检测,主板检测 (2)MBR引导 硬盘512字节 (3)GRUB菜单 操作系统菜单 (4)加载内核(kernel) 启动操作系统核心,根 ...
- 轻松学习Linux之详解系统引导过程
轻松学习Linux之详解系统引导过程-1 轻松学习Linux之详解系统引导过程-2 本文出自 "李晨光原创技术博客" 博客,谢绝转载!
- linux系统开机过程描述
本文描述linux系统开机过程,属于个人理解范畴,如果文中表述有误请大家批评指正! 计算机开机之后,首先要加载BIOS(基本输入输出系统)信息,BIOS包含了很多重要的信息,包括CPU信息,设备启动顺 ...
- 9.Linux系统引导流程
一.Linux系统引导流程 当我们按下主机电源键的那时候开始,主板上的CMOS/BIOS模块将进行固件自检,以此检查各个硬件是否正确连接. 在Linux引导流程中,一般可以分为以下几个主要过程: 1. ...
- Linux学习笔记之Linux启动引导过程
早期时,启动一台计算机意味着要给计算机喂一条包含引导程序的纸带,或者手工使用前端面板地址/数据/控制开关来加载引导程序.尽管目前的计算机已经装备了很多工具来简化引导过程,但是这一切并没有对整个过程进行 ...
- Linunx系统引导过程及MBR/GRUB故障
Linunx系统引导过程 系统初始化进程 init进程 Systemd Systemd单元类型 允许级别所对应的systemd目标 修复MBR扇区故障 解决思路 操作 修复GRUB引导故障 解决思路 ...
- Linux系统初始化过程及运行级别简介
Linux开机过程: 1 开机自检(BIOS):初始化硬件,查找启动介质 2 MBR引导 3 GRUB引导菜单:GRUB程序安装在Bootloader 4 加载内核(kernel) 5 运行INIT进 ...
随机推荐
- gvim 配置vimrc
##################################################################### normal setup################## ...
- LeetCode-097-交错字符串
交错字符串 题目描述:给定三个字符串 s1.s2.s3,请你帮忙验证 s3 是否是由 s1 和 s2 交错 组成的. 示例说明请见LeetCode官网. 来源:力扣(LeetCode) 链接:http ...
- jmeter + tomcat + ant + svn +jenkins 实现持续集成测试
l 安装jdk时候需要提前检查jdk是否安装成功 l 在dos下输入javac java -version l l 安装jmeter l 校验是否安装成功: l 进入jmeter目录下bin ...
- 『德不孤』Pytest框架 — 11、Pytest中Fixture装饰器(一)
目录 1.Fixture装饰器的用途 2.Fixture参数说明 3.Fixture装饰器简单应用 4.yield执行后置函数 1.Fixture装饰器的用途 做测试前后的初始化设置,如测试数据准备, ...
- tensorflow源码解析之framework-allocator
目录 什么是allocator 内存分配器的管理 内存分配追踪 其它结构 关系图 涉及的文件 迭代记录 1. 什么是allocator Allocator是所有内存分配器的基类,它定义了内存分配器需要 ...
- 制作自己的rpm包,并为其制作patch包。
本文分为两个部分,第一部分是制作一个简单的自己的rpm包,并安装运行它.第二部分是为其制作一个patch包,并通过spec配置文件去打补丁,安装.运行打补丁后的程序. 一.安装工具 [yh@local ...
- C++高并发场景下读多写少的优化方案
概述 一谈到高并发的优化方案,往往能想到模块水平拆分.数据库读写分离.分库分表,加缓存.加mq等,这些都是从系统架构上解决.单模块作为系统的组成单元,其性能好坏也能很大的影响整体性能,本文从单模块下读 ...
- 在西电使用校内Linux 开源软件镜像
西电开源社区(linux.xidian.edu.cn)为全校师生提供开源镜像服务,由于其使用校内服务器,因此产生的流量不会计入校园网 打开镜像列表:https://linux.xidian.edu.c ...
- 【KiCad镜像】下载与安装
镜像下载.域名解析.时间同步请点击 阿里云开源镜像站 一.KiCad介绍 KiCad EDA 是一款用于印刷电路板设计的开源自由软件,基于 GPLv3 开源协议. 软件包含工程项目管理.原理图设计.线 ...
- Git 、运算符一 JAVA day10
不知不觉已是第十天学习,学习时时间往往过的很快.废话不多说进入正题: 今天开始学习JAVA中的运算符 一.基本运算符 +,-,*,/.%:加.减.乘.除,余数 下面用IDEA来举例说明 基本运算符 p ...