nginx编译安装以及常用参数详解
1 基于ansible role实现编译安装nginx
利用ansible控制端10.0.0.8机器,在被控制端10.0.0.18上部署nginx
首先打通ansible控制端与被控制端的基于key验证
[root@ansible-rocky ~]$ ssh-copy-id 10.0.0.18

[root@ansible-rocky ~]$ ssh 10.0.0.18

Last login: Wed Jan 11 12:18:28 2023 from 10.0.0.8

[root@rocky8 ~]$ hostname -I

10.0.0.18
然后创建nginx项目目录实现基于role的部署任务
#nginx role项目目录总览

[root@ansible-rocky opt]$ tree /opt

/opt

├── hosts_nginx

├── nginx_role.yml

└── roles

    └── nginx

        ├── handlers

        │   └── main.yml

        ├── tasks

        │   └── main.yml

        └── templates

            ├── nginx.conf.j2

            └── nginx.service.j2

#task文件

[root@ansible-rocky roles]$ cat nginx/tasks/main.yml

- name: add group nginx

  group: name=nginx system=yes gid=80

- name: add user nginx

  user: name=nginx group=nginx uid=80 system=yes shell="/sbin/nologin" create_home=no

- name: install dependent package

  yum: name={{item}} state=latest

  loop:

    - gcc

    - make

    - pcre-devel

    - openssl-devel

    - zlib-devel

    - perl-ExtUtils-Embed

- name: get nginx source

  unarchive:

    src: "{{ url }}"

    dest: "/usr/local/src"

    remote_src: yes

- name: compile and install

  shell:

    cmd: "./configure --prefix={{install_dir}} --user=nginx --group=nginx --with-http_ssl_module --with-http_v2_module --with-http_realip_module --with-http_stub_status_module --with-http_gzip_static_module --with-pcre --with-stream --with-stream_ssl_module --with-stream_realip_module && make && make install"

    chdir: "/usr/local/src/nginx-{{ version }}"

    creates: "{{install_dir}}/sbin/nginx"

- name: config file

  template:

    src: nginx.conf.j2

    dest: "{{install_dir}}/conf/nginx.conf"

    owner: nginx

    group: nginx

  notify: restart service

  tags:

    - config

- name: create directory

  file:

    path: "{{install_dir}}/conf/conf.d"

    state: directory

    owner: nginx

    group: nginx

- name: change install directory owner

  file:

    path: "{{install_dir}}"

    owner: nginx

    group: nginx

    recurse: yes

- name: copy service file

  template:

    src: nginx.service.j2

    dest: "/lib/systemd/system/nginx.service"

- name: check config

  shell:

    cmd: "{{install_dir}}/sbin/nginx -t"

  register: check_nginx_config

  changed_when:

    - check_nginx_config.stdout.find('successful')

    - false

- name: start service

  systemd:

    daemon_reload: yes

    name: nginx.service

    state: started

    enabled: yes

#创建handler文件

[root@ansible-rocky roles]$ cat nginx/handlers/main.yml

- name: restart service

  service:

    name: nginx

    state: restarted

#装备两个template文件

[root@ansible-rocky roles]$ cat nginx/templates/nginx.conf.j2

user nginx;

worker_processes  {{ ansible_processor_vcpus*2 }};

events {

    worker_connections  1024;

}

http {

    include       mime.types;

    default_type  application/octet-stream;

    log_format  access_json '{"@timestamp":"$time_iso8601",'

        '"host":"$server_addr",'

        '"clientip":"$remote_addr",'

        '"size":$body_bytes_sent,'

        '"responsetime":$request_time,'

        '"upstreamtime":"$upstream_response_time",'

        '"upstreamhost":"$upstream_addr",'

        '"http_host":"$host",'

        '"uri":"$uri",'

        '"xff":"$http_x_forwarded_for",'

        '"referer":"$http_referer",'

        '"tcp_xff":"$proxy_protocol_addr",'

        '"http_user_agent":"$http_user_agent",'

        '"status":"$status"}';

    # logging

    access_log {{install_dir}}/logs/access-json.log access_json;

    error_log {{install_dir}}/logs/error.log warn;

    keepalive_timeout  65;

    include {{install_dir}}/conf/conf.d/*.conf;

}

[root@ansible-rocky roles]$ cat nginx/templates/nginx.service.j2

[Unit]

Description=The nginx HTTP and reverse proxy server

After=network.target remote-fs.target nss-lookup.target

[Service]

Type=forking

PIDFile={{install_dir}}/logs/nginx.pid

ExecStartPre=/bin/rm -f {{install_dir}}/logs/nginx.pid

ExecStartPre={{install_dir}}/sbin/nginx -t

ExecStart={{install_dir}}/sbin/nginx

ExecReload=/bin/kill -s HUP \$MAINPID

KillSignal=SIGQUIT

TimeoutStopSec=5

KillMode=process

PrivateTmp=true

LimitNOFILE=100000

[Install]

WantedBy=multi-user.target

#在hosts文件中定义wensrvs需要的变量

[root@ansible-rocky opt]$ cat hosts_nginx

[websrvs]

10.0.0.18

[websrvs:vars]

version="1.22.1"

url="http://nginx.org/download/nginx-{{ version }}.tar.gz"

install_dir="/apps/nginx"

#在playbook中调用角色

[root@ansible-rocky opt]$ cat nginx_role.yml

- hosts: websrvs

  remote_user: root

  roles:

    - nginx

#运行playbook

[root@ansible-rocky opt]$ ansible-playbook -i hosts_nginx nginx_role.yml

PLAY [websrvs] ****************************************************************************************

TASK [Gathering Facts] ********************************************************************************

ok: [10.0.0.18]

TASK [nginx : add group nginx] ************************************************************************

changed: [10.0.0.18]

TASK [nginx : add user nginx] *************************************************************************

changed: [10.0.0.18]

TASK [nginx : install dependent package] **************************************************************

changed: [10.0.0.18] => (item=gcc)

ok: [10.0.0.18] => (item=make)

changed: [10.0.0.18] => (item=pcre-devel)

changed: [10.0.0.18] => (item=openssl-devel)

ok: [10.0.0.18] => (item=zlib-devel)

changed: [10.0.0.18] => (item=perl-ExtUtils-Embed)

TASK [nginx : get nginx source] ***********************************************************************

changed: [10.0.0.18]

TASK [nginx : compile and install] ********************************************************************

changed: [10.0.0.18]

TASK [nginx : config file] ****************************************************************************

changed: [10.0.0.18]

TASK [nginx : create directory] ***********************************************************************

changed: [10.0.0.18]

TASK [nginx : change install directory owner] *********************************************************

changed: [10.0.0.18]

TASK [nginx : copy service file] **********************************************************************

changed: [10.0.0.18]

TASK [nginx : check config] ***************************************************************************

ok: [10.0.0.18]

TASK [nginx : start service] **************************************************************************

changed: [10.0.0.18]

RUNNING HANDLER [nginx : restart service] *************************************************************

changed: [10.0.0.18]

PLAY RECAP ********************************************************************************************

10.0.0.18                  : ok=13   changed=11   unreachable=0    failed=0    skipped=0    rescued=0    ignored=0
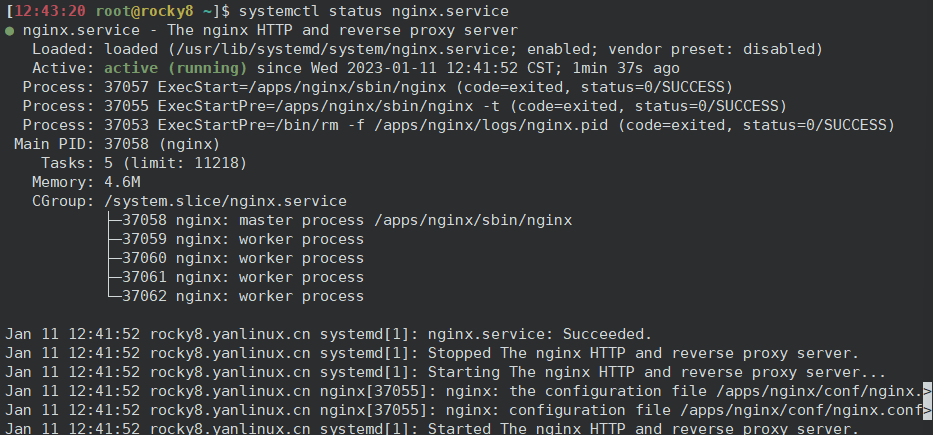
在被控制端检查是否安装完成
2 编译安装参数详解
编译安装参数示例:
./configure --prefix={{install_dir}} \

--user=nginx \

--group=nginx \

--with-http_ssl_module \

--with-http_v2_module \

--with-http_realip_module \

--with-http_stub_status_module \

--with-http_gzip_static_module \

--with-pcre \

--with-stream \

--with-stream_ssl_module \

--with-stream_realip_module
在编译安装参数中--with开头的选项默认是禁用的,想要使用的话就需要在编译的时候加上;without开头的选项默认是开启的,不想要启用此模块的话就需要在编译的时候加上。
通用配置选项参数:
| 选项 | 解释说明 |
|---|---|
| --prefix=<path> | Nginx安装的根路径,所有其它路径都要依赖该选项 |
| --sbin-path=<path> | 指定nginx二进制文件的路径,没指定的话 这个路径依赖<prefix>选项 |
| --conf-path=<path> | 命令行未指定配置文件,将会通过这里指定的路径加载配置文件 |
| --error-log-path=<path> | 写入错误日志文件地址,默认值:<prefix>/logs/error.log。安装后,可以使用 nginx.conf 中的 error_log 指令更改。 |
| --pid-path=<path> | nginx master进程pid写入的文件位置,默认值:<prefix>/logs/nginx.pid。安装后,可以使用 nginx.conf 中的 pid 指令更改。 |
| --lock-path=<path> | 共享存储器互斥锁文件路径 |
| --user=<user> | nginx 运行用户。默认值:nobody。安装后,可以使用 nginx.conf 中的 user 指令更改。 |
| --group=<group> | nginx 运行组。默认值:--user 指定的值。安装后,可以使用 nginx.conf 中的 user 指令更改。 |
默认开启的模块
| 选项 | 解释说明 |
|---|---|
| --without-http_gzip_module | 禁用 ngx_http_gzip_module 模块 |
| --without-http_userid_module | 禁用 ngx_http_userid_module 模块,该模块设置适用于客户端标识的 cookie |
| --without-http_access_module | 禁用 ngx_http_access_module 模块,该模块允许限制对某些客户端地址的访问 |
| --without-http_rewrite_module | 禁用 URL 转发(rewrite) |
| --without-http_proxy_module | 禁用 HTTP 服务器代理(proxy)模块 |
| --without-http-cache | 禁用 HTTP 缓存 |
默认未开启模块
| 选项 | 解释说明 |
|---|---|
| --with-http_ssl_module | 启用 HTTPS 协议支持,需要 OpenSSL 库。默认情况下未构建此模块 |
| --with-http_v2_module | 启用 HTTP/2 协议支持。默认情况下未构建此模块。 |
| --with-http_realip_module | 启用 ngx_http_realip_module 模块的功能,该模块将客户端地址更改为在指定的 "header " 字段中发送的地址。默认情况下未构建此模块 |
| --with-http_sub_module | 启用 ngx_http_sub_module 模块,该模块通过将一个指定的字符串替换为另一个指定的字符串来修改响应。默认情况下未构建此模块 |
| --with-http_gzip_static_module | 启用 ngx_http_gzip_static_module 模块,该模块支持发送扩展名为 “.gz” 的预压缩文件,而不是常规文件。默认情况下未构建此模块 |
| --with-http_auth_request_module | 启用 ngx_http_auth_request_module 模块,该模块基于子请求的结果实现客户端授权。默认情况下未构建此模块 |
| --with-http_stub_status_module | 启用 ngx_http_stub_status_module 模块,该模块提供对基本状态信息的访问。默认情况下未构建此模块 |
| --add-module=path | 启用外部模块 |
| --add-dynamic-module=path | 启用外部动态模块 |
| --modules-path=path | nginx 动态模块的目录。默认值:<prefix>/modules目录 |
perl模块相关选项参数
| 选项 | 解释说明 |
|---|---|
| --without-pcre | 禁用PCRE库 |
| --with-pcre | 强制使用PCRE库 |
邮件模块相关配置选项参数
| 选项 | 解释说明 |
|---|---|
| --with-mail | 激活POP3/IMAP4/SMTP代理模块,默认未激活 |
| --with-mail_ssl_module | 允许ngx_mail_ssl_module模块这个模块使得POP3/IMAP/SMTP可以使用SSL/TLS.配置已经定义了HTTP SSL模块,但是不支持客户端证书检测 |
| --without-mail_pop3_module | 启用mail模块后,单独禁用pop3模块 |
| --without-mail_imap_module | 启用mail模块后,单独禁用imap模块 |
| --without-mail_smtp_module | 启用mail模块后,单独禁用smtp模块 |
| --without-http | 完全禁用http模块,如果只想支持mall,可以使用此项设置 |
| --with-openssl=DIR | 设定OpenSSL库文件路径 |
stream模块相关参数
| 选项 | 解释说明 |
|---|---|
| --with-stream | 开启stream模块 |
| --with-stream_ssl_module | 启用 stream 模块的 SSL/TLS 协议支持。构建和运行此模块需要 OpenSSL 库。默认情况下未构建此模块 |
| --with-stream_realip_module | 启用 ngx_stream_realip_module 模块的功能,该模块将客户端地址更改为 PROXY 协议标头中发送的地址。默认情况下未构建此模块 |
| --without-stream_access_module | 禁用 ngx_stream_access_module 模块,该模块允许限制对某些客户端地址的访问 |
nginx编译安装以及常用参数详解的更多相关文章
- nginx编译安装之-./configure 参数详解
参考官方文档 http://nginx.org/en/docs/configure.html --with开头的,默认是禁用的(没启动的,想使用的话需要在编译的时候加上) --without开头的,默 ...
- Linux下nginx编译安装教程和编译参数详解
这篇文章主要介绍了Linux下nginx编译安装教程和编译参数详解,需要的朋友可以参考下 一.必要软件准备1.安装pcre 为了支持rewrite功能,我们需要安装pcre 复制代码代码如下: # y ...
- Nginx核心配置文件常用参数详解
Nginx核心配置文件常用参数详解 作者:尹正杰 版权声明:原创作品,谢绝转载!否则将追究法律责任. 关于Nginx权威文档的话童鞋们可以参考Nginx官方文档介绍:http://nginx.org/ ...
- cat常用参数详解
cat常用参数详解 作者:尹正杰 版权声明:原创作品,谢绝转载!否则将追究法律责任. 最近,我的一个朋友对linux特别感兴趣,于是我觉得每天交给他一个命令的使用,这样一个月下来也会使用30个命令,基 ...
- nmap常用参数详解
nmap常用参数详解 作者:尹正杰 版权声明:原创作品,谢绝转载!否则将追究法律责任. 借用英雄联盟的一个英雄赵信的一句话:“即使敌众我寡,末将亦能万军丛中取敌将首级!”.三国关羽,万军丛中斩了颜良, ...
- free命令常用参数详解
free命令常用参数详解 作者:尹正杰 版权声明:原创作品,谢绝转载!否则将追究法律责任. 在运维期间我们会经常去查看服务器硬件信息,比如说内存,大家可能知道看内存用“[root@yinzhengji ...
- chattr的常用参数详解
chattr的常用参数详解 作者:尹正杰 版权声明:原创作品,谢绝转载!否则将追究法律责任. 在实际生产环境中,有的运维工程师不得不和开发和测试打交道,在我们公司最常见的就是部署接口.每天每个人部署的 ...
- find常用参数详解
find常用参数详解 作者:尹正杰 版权声明:原创作品,谢绝转载!否则将追究法律责任. 在linux系统中,在init 3模式情况下都是命令行模式,这个时候我们想要找到一个文件的就得依赖一个非常好用的 ...
- rsync常用参数详解
rsync常用参数详解 作者:尹正杰 版权声明:原创作品,谢绝转载!否则将追究法律责任. 在linux中,一切皆是文件,包括你的终端,硬件设备信息,目录,内核文件等等.所以工作中我们难免会遇到拷贝文件 ...
- tcpdump常用参数详解
tcpdump常用参数详解 作者:尹正杰 版权声明:原创作品,谢绝转载!否则将追究法律责任. 好久没有更新我的博客了,看来自己最近还没有在放假中回过神来啊,哈哈~是不是也有小伙伴跟我一样呢?回归正题, ...
随机推荐
- JavaScript Promises, async/await
new Promise() 的时候,传一个 executor 给 Promise. let promise = new Promise(function(resolve, reject) { // t ...
- 什么是django中间件?(七个中间件-自定义中间件)
目录 一:django中间件 1.什么是django中间件 2.django请求生命周期流程图 二:django自带七个中间件 1.研究django中间件代码规律 2.django支持程序员自定义中间 ...
- 学习ASP.NET Core Blazor编程系列十七——文件上传(上)
学习ASP.NET Core Blazor编程系列文章之目录 学习ASP.NET Core Blazor编程系列一--综述 学习ASP.NET Core Blazor编程系列二--第一个Blazor应 ...
- 使用 BenchmarkDotNet 比较指定容量的 List 的性能
我们之前提到 List 是 .NET 中常用的数据结构,其在存储大量数据时,如果能够指定它的初始化容量,就会有性能提升.这个优化的方法并不是很明显,因此本文将使用 BenchmarkDotNet 库, ...
- python文件的写入与读出
Python对文件的处理,新建目录,写入一个txt文件然后读取刚才写入的内容.这里是在windows系统演示,目录用"\".如果在linux系统,区别就是目录的斜杠号要用" ...
- go_json_learn
解析嵌套类型示例: func test3() { b := []byte(`{"Name":"tom","Age":20,"Ema ...
- 终于弄明白了 RocketMQ 的存储模型
RocketMQ 优异的性能表现,必然绕不开其优秀的存储模型 . 这篇文章,笔者按照自己的理解 , 尝试分析 RocketMQ 的存储模型,希望对大家有所启发. 1 整体概览 首先温习下 Rocket ...
- Js生成图片验证码
上代码 /** * [使用说明] * 1.生成验证码 * 函数: * generateRandomCode( dom对象Id ); * 例: * generateRandomCode( 'id' ); ...
- 《Effective C++》模版与泛型编程
Item41:了解隐式接口和编译期多态. 纵使你从未使用过templates,应该不陌生"运行期多态"和"编译期多态"之间的差异.因为它类似于"哪一个 ...
- react 高效高质量搭建后台系统 系列 —— 登录
其他章节请看: react 高效高质量搭建后台系统 系列 登录 本篇将完成登录模块.效果和 spug 相同: 需求如下: 登录页的绘制 支持普通登录和LDAP登录 登录成功后跳转到主页,没有登录的情况 ...