ThinkPHP V6.0.12在php8.1下验证码出现问题
一、问题描述
1、项目需求要求使用PHP8.1.*版本
2、运行程序发现验证码不生效报错如下:
二、错误描述
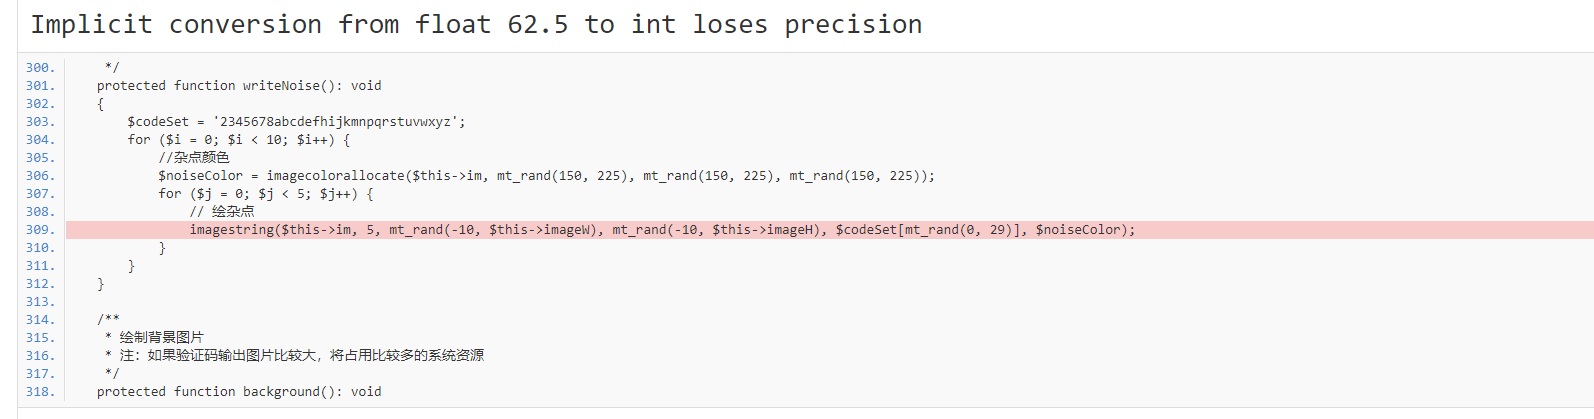
1、报错信息得出:从浮点(数字)到整数的隐式转换将失去精度
三、解决流程
1、找到报错文件位置
vendor\topthink\think-captcha\src\Captcha.php line 3092、发现是第309行报错,将代码改成以下内容(也可直接替换)
    /**

     * 画杂点

     * 往图片上写不同颜色的字母或数字

     */

    protected function writeNoise(): void

    {

        $codeSet = '2345678abcdefhijkmnpqrstuvwxyz';

        for ($i = 0; $i < 10; $i++) {

            //杂点颜色

            $noiseColor = imagecolorallocate($this->im, mt_rand(150, 225), mt_rand(150, 225), mt_rand(150, 225));

            for ($j = 0; $j < 5; $j++) {

                // 绘杂点

                imagestring($this->im, 5, mt_rand(-10, (int) $this->imageW), mt_rand(-10, (int)$this->imageH), $codeSet[mt_rand(0, 29)], $noiseColor);

            }

        }

    }
3、此时刷新页面发现了新的报错信息(意思基本相同):
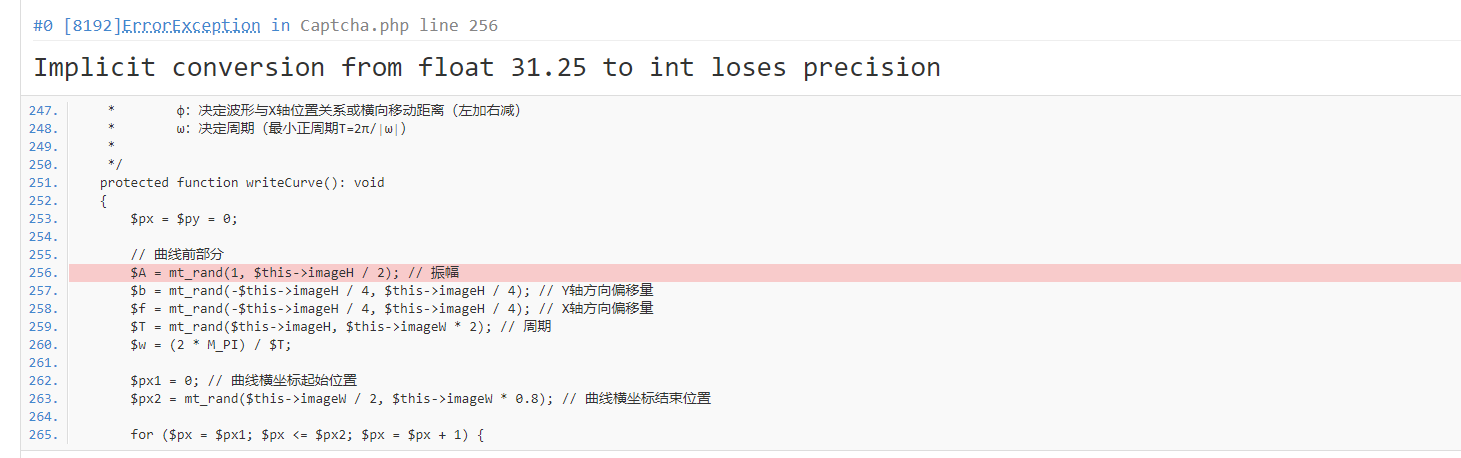
4、搜索(writeCurve)方法直接替换:
/**

     * 画一条由两条连在一起构成的随机正弦函数曲线作干扰线(你可以改成更帅的曲线函数)

     *

     *      高中的数学公式咋都忘了涅,写出来

     *        正弦型函数解析式:y=Asin(ωx+φ)+b

     *      各常数值对函数图像的影响:

     *        A:决定峰值(即纵向拉伸压缩的倍数)

     *        b:表示波形在Y轴的位置关系或纵向移动距离(上加下减)

     *        φ:决定波形与X轴位置关系或横向移动距离(左加右减)

     *        ω:决定周期(最小正周期T=2π/∣ω∣)

     *

     */

    protected function writeCurve(): void

    {

        $px = $py = 0;

        // 曲线前部分

        $A = mt_rand(1, (int) $this->imageH / 2); // 振幅

        $b = mt_rand(-intval($this->imageH / 4), intval($this->imageH / 4)); // Y轴方向偏移量

        $f = mt_rand(-intval($this->imageH / 4), intval($this->imageH / 4)); // X轴方向偏移量

        $T = mt_rand((int) $this->imageH, intval($this->imageW * 2)); // 周期

        $w = (2 * M_PI) / $T;

        $px1 = 0; // 曲线横坐标起始位置

        $px2 = mt_rand($this->imageW / 2, $this->imageW * 0.8); // 曲线横坐标结束位置

        for ($px = $px1; $px <= $px2; $px = $px + 1) {

            if (0 != $w) {

                $py = $A * sin($w * $px + $f) + $b + $this->imageH / 2; // y = Asin(ωx+φ) + b

                $i  = (int) ($this->fontSize / 5);

                while ($i > 0) {

                    imagesetpixel($this->im, (int) $px + $i, (int) $py + $i, $this->color); // 这里(while)循环画像素点比imagettftext和imagestring用字体大小一次画出(不用这while循环)性能要好很多

                    $i--;

                }

            }

        }

        // 曲线后部分

        $A   = mt_rand(1, intval($this->imageH / 2)); // 振幅

        $f   = mt_rand(-intval($this->imageH / 4), intval($this->imageH / 4)); // X轴方向偏移量

        $T   = mt_rand((int) $this->imageH, intval($this->imageW * 2)); // 周期

        $w   = (2 * M_PI) / $T;

        $b   = $py - $A * sin($w * $px + $f) - $this->imageH / 2;

        $px1 = $px2;

        $px2 = $this->imageW;

        for ($px = $px1; $px <= $px2; $px = $px + 1) {

            if (0 != $w) {

                $py = $A * sin($w * $px + $f) + $b + $this->imageH / 2; // y = Asin(ωx+φ) + b

                $i  = (int) ($this->fontSize / 5);

                while ($i > 0) {

                    imagesetpixel($this->im, (int) $px + $i, (int) $py + $i, $this->color);

                    $i--;

                }

            }

        }

    }
5、最后一步,搜索(create)方法直接替换:
 /**

     * 输出验证码并把验证码的值保存的session中

     * @access public

     * @param null|string $config

     * @param bool        $api

     * @return Response

     */

    public function create(string $config = null, bool $api = false): Response

    {

        $this->configure($config);

        $generator = $this->generate();

        // 图片宽(px)

        $this->imageW || $this->imageW = $this->length * $this->fontSize * 1.5 + $this->length * $this->fontSize / 2;

        // 图片高(px)

        $this->imageH || $this->imageH = $this->fontSize * 2.5;

        // 建立一幅 $this->imageW x $this->imageH 的图像

        $this->im = imagecreate((int) $this->imageW, (int) $this->imageH);

        // 设置背景

        imagecolorallocate($this->im, $this->bg[0], $this->bg[1], $this->bg[2]);

        // 验证码字体随机颜色

        $this->color = imagecolorallocate($this->im, mt_rand(1, 150), mt_rand(1, 150), mt_rand(1, 150));

        // 验证码使用随机字体

        $ttfPath = __DIR__ . '/../assets/' . ($this->useZh ? 'zhttfs' : 'ttfs') . '/';

        if (empty($this->fontttf)) {

            $dir  = dir($ttfPath);

            $ttfs = [];

            while (false !== ($file = $dir->read())) {

                if ('.' != $file[0] && substr($file, -4) == '.ttf') {

                    $ttfs[] = $file;

                }

            }

            $dir->close();

            $this->fontttf = $ttfs[array_rand($ttfs)];

        }

        $fontttf = $ttfPath . $this->fontttf;

        if ($this->useImgBg) {

            $this->background();

        }

        if ($this->useNoise) {

            // 绘杂点

            $this->writeNoise();

        }

        if ($this->useCurve) {

            // 绘干扰线

            $this->writeCurve();

        }

        // 绘验证码

        $text = $this->useZh ? preg_split('/(?<!^)(?!$)/u', $generator['value']) : str_split($generator['value']); // 验证码

        foreach ($text as $index => $char) {

            $x     = $this->fontSize * ($index + 1) * mt_rand((int) 1.2, (int) 1.6) * ($this->math ? 1 : 1.5);

            $y     = $this->fontSize + mt_rand(10, 20);

            $angle = $this->math ? 0 : mt_rand(-40, 40);

            imagettftext($this->im, $this->fontSize, $angle, (int) $x, (int) $y, $this->color, $fontttf, $char);

        }

        ob_start();

        // 输出图像

        imagepng($this->im);

        $content = ob_get_clean();

        imagedestroy($this->im);

        return response($content, 200, ['Content-Length' => strlen($content)])->contentType('image/png');

    }
说明:以上是按照报错信息依次修改;如有大佬有更好的解决办法欢迎评论留言
ThinkPHP V6.0.12在php8.1下验证码出现问题的更多相关文章
- VM virtualBox中文版 v6.0.12.133076官方版(64/-虚拟机
virtualBox中文版 v6.0.12.133076官方版(64/-虚拟机 http://www.onlinedown.net/soft/82464.htm http://8dx.pc6.com/ ...
- ThinkPHP v6.0.x 反序列化漏洞利用
前言: 上次做了成信大的安询杯第二届CTF比赛,遇到一个tp6的题,给了源码,目的是让通过pop链审计出反序列化漏洞. 这里总结一下tp6的反序列化漏洞的利用. 0x01环境搭建 现在tp新版本的官网 ...
- 详解Linux下swig 3.0.12的手动安装过程
详解Linux下swig 3.0.12的手动安装过程 首先 从http://www.linuxfromscratch.org/blfs/view/cvs/general/swig.html上下载swi ...
- thinkphp 5.0 lnmp环境下 无法访问,报错500(public目录)
两种方法: 1.修改fastcgi的配置文件 /usr/local/nginx/conf/fastcgi.conf fastcgi_param PHP_ADMIN_VALUE "open_b ...
- centos7下安装mysql8.0.12及设置权限
一.mysql版本介绍 mysql的官网为:https://www.mysql.com/ 在官网上可以看到多个版本,主要版本如下, 1.MySQL Community Server 社区版本,开源免费 ...
- windows下mysql 8.0.12安装步骤及基本使用教程
本文实例为大家分享了windows下mysql 8.0.12安装步骤及使用教程,供大家参考,具体内容如下 补充:mysql 已经更新到了 8.0.19,大致步骤和这个差不多,照着来就完事了. 我下载的 ...
- Linux下Redis4.0.12安装、配置、优化
一.安装 1.检查gcc环境 执行命令,如果Linux系统没有安装gcc编译器,会提示“Command not found” # gcc -v 安装gcc # yum -y install gcc 以 ...
- Windows 下 Mysql8.0.12 的安装方法
1. 之前在windows 上面安装了 mysql 5.6 还有 mysql 5.7 遇到了几个坑 , 最近想直接安装最新版的 mysql 8.0.12(较新) 发现还是有坑 跟之前的版本不一样 这里 ...
- 《ThinkPHP 5.0快速入门》 数据库、查询语言
1.数据库配置 return [ 'type' => 'mysql',// 数据库类型 'hostname' => '127.0.0.1',// 服务器地址 'database' => ...
随机推荐
- eclipse开发工具之“指定Maven仓库和setting.xml文件位置”
1.先点击window,然后选择Preferences按钮进入设置 2.找到Maven,选择UserSettings 点击Browse控件,添加setting.xml 点击Reindex控件,添加依赖 ...
- 10.Flink实时项目之订单维度表关联
1. 维度查询 在上一篇中,我们已经把订单和订单明细表join完,本文将关联订单的其他维度数据,维度关联实际上就是在流中查询存储在 hbase 中的数据表.但是即使通过主键的方式查询,hbase 速度 ...
- (stm32学习总结)—GPIO位带操作
本章参考资料:<STM32F10X-中文参考手册>存储器和总线构架章节.GPIO 章节,<CM3 权威指南 CnR2>存储器系统章节. 位带简介 位操作就是可以单独的对一个比特 ...
- vue和mint-ui loadMore 实现上拉加载和下拉刷新
首先安装mint-ui组件库 npm install mint-ui 在main.js中引入mint-ui和样式 import 'mint-ui/lib/style.css' import MintU ...
- 玩别人玩剩下的:canvas大雪纷飞
canvas大雪纷飞 前言:正好业务触及到canvas,看完api顺手写个雪花效果,因为之前看到过很多次这个,主要看思路,想象力好的可以慢慢去创作属于自己的canvas效果 思路: 利用画圆arc() ...
- PAT B1056组合数的和
给定 N 个非 0 的个位数字,用其中任意 2 个数字都可以组合成 1 个 2 位的数字.要求所有可能组合出来的 2 位数字的和.例如给定 2.5.8,则可以组合出:25.28.52.58.82.85 ...
- Native方法的使用
Java不是完美的,Java的不足除了体现在运行速度上要比传统的C++慢许多之外,Java无法直接访问到操作系统底层(如系统硬件等),为此Java使用native方法来扩展Java程序的功能. 可以将 ...
- android的布局xml文件如何添加注释?
xml布局文件如图添加注释后报错,错误内容如下: 上网查阅xml添加注释的语法规则: XML 中的注释 在 XML 中编写注释的语法与 HTML 的语法很相似: <!--This is a co ...
- 小程序预览图片wx.previewImage
效果图: ====> ==> 代码: <image mode='aspectFill' bindtap='previewImage' data-src='{{dataList ...
- 安卓电池健康查看软件AccuBattery 分享
一.天下苦秦久矣 说实话,我是小米的忠实粉丝(雷总打钱),手里目前是红米k30pro标准版, 室友中有用华为也有苹果的,据我所知苹果系统是可以看到电池健康的,但是安卓却不行, 所以推荐大家一个安卓软件 ...