使用 Spring Cloud LoadBalancer 实现客户端负载均衡
使用 Spring Cloud LoadBalancer 实现客户端负载均衡
作者:Grey
原文地址:
博客园:使用 Spring Cloud LoadBalancer 实现客户端负载均衡
CSDN:使用 Spring Cloud LoadBalancer 实现客户端负载均衡
背景
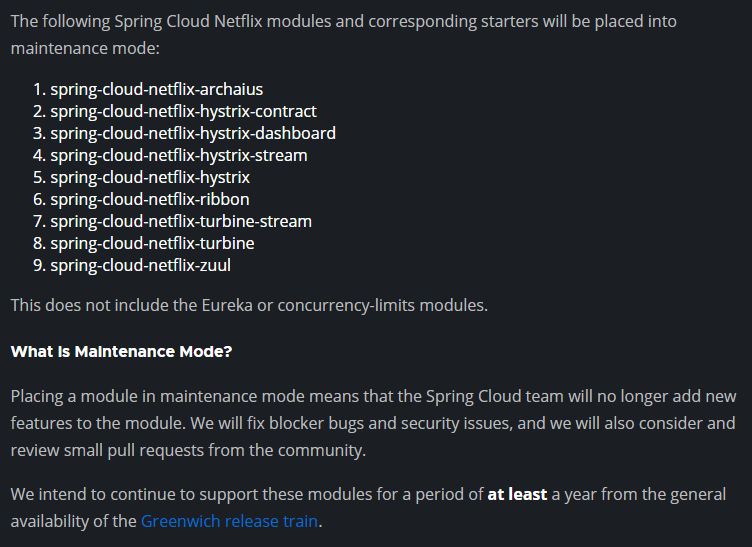
在Spring Cloud G 版发布时提到,
Spring Cloud Netflix 那套组件很多都进入了维护期,如下表所示
同时,针对一些组件,Spring 官方给出了一些替代方案
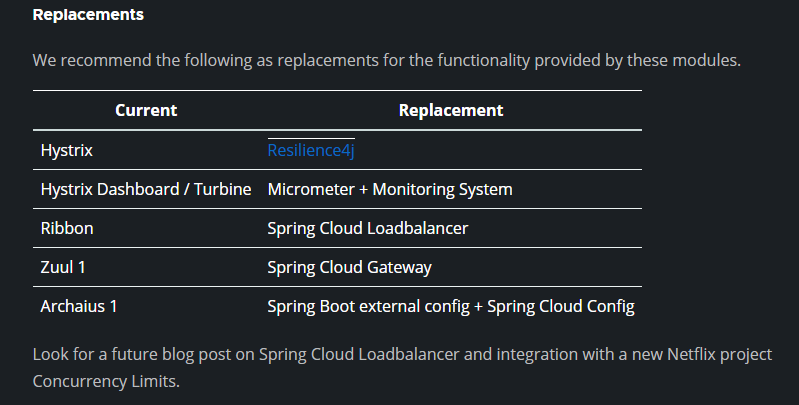
针对 spring-cloud-ribbon 这个负载均衡组件,Spring 官方提出的替换解决方案是 Spring Cloud Loadbalancer。本文主要通过一个示例介绍了 Spring Cloud Loadbalancer 的基础使用。
环境
JDK 1.8+
Maven 3.5+
Spring Boot 版本:2.7.5
Spring Cloud 版本:2021.0.5
项目结构和说明
- spring-cloud-loadbalanced-usage:父项目名称
- server : 服务端端模块
- src/
- pom.xml
- client : 客户端模块
- src/
- pom.xml
- pom.xml:父项目 pom 配置
- server : 服务端端模块
流程
整个过程如下示例图

注:Spring Cloud Loadbalancer 是在客户端实现负载均衡策略。
代码说明
服务端主要暴露一个服务,未做特殊配置
    @GetMapping("/greeting")

    public String greet() {

        log.info("Access /greeting");

        int randomNum = rand.nextInt(greetings.size());

        return greetings.get(randomNum);

    }
客户端的核心配置如下,主要是针对负载均衡配置:
package git.snippet.client.config;

import org.springframework.cloud.client.DefaultServiceInstance;

import org.springframework.cloud.client.ServiceInstance;

import org.springframework.cloud.client.loadbalancer.LoadBalanced;

import org.springframework.cloud.loadbalancer.annotation.LoadBalancerClient;

import org.springframework.cloud.loadbalancer.core.ServiceInstanceListSupplier;

import org.springframework.context.annotation.Bean;

import org.springframework.context.annotation.Configuration;

import org.springframework.context.annotation.Primary;

import org.springframework.web.reactive.function.client.WebClient;

import reactor.core.publisher.Flux;

import java.util.Arrays;

import java.util.List;

@Configuration

@LoadBalancerClient(name = "server")

public class WebClientConfig {

    @LoadBalanced

    @Bean

    WebClient.Builder webClientBuilder() {

        return WebClient.builder();

    }

    @Bean

    @Primary

    ServiceInstanceListSupplier serviceInstanceListSupplier() {

        return new ServiceInstanceListSupplier() {

            @Override

            public String getServiceId() {

                return "server";

            }

            @Override

            public Flux<List<ServiceInstance>> get() {

                return Flux.just(Arrays.asList(

                        new DefaultServiceInstance(getServiceId() + "1", getServiceId(), "localhost", 8090, false),

                        new DefaultServiceInstance(getServiceId() + "2", getServiceId(), "localhost", 9092, false),

                        new DefaultServiceInstance(getServiceId() + "3", getServiceId(), "localhost", 9999, false)));

            }

        };

    }

}
其中 @LoadBalancerClient(name = "server") 指定了 服务端的名称;
getServiceId()指定了服务端的服务 ID;
serviceInstanceListSupplier()方法中列出了三个服务端实例的地址;
new DefaultServiceInstance(getServiceId() + "1", getServiceId(), "localhost", 8090, false)

new DefaultServiceInstance(getServiceId() + "2", getServiceId(), "localhost", 9092, false)

new DefaultServiceInstance(getServiceId() + "3", getServiceId(), "localhost", 9999, false)
有了这个配置,在客户端的 Controller 中,做如下注入即可
package git.snippet.client.controller;

import org.springframework.cloud.client.loadbalancer.reactive.ReactorLoadBalancerExchangeFilterFunction;

import org.springframework.web.bind.annotation.RequestMapping;

import org.springframework.web.bind.annotation.RequestParam;

import org.springframework.web.bind.annotation.RestController;

import org.springframework.web.reactive.function.client.WebClient;

import reactor.core.publisher.Mono;

@RestController

public class HiController {

    private final WebClient.Builder loadBalancedWebClientBuilder;

    private final ReactorLoadBalancerExchangeFilterFunction lbFunction;

    public HiController(WebClient.Builder loadBalancedWebClientBuilder, ReactorLoadBalancerExchangeFilterFunction lbFunction) {

        this.loadBalancedWebClientBuilder = loadBalancedWebClientBuilder;

        this.lbFunction = lbFunction;

    }

    @RequestMapping("/hi")

    public Mono<String> hi(@RequestParam(value = "name", defaultValue = "Mary") String name) {

        return loadBalancedWebClientBuilder.build().get().uri("http://server/greeting").retrieve().bodyToMono(String.class).map(greeting -> String.format("%s, %s!", greeting, name));

    }

    @RequestMapping("/hello")

    public Mono<String> hello(@RequestParam(value = "name", defaultValue = "John") String name) {

        return WebClient.builder().filter(lbFunction).build().get().uri("http://server/greeting").retrieve().bodyToMono(String.class).map(greeting -> String.format("%s, %s!", greeting, name));

    }

}
启动并测试
首先启动 server,注意:
启动 server 的时候,需要启动多实例,且每个实例要定义 VM options
实例一定义 VM options 为 -Dserver.port=8090;
实例二定义 VM options 为 -Dserver.port=9092;
实例三定义 VM options 为 -Dserver.port=9999。
如果使用 IDEA Intellij,配置方式如下

三个 Server 启动后,接下来启动 client,运行 ClientApplication,启动完毕后,多次访问: http://localhost:8888/hi
可以通过每个 server 实例的运行日志,查看到每个实例都轮流获取到了请求,实现了负载均衡。
完整代码
见:spring-cloud-loadbalancer-usage
参考文档
Spring Cloud Greenwich.RELEASE is now available
Client-Side Load-Balancing with Spring Cloud LoadBalancer
使用 Spring Cloud LoadBalancer 实现客户端负载均衡的更多相关文章
- 服务注册发现Eureka之三:Spring Cloud Ribbon实现客户端负载均衡(客户端负载均衡Ribbon之三:使用Ribbon实现客户端的均衡负载)
在使用RestTemplate来消费spring boot的Restful服务示例中,我们提到,调用spring boot服务的时候,需要将服务的URL写死或者是写在配置文件中,但这两种方式,无论哪一 ...
- Spring Cloud Ribbon实现客户端负载均衡
1.构建microservice-consumer-movie-ribbon项目,在pom.xml中引入ribbon依赖 在引入Eureka依赖的时候,默认里面含有ribbon依赖 2.添加@Load ...
- Spring Cloud 客服端负载均衡 Ribbon
一.简介 Spring Cloud Ribbon 是一个基于Http和TCP的客服端负载均衡工具,它是基于Netflix Ribbon实现的.它不像服务注册中心.配置中心.API网关那样独立部署, ...
- Spring Cloud - 切换Ribbon的负载均衡模式
Spring Cloud Ribbon是一个基于HTTP和TCP的客户端负载均衡工具,它基于Netflix Ribbon实现.通过Spring Cloud的封装,可以让我们轻松地将面向服务的REST模 ...
- 2.【Spring Cloud Alibaba】实现负载均衡-Ribbon
负载均衡的两种方式 如何实现负载均衡 目前已经实现让A总能找到B,如何实现负载均衡 负载均衡的两种方式 服务器端负载均衡 客户端负载均衡 使用Ribbo实现负载均衡 Ribbon是什么 ==Netfl ...
- Spring Cloud微服务Ribbon负载均衡/Zuul网关使用
客户端负载均衡,当服务节点出现问题时进行调节或是在正常情况下进行 服务调度.所谓的负载均衡,就是当服务提供的数量和调用方对服务进行 取舍的调节问题,在spring cloud中是通过Ribbon来解决 ...
- 4.Spring Cloud初相识--------Feign负载均衡
前言: 在上一节里,我们学习了ribbon的使用. 我们了解到ribbon是一个客户端负载均衡机制. 而我们今天要讲的Feign呢,也是一款客户端负载均衡机制. 或者这样说,Feign封装了ribbo ...
- 撸一撸Spring Cloud Ribbon的原理-负载均衡策略
在前两篇<撸一撸Spring Cloud Ribbon的原理>,<撸一撸Spring Cloud Ribbon的原理-负载均衡器>中,整理了Ribbon如何通过负载均衡拦截器植 ...
- Spring Cloud Gateway Ribbon 自定义负载均衡
在微服务开发中,使用Spring Cloud Gateway做为服务的网关,网关后面启动N个业务服务.但是有这样一个需求,同一个用户的操作,有时候需要保证顺序性,如果使用默认负载均衡策略,同一个用户的 ...
- 【Spring Cloud学习之三】负载均衡
环境 eclipse 4.7 jdk 1.8 Spring Boot 1.5.2 Spring Cloud 1.2 主流的负载均衡技术有nginx.LVS.HAproxy.F5,Spring Clou ...
随机推荐
- Android Kotlin Annotation Processer
Annotation Processer 注解处理器(Annotation Processer)是javac内置的注解处理工具,可以在编译时处理注解,让我们自己做相应的处理.比如生成重复度很高的代码, ...
- 永久解决IDEA 连接 mysql时区问题`
永久解决IDEA 连接 mysql时区问题` 找到mysql的安装路径下的my.ini文件 加入以下代码 [mysqld] default-time_zone='+8:00' 关闭然后保存 打开然后以 ...
- PTA C语言作业
6-1 使用函数输出一个整数的逆序数 (20 分) 本题要求实现一个求整数的逆序数的简单函数. 函数接口定义: int reverse( int number ); 其中函数reverse须返回用户 ...
- Linux虚拟机 RHEL8.0安装步骤
一. 创建空白虚拟机 1.打开 VMware 虚拟机软件依次选择新建虚拟机并选择选择"自定义" 自定义功能更加全面,典型就是比较简单的配置 2.选择对应的 VMware 版本,此则 ...
- KingbaseES V8R6集群维护之--修改数据库服务端口案例
案例说明: 对于KingbaseES数据库单实例环境,只需要修改kingbase.conf文件的'port'参数即可,但是对于KingbaseES V8R6集群中涉及到多个配置文件的修改,并且在应 ...
- 设计模式——桥接模式(Bridge模式)
基本介绍 桥接模式(Bridge模式):将实现与抽象放在两个不同的类层次中,使两层次可以独立改变 是一种结构型设计模式 说白了就是有多个维度的变化,这样的组合关系如果按照传统的方式会导致类爆炸,所以需 ...
- linux下搭建ftp文件服务器
linux下搭建ftp文件服务器 一.搭建步骤(以在centos7中搭建为例) 1.首先检查一下系统中是否已经安装了vsftpd软件 # 查看是否安装vsftpd rpm -q vsftpd rpm ...
- vscode调试thinkhphp
第一步先安装xdebug扩展,我用宝塔环境,所以一键安装 第二步.在vscode中安装插件 我的php.ini是这样的 xdebug.remote_enable = 1 xdebug.remote_a ...
- Kubernetes 调度 - 污点和容忍度详解
当我们使用节点亲和力(Pod 的一个属性)时,它会将Pod吸引到一组节点(作为偏好或硬性要求).污点的行为完全相反,它们允许一个节点排斥一组 Pod. 在 Kubernetes 中,您可以标记(污染) ...
- Docker 部署 RocketMQ 双主双从模式( 版本v4.7.0)
文章转载自:http://www.mydlq.club/article/96/ 系统环境: 系统版本:CentOS 7.8 RocketMQ 版本:4.7.0 Docker 版本:19.03.13 一 ...