编写最简单的 iPhone 界面切换应用
以下是在iOS中最简单的界面切换示例。使用了多个Controller,并演示Controller之间在切换界面时的代码处理。
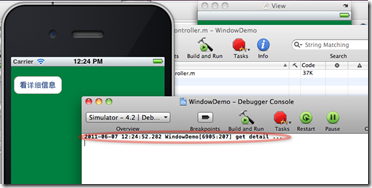
实现的应用界面:


首先,创建一个window-based application,即:

使用window-base application的目的是,尽量从最基本的情况下说明程序的编写过程。项目创建好后,即可以编译运行,执行结果是白屏页面:

编写第一个视图和控制器,我管它叫Topic,即主题,因此控制器命名为:TopicController,视图TopicView。
创建TopicController:
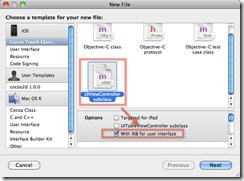
这样将创建3个文件:

视图xib文件也一同创建了。而且:

会自动生成File’s Owner的Class。
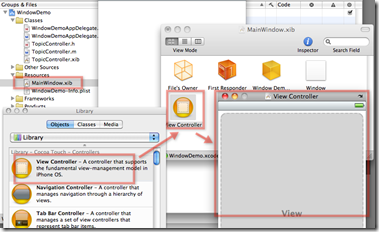
在MainWindow.xib中,将刚刚创建的控制器(TopicController)加进来。
先要拖拽一个View Controller进来:
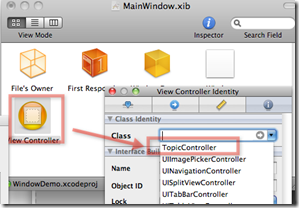
然后,给View Controller改名:
下面,要把这个Controller设置给WindowDemoAppDelegate。在它的头文件中:
#import <UIKit/UIKit.h>
#import "TopicController.h"@interface WindowDemoAppDelegate : NSObject <UIApplicationDelegate> {
UIWindow *window;
IBOutlet TopicController *topicController;
}@property (nonatomic, retain) IBOutlet UIWindow *window;
@end
在实现文件中:
#import "WindowDemoAppDelegate.h"
@implementation WindowDemoAppDelegate
@synthesize window;
#pragma mark –
#pragma mark Application lifecycle- (BOOL)application:(UIApplication *)application didFinishLaunchingWithOptions:(NSDictionary *)launchOptions {
// Override point for customization after application launch.
[self.window addSubview:topicController.view];
[self.window makeKeyAndVisible];
return YES;
}
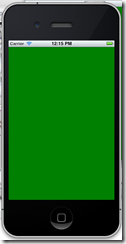
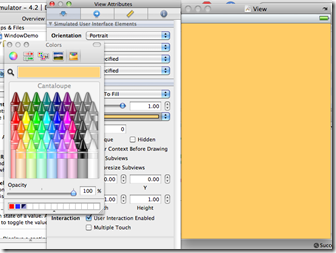
然后,为了看的清楚,把TopicController.xib文件中的视图颜色改为绿色:

运行应用,会看到如下效果:
为该界面添加一个按钮:

为该按钮创建处理方法。在TopicController的头文件中:
#import <UIKit/UIKit.h>
@interface TopicController : UIViewController {
}
-(IBAction) getDetail:(id)sender;
@end
在实现文件中:
#import "TopicController.h"
@implementation TopicController
-(IBAction) getDetail:(id)sender{
NSLog(@"get detail …");
}
在IB中,将按钮和控制器的Action连接:

再次运行应用,可看到日志中的打印内容:
按照上面创建Controller的方法,再创建一个DetailController。先把DetailController.xib的视图设置颜色,为了以后调试观察识别。
然后,我需要点击TopicController视图中按钮切换到DetailController视图。这需要在下面代码中想办法:
#import "TopicController.h"
@implementation TopicController
-(IBAction) getDetail:(id)sender{
NSLog(@"get detail …");
}
基本思路是找到window实例,可通过window的rootViewController属性设置新的控制器实例(比如DetailController),取代TopicController。代码可这样写:
#import "TopicController.h"
#import "DetailController.h"@implementation TopicController
-(IBAction) getDetail:(id)sender{
NSLog(@"get detail …, window.views: %@",self.view.window.subviews);
DetailController *detailController=[[DetailController alloc] initWithNibName:@"DetailController" bundle:nil];
self.view.window.rootViewController=detailController;
NSLog(@"window.views: %@",detailController.view.window.subviews);
}
加上这部分代码后,点击按钮就可生效,产生这样的效果:


上面的代码做一下解释:
- 首先创建了一个新的DetailController实例
- 然后,当前的controller的view属性,可以获得window实例,通过window实例的rootViewController属性的设置,将当前的控制器替换为新的控制器
- window对象是一个非常重要的类,你可以把它看作ios开发的画框,视图是放在画框里的,window有个subvews列表,里面可以存放多个View
- 当设置window.rootViewController属性的时候,window会自动将该属性的UIViewController的view添加到window的subview中,这也是为什么日志中打印的window.subviews列表中有两个实例的原因
这个代码很不完备,比如存在内存泄漏,需要这样:
DetailController *detailController=[[[DetailController alloc] initWithNibName:@"DetailController" bundle:nil] autorelease];
因为,这个detailController这句话后,计数器为1了,再赋值给window.rootViewController属性,就是2了。因此这里要做自动释放。
这个代码还有个问题,就是看上去很别扭,在一个控制器代码里去创建另一个控制器。这一方面很容易出问题,另一方面,代码的结构不清晰。下面用委托模式给代码解耦,也为下一步做返回按钮做准备。
委托模式,一般用protocol来实现。先写个protocol:
#import <UIKit/UIKit.h>
@protocol SwitchViewDelegate
-(void)getDetail;
@end
然后,需要让UIApplicationDelegate实现类实现该protocol:
#import <UIKit/UIKit.h>
#import "TopicController.h"
#import "SwitchViewDelegate.h"@interface WindowDemoAppDelegate : NSObject <UIApplicationDelegate,SwitchViewDelegate> {
UIWindow *window;
IBOutlet TopicController *topicController;
}@property (nonatomic, retain) IBOutlet UIWindow *window;
@end
在实现类中:
#import "WindowDemoAppDelegate.h"
#import "DetailController.h"@implementation WindowDemoAppDelegate
@synthesize window;
#pragma mark –
#pragma mark Application lifecycle- (BOOL)application:(UIApplication *)application didFinishLaunchingWithOptions:(NSDictionary *)launchOptions {
// Override point for customization after application launch.
[self.window addSubview:topicController.view];
topicController.delegate=self;
[self.window makeKeyAndVisible];
return YES;
}- (void)applicationWillResignActive:(UIApplication *)application {
/*
Sent when the application is about to move from active to inactive state. This can occur for certain types of temporary interruptions (such as an incoming phone call or SMS message) or when the user quits the application and it begins the transition to
the background state.
Use this method to pause ongoing tasks, disable timers, and throttle down OpenGL ES frame rates. Games should use this method to pause the game.
*/
}- (void)applicationDidEnterBackground:(UIApplication *)application {
/*
Use this method to release shared resources, save user data, invalidate timers, and store enough application state information to restore your application to its current state in case it is terminated later.
If your application supports background execution, called instead of applicationWillTerminate: when the user quits.
*/
}- (void)applicationWillEnterForeground:(UIApplication *)application {
/*
Called as part of transition from the background to the inactive state: here you can undo many of the changes made on entering the background.
*/
}- (void)applicationDidBecomeActive:(UIApplication *)application {
/*
Restart any tasks that were paused (or not yet started) while the application was inactive. If the application was previously in the background, optionally refresh the user interface.
*/
}- (void)applicationWillTerminate:(UIApplication *)application {
/*
Called when the application is about to terminate.
See also applicationDidEnterBackground:.
*/
}#pragma mark –
#pragma mark Memory management- (void)applicationDidReceiveMemoryWarning:(UIApplication *)application {
/*
Free up as much memory as possible by purging cached data objects that can be recreated (or reloaded from disk) later.
*/
}- (void)dealloc {
[window release];
[super dealloc];
}-(void)getDetail{
DetailController *detailController=[[[DetailController alloc] initWithNibName:@"DetailController" bundle:nil] autorelease];
self.window.rootViewController=detailController;
}@end
另外,就是要为控制器里增加delegate属性,头文件:
#import <UIKit/UIKit.h>
#import "SwitchViewDelegate.h"@interface TopicController : UIViewController {
id<SwitchViewDelegate> delegate;
}@property(nonatomic,retain) id<SwitchViewDelegate> delegate;
-(IBAction) getDetail:(id)sender;
@end
实现文件:
#import "TopicController.h"
#import "DetailController.h"@implementation TopicController
@synthesize delegate;
-(IBAction) getDetail:(id)sender{
NSLog(@"get detail …, window.views: %@",self.view.window.subviews);
[delegate getDetail];
}
实现的效果和上面的是类似的,但是引入委托模式后,代码的架构就比较清楚了,利于以后的维护。
编写最简单的 iPhone 界面切换应用的更多相关文章
- WPF如何实现类似iPhone界面切换的效果(转载)
WPF如何实现类似iPhone界面切换的效果 (version .1) 转自:http://blog.csdn.net/fallincloud/article/details/6968764 在论坛上 ...
- iOS 实现简单的界面切换
以下是在iOS中最简单的界面切换示例.使用了多个Controller,并演示Controller之间在切换界面时的代码处理. 实现的应用界面: 首先,创建一个window-based applicat ...
- HTML 和 JavaScript 编写简单的 404 界面
编写简单的 404 界面,也可以用来做 500 报错界面,还会飘东西,特别好,蛮漂亮的! <!DOCTYPE html> <html> <head> <met ...
- Linux启动界面切换:图形界面-字符界面(转)
Linux字符界面切换到图形界面 由字符界面切换到图形界面可用两种简单方法实现: 1.在字符界面输入startx或init 5 . 2.通过编辑/etc/inittab文件实现默认进入图形界面. 把其 ...
- Html5 Egret游戏开发 成语大挑战(五)界面切换和数据处理
经过前面的制作,使用Egret的Wing很快完成了开始界面和选关卡界面,下面通常来说就是游戏界面,但此时界面切换和关卡数据还没有准备好,这次讲解界面的切换和关卡数据的解析.前面多次修改了Main.ts ...
- Java入门篇(一)——如何编写一个简单的Java程序
最近准备花费很长一段时间写一些关于Java的从入门到进阶再到项目开发的教程,希望对初学Java的朋友们有所帮助,更快的融入Java的学习之中. 主要内容包括JavaSE.JavaEE的基础知识以及如何 ...
- BAT脚本编写教程简单入门篇
BAT脚本编写教程简单入门篇 批处理文件最常用的几个命令: echo表示显示此命令后的字符 echo on 表示在此语句后所有运行的命令都显示命令行本身 echo off 表示在此语句后所有运行的命 ...
- [android] 界面切换的核心方法
根据效果图拆分界面 主体部分 View ==> ViewGroup ==> RelativeLayout,主体部分使用RelativeLayout作为占位 View和ViewGroup的区 ...
- android 界面切换教程
Android的界面切换其实并没有什么难度,就和java的界面切换一样简单,但是java的使用的是Swing框架进行的切换,而Android使用的是Intent 来切换框架的,这是一个全新的使用方法, ...
随机推荐
- c++大数模版
http://blog.csdn.net/hackbuteer1/article/details/6595881 #include<iostream> #include<string ...
- C++14介绍
C++14标准是 ISO/IEC 14882:2014 Information technology -- Programming languages -- C++ 的简称[1] .在标准正式通过之 ...
- cdecl、pascal、stdcall、fastcall
Directive Parameter order Clean-up Passes parameters in registers?register Left-to-right ...
- 杭电oj1236 排名
Tips:此题比较简单,最好将每一个学生的信息构建一个结构体,另外需要注意的是,若分数相同,排序按姓名排序,我看网上很多都是使用<algorithm>中的sort算法,只需重写cmp函数即 ...
- java MongoDB driver error infos
DataTables warning: table id=dateTable - Ajax error. For more information about this error, please s ...
- BestCoder Round #3 A,B
A.预处理出来,0(1)输出. Task schedule Time Limit: 2000/1000 MS (Java/Others) Memory Limit: 32768/32768 K ...
- -bash: ulimit: max user processes: cannot modify limit: Operation not permitted
安装oracle时候在创建oracle用户后,切换oracle用户时,报如下错 [root@localhost ~]# su - oracle-bash: ulimit: max user proce ...
- hyper-v新内容
摘自http://geek.csdn.net/news/detail/30249 继开源.NET,微软推出Hyper-V Container技术及Nano Server Hyper-V Server ...
- SqLiter
1.去重 select * from daydata where wtid||rectime in (select wtid||rectime from daydata group by wtid| ...
- 什么是 CSS 预处理器?
什么是 CSS 预处理器? 就CSS本身而言,对于大多数Web前端从业人员来说就不是问题.学过CSS的人都知道,它不是一种编程语言.你可以用它开发网页样式,但是没法用它编程.换句话说,CSS基本上是 ...