使用Xshell连接虚机安装的vyOS

本文主要讲解:使用虚机(Vitual Box)安装的vyOS,如何使用Xshell来通过ssh方式连接。
首先咱们安装vyOS
1.安装vyOS
先用Vitual Box安装vyOS镜像。
接下来的操作其实官网教程讲的很清楚了,基本就是一路默认往下点就可以。
主要就是执行这条语句install image
vyos@vyos:~$ install image

Welcome to the VyOS install program.  This script

will walk you through the process of installing the

VyOS image to a local hard drive.

Would you like to continue? (Yes/No) [Yes]: Yes

Probing drives: OK

Looking for pre-existing RAID groups...none found.

The VyOS image will require a minimum 2000MB root.

Would you like me to try to partition a drive automatically

or would you rather partition it manually with parted?  If

you have already setup your partitions, you may skip this step

Partition (Auto/Parted/Skip) [Auto]:

I found the following drives on your system:

 sda    4294MB

Install the image on? [sda]:

This will destroy all data on /dev/sda.

Continue? (Yes/No) [No]: Yes

How big of a root partition should I create? (2000MB - 4294MB) [4294]MB:

Creating filesystem on /dev/sda1: OK

Done!

Mounting /dev/sda1...

What would you like to name this image? [1.2.0-rolling+201809210337]:

OK.  This image will be named: 1.2.0-rolling+201809210337

Copying squashfs image...

Copying kernel and initrd images...

Done!

I found the following configuration files:

    /opt/vyatta/etc/config.boot.default

Which one should I copy to sda? [/opt/vyatta/etc/config.boot.default]:

Copying /opt/vyatta/etc/config.boot.default to sda.

Enter password for administrator account

Enter password for user 'vyos':

Retype password for user 'vyos':

I need to install the GRUB boot loader.

I found the following drives on your system:

 sda    4294MB

Which drive should GRUB modify the boot partition on? [sda]:

Setting up grub: OK

Done!

vyos@vyos:~$
最后重启系统:
vyos@vyos:~$ reboot

Proceed with reboot? (Yes/No) [No] Yes
2.配置vyOS可通过SSH连接
2.1 进入配置模式
vyos@vyos$ configure

vyos@vyos#
2.2 配置网络接口
vyos@vyos# set interfaces ethernet eth0 address dhcp

vyos@vyos# set interfaces ethernet eth0 description 'OUTSIDE'
2.3 启用ssh
vyos@vyos# set service ssh port '22'
2.4 保存改动
vyos@vyos# commit

vyos@vyos# save
3. 配置Xshell连接
3.1 获取连接ip
接着2.4的操作:
vyos@vyos# exit

vyos@vyos$ sudo ifconfig

eth0      Link encap:Ethernet  HWaddr 08:00:27:40:ac:ef

          inet addr:你需要复制的地址  Bcast:XXX.XXX.XXX.XXX  Mask:255.255.255.0

          inet6 addr: fe80::a00:27ff:fe40:acef/64 Scope:Link

          UP BROADCAST RUNNING MULTICAST  MTU:1500  Metric:1

          RX packets:2425 errors:0 dropped:0 overruns:0 frame:0

          TX packets:185 errors:0 dropped:0 overruns:0 carrier:0

          collisions:0 txqueuelen:1000

          RX bytes:237660 (232.0 KiB)  TX bytes:19908 (19.4 KiB)

lo        Link encap:Local Loopback

          inet addr:127.0.0.1  Mask:255.0.0.0

          inet6 addr: ::1/128 Scope:Host

          UP LOOPBACK RUNNING  MTU:65536  Metric:1

          RX packets:30910 errors:0 dropped:0 overruns:0 frame:0

          TX packets:30910 errors:0 dropped:0 overruns:0 carrier:0

          collisions:0 txqueuelen:0

          RX bytes:1865376 (1.7 MiB)  TX bytes:1865376 (1.7 MiB)
你如果直接把上面的ip地址复制进入Xshell连接配置的主机(H)栏,大概率是连不上虚机中的vyOS的,
在进行接下来的操作之前,我们还需要修改虚机的桥接模式
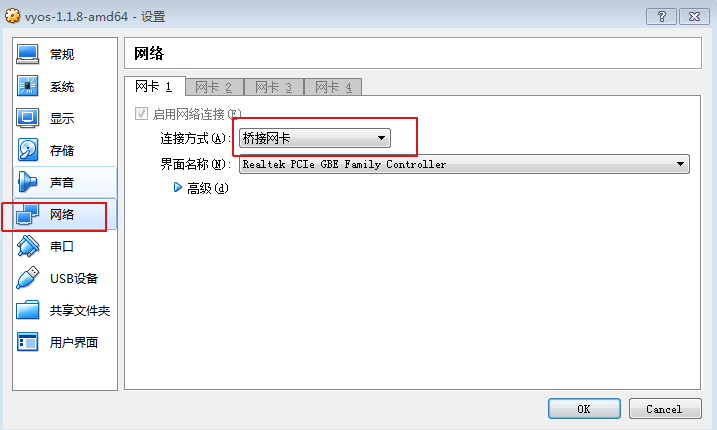
3.2 修改虚机桥接模式
选择vyOS虚机,右键 > 设置 > 网络 > 网卡1 > 连接方式 > 选择桥接网卡。
执行完上面操作后,咱们再次获取连接ip,操作同3.1。
3.3 再次获取连接ip
将获取到的ip填入到Xshell连接配置的主机(H)栏。账号密码都是安装vyOS时候设置的。即vyos。
这样一来,就OK了!
使用Xshell连接虚机安装的vyOS的更多相关文章
- Linux虚机安装配置Tomcat
d第一步:下载Tomcat包,网址http://tomcat.apache.org/ 选择tar.gz包下载,并传到虚机中 第二步:解压下载好的Tomcat包 命令:tar -zxvf apache- ...
- 无法与域Active Directory域控制器(AD DC)连接(虚机加域出错问题)
今天建了两台虚机用的VMWARE,一台做域控,一台做应用服务器,但是部署好域控要把应用服务器加入域时候报错 虚机网卡设置桥接并设置好IP使两台虚机在同一个局域网内,通过ip地址互ping能ping通, ...
- Linux系列-Xshell连接本地VMware安装的Linux虚拟机
一.安装VMwareWorkstation并安装RedHat虚拟机,这里安装步骤省略,网络的资料很多,大侠们不如百度或者谷歌一下,大把的资料. 二.打开本地电脑的“网络连接”,你会发现多出了2个网络适 ...
- Ubuntu --- Xshell 连接 VirtualBox下安装的Ubuntu
1.桥接模式 打开VirtualBox管理器---设置---网络---连接方式选择桥接网卡 2.安装ssh服务 安装: sudo apt-get install openssh-server 启动: ...
- 连接虚机中的mysql服务
1:修改mysql库中的user表的root用户的host值为% 2:授权:在mysql命令中执行 GRANT ALL PRIVILEGES ON *.* TO 'root'@'%' IDENTIFI ...
- VMWare 安装ubuntu,虚机设置静态IP接入公网
本文提供的kafka安装配置为Linux(ubuntu-16.04.3) 1.首先安装VMarea(14.0.0 build-6661328) 2.到http://www.ubuntu.org.cn/ ...
- KVM 介绍(6):Nova 通过 libvirt 管理 QEMU/KVM 虚机 [Nova Libvirt QEMU/KVM Domain]
学习 KVM 的系列文章: (1)介绍和安装 (2)CPU 和 内存虚拟化 (3)I/O QEMU 全虚拟化和准虚拟化(Para-virtulizaiton) (4)I/O PCI/PCIe设备直接分 ...
- ESXi6.5上的Ubuntu虚机在远程SSH时宕机
情况是这样的, 有一个ESXi6.5上跑的Ubuntu虚机, 版本是18.04.1, 今天升级成18.04.2后, 就发现远程连接SSH不对劲, 在本地登录和操作都好好的, 只要远程SSH一连接, 服 ...
- Neutron 理解(5):Neutron 是如何向 Nova 虚机分配固定IP地址的 (How Neutron Allocates Fixed IPs to Nova Instance)
学习 Neutron 系列文章: (1)Neutron 所实现的虚拟化网络 (2)Neutron OpenvSwitch + VLAN 虚拟网络 (3)Neutron OpenvSwitch + GR ...
随机推荐
- tcpdump软件使用
tcpdump是一个抓包工具, -w 选项是把抓到的包写到二进制文件中,一般扩展名是.cap或.dmp,但tcpdump程序创建文件时并不添加扩展名,可自己指定. -i 是指定要抓包的interfac ...
- 1java基础
1.java特性 详细解读 Java语言_小沐CA-CSDN博客 (1)Easy:Java的语法比C++的相对简单,另一个方面就是Java能使软件在很小的机器上运行,基础解释其和类库的支持的大小约为4 ...
- RHEL7配置端口转发和地址伪装
说明:这里是Linux服务综合搭建文章的一部分,本文可以作为Linux上使用firewalld做端口转发和地址伪装以及外网访问内网的参考. 注意:这里所有的标题都是根据主要的文章(Linux基础服务搭 ...
- 解析ArrayList的底层实现(上)
private static final long serialVersionUID = 8683452581122892189L;//唯一序列号ID private static final int ...
- Python自动化测试面试题-Linux篇
目录 Python自动化测试面试题-经验篇 Python自动化测试面试题-用例设计篇 Python自动化测试面试题-Linux篇 Python自动化测试面试题-MySQL篇 Python自动化测试面试 ...
- Jmeter 学习笔记 1 - Logic Controller -组织执行场景
using this website to practice performance testing: http://advantageonlineshopping.com/#/ Jemeter ho ...
- 构建前端第3篇之---使用scss
张艳涛 写于2021-1-20 主要解决俩个问题: 在单个vue文件中 <style rel="stylesheet/scss" lang="scss"& ...
- ifix 在切换菜单按钮弹出”已打开该画面“bug修复
在ifix项目中,实际上会用到点击按钮弹出按钮菜单,点击另一按钮弹出另一按钮菜单的情况.一般在使用过程中切换菜单可有如下两种普遍做法: 1.使用ClosePicture "Middle&qu ...
- 电脑桌面与群晖NAS双向实时同步-20210105
电脑桌面与群晖NAS双向实时同步 2021年1月15日星期五 一.购买群晖DS920+网络存储服务器.NEC超轻笔记本电脑(重量小于800克).小米10至尊版安卓智能手机和intel i9 1 ...
- 自学linux——6.安全外壳协议(ssh服务)
ssh服务 ssh(secure shell)安全外壳协议:远程连接协议,远程文件传输协议 1.协议使用端口号默认:22 若要修改,则修改ssh服务的配置文件/etc/ssh/ssh_config a ...