Linux创建RAID0_实战
Linux创建RAID实战
一、Linux创建RAID0
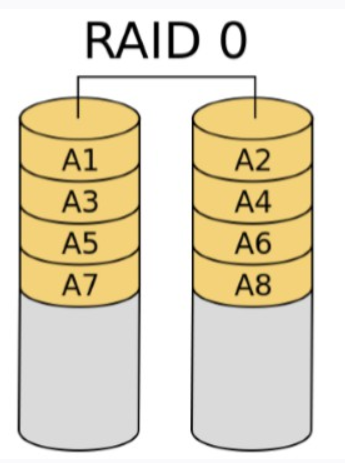
- RAID0俗称条带,它将两个或多个硬盘组成一个逻辑硬盘,容量是所有硬盘之和
- 因为是多个硬盘组合成一个,故可并行写操作,写入速度提高,但此方式硬盘数据没有冗余,没有容错,一旦一个物理硬盘损坏,则所有数据均丢失
- RAID0适合于对数据量大,但安全性要求不高的场景,比如音像、视频文件的存储等
二、创建RAID0,并格式化、挂载使用
- 添加两块10G的虚拟硬盘
[root@localhost ~]# lsblk

NAME          MAJ:MIN RM  SIZE RO TYPE MOUNTPOINT

sda             8:0    0   10G  0 disk      //添加的第一块10G的虚拟硬盘

sdb             8:16   0   10G  0 disk      //添加的第二块10G的虚拟硬盘

sr0            11:0    1  7.3G  0 rom

nvme0n1       259:0    0   80G  0 disk

├─nvme0n1p1   259:1    0    1G  0 part /boot

└─nvme0n1p2   259:2    0   79G  0 part

  ├─rhel-root 253:0    0   50G  0 lvm  /

  ├─rhel-swap 253:1    0    2G  0 lvm  [SWAP]

  └─rhel-home 253:2    0   27G  0 lvm  /home
- 将两块虚拟硬盘分区,分区ID为fd(Linux raid autodetect)
[root@localhost ~]# fdisk /dev/sda

Welcome to fdisk (util-linux 2.32.1).

Changes will remain in memory only, until you decide to write them.

Be careful before using the write command.

Command (m for help): n

Partition type

   p   primary (0 primary, 0 extended, 4 free)

   e   extended (container for logical partitions)

Select (default p): p

Partition number (1-4, default 1):

First sector (2048-20971519, default 2048):

Last sector, +sectors or +size{K,M,G,T,P} (2048-20971519, default 20971519):    //直接回车,将所有空间分成一个主分区

Created a new partition 1 of type 'Linux' and of size 10 GiB.

Command (m for help): t    //更改分区ID类型

Selected partition 1

Hex code (type L to list all codes): fd          //设置分区类型ID为fd

Changed type of partition 'Linux' to 'Linux raid autodetect'.

Command (m for help): p          //查看创建的分区

Disk /dev/sda: 10 GiB, 10737418240 bytes, 20971520 sectors

Units: sectors of 1 * 512 = 512 bytes

Sector size (logical/physical): 512 bytes / 512 bytes

I/O size (minimum/optimal): 512 bytes / 512 bytes

Disklabel type: dos

Disk identifier: 0x3c4b6576

Device     Boot Start      End  Sectors Size Id Type

/dev/sda1        2048 20971519 20969472  10G fd Linux raid autodetect               //刚刚创建的分区,id=fd就是对的

Command (m for help): w      //保存退出

The partition table has been altered.

Calling ioctl() to re-read partition table.

Syncing disks.
同理,第二块虚拟硬盘分区ID也是fd。
- 查看创建的分区
[root@localhost ~]# fdisk -l | grep raid

/dev/sdb1        2048 20971519 20969472  10G fd Linux raid autodetect

/dev/sda1        2048 20971519 20969472  10G fd Linux raid autodetect
- 创建 RAID0
[root@localhost ~]# yum install -y mdadm

[root@localhost ~]# mdadm -C -v /dev/md0 -l0 -n2 /dev/sd{a,b}1

mdadm: chunk size defaults to 512K

mdadm: Defaulting to version 1.2 metadata

mdadm: array /dev/md0 started.
- 查看 raidstat 状态
[root@localhost ~]# cat /proc/mdstat

Personalities : [raid0]

md0 : active raid0 sdb1[1] sda1[0]

      20951040 blocks super 1.2 512k chunks

unused devices: <none>
- 查看 RAID0 的详细信息
[root@localhost ~]# mdadm -D /dev/md0

/dev/md0:

           Version : 1.2

     Creation Time : Tue Dec 15 13:07:37 2020

        Raid Level : raid0

        Array Size : 20951040 (19.98 GiB 21.45 GB)

      Raid Devices : 2

     Total Devices : 2

       Persistence : Superblock is persistent

       Update Time : Tue Dec 15 13:07:37 2020

             State : clean

    Active Devices : 2

   Working Devices : 2

    Failed Devices : 0

     Spare Devices : 0

            Layout : original

        Chunk Size : 512K

Consistency Policy : none

              Name : localhost:0  (local to host localhost)

              UUID : a3aad0f2:ed4fc982:e7dec94f:4d481ef0

            Events : 0

    Number   Major   Minor   RaidDevice State

       0       8        1        0      active sync   /dev/sda1

       1       8       17        1      active sync   /dev/sdb1
- 格式化 /dev/md0,类型为xfs
[root@localhost ~]# mkfs.xfs /dev/md0

meta-data=/dev/md0               isize=512    agcount=16, agsize=327296 blks

         =                       sectsz=512   attr=2, projid32bit=1

         =                       crc=1        finobt=1, sparse=1, rmapbt=0

         =                       reflink=1

data     =                       bsize=4096   blocks=5236736, imaxpct=25

         =                       sunit=128    swidth=256 blks

naming   =version 2              bsize=4096   ascii-ci=0, ftype=1

log      =internal log           bsize=4096   blocks=2560, version=2

         =                       sectsz=512   sunit=0 blks, lazy-count=1

realtime =none                   extsz=4096   blocks=0, rtextents=0
- 挂载 /dev/md0
[root@localhost ~]# mkdir /raid0

[root@localhost ~]# mount /dev/md0 /raid0/

[root@localhost ~]# df -h

Filesystem             Size  Used Avail Use% Mounted on

devtmpfs               887M     0  887M   0% /dev

tmpfs                  904M     0  904M   0% /dev/shm

tmpfs                  904M  8.7M  895M   1% /run

tmpfs                  904M     0  904M   0% /sys/fs/cgroup

/dev/mapper/rhel-root   50G  4.5G   46G   9% /

/dev/nvme0n1p1        1014M  173M  842M  18% /boot

/dev/mapper/rhel-home   27G  225M   27G   1% /home

tmpfs                  181M     0  181M   0% /run/user/0

/dev/md0                20G  176M   20G   1% /raid0
Linux创建RAID0_实战的更多相关文章
- Linux创建RAID10_实战
Linux创建RAID10_实战 Linux创建RAID10 RAID10 是先将数据进行镜像操作,然后再对数据进行分组,RAID1 在这里就是一个冗余的备份阵列,而RAID0则负责数据的读写阵列 至 ...
- Linux创建RAID5_实战
Linux创建RAID5实战 Linux创建RAID5 RAID5最少由三个硬盘组成,它将数据分散存储于阵列中的每个硬盘,并且还伴有一个数据校验位,数据位与校验位通过算法能相互验证 RAID5最多能允 ...
- Linux创建RAID1_实战
Linux创建RAID1实战 Linux创建RAID1 RAID1俗称镜像,它最少由两个硬盘组成,且两个硬盘上存储的数据均相同,以实现数据冗余 RAID1读操作速度有所提高,写操作理论上与单硬盘速度一 ...
- 优化系统资源ulimit《高性能Linux服务器构建实战:运维监控、性能调优与集群应用》
优化系统资源ulimit<高性能Linux服务器构建实战:运维监控.性能调优与集群应用> 假设有这样一种情况,一台Linux 主机上同时登录了10个用户,在没有限制系统资源的情况下,这10 ...
- (热死你)Resin https ssl Linux 配置,实战可用
(热死你)Resin https ssl Linux 配置,实战可用 一.配置resin 1.在resin服务器中创建目录keys文件和openssl.conf,格式内容如下: #先复制以下的内容: ...
- Linux入门到实战
关注公众号 cxytester 获取第一手资讯. 1. 全是干货-Linux命令大全 1.1 线上查询及帮助(1个) help 1.2 文件目录及操作(12个) ls tree pwd mkdir r ...
- linux useradd(adduser)命令参数及用法详解(linux创建新用户命令)
linux useradd(adduser)命令参数及用法详解(linux创建新用户命令) useradd可用来建立用户帐号.帐号建好之后,再用passwd设定帐号的密码.而可用userdel删除帐号 ...
- 优化Linux内核参数/etc/sysctl.conf sysctl 《高性能Linux服务器构建实战:运维监控、性能调优与集群应用》
优化Linux内核参数/etc/sysctl.conf sysctl <高性能Linux服务器构建实战:运维监控.性能调优与集群应用> http://book.51cto.com/ar ...
- linux创建用户和用户组
Linux创建用户.用户组 及 删除 在创建用户时,需要为新建用户指定一用户组,如果不指定其用户所属的工作组,自动会生成一个与用户名同名的工作组.创建用户user1的时候指定其所属工作组users,例 ...
随机推荐
- 如何建立一个足够安全的SSH连接?
1 概述 使用SSH连接服务器是一件很平常的事,但是,连接是否足够安全是一个令人担忧的问题.本文从如下几个方面介绍了如何建立一个足够安全的SSH连接: 端口 协议 用户 密码 密钥对 ssh-agen ...
- shell脚本 4 函数与正则
shell函数 shell中允许将一组命令集合或语句形成一段可用代码,这些代码块称为shell函数.给这段代码起个名字称为函数名,后续可以直接调用该段代码. 格式 func() { #指定函数名 ...
- Run Horovod
Run Horovod https://horovod.readthedocs.io/en/stable/running_include.html https://horovod.readthedoc ...
- 我自横刀向天笑,手写Spring IOC容器,快来Look Look!
目录 IOC分析 IOC是什么 IOC能够带来什么好处 IOC容器是做什么工作的 IOC容器是否是工厂模式的实例 IOC设计实现 设计IOC需要什么 定义接口 一:Bean工厂接口 二:Bean定义的 ...
- Day11_51_Collections工具类之sort方法和list集合的遍历方式
Collections工具类之sort方法 * 使用Collections工具类对List集合进行排序 Collections.sort(List集合) * Collections.sort()方法只 ...
- jasypt在springboot项目中遇到异常:Error creating bean with name 'enableEncryptablePropertySourcesPostProcessor' defined in class path resource
背景 在使用jasypt对spring boot的配置文件中的敏感信息进行加密处理时,使用stater直接启动时,遇到了一个异常 <dependency> <groupId>c ...
- 前后端分离中的无痛刷新token机制
今天我们来说一说前后端分离中的无痛刷新token机制 博主先来分享一波福利,最近挖到的宝藏,刚开始学Java的同学看 https://www.bilibili.com/video/BV1Rx41187 ...
- 解决mysql You can't specify target table for update in FROM clause错误
mysql中You can't specify target table for update in FROM clause错误的意思是说,不能先select出同一表中的某些值,再update这个表( ...
- 1058 A+B in Hogwarts
If you are a fan of Harry Potter, you would know the world of magic has its own currency system -- a ...
- E - Minimal Subarray Length(连续区间和)
题目链接 题意:给出n个数,求加和大于x的最短区间的区间长度. 如果前i个数字和为y,那么如果前j数字的和小于等于y-x,那么i-j就是一种可能的情况,我们对于所有的i找出前面最大的j就可以了,因为数 ...