
搭建kerberos和NTP服务器以及安全的NFS服务
说明:这里是Linux服务综合搭建文章的一部分,本文可以作为单独搭建Kerberos和NTP时钟服务的参考。
注意:这里所有的标题都是根据主要的文章(Linux基础服务搭建综合)的顺序来做的。
如果需要查看相关软件版本和主机配置要求,请根据目录自行查看。
Linux服务综合搭建的文章目录
====================================================
5、foundation通过Rsyslog搭建集中日志服务器
8、rhel7 JAVA web环境搭建(使用Tomcat8整合httpd)
10、foundation配置kerberos和NTP服务以及安全的NFS挂载
====================================================
主机角色说明

10、foundation配置kerberos
注意:先搭建好时钟同步服务器(这里介绍两种方案,当然,也可以直接使用国内一些现成的时钟服务器,比如阿里云的)然后再开始搭建kerberos
10.1一些概念
10.1.1 什么是NTP?
NTP(Network Time Protocol,网络时间协议)是用来使网络中的各个计算机时间同步的一种协议。它的用途是把计算机的时钟同步到世界协调时UTC,其精度在局域网内可达0.1ms,在互联网上绝大多数的地方其精度可以达到1-50ms。NTP服务器就是利用NTP协议提供时间同步服务的。
10.1.2 为什么要做时间同步?
时间同步有很多好处,这里我们必须让时间同步的原因就是我们使用的kerberos它依赖时间的准确性。在kerberos官方文档中有如下的信息:
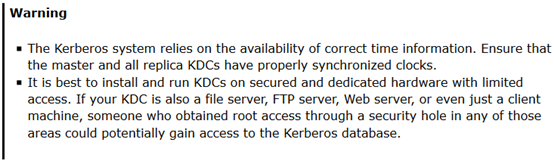
kerberos官方文档:https://web.mit.edu/kerberos/krb5-latest/doc/admin/install.html
(虽然是英文,但是技术文档一般都不会有很难的单词,实在不行可以使用浏览器的翻译插件看,千万不要抵触英文)
同步时钟最大的好处就是相关系统上日志文件中的数据,如果网络中使用中央日志主机集中管理日志,
得到的日志结果就更能反映真实情况。在同步了时钟的网络中,集中式的性能监控、服务监控系统能实时的反应系统信息,
系统管理员可以快速的检测和解决系统错误。如果时间不同步,很多应用将无法正常运行,
同时大数据系统也是对时间很敏感的,时间同步才能使得大数据处理更加精确。
10.1.3 ntpd、ntpdate和chronyd的区别
ntpd和chronyd都可以作为时间同步服务器,同时ntpd和chronyd不仅仅是时间同步服务器,它还可以做客户端与标准时间服务器进行同步时间,并且是平滑同步。而ntpdate并是立即同步,并不是平滑同步,在生产环境中慎用ntpdate,也正如此两者不可同时运行。
ntpdate依赖于NTP服务器的安全,如果ntpdate被攻击,时间同步则会有问题,并且NTP服务器一旦宕机,跟随它的服务器也就无法同步,另外使用ntpdate也不够优雅,它是立即同步,时间是跳变,依赖于时间的应用就会出问题。
所以在这里我们仅仅使用ntpdate来做测试。
10.1.4 kerberos
Kerberos协议主要用于计算机网络的身份鉴别(Authentication), 它的特点是用户只需输入一次身份验证信息就可以凭借此验证获得的票据(ticket-granting ticket)访问多个服务,即SSO(Single Sign On)。由于在每个Client和Service之间建立了共享密钥,使得该协议具有相当的安全性。
Kerberos协议分为两个部分:
1.Client向KDC发送自己的身份信息,KDC从Ticket Granting Service得到TGT(ticket-granting ticket),并用协议开始前Client与KDC之间的密钥将TGT加密回复给Client。
此时只有真正的Client才能利用它与KDC之间的密钥将加密后的TGT解密,从而获得TGT。
(此过程避免了Client直接向KDC发送密码,以求通过验证的不安全方式)
2.Client利用之前获得的TGT向KDC请求其他Service的Ticket,从而通过其他Service的身份鉴别。
用对话场景来解释kerbeors的设计过程请参考:
https://blog.csdn.net/dog250/article/details/5468741
kerberos认证原理请参考:
https://blog.csdn.net/wulantian/article/details/42418231
kerberos认证简易流程:这里就不详解kerberos的原理和搭建设计思路了。
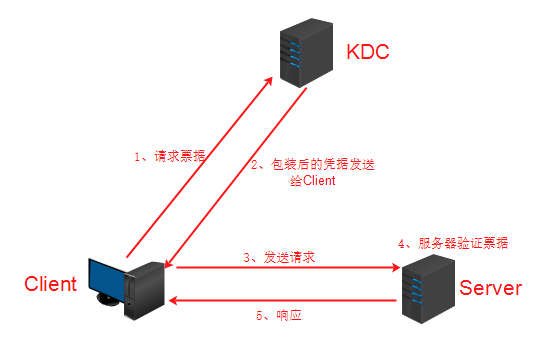
概念补充:
1、principal
认证的主体,简单来说就是"用户名"
2、realm
realm有点像编程语言中的namespace。在编程语言中,变量名只有在某个"namespace"里才有意义。同样的,一个principal只有在某个realm下才有意义。
所以realm可以看成是principal的一个"容器"或者"空间"。相对应的,principal的命名规则是"what_name_you_like@realm"。
在kerberos, 大家都约定成俗用大写来命名realm, 比如"EXAMPLE.COM"
3、password
某个用户的密码,对应于kerberos中的master_key。password可以存在一个keytab文件中。所以kerberos中需要使用密码的场景都可以用一个keytab作为输入。
4、credential
credential是“证明某个人确定是他自己/某一种行为的确可以发生”的凭据。在不同的使用场景下, credential的具体含义也略有不同:
对于某个principal个体而言,他的credential就是他的password。
在kerberos认证的环节中,credential就意味着各种各样的ticket。
10.2 使用ntp搭建NTP时间服务器
10.2.1 安装软件包
在我们RHEL7.4的ISO镜像文件中有ntp的包,所以直接yum安装即可。
1 [root@foundation ~]# yum install ntp
10.2.2 配置
#简化配置文件,去掉所有注释,可以使用egrep -v

[root@foundation ~]# grep -v -E "^$|#" /etc/ntp.conf

driftfile /var/lib/ntp/drift

restrict default nomodify notrap nopeer noquery

restrict 172.25.0.55 nomodify notrap nopeer noquery

restrict 127.0.0.1

restrict ::1

server 127.127.1.0

fudge 127.127.1.0 stratum 10

includefile /etc/ntp/crypto/pw

keys /etc/ntp/keys

disable monitor
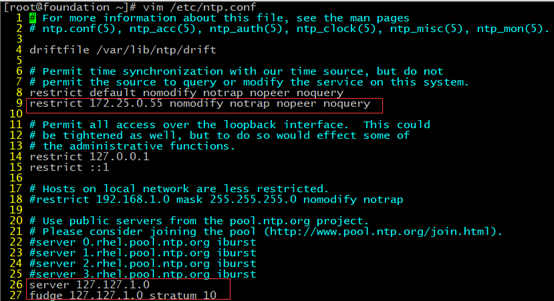
配置参数的解释
#以下是配置项的解释

[root@foundation ~]# cat /etc/ntp.conf

# For more information about this file, see the man pages

# ntp.conf(5), ntp_acc(5), ntp_auth(5), ntp_clock(5), ntp_misc(5), ntp_mon(5).

driftfile /var/lib/ntp/drift  #预定义的时间差异分析档案存放的路径,一般不作更改

# Permit time synchronization with our time source, but do not

# permit the source to query or modify the service on this system.

restrict default nomodify notrap nopeer noquery  #拒绝IPV4的用户

#restrict -6 default kod nomodify notrap nopeer noquery  #拒绝 IPv6 的用户

restrict 172.25.0.55 nomodify notrap nopeer noquery  #当前节点的IP地址

# Permit all access over the loopback interface.  This could

# be tightened as well, but to do so would effect some of

# the administrative functions.

#放行局域网用户来源,也可以单独列出IP地址

restrict 172.25.0.0 mask 255.255.255.0 nomodify  #一般是局域网中网关的IP或者直接是网段

#单独列出IP放行主机(上游主机)进入本NTP源的格式如下

restrict 172.25.0.11

#下面的是默认值,放行本机来源

restrict 127.0.0.1

restrict ::1

# Hosts on local network are less restricted.

#restrict 192.168.1.0 mask 255.255.255.0 nomodify notrap

# Use public servers from the pool.ntp.org project.

# Please consider joining the pool (http://www.pool.ntp.org/join.html).

#设置上游主机来源,一般会先注释掉默认的几个

#server 0.rhel.pool.ntp.org iburst

#server 1.rhel.pool.ntp.org iburst

#server 2.rhel.pool.ntp.org iburst

#server 3.rhel.pool.ntp.org iburst

#上游主机

#server 172.25.0.77 prefer   #加上prefer表示这台主机优先

#默认当上游主机找不到,我们就使用本机的时间作为时间服务

server 127.127.1.0

fudge 127.127.1.0 stratum 10

#broadcast 192.168.1.255 autokey        # broadcast server

#broadcastclient                        # broadcast client

#broadcast 224.0.1.1 autokey            # multicast server

#multicastclient 224.0.1.1              # multicast client

#manycastserver 239.255.254.254         # manycast server

#manycastclient 239.255.254.254 autokey # manycast client

# Enable public key cryptography.

#crypto

includefile /etc/ntp/crypto/pw

# Key file containing the keys and key identifiers used when operating

# with symmetric key cryptography.

keys /etc/ntp/keys

# Specify the key identifiers which are trusted.

#trustedkey 4 8 42

# Specify the key identifier to use with the ntpdc utility.

#requestkey 8

# Specify the key identifier to use with the ntpq utility.

#controlkey 8

# Enable writing of statistics records.

#statistics clockstats cryptostats loopstats peerstats

# Disable the monitoring facility to prevent amplification attacks using ntpdc

# monlist command when default restrict does not include the noquery flag. See

# CVE-2013-5211 for more details.

# Note: Monitoring will not be disabled with the limited restriction flag.

disable monitor
restrict [ 客户端IP ]  mask  [ IP掩码 ]  [参数]

“客户端IP” 和 “IP掩码” 指定了对网络中哪些范围的计算机进行控制,如果使用default关键字,则表示对所有的计算机进行控制,参数指定了具体的限制内容,常见的参数如下:

◆ ignore:拒绝连接到NTP服务器

◆ nomodiy: 客户端不能更改服务端的时间参数,但是客户端可以通过服务端进行网络校时。

◆ noquery: 不提供客户端的时间查询

◆ notrap: 不提供trap远程登录功能,trap服务是一种远程时间日志服务。

◆ notrust: 客户端除非通过认证,否则该客户端来源将被视为不信任子网 。

◆ nopeer: 提供时间服务,但不作为对等体。

◆ kod: 向不安全的访问者发送Kiss-Of-Death报文。
server host  [ key n ] [ version n ] [ prefer ] [ mode n ] [ minpoll n ] [ maxpoll n ] [ iburst ]

其中host是上层NTP服务器的IP地址或域名,随后所跟的参数解释如下所示:

◆ key: 表示所有发往服务器的报文包含有秘钥加密的认证信息,n是32位的整数,表示秘钥号。

◆ version: 表示发往上层服务器的报文使用的版本号,n默认是3,可以是1或者2。

◆ prefer: 如果有多个server选项,具有该参数的服务器有限使用。

◆ mode: 指定数据报文mode字段的值。

◆ minpoll: 指定与查询该服务器的最小时间间隔为2的n次方秒,n默认为6,范围为4-14。

◆ maxpoll:  指定与查询该服务器的最大时间间隔为2的n次方秒,n默认为10,范围为4-14。

◆ iburst: 当初始同步请求时,采用突发方式接连发送8个报文,时间间隔为2秒
启动服务并设置服务为自启动并配置防火墙放行123端口
1 [root@foundation ~]# systemctl restart ntpd

2 [root@foundation ~]# systemctl enable ntpd

3 [root@foundation ~]# firewall-cmd --permanent --add-service=ntp && firewall-cmd --reload

4 [root@foundation ~]# ntpq -p  #服务端检查ntp同步是否正常

5 [root@foundation ~]# netstat -lntup|grep 123  #查看端口监听情况

注意:ntpq -p 命令在服务端检查ntp同步是否正常时,一般有输出不报错就没问题的,
但是也可能遇到当所有远程服务器的jitter值都为4000,并且reach和dalay的值是0时,就表示时间同步有问题。
主要原因有两个,一是服务端防火墙没有允许123端口通过,而是NTP服务重启后和客户端建立连接一般需要3-5分钟,
这个时间段可能不会正常同步。(下图为正常情况,图中的*LOCAL()表示正在使用本机时间作为NTP的时间服务)。

10.2.3 测试(在rhel7这台主机)
这里我们使用chronyd作为客户端,也可以使用ntpd作为客户端
1 [root@rhel7 /]# systemctl restart chronyd

2 [root@rhel7 /]# systemctl enable chronyd

3 [root@rhel7 /]# vim /etc/chrony.conf

4 注释掉以前的上游服务器地址,然后添加我们的foudation.mei.com主机

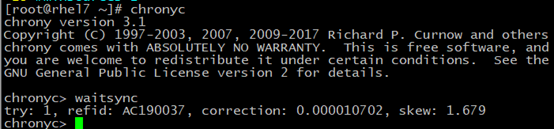
注意,刚配置完服务器端,马上就用chronyc测试,可能会一直同步不到,
当然也可能是之前配置时服务器端忘记了防火墙放行123端口,建议直接使用ntpdate命令来测试。
如果ntpdate测试出现no server suitable for synchronization found错误提示,前面防火墙也没问题,
那么可能是每次重启ntp服务器之后,大约3-5分钟客户端才能与服务端建立连接,
建立连接之后才能进行时间同步,这段时间内可能客户端确实还没有和服务端连接,所以就报错。
出现这种情况稍等片刻再测试就行。

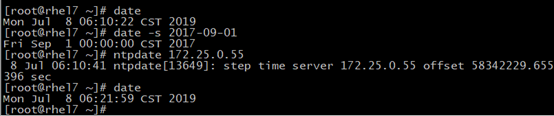
使用ntpdate测试
1 [root@rhel7 ~]# date

2 Mon Jul  8 06:10:22 CST 2019

3 [root@rhel7 ~]# date -s 2017-09-01

4 Fri Sep  1 00:00:00 CST 2017

5 [root@rhel7 ~]# ntpdate 172.25.0.55   #这里是NTP服务器的地址,可以是域名

6  8 Jul 06:10:41 ntpdate[13649]: step time server 172.25.0.55 offset 58342229.655396 sec

7 [root@rhel7 ~]# date    #再次获取时间能够看到时间已经同步

8 Mon Jul  8 06:21:59 CST 2019
10.3 使用chronyd搭建NTP时间服务器
10.3.1 安装
因为RHEL7默认安装了chronyd的,所以我们直接就可以使用了,如果没有直接yum安装即可。

10.3.1 配置
直接编辑配置文件如下
[root@foundation ~]# grep -v -E "^$|#" /etc/chrony.conf

server 0.rhel.pool.ntp.org iburst

server 1.rhel.pool.ntp.org iburst

server 2.rhel.pool.ntp.org iburst

server 3.rhel.pool.ntp.org iburst

stratumweight 0

driftfile /var/lib/chrony/drift

rtcsync

makestep 10 3

allow 172.25.0.0/16

bindcmdaddress 127.0.0.1

bindcmdaddress ::1

bindcmdaddress 172.25.0.55

local stratum 10

keyfile /etc/chrony.keys

commandkey 1

generatecommandkey

noclientlog

logchange 0.5

logdir /var/log/chrony
配置选项(参数)解释
# 用于添加时钟服务器,可以添任意多个

server 0.rhel.pool.ntp.org iburst

server 1.rhel.pool.ntp.org iburst

server 2.rhel.pool.ntp.org iburst

server 3.rhel.pool.ntp.org iburst

# Ignore stratum in source selection.

# stratumweight指令设置当chronyd从可用源中选择同步源时,每个层应该添加多少距离到同步距离。默认情况下,设置为0,让chronyd在选择源时忽略源的层级。

stratumweight 0

# Record the rate at which the system clock gains/losses time.

# chronyd程序的主要行为之一,就是根据实际时间计算出计算机增减时间的比率,将它记录到一个文件中是最合理的,它会在重启后为系统时钟作出补偿,甚至可能的话,会从时钟服务器获得较好的估值。

driftfile /var/lib/chrony/drift

# Enable kernel RTC synchronization.

# rtcsync指令将启用一个内核模式,在该模式中,系统时间每11分钟会拷贝到实时时钟(RTC)。

rtcsync

# In first three updates step the system clock instead of slew

# if the adjustment is larger than 10 seconds.

通常,chronyd将根据需求通过减慢或加速时钟,使得系统逐步纠正所有时间偏差。在某些特定情况下,系统时钟可能会漂移过快,导致该调整过程消耗很长的时间来纠正系统时钟。该指令强制chronyd在调整期大于某个阀值时步进调整系统时钟,但只有在因为chronyd启动时间超过指定限制(可使用负值来禁用限制),没有更多时钟更新时才生效。

makestep 10 3

# Allow NTP client access from local network.

# 这里你可以指定一台主机、子网,或者网络以允许或拒绝NTP连接到扮演时钟服务器的机器。

#allow 172.25.0.0/24

#deny 172.25.0.11

# Listen for commands only on localhost.

# 该指令允许你限制chronyd监听哪个网络接口的命令包(由chronyc执行)。该指令通过cmddeny机制提供了一个除上述限制以外可用的额外的访问控制等级。

bindcmdaddress 127.0.0.1

bindcmdaddress ::1

# Serve time even if not synchronized to any NTP server.

#local stratum 10

keyfile /etc/chrony.keys

# Specify the key used as password for chronyc.

commandkey 1

# Generate command key if missing.

generatecommandkey

# Disable logging of client accesses.

noclientlog

# Send a message to syslog if a clock adjustment is larger than 0.5 seconds.

logchange 0.5

logdir /var/log/chrony

#log measurements statistics tracking
重启服务并且防火墙放行123端口通过
1 [root@foundation ~]# systemctl restart chronyd && systemctl enable chronyd

2 [root@foundation ~]# firewall-cmd --permanent --add-service=ntp

3 [root@foundation ~]# firewall-cmd --reload
10.3.2 客户端配置和测试(在rhel7这台主机)
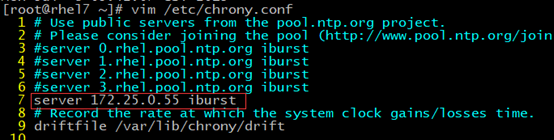
配置:
在上游服务器的配置参数中添加我们刚才创建的服务器地址,可以是域名,也可以直接是IP地址。

然后测试:
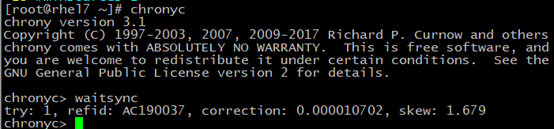
注意,刚配置完服务器端,马上就用chronyc测试,可能会一直同步不到,当然也可能是之前配置时服务器端忘
记了防火墙放行123端口,建议直接使用ntpdate命令来测试。
如果ntpdate测试出现no server suitable for synchronization found错误提示,前面防火墙也没问题,
那么可能是每次重启ntp服务器之后,大约3-5分钟客户端才能与服务端建立连接,建立连接之后才能进行时间同步,
这段时间内可能客户端确实还没有和服务端连接,所以就报错。
出现这种情况稍等片刻再测试就行。

使用ntpdate测试
1 [root@rhel7 ~]# date

2 Mon Jul  8 06:10:22 CST 2019

3 [root@rhel7 ~]# date -s 2017-09-01

4 Fri Sep  1 00:00:00 CST 2017

5 [root@rhel7 ~]# ntpdate 172.25.0.55   #这里是NTP服务器的地址,可以是域名

6  8 Jul 06:10:41 ntpdate[13649]: step time server 172.25.0.55 offset 58342229.655396 sec

7 [root@rhel7 ~]# date    #再次获取时间能够看到时间已经同步

8 Mon Jul  8 06:21:59 CST 2019

10.4 kerberos搭建
10.4.1 安装软件包
1 [root@foundation ~]# yum install krb5-server krb5-libs krb5-workstation -y
10.4.2 编辑配置文件
配置文件的具体含义和配置参数请直接参考官方文档(虽然是英文,但是技术文档一般都不会有很难的单词
,实在不行可以使用浏览器的翻译插件看,千万不要抵触英文)。
https://web.mit.edu/kerberos/krb5-latest/doc/admin/conf_files/index.html
[root@foundation ~]# cat /etc/krb5.conf

# Configuration snippets may be placed in this directory as well

includedir /etc/krb5.conf.d/

[logging]

 default = FILE:/var/log/krb5libs.log

 kdc = FILE:/var/log/krb5kdc.log

 admin_server = FILE:/var/log/kadmind.log

[libdefaults]

 dns_lookup_realm = false

 ticket_lifetime = 24h

 renew_lifetime = 7d

 forwardable = true

 rdns = false

# default_realm = EXAMPLE.COM

 default_realm = MEI.COM

 default_ccache_name = KEYRING:persistent:%{uid}

[realms]

# EXAMPLE.COM = {

#  kdc = kerberos.example.com

#  admin_server = kerberos.example.com

# }

 MEI.COM = {

   kdc = foundation.mei.com

   admin_server = foundation.mei.com

 }

[domain_realm]

# .example.com = EXAMPLE.COM

# example.com = EXAMPLE.COM

  .mei.com = MEI.COM
[root@foundation ~]# cat /var/kerberos/krb5kdc/kdc.conf

[kdcdefaults]

 kdc_ports = 88

 kdc_tcp_ports = 88

[realms]

 MEI.COM = {

 kadmind_port = 749

 max_life = 12h 0m 0s

 max_renewable_life = 7d 0h 0m 0s

 #master_key_type = aes256-cts

  #master_key_type = aes256-cts

  acl_file = /var/kerberos/krb5kdc/kadm5.acl

  dict_file = /usr/share/dict/words

  admin_keytab = /var/kerberos/krb5kdc/kadm5.keytab

  supported_enctypes = aes256-cts:normal aes128-cts:normal des3-hmac-sha1:normal arcfour-hmac:normal camellia256-cts:normal camellia128-cts:normal des-hmac-sha1:normal des-cbc-md5:normal des-cbc-crc:normal

 }/var/kerberos/krb5kdc/kadm5.acl
[root@foundation ~]# cat /var/kerberos/krb5kdc/kadm5.acl

*/admin@MEI.COM *
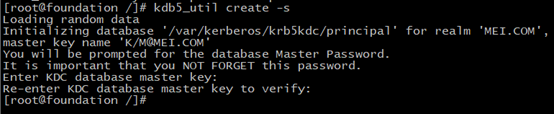
10.4.3创建数据库
1 kdb5_util create -s -r MEI.COM #如果有多个realm这样就很有必要
10.4.4 添加数据库的管理员
添加database administrator

我们需要为Kerberos database添加administrative principals (即能够管理database的principals) —— 至少要添加1个principal来使得Kerberos的管理进程kadmind能够在网络上与程序kadmin进行通讯。:

kadmin.local -q "addprinc admin/admin"

或者:

[root@foundation ~]# kadmin.local

Authenticating as principal root/admin@MEI.COM with password.

kadmin.local:  addprinc admin/admin

WARNING: no policy specified for admin/admin@MEI.COM; defaulting to no policy

Enter password for principal "admin/admin@MEI.COM":

Re-enter password for principal "admin/admin@MEI.COM":

Principal "admin/admin@MEI.COM" created.
10.4.4 启动服务并添加防火墙策略
1 [root@foundation ~]# systemctl restart krb5kdc kadmin

2 [root@foundation ~]# systemctl enable krb5kdc kadmin

3 [root@foundation ~]# firewall-cmd --permanent --add-service=kerberos

4 [root@foundation ~]# firewall-cmd --reload
10.4.5 添加principal
使用下面这种语法添加用户的同时添加密码(密码会显示在命令行输出中):

kadmin.local -q "addprinc -pw <password> <username>"

或者下面这种语法,交互式输入密码

kadmin.local -q "addprinc <username>"

再或者交互式添加和设置密码(建议使用):

[root@foundation ~]# kadmin.local

Authenticating as principal host/admin@MEI.COM with password.

kadmin.local:  addprinc host/rhel7

---中间输出省略---

按照此方法依次添加principal:

nfs/rhel7

host/rhel6

nfs/rhel6

host/foundation

nfs/foundation

后面如果有需要就按上面的方式添加principal即可

#下面为查看KDC的principal(简单说就是用户名)配置:

kadmin.local:  listprincs

K/M@MEI.COM

admin/admin@MEI.COM

host/foundation@MEI.COM

host/rhel6@MEI.COM

host/rhel7@MEI.COM

kadmin/admin@MEI.COM

kadmin/changepw@MEI.COM

kadmin/foundation@MEI.COM

kiprop/foundation@MEI.COM

krbtgt/MEI.COM@MEI.COM

nfs/foundation@MEI.COM

nfs/rhel6@MEI.COM

nfs/rhel7@MEI.COM
10.4.6 服务端验证principal是否添加成功
1 可使用下面命令验证我们添加的principal,这里只验证一个作为例子。

2 [root@foundation ~]# kinit host/foundation

3 Password for host/foundation@MEI.COM:

4 [root@foundation ~]#
10.4.7 导出keytab文件并且不修改密码
kadmin:xst -norandkey  -k /path/to/name.keytab <username>

或者:

ktadd -norandkey -k /path/to/name.keytab <username>

我们需要导出为某台主机添加的所有相关principal的keytab文件(即host/rhel7和nfs/rhe7)

例如:

[root@foundation ~]# kadmin.local

Authenticating as principal root/admin@MEI.COM with password.

kadmin.local:  ktadd -norandkey -k /root/rhel7.keytab host/rhel7

---输出信息省略---

kadmin.local:  ktadd -norandkey -k /root/rhel7.keytab nfs/rhel7

---输出信息省略---

注意:如果每次导出keytab文件的路径指向同一个文件,它将自动追加,这也正是我们需要的(让keytab存储多个信息)。

查看keytab文件

klist -kt /ptah/to/name.keytab

[root@foundation ~]# klist -kt /root/rhel7.keytab

Keytab name: FILE:/root/rhel7.keytab

KVNO Timestamp           Principal

---输出信息省略---
10.4.6 客户端配置
1 安装软件包:

2 [root@rhel7 ~]# yum install krb5-workstation krb5-libs

3 拷贝服务端的krb5.conf文件替换客户端的krb5.conf文件,并保持随时同步。

4 使用scp 等方式拷贝即可。
10.5 配置安全的NFS来测试kerberos
这里我们使用NFS的安全挂载来测试,安全方式使用kerb5p,NFS的搭建和客户端配置这里就不赘述了,并且这里我们使用前面搭建好的NFS环境即可。
注意,全程要保证时钟能够正常同步
10.5.1 NFS配置服务端
1 [root@foundation ~]# mkdir /nfssecure

2 [root@foundation ~]# grep "nfssecure" /etc/exports

3 [root@foundation ~]# vim /etc/sysconfig/nfs


从kerberos导出foudation这台主机相关的keytab文件,放到/etc/目录下面,并且重命名为krb5.keytab。
1 [root@foundation ~]# systemctl enable nfs-secure

2

3 [root@foundation ~]# systemctl restart nfs-secure
10.5.2 NFS客户端配置
从kerberos导出客户端这台主机的相关的keytab文件,放到/etc/目录下面,并且重命名为krb5.keytab。
编辑/etc/fstab文件
添加如下内容
1 foundation.mei.com:/nfssecure/ /mnt/ nfs defaults,v4.2,sec=krb5p 0 0

然后 mount -a 挂载
10.5.3 kerberos故障排除
挂载过程中可能会遇到下面的问题
1 [root@rhel7 ~]# mount -a

2 mount.nfs: access denied by server while mounting foundation.mei.com:/nfssecure/
排除故障的思路:
1、使用kinit -kt /path/to/name.keytab <username> 确认能不能初始化
2、如果不能初始化,看服务端krb5kdc kdamin服务是否启动,防火墙是否允许kerberos通过;
3、在防火墙和服务都没有问题的情况下看/var/log/krb5kdc.log 里面的错误日志信息。
4、下面是查看日志排错过程:
[root@foundation ~]# tail -f /var/log/krb5kdc.log #实时查看错误日志信息
然后在客户端执行mount -a
返回到foundation看刚才的实时日志,这里我的错误如下:
Jul 09 19:05:26 foundation krb5kdc[11244](info): TGS_REQ (4 etypes {18 17 16 23}) 172.25.0.15: LOOKING_UP_SERVER: authtime 0, host/rhel7@MEI.COM for nfs/www.mei.com@MEI.COM, Server not found in Kerberos database
显然,客户端在认证是它要验证的是nfs/www.mei.com@MEI.COM,而我们的kerberos数据库中确实没有,
这里我们直接使用kadmin.local命令添加一个这样的用户,然后导出它的keytab文件并追加到之前导出
的foundation相关的keytab文件中即可,注意,这里指的追加是指导出时直接指定同一个文件,而不是控制台的追加重定向。
10.6 kerberos相关的一些命令介绍
服务端可以使用kadmin.local直接登录kerberos交互式进行管理,能补全,也可以非交互式的方式管理,但不能补全。

1、生成keytab:使用xst命令或者ktadd命令

不加/path/to/name.keytab(路径)和-k参数就存储到/etc/krb5.keytab

kadmin:xst -k /path/to/name.keytab username

或者

kadmin.local -q "ktadd -norandkey -k /path/to/name.keytab <username>"

2、查看当前的认证用户

klist

3、删除当前的认证的缓存

kdestroy

4、验证用户

kinit -kt /path/to/name.keytab username  #使用keytab文件加用户名

kinit username   #直接使用用户名验证

5、创建principal

kadmin.local -q "addprinc -pw <password> <username>"

或者:

kadmin.local -q "addprinc <username>"

6、查询keytab文件内容

klist -kt /path/to/name.keytab

7、查询KDC用户列表

kadmin.local:  listprincs

8、删除用户

kadmin.local -q "delprinc -force <username>"

9、修改密码

kpasswd 用户名

10、klist命令

klist 命令显示 Kerberos 凭证高速缓存或密钥表的内容。具体可以看man帮助

12、kadmin.local命令

具体可以看帮助或者shell执行kadmin.local然后进入后输入问号,能够显示命令的用法。
最后希望大家提意见、转发、评论和交流!!!
搭建kerberos和NTP服务器以及安全的NFS服务的更多相关文章
- CentOS搭建内网NTP服务器
在企业内部网络,不是所有的服务器都可以连接外网,需要搭建一台可以连接外网的服务器用于NTP服务器 安装环境查看 安装ntp yum -y install ntp 修改配置文件 driftfile ...
- 阿里云内网和公网NTP服务器和其他互联网基础服务时间同步服务器
阿里云为云服务器ECS提供了内网NTP服务器,对于阿里云以外的设备,阿里云同时提供了 公网NTP服务器,供互联网上的设备使用. 内网和公网NTP服务器 以下为阿里云提供的内网和公网NTP服务器列表. ...
- CentOS7搭建NTP服务器及客户端同步时间
一.服务器配置 1.查看服务器.客户端操作系统版本 [root@hadoop101 ~]# cat /etc/redhat-release CentOS Linux release (Core) 2. ...
- 使用阿里云镜像站NTP服务搭建NTP服务器(基于CentOS 7系统)
镜像下载.域名解析.时间同步请点击 阿里云开源镜像站 一.NTP服务器介绍 网络时间协议(Network Time Protocol,NTP)服务器,也就是日常所说的NTP服务器,用来提供同步时间服务 ...
- 部署NTP服务器进行时间同步
NTP服务端:linl_S IP:10.0.0.15 NTP客户端:lin_C IP:10.0.0.16 NTP服务概述 1.原理 NTP(Network TimeProtocol,网络时 ...
- ntp服务器同步时间详细配置
部署NTP服务器进行时间同步 NTP服务端:linl_S IP:10.0.0.15 NTP客户端:lin_C IP:10.0.0.16 NTP服务概述 1.原理 NTP(Network ...
- NTP服务器搭建
NTP服务器搭建 :http://www.jbxue.com/LINUXjishu/22352.html 客户端配置: vim /etc/ntp.conf #server 0.centos.pool. ...
- Centos7安装搭建NTP服务器和NTP客户端同步时间
NTP简介: NTP是网络时间协议(Network Time Protocol),它是用来同步网络中各个计算机的时间的协议. 在计算机的世界里,时间非常地重要 例如:对于火箭发射这种科研活动,对时间的 ...
- docker 搭建ntp服务器
背景 在搭建etcd集群时,如果主机时间相差太多会出现同步错误,如果外部网络不可用时,需要使用内部的ntp服务器同步时间. 构建ntp镜像 创建Dockerfile # usage: # docker ...
随机推荐
- MySQL进阶:主主复制+Keepalived高可用
Blog:博客园 个人 概述 mysql主主复制 所谓主主复制,即双主备份,或者叫互作主从复制,每台master既是master,又是slave.这种方案,既做到了访问量的压力分流,同时也解决了单点故 ...
- Java第二次博客作业
Java第二次博客作业 时间过的很快啊,在不知不觉中这门课程的学习也就快要过去一半了,现在就来总结一下在这个第二个月的学习当中存在的问题以及得到的心得. 1.前言 第四次题目集和第五次题目集给我的感觉 ...
- 听说你还不知道Spring是如何解决循环依赖问题的?
Spring如何解决的循环依赖,是近两年流行起来的一道Java面试题. 其实笔者本人对这类框架源码题还是持一定的怀疑态度的. 如果笔者作为面试官,可能会问一些诸如"如果注入的属性为null, ...
- 带你认真了解一下Java分布式系统的基本特性
一般,分布式系统需要支持以下特性: 资源共享 开放性 并发性 可伸缩性 容错性 透明性 下面分别讨论. 容易理解的 资源共享 一旦授权,可以访问环境中的任何资源 资源:包括硬件(e.g. printe ...
- 基于websocket vue 聊天demo 解决方案
基于websocket vue 聊天demo 解决方案 demo 背景 电商后台管理的客服 相关技术 vuex axios vue websocket 聊天几种模型 一对一模型 一对一 消息只一个客户 ...
- gRPC入门—golang实现
1.RPC 1.1 什么是RPC RPC(Remote Procedure Call),即远程过程调用,过程就是方法,简单来说,它就是一种能够像调用本地方法一样调用远程计算机进程中的方法的技术,在这种 ...
- oscp-缓冲区溢出(持续更新)
环境准备 Windows7虚拟机(我选了IE8,其实也没什么关系) 微软官方下载地址 These virtual machines expire after 90 days. We recommend ...
- Redis配置统计字典
本章将对Redis的系统状态信息(info命令结果)和Redis的所有配置(包括Standalone.Sentinel.Cluster三种模式)做一个全面的梳理,希望本章能够成为Redis配置统计字典 ...
- 7.7、深入解析openstak工作流程
1.openstack的使用: (1)使用openstack创建的用户默认是default域,角色是user; (2)域-->角色-->用户-->项目 (3)配额在管理员登录后再项目 ...
- SQL 清除数据库日志
exec sp_detach_db 'MCS4WLSQM','true' --运行上一个命令. --改名LOG文件后再关闭上一行代码,然后再运行下一行代码 exec sp_attach_single_ ...