巨蟒python全栈开发数据库前端8:jQuery框架2
数据可视化推荐网站(都是JavaScript写的):
https://echarts.baidu.com/
https://www.joinquant.com/
我们要多用心也是可以做前端的!!!
回顾:
1.jquery介绍
2.jquery的引入方式
3.jquery选择器:找标签
基本选择器:ID,Class,标签,配合使用,组合选择器,所有元素选择器,
层级选择器:同css
基本筛选器:选择之后进行过滤
属性选择器:
表单筛选器:
4.筛选器方法(将来用的会很多):下一个元素,上一个元素,父亲元素,儿子和兄弟元素,查找,筛选
5.操作标签:
样式操作:(样式类)
位置操作:
尺寸:
文本操作:
属性操作:
文档处理:
6.转换:jq=>dom [0]
dom=>jq $("this")
7.后边的django逻辑性会有很多,需要视频查漏补缺.
今日大纲:
1.事件
2.批量操作
3.事件冒泡
4.事件委托
详细内容:
1.事件
常用事件
click(function(){...})
hover(function(){...})
blur(function(){...})
focus(function(){...})
change(function(){...}) //内容发生变化,input,select等
keyup(function(){...})
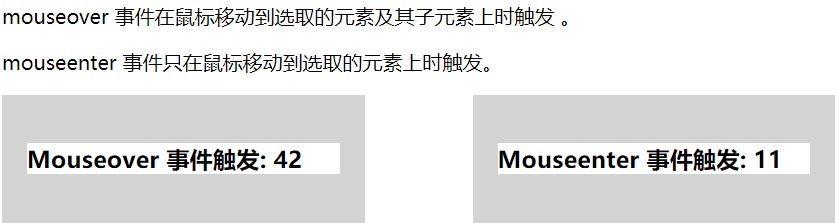
mouseover 和 mouseenter的区别是:mouseover事件只要你在绑定该事件的对象上移动就会一直触发,mmouseenter事件只触发一次,表示鼠标进入这个对象
第一种绑定事件的方法: click
代码:
<!DOCTYPE html>

<html lang="zh-CN">

<head>

    <meta http-equiv="content-Type" charset="UTF-8">

    <meta http-equiv="x-ua-compatible" content="IE=edge">

    <title>Title</title>

</head>

<body>

    <button id="btn1">点我啊</button>

    <!--1.button按钮-->

    <script src="jquery-3.3.1.min.js"></script>

    <!--2.引入js包-->

    <script>

        $('#btn1').click(function () {

            alert('999');

        })

    //3.弹窗

    </script>

</body>

</html>
测试结果:点击"点我啊",弹出下面的对话框

第二种绑定事件的方法(on):
<!DOCTYPE html>

<html lang="zh-CN">

<head>

    <meta http-equiv="content-Type" charset="UTF-8">

    <meta http-equiv="x-ua-compatible" content="IE=edge">

    <title>Title</title>

</head>

<body>

    <button id="btn1">点我啊</button>

    <!--1.button按钮-->

    <script src="jquery-3.3.1.min.js"></script>

    <!--2.引入js包-->

    <script>

        // $('#btn1').click(function () {

        //     alert('999');

        // })

    //3.弹窗

        $('#btn1').on('click',function () {

            alert('777');

        })

    //    第二种绑定事件的方法

    </script>

</body>

</html>
测试结果:点击"点我啊",弹出下面的对话框

hover指的是,鼠标移动上去,这个事件.
代码:测试的是hover div标签,class值为d1
<!DOCTYPE html>
<html lang="zh-CN">
<head>
<meta http-equiv="content-Type" charset="UTF-8">
<meta http-equiv="x-ua-compatible" content="IE=edge">
<title>Title</title>
<style>
.d1{
background-color: red;
width: 100px;
height: 100px;
}
</style>
</head>
<body>
<div class="d1"></div>
<button id="btn1">点我啊</button>
<!--1.button按钮-->
<script src="jquery-3.3.1.min.js"></script>
<!--2.引入js包-->
<script>
// $('#btn1').click(function () {
// alert('999');
// })
//3.弹窗
$('#btn1').on('click',function () {
alert('777');
})
// 第二种绑定事件的方法
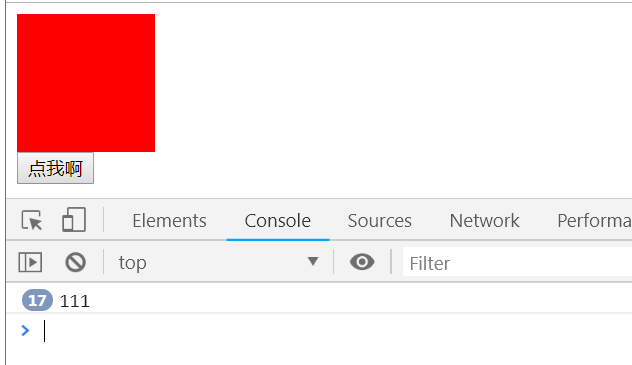
$('.d1').hover(function () {
console.log('111');
})
</script>
</body>
</html>
测试结果:鼠标每移动上去一次,下边就加一次
鼠标移动到div上,变为绿色,移动下来变成红色
<!DOCTYPE html>

<html lang="zh-CN">

<head>

    <meta http-equiv="content-Type" charset="UTF-8">

    <meta http-equiv="x-ua-compatible" content="IE=edge">

    <title>Title</title>

    <style>

        .d1{

            background-color: red;

            width: 100px;

            height: 100px;

        }

    </style>

</head>

<body>

    <div class="d1"></div>

    <button id="btn1">点我啊</button>

    <!--1.button按钮-->

    <script src="jquery-3.3.1.min.js"></script>

    <!--2.引入js包-->

    <script>

        // $('#btn1').click(function () {

        //     alert('999');

        // })

    //3.弹窗

        $('#btn1').on('click',function () {

            alert('777');

        })

    //    第二种绑定事件的方法

        $('.d1').hover(

            function () {

            // console.log('111');

            $(this).css('background-color','green')

        //    鼠标移动上去就改变为绿颜色

            },

            function () {

                $(this).css('background-color','red')

            //鼠标移动下来颜色颜色改变为红色

            }

        )

    </script>

</body>

</html>
focus焦点事件&blur事件:
代码案例:
<!DOCTYPE html>

<html lang="zh-CN">

<head>

    <meta http-equiv="content-Type" charset="UTF-8">

    <meta http-equiv="x-ua-compatible" content="IE=edge">

    <title>Title</title>

    <style>

        .d1{

            background-color: red;

            width: 100px;

            height: 100px;

        }

    </style>

</head>

<body>

    <div class="d1"></div>

    <input id="i1" type="text">

    <!--input获取焦点-->

    <button id="btn1">点我啊</button>

    <!--1.button按钮-->

    <script src="jquery-3.3.1.min.js"></script>

    <!--2.引入js包-->

    <script>

        // $('#btn1').click(function () {

        //     alert('999');

        // })

    //3.弹窗

        $('#btn1').on('click',function () {

            alert('777');

        });

    //    第二种绑定事件的方法

        $('.d1').hover(

            function () {

            // console.log('111');

            $(this).css('background-color','green')

        //    鼠标移动上去就改变为绿颜色

            },

            function () {

                $(this).css('background-color','red')

            //鼠标移动下来颜色颜色改变为红色

            }

        );

        $("#i1").focus(function () {

            $(this).css('background-color','red');

        //    鼠标移动到input框上去点击,变成红色

        })

        $("#i1").blur(function () {

            $(this).css('background-color','green');

        //    鼠标移动到input框下来点击,变成绿色

        })

    </script>

</body>

</html>
change事件:
html代码:选择框内发生改变,输入框的颜色发生变化
<!DOCTYPE html>

<html lang="zh-CN">

<head>

    <meta http-equiv="content-Type" charset="UTF-8">

    <meta http-equiv="x-ua-compatible" content="IE=edge">

    <title>Title</title>

    <style>

        .d1{

            background-color: red;

            width: 100px;

            height: 100px;

        }

    </style>

</head>

<body>

    <div class="d1"></div>

    <input id="i1" type="text">

    <!--input获取焦点-->

<select name="" id="s1">

    <option value="1">11</option>

    <option value="2">22</option>

    <option value="3">33</option>

</select>

    <button id="btn1">点我啊</button>

    <!--1.button按钮-->

    <script src="jquery-3.3.1.min.js"></script>

    <!--2.引入js包-->

    <script>

        // $('#btn1').click(function () {

        //     alert('999');

        // })

    //3.弹窗

        $('#btn1').on('click',function () {

            alert('777');

        });

    //    第二种绑定事件的方法

        $('.d1').hover(

            function () {

            // console.log('111');

            $(this).css('background-color','green')

        //    鼠标移动上去就改变为绿颜色

            },

            function () {

                $(this).css('background-color','red')

            //鼠标移动下来颜色颜色改变为红色

            }

        );

        $("#i1").focus(function () {

            $(this).css('background-color','red');

        //    鼠标移动到input框上去点击,变成红色

        });

        $("#i1").blur(function () {

            $(this).css('background-color','green');

        //    鼠标移动到input框下来点击,变成绿色

        });

        $("#s1").change(function () {

            $("#i1").css('background-color','blue');

        })

    </script>

</body>

</html>
keyup&keydown事件(键盘上按下来)
//e,event代表事件
<!DOCTYPE html>

<html lang="zh-CN">

<head>

    <meta http-equiv="content-Type" charset="UTF-8">

    <meta http-equiv="x-ua-compatible" content="IE=edge">

    <title>Title</title>

    <style>

        .d1{

            background-color: red;

            width: 100px;

            height: 100px;

        }

    </style>

</head>

<body>

    <div class="d1"></div>

    <input id="i1" type="text">

    <!--input获取焦点-->

<select name="" id="s1">

    <option value="1">11</option>

    <option value="2">22</option>

    <option value="3">33</option>

</select>

    <button id="btn1">点我啊</button>

    <!--1.button按钮-->

    <script src="jquery-3.3.1.min.js"></script>

    <!--2.引入js包-->

    <script>

        // $('#btn1').click(function () {

        //     alert('999');

        // })

    //3.弹窗

        $('#btn1').on('click',function () {

            alert('777');

        });

    //    第二种绑定事件的方法

        $('.d1').hover(

            function () {

            // console.log('111');

            $(this).css('background-color','green')

        //    鼠标移动上去就改变为绿颜色

            },

            function () {

                $(this).css('background-color','red')

            //鼠标移动下来颜色颜色改变为红色

            }

        );

        $("#i1").focus(function () {

            $(this).css('background-color','red');

        //    鼠标移动到input框上去点击,变成红色

        });

        $("#i1").blur(function () {

            $(this).css('background-color','green');

        //    鼠标移动到input框下来点击,变成绿色

        });

        $("#s1").change(function () {

            $("#i1").css('background-color','blue');

        });

        $(window).keydown(function (e) {

            console.log(e.keyCode);

        })

    </script>

</body>

</html>
鼠标点击在页面上,再在键盘上输入字母等,显示数字,推测应该显示的是ascii码.

#shift键表示16,时刻监控着键盘,同上边一样
这个e或者event表示鼠标按下或者抬起这个事件的本身.
在键盘上按下,或者抬起
<!DOCTYPE html>

<html lang="zh-CN">

<head>

    <meta http-equiv="content-Type" charset="UTF-8">

    <meta http-equiv="x-ua-compatible" content="IE=edge">

    <title>Title</title>

    <style>

        .d1{

            background-color: red;

            width: 100px;

            height: 100px;

        }

    </style>

</head>

<body>

    <div class="d1"></div>

    <input id="i1" type="text">

    <!--input获取焦点-->

<select name="" id="s1">

    <option value="1">11</option>

    <option value="2">22</option>

    <option value="3">33</option>

</select>

    <button id="btn1">点我啊</button>

    <!--1.button按钮-->

    <script src="jquery-3.3.1.min.js"></script>

    <!--2.引入js包-->

    <script>

        // $('#btn1').click(function () {

        //     alert('999');

        // })

    //3.弹窗

        $('#btn1').on('click',function () {

            alert('777');

        });

    //    第二种绑定事件的方法

        $('.d1').hover(

            function () {

            // console.log('111');

            $(this).css('background-color','green')

        //    鼠标移动上去就改变为绿颜色

            },

            function () {

                $(this).css('background-color','red')

            //鼠标移动下来颜色颜色改变为红色

            }

        );

        $("#i1").focus(function () {

            $(this).css('background-color','red');

        //    鼠标移动到input框上去点击,变成红色

        });

        $("#i1").blur(function () {

            $(this).css('background-color','green');

        //    鼠标移动到input框下来点击,变成绿色

        });

        $("#s1").change(function () {

            $("#i1").css('background-color','blue');

        });

        $(window).keydown(function (e) {

            // console.log(e.keyCode);

            if(e.keyCode===16){

                console.log('这是shift键')

            //    鼠标按在shift键上会显示这个

            }

        })

    </script>

</body>

</html>
mouseover表示鼠标每次从外边移动进去,则加1,
mouseenter
<!DOCTYPE html>

<html lang="zh-CN">

<head>

    <meta http-equiv="content-Type" charset="UTF-8">

    <meta http-equiv="x-ua-compatible" content="IE=edge">

    <title>Title</title>

    <style>

        .d1,#d2{

            background-color: red;

            width: 100px;

            height: 100px;

        }

    </style>

</head>

<body>

    <div class="d1"></div>

    <input id="i1" type="text">

    <!--input获取焦点-->

<select name="" id="s1">

    <option value="1">11</option>

    <option value="2">22</option>

    <option value="3">33</option>

</select>

<div id="d2"></div>

    <button id="btn1">点我啊</button>

    <!--1.button按钮-->

    <script src="jquery-3.3.1.min.js"></script>

    <!--2.引入js包-->

    <script>

        // $('#btn1').click(function () {

        //     alert('999');

        // })

    //3.弹窗

        $('#btn1').on('click',function () {

            alert('777');

        });

    //    第二种绑定事件的方法

        $('.d1').hover(

            function () {

            // console.log('111');

            $(this).css('background-color','green')

        //    鼠标移动上去就改变为绿颜色

            },

            function () {

                $(this).css('background-color','red')

            //鼠标移动下来颜色颜色改变为红色

            }

        );

        $("#i1").focus(function () {

            $(this).css('background-color','red');

        //    鼠标移动到input框上去点击,变成红色

        });

        $("#i1").blur(function () {

            $(this).css('background-color','green');

        //    鼠标移动到input框下来点击,变成绿色

        });

        $("#s1").change(function () {

            $("#i1").css('background-color','blue');

        });

        $(window).keyup(function (e) {

            // console.log(e.keyCode);

            if(e.keyCode===16){

                console.log('这是shift键')

            //    鼠标按在shift键上会显示这个

            }

        });

        $('#d2').mouseover(function () {

            console.log('xxx');

        //    应该是在框内移动,就打印,实际情况是在每次进入才打印

        });

        // $('#d2').mouseenter(function () {

        //     console.log('xxx');

        //    每次进入打印一次.

        // });

    </script>

</body>

</html>
参考菜鸟教程:(讲解有误)
注意:hover事件不可以通过on进行绑定.
事件绑定:
移除事件(不常用):
组织后续时间执行:
2.批量操作
当选中某个操作,按住shift,可以一起操作某个事件.
批量操作可以理解成,对一些事物,处理相同的操作的一个程序
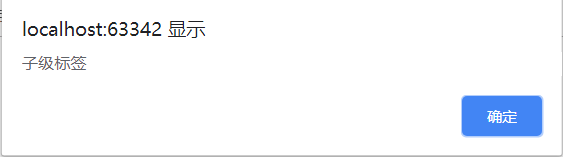
3.事件冒泡:
事件冒泡可以理解为,触发了子事件,父事件也会跟着触发.
代码:
<!DOCTYPE html>

<html lang="zh-CN">

<head>

    <meta http-equiv="content-Type" charset="UTF-8">

    <meta http-equiv="x-ua-compatible" content="IE=edge">

    <title>Title</title>

    <style>

        #d2{

            height: 100px;

            width:100px;

            background-color: green;

        }

    </style>

</head>

<body>

<div id="d1">

    <div id="d2"></div>

</div>

<script src="jquery-3.3.1.min.js"></script>

<script>

    $("#d1").click(function () {

        alert('父级标签')

    });

    $("#d2").click(function () {

        alert('子级标签')

    });

</script>

</body>

</html>
点击绿框:

阻止冒泡发生的方法:两种
<!DOCTYPE html>

<html lang="zh-CN">

<head>

    <meta http-equiv="content-Type" charset="UTF-8">

    <meta http-equiv="x-ua-compatible" content="IE=edge">

    <title>Title</title>

    <style>

        #d2{

            height: 100px;

            width:100px;

            background-color: green;

        }

    </style>

</head>

<body>

<div id="d1">

    <div id="d2"></div>

</div>

<script src="jquery-3.3.1.min.js"></script>

<script>

    $("#d1").click(function () {

        alert('父级标签')

    });

    $("#d2").click(function (e) {

        alert('子级标签')

        // return false;

        e.stopPropagation()
    //下面这个方法必须加上e事件.

    });

</script>

</body>

</html>
4.事件委托:
事件委托是通过事件冒泡的原理,利用父标签去捕获子标签的事件,将未来添加进来的某些子标签自动绑定上事件.
以全选,取消,反选例子为基础来进行验证事件委托.
<!DOCTYPE html>

<html lang="en">

<head>

    <meta charset="UTF-8">

    <title>Title</title>

</head>

<body>

<button id="all">全选</button>

<button id="reverse">反选</button>

<button id="cancel">取消</button>

<table border="1">

   <thead>

    <tr>

        <th>#</th>

        <th>姓名</th>

        <th>爱好</th>

    </tr>

   </thead>

    <tbody>

    <tr>

        <td><input type="checkbox"></td>

        <td>金老板</td>

        <td>开车</td>

    </tr>

    <tr>

        <td><input type="checkbox"></td>

        <td>景女神</td>

        <td>茶道</td>

    </tr>

    <tr>

        <td><input type="checkbox"></td>

        <td>苑昊(苑局)</td>

        <td>不洗头、不翻车、不要脸</td>

    </tr>

    </tbody>

</table>

<!--<script src="jquery.js"></script>-->

<script src="jquery-3.3.1.min.js"></script>

<script>

    // 点击全选按钮 选中所有的checkbox

    // DOM绑定事件方法

    // $("#all")[0].onclick = function(){}

    // jQuery绑定事件方法

    $("#all").click(function () {

        $(":checkbox").prop('checked', true);

    });

    // 取消

    $("#cancel").on("click", function () {

         $(":checkbox").prop('checked', false);

    });

    // 反选

    $("#reverse").click(function () {

        // 1. 找到所有选中的checkbox取消选中

        // $("input:checked").prop('checked', false);

        // // 2. 找到没有选中的checkbox选中

        // $("input:not(:checked)").prop('checked', true);

        //你会发现上面这么写,不行,为什么呢?因为你做了第一步操作之后,再做第二步操作的时候,所有标签就已经全部取消选中了,所以第二步就把所有标签选中了

        // 方法1. for循环所有的checkbox,挨个判断原来选中就取消选中,原来没选中就选中

        var $checkbox = $(":checkbox");

        for (var i=0;i<$checkbox.length;i++){

            // 获取原来的选中与否的状态

            var status = $($checkbox[i]).prop('checked');

            $($checkbox[i]).prop('checked', !status);

        }

        // 方法2. 先用变量把标签原来的状态保存下来

    //     var $unchecked =  $("input:not(:checked)");

    //     var $checked = $("input:checked");

    //

    //     $unchecked.prop('checked', true);

    //     $checked.prop('checked', false);

    })

</script>

</body>

</html>
通过删除引出,委托事件:
<!DOCTYPE html>

<html lang="en">

<head>

    <meta charset="UTF-8">

    <title>Title</title>

    <style>

        .shadow{

            position: fixed;

            background-color: rgba(0,0,0,0.3);

            top:0;

            left:0;

            bottom:0;

            right:0;

            /*设置上下左右没有距离*/

            z-index: 900;

        }

        .modal{

            position: fixed;

            width: 400px;

            height: 200px;

            background-color: #ffffff;

            top:50%;

            left:50%;

            z-index: 1000;

            margin-top: -100px;

            /*往上移动*/

            margin-left: -200px;

            /*往左移动*/

        }

        .hide{

            display:none;

            /*隐藏*/

        }

    </style>

</head>

<body>

<button id="all">全选</button>

<button id="reverse">反选</button>

<button id="cancel">取消</button>

<button id="add">增加</button>

<table border="1">

   <thead>

    <tr>

        <th>#</th>

        <th>姓名</th>

        <th>爱好</th>

        <th>操作</th>

    </tr>

   </thead>

    <tbody>

    <tr>

        <td><input type="checkbox"></td>

        <td>金老板</td>

        <td>开车</td>

        <td><button class="b1">删除</button></td>

    </tr>

    <tr>

        <td><input type="checkbox"></td>

        <td>景女神</td>

        <td>茶道</td>

        <td><button class="b1">删除</button></td>

    </tr>

    <tr>

        <td><input type="checkbox"></td>

        <td>苑昊(苑局)</td>

        <td>不洗头、不翻车、不要脸</td>

        <td><button class="b1">删除</button></td>

    </tr>

    </tbody>

</table>

<div class="modal hide">

    <!--对话框开始的时候隐藏-->

    <div>

        <label for="name">姓名</label>

        <input id="name" type="text">

    </div>

    <div>

        <label for="hobby">爱好</label>

        <input id="hobby" type="text">

    </div>

    <div>

        <button class="btn2">保存</button>

    </div>

</div>

<div class="shadow hide"></div>

<!--阴影层开始的时候隐藏-->

<!--<script src="jquery.js"></script>-->

<script src="jquery-3.3.1.min.js"></script>

<script>

    // 点击全选按钮 选中所有的checkbox

    // DOM绑定事件方法

    // $("#all")[0].onclick = function(){}

    // jQuery绑定事件方法

    $("#all").click(function () {

        $(":checkbox").prop('checked', true);

    });

    // 取消

    $("#cancel").on("click", function () {

         $(":checkbox").prop('checked', false);

    });

    // 反选

    $("#reverse").click(function () {

        // 1. 找到所有选中的checkbox取消选中

        // $("input:checked").prop('checked', false);

        // // 2. 找到没有选中的checkbox选中

        // $("input:not(:checked)").prop('checked', true);

        //你会发现上面这么写,不行,为什么呢?因为你做了第一步操作之后,再做第二步操作的时候,所有标签就已经全部取消选中了,所以第二步就把所有标签选中了

        // 方法1. for循环所有的checkbox,挨个判断原来选中就取消选中,原来没选中就选中

        var $checkbox = $(":checkbox");

        for (var i=0;i<$checkbox.length;i++){

            // 获取原来的选中与否的状态

            var status = $($checkbox[i]).prop('checked');

            $($checkbox[i]).prop('checked', !status);

        }

        // 方法2. 先用变量把标签原来的状态保存下来

    //     var $unchecked =  $("input:not(:checked)");

    //     var $checked = $("input:checked");

    //

    //     $unchecked.prop('checked', true);

    //     $checked.prop('checked', false);

    })

    //点击增加,弹出模态框

    $("#add").click(function () {

        // $(".modal").removeClass('hide');

        // $(".shadow").removeClass('hide');

        //整合上边的两条

        $(".modal,.shadow").removeClass('hide');

    })

    $('.btn2').click(function () {

        //1.获取用户输入的信息

        var name=$('#name').val();

        var hobby=$('#hobby').val();

        //2.创建标签,将数据添加到标签里面,拼接字符串添加标签

        var s="<tr>" +

            "<td><input type=\"checkbox\"></td>" +

            "<td>"+name+"</td>" +

            "<td>"+hobby+"</td>" +

            "<td><button class=\"b1\">删除</button></td>" +

            "</tr>";

        //在上边将要添加的name和hobby添加进去

        //3.将创建好的标签,天际到表格里面去

        $('tbody').append(s)

        //添加完成之后

        //4.关闭(隐藏)对话框

        $('.modal,.shadow').addClass('hide');

    //    5.清空用户输入的内容

        $('#name').val('');

        $('#hobby').val('');

    })

    //删除按钮事件

    // $('.b1').click(function () {

    //     $(this).parent().parent().remove();

    // //    通过单击button按钮,实现删除功能

    // })

//问题:新增加的,无法绑定删除功能?应该怎么处理

//    1.将删除功能放在最后是不可行的

//    2.需要处理添加这个标签的父标签进行处理,也就是子标签委托父标签处理这个事情。

    //    注意由上边的.b1标签改写成tbody下的tr标签,

    //    给下边的tbody下的tr绑定一个click事件,click事件由button触发

    //    也就是把button事件的处理过程给了他的父亲.

    //    在这里表示把含有.b1标签的全部委托给它的父亲

    //

    //事件委托,将button的click事件委托给了祖父tbody标签,实现的效果就是点击button按钮,触发tbody的click事件,$(this表示的还是被点击的那个标签)

    //on可以做事件委托,单纯的click不可以做事件委托

    //参数:click事件名称,button委托人,tbody的后代标签

    $('tbody').on('click','button',function () {

        $(this).parent().parent().remove();

    })

</script>

</body>

</html>
5.页面加载
案例1:
<!DOCTYPE html>
<html lang="zh-CN">
<head>
<meta http-equiv="content-Type" charset="UTF-8">
<meta http-equiv="x-ua-compatible" content="IE=edge">
<title>Title</title>
<style>
.d1{
background-color: red;
width: 100px;
height: 100px;
}
</style> </head>
<body> <div class="d1"></div>
<script src="jquery-3.3.1.min.js"></script>
<script>
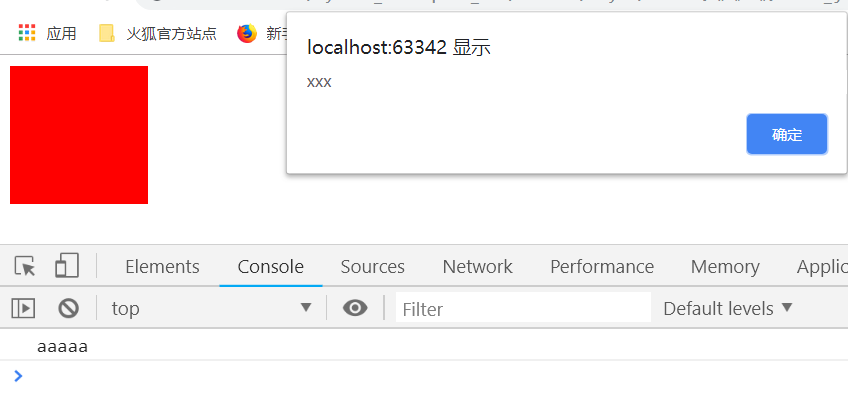
$('.d1').click(function () {
alert('xxx');
})
</script>
</body>
</html>
点击红色区域出现如下对话框.
通过window.onload实现最后加载.在头部放这个
案例:
<!DOCTYPE html>

<html lang="zh-CN">

<head>

    <meta http-equiv="content-Type" charset="UTF-8">

    <meta http-equiv="x-ua-compatible" content="IE=edge">

    <title>Title</title>

    <style>

        .d1{

            background-color: red;

            width: 100px;

            height: 100px;

        }

    </style>

    <script>

            window.onload=function () {

                $('.d1').click(function () {

                alert('xxx');

            })

            }

    </script>

</head>

<body>

<div class="d1"></div>

<script src="jquery-3.3.1.min.js"></script>

</body>

</html>
缺点分析:有两个js文件也就是多人操作中,js写在html和js文件中
html中代码:
<!DOCTYPE html>

<html lang="zh-CN">

<head>

    <meta http-equiv="content-Type" charset="UTF-8">

    <meta http-equiv="x-ua-compatible" content="IE=edge">

    <title>Title</title>

    <style>

        .d1{

            background-color: red;

            width: 100px;

            height: 100px;

        }

    </style>

    <script>

            window.onload=function () {

                $('.d1').click(function () {

                alert('xxx');

            })

            }

    </script>

    <script src="01test.js"></script>

</head>

<body>

<div class="d1"></div>

<script src="jquery-3.3.1.min.js"></script>

</body>

</html>
js代码:
window.onload=function () {

    console.log('aaaaa');

};
此时只能在调试框中显示:aaaaa
更优化的方法:(两个都能够打印出来了)

html代码:
<!DOCTYPE html>

<html lang="zh-CN">

<head>

    <meta http-equiv="content-Type" charset="UTF-8">

    <meta http-equiv="x-ua-compatible" content="IE=edge">

    <title>Title</title>

    <style>

        .d1{

            background-color: red;

            width: 100px;

            height: 100px;

        }

    </style>

    <script src="jquery-3.3.1.min.js"></script>

    <script>

            // window.onload=function () {

            //     $('.d1').click(function () {

            //     alert('xxx');

            // })

            // }

      //jquery页面加载完成之后做某些事情的操作

        $(function () {

            $('.d1').click(function () {

                alert('xxx');

            })

        })

    </script>

    <script src="01test.js"></script>

</head>

<body>

<div class="d1"></div>

</body>

</html>
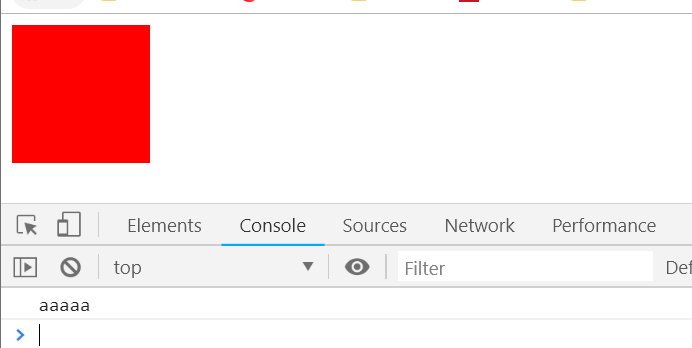
js代码(01test.js):
$(function () {

            console.log('aaaaa');

});
结果如下:
6.动画效果
代码html:
<!DOCTYPE html>

<html lang="zh-CN">

<head>

    <meta http-equiv="content-Type" charset="UTF-8">

    <meta http-equiv="x-ua-compatible" content="IE=edge">

    <title>Title</title>

    <style>

        .d1{

            background-color: red;

            width: 100px;

            height: 100px;

            display: none;

        }

    </style>

</head>

<body>

<div class="d1"></div>

</body>

<script src="jquery-3.3.1.min.js"></script>

</html>

动画效果案例html2:
<!DOCTYPE html>
<html lang="en">
<head>
<meta charset="UTF-8">
<title>Title</title>
<style>
.c1{
background-color: red;
/*background: url("hlw.png") no-repeat;*/
width: 200px;
height: 200px;
/*position: absolute;*/ /*自己试以下position:absolute的效果*/
display: none;
}
.c2{
height: 100px;
background-color: lawngreen;
} </style>
</head>
<body> <!--<div class="c1" hidden></div>--> <!--不用hidden,上面写display:none也是可以的-->
<div class="c1"></div>
<div class="c2"></div>
<script src="jquery-3.3.1.min.js"></script>
<script>
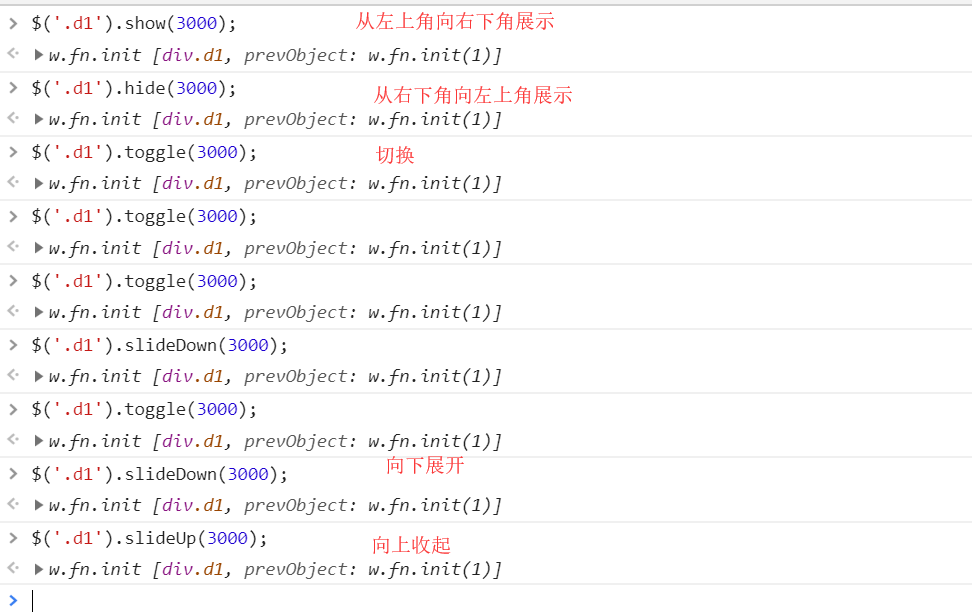
// $('.c1').hide(3000);
$('.c1').show(3000); </script>
</body>
</html>
点赞html案例:
<!DOCTYPE html>

<html lang="zh-CN">

<head>

  <meta charset="UTF-8">

  <meta http-equiv="x-ua-compatible" content="IE=edge">

  <meta name="viewport" content="width=device-width, initial-scale=1">

  <title>点赞动画示例</title>

  <style>

    div {

      position: relative;

      display: inline-block;

    }

    div>i {

      display: inline-block;

      color: red;

      position: absolute;

      right: -16px;

      top: -5px;

      opacity: 1;

    }

  </style>

</head>

<body>

<div id="d1">点赞</div>

<script src="jquery-3.2.1.min.js"></script>

<script>

  $("#d1").on("click", function () {

    var newI = document.createElement("i");

    newI.innerText = "+1";

    $(this).append(newI);

    $(this).children("i").animate({

      opacity: 0  //1秒之后透明度变为0,注意写法,animate({属性:值},毫秒数)

    }, 1000)

  })

</script>

</body>

</html>
推荐:iconfonts,阿里图标库
7.其他
测试:

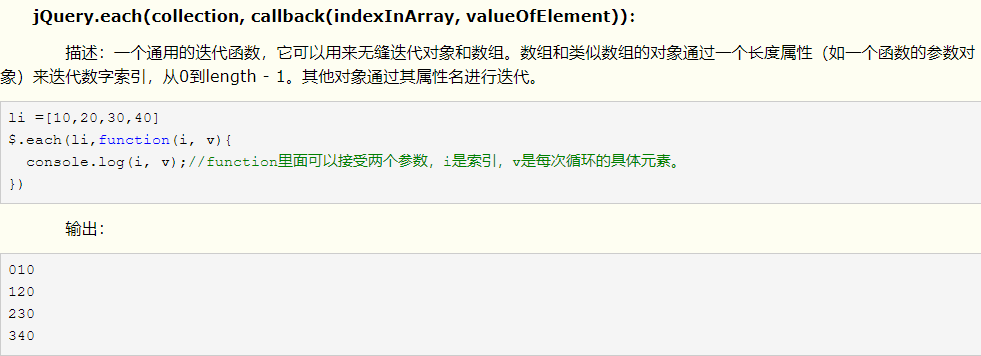
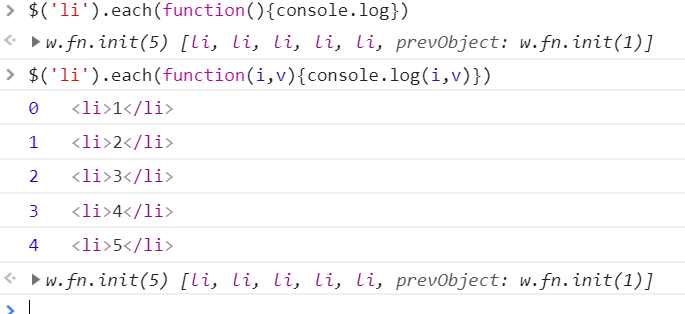
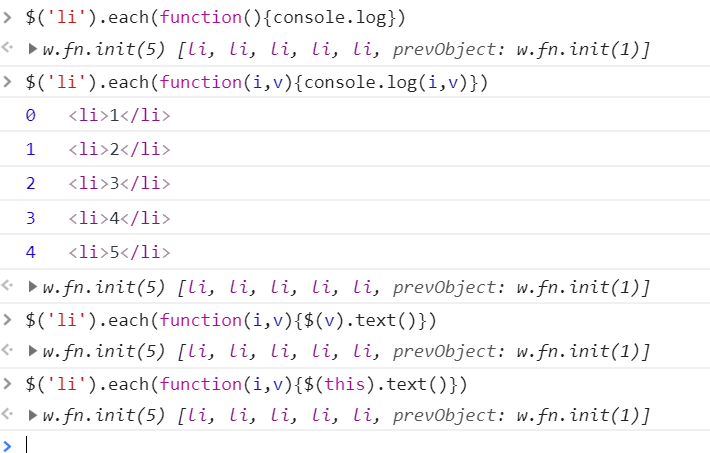
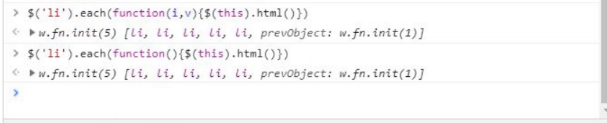
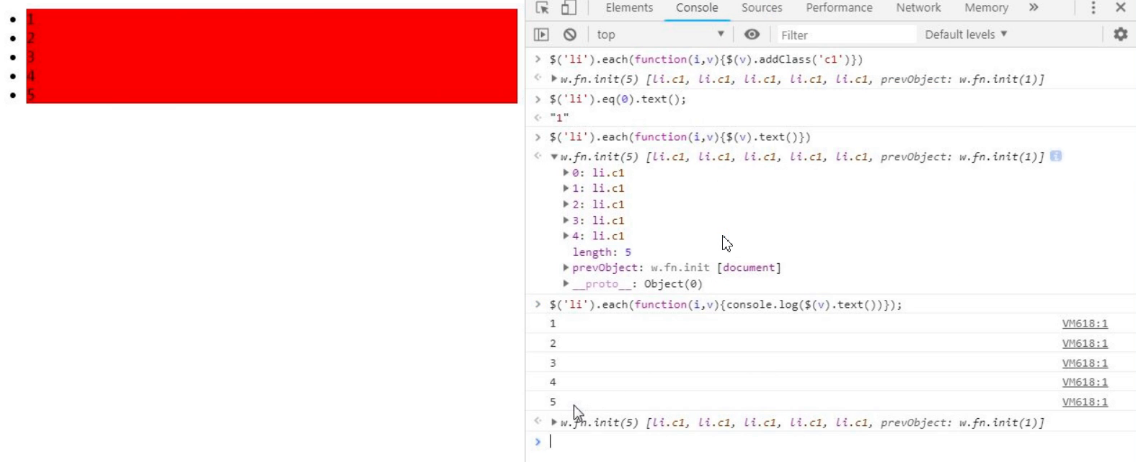
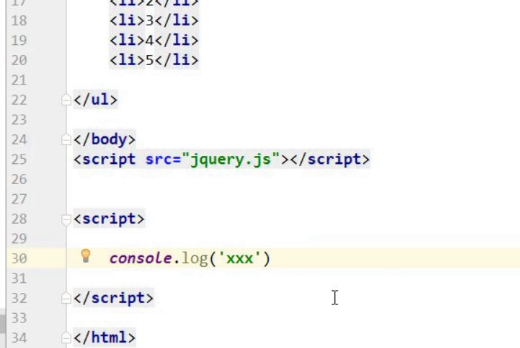
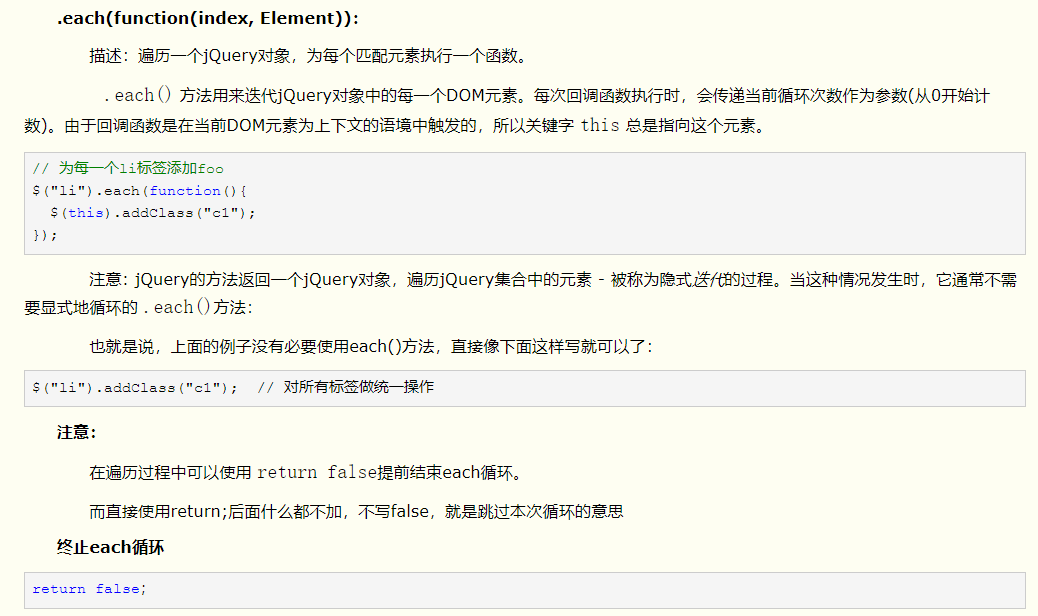
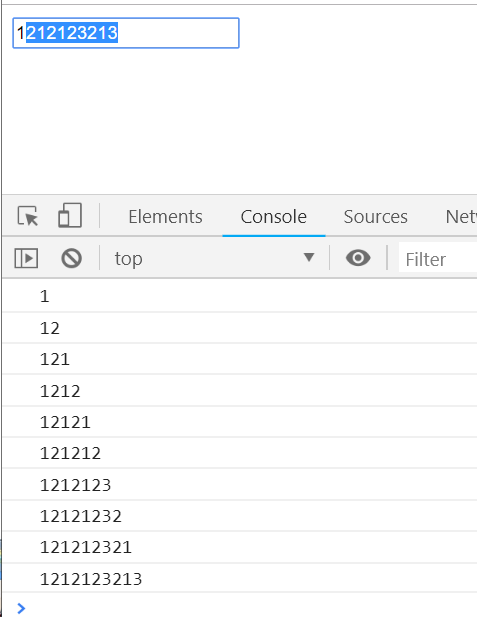
each还可以测试循环所有标签.
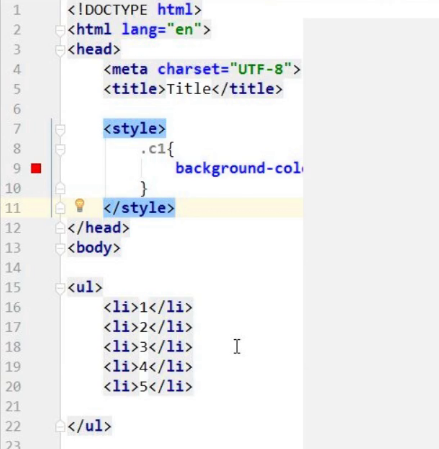
html测试代码:
<!DOCTYPE html>

<html lang="zh-CN">

<head>

    <meta http-equiv="content-Type" charset="UTF-8">

    <meta http-equiv="x-ua-compatible" content="IE=edge">

    <title>Title</title>

</head>

<body>

<ul>

    <li>1</li>

    <li>2</li>

    <li>3</li>

    <li>4</li>

    <li>5</li>

</ul>

<script src="jquery-3.3.1.min.js"></script>

</body>

</html>
测试结果:
代码截图
8.

标签内部也可以存储数据


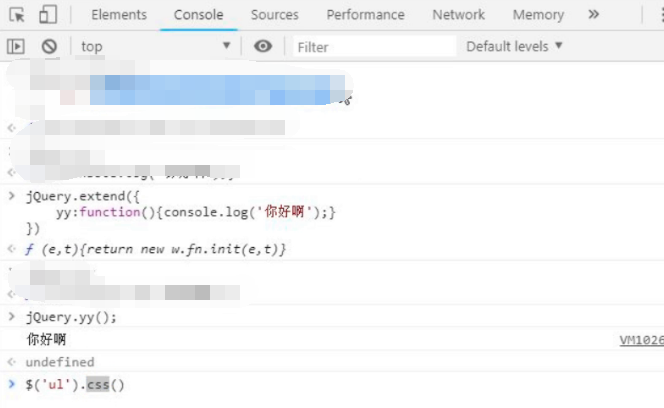
9.自定义插件
10.input事件
代码:
<!DOCTYPE html>

<html lang="zh-CN">

<head>

    <meta http-equiv="content-Type" charset="UTF-8">

    <meta http-equiv="x-ua-compatible" content="IE=edge">

    <title>Title</title>

</head>

<body>

<input id="name" type="text">

<script src="jquery-3.3.1.min.js"></script>

<script>

    $('#name').on('input',function(){

        console.log($(this).val());

    })

</script>

</body>

</html>
巨蟒python全栈开发数据库前端8:jQuery框架2的更多相关文章
- 巨蟒python全栈开发数据库前端7:jQuery框架
每个人的标准不同,看法等等,认识,价值观有所不同,促成了这些矛盾. 1.select例子 <!DOCTYPE html> <html lang="en"> ...
- 巨蟒python全栈开发数据库前端5:JavaScript1
1.js介绍&变量&基础数据类型 2.类型查询&运算符&if判断&for循环 3.while循环&三元运算符 4.函数 5.今日总结 1.js介绍&am ...
- 巨蟒python全栈开发数据库前端6:事件onclick的两种绑定方式&&onblur和onfocus事件&&window.onload解释&&小米商城讲解
1.回顾上节内容(JavaScript) 一.JavaScript概述 1.ECMAScript和JavaScript的关系 2.ECMAScript的历史 3.JavaScript是一门前后端都可以 ...
- 巨蟒python全栈开发数据库前端1:HTML基础
1.HTML介绍 什么是前端? 前端就是我们打开浏览器的页面.,很多公司都有自己的浏览器的页面,这个阶段学习的就是浏览器界面 比如京东的界面:https://www.jd.com/ 引子 例1 soc ...
- 巨蟒python全栈开发数据库前端3:CSS基础2
1.文本属性 2.背景属性 3.边框属性 4.display属性 5.盒子模型
- 巨蟒python全栈开发数据库前端4:CSS基础3
1.float浮动 清除浮动 2.position定位&overflow溢出&z-index属性 3.定位补充 4.导航栏
- 巨蟒python全栈开发数据库前端9:bootstrap
1.bootstrap的主网站: http://www.bootcss.com/ (1)bootstrap的CSS样式 (2)bootstrap组件 (3)JavaScript插件 (4)阿里图标库的 ...
- 巨蟒python全栈开发数据库攻略1:基础攻略
1.什么是数据库? 2.数据库分类 3.数据库简单介绍 4.安装数据库 5.修改root密码 6.修改字符集 7.sql介绍 8.简单sql操作
- 巨蟒python全栈开发数据库攻略2:基础攻略2
1.存储引擎表类型 2.整数类型和sql_mode 3.浮点类&字符串类型&日期类型&集合类型&枚举类型 4.数值类型补充 5.完整性约束
随机推荐
- Excel中如何将时间戳转为时间?
Unix时间戳转换Excel时间? Excel中如何将时间戳转为时间? Excel默认不支持Unix格式时间戳,这在导入数据时十分不便.可以用以下公式将时间戳转换成Excel格式的时间: =(x+8* ...
- OpenERP为form和tree视图同时指定view_id的方法
Odoo,OpenERP中文网 / 2014-07-16 文所说的是关于OpenERP中同一个对象(同名继承)使用view_id来指定form和tree视图的方法,由于官方文档中Views and E ...
- __block 和__weak 区别及使用
API Reference对__block变量修饰符有如下几处解释: //A powerful feature of blocks is that they can modify variables ...
- vb.net版机房收费——助你学会七层架构(二)反射+抽象工厂
上一篇咱们做好了准备工作.数据库设计和Entity层,如今介绍 4.反射+抽象工厂 反射:用来消除Switch和if的,这里我尽量简单地介绍,以便大家理解.反射其有用起来非常easy.你就觉得他就是决 ...
- [ci]安装配置jenkins及其插件
后面尝试ms模式部署多台jenkins 安装jenkins:(hudson是jenkins的商业版) cd /etc/yum.repos.d/ wget http://pkg.jenkins.io/r ...
- Redis命令学习-string类型操作
APPEND key value 假设key已经存在,而且为字符串.那么这个命令会把value追加到原来值的末尾.假设key不存在.首先创建一个空字符串,再运行追加操作. 返回值:返回 ...
- iOS 学习笔记四 【xcode 7.3 ESJsonFormat-Xcode 插件不能使用的解决办法】
步骤: 1.[前提要[关掉xcode],然后终端运行,一次不行,运行两次!] 2.[鼠标双击下方代码,command + c 复制即可] 3.[打开终端,command + V 粘贴,按回车运行即可, ...
- iOS使用AVCaptureSession自定义相机
关于iOS调用摄像机来获取照片,通常我们都会调用UIImagePickerController来调用系统提供的相机来拍照,这个控件非常好 用.但是有时UIImagePickerController控件 ...
- 密码学hash函数-SHA256-512
[latexpage] Hash函数又称哈希函数.散列函数.杂凑函数.它是一种单向密码体制,即从一个从明文到密文的不可逆映射,只有加密过程,没有解密过程. Hash函数H将可变长度的数据块M作为输入, ...
- C++之类的静态成员变量和静态成员函数
static静态成员函数 在类中.static 除了声明静态成员变量,还能够声明静态成员函数. 普通成员函数能够訪问全部成员变量.而静态成员函数仅仅能訪问静态成员变量. 我们知道.当调用一个对象的成员 ...