
15、Work原理及源码分析
一、Work原理
1、图解
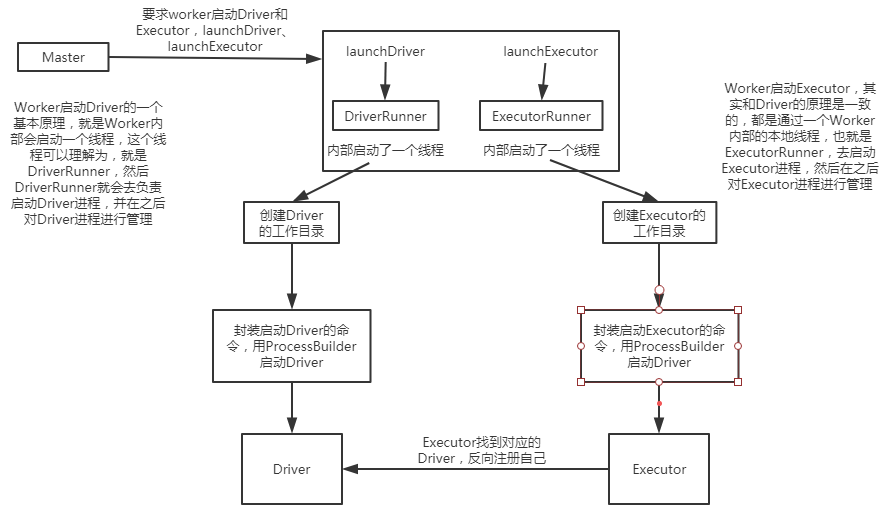
Worker启动Driver的一个基本原理,就是Worker内部会启动一个线程,这个线程可以理解为,就是DriverRunner,然后DriverRunner就会去负责启动Driver进程,

并在之后对Driver进程进行管理;

Worker启动Executor,其实和Driver的原理是一致的,都是通过一个Worker内部的本地线程,也就是ExecutorRunner,去启动Executor进程,然后在之后

对Executor进程进行管理;
二、源码分析
1、Driver的启动
###org.apache.spark.deploy.worker/Worker.scala

case LaunchDriver(driverId, driverDesc) => {

      logInfo(s"Asked to launch driver $driverId")

      // 创建DriverRunner

      val driver = new DriverRunner(

        conf,

        driverId,

        workDir,

        sparkHome,

        driverDesc.copy(command = Worker.maybeUpdateSSLSettings(driverDesc.command, conf)),

        self,

        akkaUrl)

      // 将driver加入本地缓存

      drivers(driverId) = driver

      // 开始DriverRunner

      driver.start()

      // 加上Driver要使用的资源

      coresUsed += driverDesc.cores

      memoryUsed += driverDesc.mem

    }

###org.apache.spark.deploy.worker/DriverRunner.scala

###driver.start()方法

def start() = {

    // 启动一个java线程

    new Thread("DriverRunner for " + driverId) {

      // java线程体

      override def run() {

        try {

          // 创建Driver的工作目录

          val driverDir = createWorkingDirectory()

          // 下载用户上传的jar(java/scala,用maven打的jar包)

          val localJarFilename = downloadUserJar(driverDir)

          def substituteVariables(argument: String): String = argument match {

            case "{{WORKER_URL}}" => workerUrl

            case "{{USER_JAR}}" => localJarFilename

            case other => other

          }

          // TODO: If we add ability to submit multiple jars they should also be added here

          // 构建ProcessBuilder,传入了driver的启动命令,需要的内存大小等信息

          val builder = CommandUtils.buildProcessBuilder(driverDesc.command, driverDesc.mem,

            sparkHome.getAbsolutePath, substituteVariables)

          // 启动Driver

          launchDriver(builder, driverDir, driverDesc.supervise)

        }

        catch {

          case e: Exception => finalException = Some(e)

        }

        // 对driver的退出状态做一些处理

        val state =

          if (killed) {

            DriverState.KILLED

          } else if (finalException.isDefined) {

            DriverState.ERROR

          } else {

            finalExitCode match {

              case Some(0) => DriverState.FINISHED

              case _ => DriverState.FAILED

            }

          }

        finalState = Some(state)

        // 这个DriverRunner线程,向它所属的worker的actor,发送一个DriverStateChanged的事件

        worker ! DriverStateChanged(driverId, state, finalException)

      }

    }.start()

  }

###org.apache.spark.deploy.worker/DriverRunner.scala

###downloadUserJar()方法

private def downloadUserJar(driverDir: File): String = {

    // hadoop jar里的Path

    val jarPath = new Path(driverDesc.jarUrl)

    // 拿到hadoop配置

    val hadoopConf = SparkHadoopUtil.get.newConfiguration(conf)

    // 获取HDFS的FileSystem

    val jarFileSystem = jarPath.getFileSystem(hadoopConf)

    // 创建本地目录

    val destPath = new File(driverDir.getAbsolutePath, jarPath.getName)

    val jarFileName = jarPath.getName

    val localJarFile = new File(driverDir, jarFileName)

    val localJarFilename = localJarFile.getAbsolutePath

    // 如果jar在本地不存在

    if (!localJarFile.exists()) { // May already exist if running multiple workers on one node

      logInfo(s"Copying user jar $jarPath to $destPath")

      // 用FileUtil将jar拷贝到本地

      FileUtil.copy(jarFileSystem, jarPath, destPath, false, hadoopConf)

    }

    // 如果拷贝完了,发现jar还不存在,那么就抛出异常

    if (!localJarFile.exists()) { // Verify copy succeeded

      throw new Exception(s"Did not see expected jar $jarFileName in $driverDir")

    }

    localJarFilename

  }

###org.apache.spark.deploy.worker/DriverRunner.scala

###launchDriver()方法

private def launchDriver(builder: ProcessBuilder, baseDir: File, supervise: Boolean) {

    builder.directory(baseDir)

    def initialize(process: Process) = {

      // Redirect stdout and stderr to files

      // 重定向stdout和stderr输出流到文件中

      val stdout = new File(baseDir, "stdout")

      CommandUtils.redirectStream(process.getInputStream, stdout)

      val stderr = new File(baseDir, "stderr")

      val header = "Launch Command: %s\n%s\n\n".format(

        builder.command.mkString("\"", "\" \"", "\""), "=" * 40)

      Files.append(header, stderr, UTF_8)

      CommandUtils.redirectStream(process.getErrorStream, stderr)

    }

    runCommandWithRetry(ProcessBuilderLike(builder), initialize, supervise)

  }

###org.apache.spark.deploy.worker/Worker.scala

###DriverStateChanged

case DriverStateChanged(driverId, state, exception) => {

      state match {

        // 如果Driver的状态是错误、完成、杀死、失败,就移除Driver

        case DriverState.ERROR | DriverState.FINISHED | DriverState.KILLED | DriverState.FAILED =>

          removeDriver(driverId, state, exception)

        case _ =>

          throw new Exception(s"Received unexpected state update for driver $driverId: $state")

      }

    }

###org.apache.spark.deploy.worker/Worker.scala

###Executor的启动

    case LaunchExecutor(masterUrl, appId, execId, appDesc, cores_, memory_) =>

      if (masterUrl != activeMasterUrl) {

        logWarning("Invalid Master (" + masterUrl + ") attempted to launch executor.")

      } else {

        try {

          logInfo("Asked to launch executor %s/%d for %s".format(appId, execId, appDesc.name))

          // Create the executor's working directory

          // 创建Executor本地工作目录

          val executorDir = new File(workDir, appId + "/" + execId)

          if (!executorDir.mkdirs()) {

            throw new IOException("Failed to create directory " + executorDir)

          }

          // Create local dirs for the executor. These are passed to the executor via the

          // SPARK_LOCAL_DIRS environment variable, and deleted by the Worker when the

          // application finishes.

          val appLocalDirs = appDirectories.get(appId).getOrElse {

            Utils.getOrCreateLocalRootDirs(conf).map { dir =>

              Utils.createDirectory(dir).getAbsolutePath()

            }.toSeq

          }

          appDirectories(appId) = appLocalDirs

          // 创建ExecutorRunner

          val manager = new ExecutorRunner(

            appId,

            execId,

            appDesc.copy(command = Worker.maybeUpdateSSLSettings(appDesc.command, conf)),

            cores_,

            memory_,

            self,

            workerId,

            host,

            webUi.boundPort,

            publicAddress,

            sparkHome,

            executorDir,

            akkaUrl,

            conf,

            appLocalDirs, ExecutorState.LOADING)

          // 把Executor加入本地缓存

          executors(appId + "/" + execId) = manager

          // 启动ExecutorRunner

          manager.start()

          // 加上Executor要使用的资源

          coresUsed += cores_

          memoryUsed += memory_

          // 向master返回一个ExecutorStateChanged消息

          master ! ExecutorStateChanged(appId, execId, manager.state, None, None)

        } catch {

          case e: Exception => {

            logError(s"Failed to launch executor $appId/$execId for ${appDesc.name}.", e)

            if (executors.contains(appId + "/" + execId)) {

              executors(appId + "/" + execId).kill()

              executors -= appId + "/" + execId

            }

            master ! ExecutorStateChanged(appId, execId, ExecutorState.FAILED,

              Some(e.toString), None)

          }

        }

      }

###org.apache.spark.deploy.worker/DriverRunner.scala

###manager.start()

def start() {

    // 创建一个java线程

    workerThread = new Thread("ExecutorRunner for " + fullId) {

      override def run() { fetchAndRunExecutor() }

    }

    workerThread.start()

    // Shutdown hook that kills actors on shutdown.

    shutdownHook = new Thread() {

      override def run() {

        killProcess(Some("Worker shutting down"))

      }

    }

    Runtime.getRuntime.addShutdownHook(shutdownHook)

  }

###org.apache.spark.deploy.worker/DriverRunner.scala

###fetchAndRunExecutor()

 def fetchAndRunExecutor() {

    try {

      // Launch the process

      // 封装一个ProcessBuilder

      val builder = CommandUtils.buildProcessBuilder(appDesc.command, memory,

        sparkHome.getAbsolutePath, substituteVariables)

      val command = builder.command()

      logInfo("Launch command: " + command.mkString("\"", "\" \"", "\""))

      builder.directory(executorDir)

      builder.environment.put("SPARK_LOCAL_DIRS", appLocalDirs.mkString(","))

      // In case we are running this from within the Spark Shell, avoid creating a "scala"

      // parent process for the executor command

      builder.environment.put("SPARK_LAUNCH_WITH_SCALA", "0")

      // Add webUI log urls

      val baseUrl =

        s"http://$publicAddress:$webUiPort/logPage/?appId=$appId&executorId=$execId&logType="

      builder.environment.put("SPARK_LOG_URL_STDERR", s"${baseUrl}stderr")

      builder.environment.put("SPARK_LOG_URL_STDOUT", s"${baseUrl}stdout")

      process = builder.start()

      // 重定向输出流到文件

      // 将Executor的InputStream和ErrorStream输出的信息分别重定向到本地工作目录的stdout文件和stderr文件

      val header = "Spark Executor Command: %s\n%s\n\n".format(

        command.mkString("\"", "\" \"", "\""), "=" * 40)

      // Redirect its stdout and stderr to files

      val stdout = new File(executorDir, "stdout")

      stdoutAppender = FileAppender(process.getInputStream, stdout, conf)

      val stderr = new File(executorDir, "stderr")

      Files.write(header, stderr, UTF_8)

      stderrAppender = FileAppender(process.getErrorStream, stderr, conf)

      // Wait for it to exit; executor may exit with code 0 (when driver instructs it to shutdown)

      // or with nonzero exit code

      // 调用process的waitFor()方法,启动Executor进程

      val exitCode = process.waitFor()

      //executor执行完之后拿到返回状态

      state = ExecutorState.EXITED

      val message = "Command exited with code " + exitCode

      // 向ExecutorRunner线程所属的worker actor,发送ExecutorStateChanged消息

      worker ! ExecutorStateChanged(appId, execId, state, Some(message), Some(exitCode))

    } catch {

      case interrupted: InterruptedException => {

        logInfo("Runner thread for executor " + fullId + " interrupted")

        state = ExecutorState.KILLED

        killProcess(None)

      }

      case e: Exception => {

        logError("Error running executor", e)

        state = ExecutorState.FAILED

        killProcess(Some(e.toString))

      }

    }

  }

###org.apache.spark.deploy.worker/Worker.scala

    case ExecutorStateChanged(appId, execId, state, message, exitStatus) =>

      // 直接向master也发送一个ExecutorStateChanged消息

      master ! ExecutorStateChanged(appId, execId, state, message, exitStatus)

      val fullId = appId + "/" + execId

      // 如果Executor状态是finished

      if (ExecutorState.isFinished(state)) {

        executors.get(fullId) match {

          case Some(executor) =>

            logInfo("Executor " + fullId + " finished with state " + state +

              message.map(" message " + _).getOrElse("") +

              exitStatus.map(" exitStatus " + _).getOrElse(""))

            // 将executor从内存缓存中移除

            executors -= fullId

            finishedExecutors(fullId) = executor

            // 释放Executor占用的内存和cpu资源

            coresUsed -= executor.cores

            memoryUsed -= executor.memory

          case None =>

            logInfo("Unknown Executor " + fullId + " finished with state " + state +

              message.map(" message " + _).getOrElse("") +

              exitStatus.map(" exitStatus " + _).getOrElse(""))

        }

        maybeCleanupApplication(appId)

      }

###org.apache.spark.deploy.master/Master.scala

case ExecutorStateChanged(appId, execId, state, message, exitStatus) => {

      // 找到Executor对应的Application,然后再反过来通过Application内部的Executor缓存获取Executor信息

      val execOption = idToApp.get(appId).flatMap(app => app.executors.get(execId))

      execOption match {

        case Some(exec) => {

          // 如果有值

          val appInfo = idToApp(appId)

          exec.state = state

          if (state == ExecutorState.RUNNING) { appInfo.resetRetryCount() }

          // 向driver同步发送ExecutorUpdated消息

          exec.application.driver ! ExecutorUpdated(execId, state, message, exitStatus)

          // 判断,如果Executor完成了

          if (ExecutorState.isFinished(state)) {

            // Remove this executor from the worker and app

            logInfo(s"Removing executor ${exec.fullId} because it is $state")

            // 从Application缓存中移除Executor

            appInfo.removeExecutor(exec)

            // 从运行Executor的Worker的缓存中移除Executor

            exec.worker.removeExecutor(exec)

            // 判断 如果Executor的退出状态是非正常的

            val normalExit = exitStatus == Some(0)

            // Only retry certain number of times so we don't go into an infinite loop.

            if (!normalExit) {

              // 判断Application当前的重试次数,是否达到了最大值,最大值是10

              // 也就是说,Executor反复调度都是失败,那么认为Application也失败了

              if (appInfo.incrementRetryCount() < ApplicationState.MAX_NUM_RETRY) {

                // 重新进行调度

                schedule()

              } else {

                // 否则,进行移除Application操作

                val execs = appInfo.executors.values

                if (!execs.exists(_.state == ExecutorState.RUNNING)) {

                  logError(s"Application ${appInfo.desc.name} with ID ${appInfo.id} failed " +

                    s"${appInfo.retryCount} times; removing it")

                  removeApplication(appInfo, ApplicationState.FAILED)

                }

              }

            }

          }

        }

        case None =>

          logWarning(s"Got status update for unknown executor $appId/$execId")

      }

    }
15、Work原理及源码分析的更多相关文章
- ConcurrentHashMap实现原理及源码分析
ConcurrentHashMap实现原理 ConcurrentHashMap源码分析 总结 ConcurrentHashMap是Java并发包中提供的一个线程安全且高效的HashMap实现(若对Ha ...
- HashMap和ConcurrentHashMap实现原理及源码分析
HashMap实现原理及源码分析 哈希表(hash table)也叫散列表,是一种非常重要的数据结构,应用场景及其丰富,许多缓存技术(比如memcached)的核心其实就是在内存中维护一张大的哈希表, ...
- 【转】HashMap实现原理及源码分析
哈希表(hash table)也叫散列表,是一种非常重要的数据结构,应用场景极其丰富,许多缓存技术(比如memcached)的核心其实就是在内存中维护一张大的哈希表,而HashMap的实现原理也常常出 ...
- HashMap实现原理及源码分析之JDK8
继续上回HashMap的学习 HashMap实现原理及源码分析之JDK7 转载 Java8源码-HashMap 基于JDK8的HashMap源码解析 [jdk1.8]HashMap源码分析 一.H ...
- 【OpenCV】SIFT原理与源码分析:方向赋值
<SIFT原理与源码分析>系列文章索引:http://www.cnblogs.com/tianyalu/p/5467813.html 由前一篇<关键点搜索与定位>,我们已经找到 ...
- 每天学会一点点(HashMap实现原理及源码分析)
HashMap实现原理及源码分析 哈希表(hash table)也叫散列表,是一种非常重要的数据结构,应用场景及其丰富,许多缓存技术(比如memcached)的核心其实就是在内存中维护一张大的哈希 ...
- OpenCV学习笔记(27)KAZE 算法原理与源码分析(一)非线性扩散滤波
http://blog.csdn.net/chenyusiyuan/article/details/8710462 OpenCV学习笔记(27)KAZE 算法原理与源码分析(一)非线性扩散滤波 201 ...
- (转)ReentrantLock实现原理及源码分析
背景:ReetrantLock底层是基于AQS实现的(CAS+CHL),有公平和非公平两种区别. 这种底层机制,很有必要通过跟踪源码来进行分析. 参考 ReentrantLock实现原理及源码分析 源 ...
- 【OpenCV】SIFT原理与源码分析:DoG尺度空间构造
原文地址:http://blog.csdn.net/xiaowei_cqu/article/details/8067881 尺度空间理论 自然界中的物体随着观测尺度不同有不同的表现形态.例如我们形 ...
- 《深入探索Netty原理及源码分析》文集小结
<深入探索Netty原理及源码分析>文集小结 https://www.jianshu.com/p/239a196152de
随机推荐
- [洛谷P5340][TJOI2019]大中锋的游乐场
题目大意:有$n(n\leqslant10^4)$个点,$m(m\leqslant10^5)$条边的无向图,每个点有一个属性$A/B$,要求$|cnt_A-cnt_B|\leqslant k(k\le ...
- 【转载】Windows安装Redis并添加本地自启动服务
概况 在windows本地搭建redis缓存,添加到本地计算机的服务中,保证每次开机自动启动服务. 第一步:下载redis(我的是计算机win10,64位) https://github.com/Mi ...
- 14-4 ADO.NET简介2
14-4-1Connection连接.关闭数据库 1.为了访问数据库,就要提供数据库连接类,在C#中,是通过Connection类来实现的.它有 四种类型的连接方式: SQLConnection AD ...
- ADO.NET 七(一个例子)
通过一个完整的实例实现课程信息管理功能的操作,包括查询.修改.删除课程信息等操作. 1) 创建课程信息表 create table StuCourse ( id int primary key ide ...
- 【转载】C#中string.IsNullOrEmpty和string.IsNullOrWhiteSpace区别
在C#中判断字段是否为空或者Null的时候,我们一般会使用到string.IsNullOrEmpty和string.IsNullOrWhiteSpace方法,这两个方法在大部分情况下判断的结果是一致的 ...
- python 笔记一
1. is 和 ==区别 is 判断是否是一个ID(内存中的数据是否是同一个), == 判断内容是否一致. 2.python 常量池包括 1.短整型的-5~256 2.字符串的数字.大小写字母随意组合 ...
- Navicat中文破解版(windows10)
1.下载安装包 链接:https://pan.baidu.com/s/1hP3cD9aTv8nvJfNwjXPdrQ 提取码:xmsu 2.解压安装包 选择.exe 文件然后 安装 选择自己要安装的 ...
- javascript_18-Array 数组
数组 数组-引用类型,JavaScript中的内置对象 Array对象的属性 length 获取数组的长度(元素个数) 检测数组 instanceof Array.isArray() //h5新增 常 ...
- 13.5. zipfile — Work with ZIP archives
13.5. zipfile — Work with ZIP archives Source code: Lib/zipfile.py The ZIP file format is a common a ...
- 191011 python3-format函数
# 题目:一球从100米高度自由落下,每次落地后反跳回原高度的一半:# 再落下,求它在第10次落地时,共经过多少米?第10次反弹多高?方法一: l = 100.0 s = 100 for i in r ...