Spring-Cloud之Config配置中心-7
一、我们前面基本上都是讲解的Spring Cloud Netflix的组件,下面我们会重点说Spring Cloud Config分布式配置中心。为什么需要这个组件来管理配置呢?在分布式应用开发过程中我们的大小服务会特别多,如果一个个去配置的话会带来更多的工作量,所以Spring Cloud 催生一种集中配置的方式,这种方式就是Config组件。这个主键主要介绍一下几个部分。
1)Config Server从本地读取配置。
2)Config Server从远程仓库Git上面读取配置。
3)搭建高可用的Config Server集群。
4)使用Spring Cloud Bus刷新配置。
二、Config Server从本地读取配置。
1、Config Server编写。
1)首先在Springboot和SpringCloud的基础上加入一下依赖。
        <dependency>

            <groupId>org.springframework.boot</groupId>

            <artifactId>spring-boot-starter-web</artifactId>

        </dependency>

        <dependency>

            <groupId>org.springframework.cloud</groupId>

            <artifactId>spring-cloud-config-server</artifactId>

        </dependency>
2)编写启动项
package com.cetc;

import org.springframework.boot.SpringApplication;

import org.springframework.boot.autoconfigure.SpringBootApplication;

import org.springframework.cloud.config.server.EnableConfigServer;

@SpringBootApplication

@EnableConfigServer

public class ConfigServerApplication {

    public static void main(String[] args) {

        SpringApplication.run(ConfigServerApplication.class, args);

    }

}
3)编写配置application.yaml
server:

  port: 8683

#  port: 8684

spring:

  application:

    name: config-server

  cloud:

    config:

      server:

        native:

          search-locations: classpath:/shared # 指定本地配置目录

  profiles:

    active: native # 本地读取配置
说明:这里profiles.active这里一定要配置native从本地读取。spring.cloud.server.native.search-locations为指定扫描的路径。
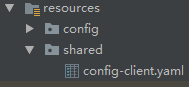
4)编写需要配置的客户端配置文件config-client.yaml
server:

  port: 8685

version: 1.0
说明:config-client必须和服务名称一样。如何存在不同环境,比如:dev,test,prod等环境。可以通过spring.profiles.active来激活指定文件。
服务端的配置就完成了。那么下面编写客户端。
2、编写Config Client客户端。
1)加入相关配置pom.xml
        <dependency>

            <groupId>org.springframework.boot</groupId>

            <artifactId>spring-boot-starter-web</artifactId>

        </dependency>

        <dependency>

            <groupId>org.springframework.cloud</groupId>

            <artifactId>spring-cloud-starter-config</artifactId>

        </dependency>
2)编写启动项和测试接口。
package com.cetc;

import org.springframework.boot.SpringApplication;

import org.springframework.boot.autoconfigure.SpringBootApplication;

@SpringBootApplication

public class ConfigClientApplication {

    public static void main(String[] args) {

        SpringApplication.run(ConfigClientApplication.class, args);

    }

}
package com.cetc.web.rest; import org.springframework.beans.factory.annotation.Value;import org.springframework.web.bind.annotation.GetMapping;
import org.springframework.web.bind.annotation.RequestMapping;
import org.springframework.web.bind.annotation.RestController; @RestController
@RequestMapping("/api/test")
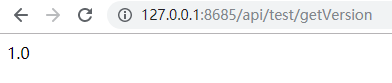
public class TestResource { @Value("${version}")
private String version; @GetMapping("/getVersion")
public String getVersion() {
return version;
}
}
3)重点来了,这里我们不编写application.yaml类似的文件了,这里我们使用bootstrap.yaml。为什么是bootstrap.yaml,因为bootstrap相对于application有优先执行权。
spring:

  application:

    name: config-client

  cloud:

    config:

      uri: http://127.0.0.1:8683

      fail-fast: true
说明:这里的spring.cloud.config的uri为服务配置地址。fail-fast为快速失败配置。
3、测试。启动Config Server、Config Client端口为8683,8685。
Config Client启动过程节点。


测试接口:

三、Config Server从Git仓库获取配置文件。可以自己使用github,也可以自己打架gitlab服务。我这里是自己搭建的gitlab。
1)上面的工程基本上都是一样的,需要修改的地方就是Config Server 的application.yaml配置文件,修改如下:
server:

  port: 8683

#  port: 8684

spring:

  application:

    name: config-server

  cloud:

    config:

      server:

        git:

          uri: http://127.0.0.1/lilin/SpringCloudConfig.git

          search-paths: shared

          username: lilin

          password:

      label: master
说明:一般配置文件都是私有的,所以一般都是使用账号登录,如果需要公开的可以使用github等方式。label:为那个分支。search-paths为搜索路径。
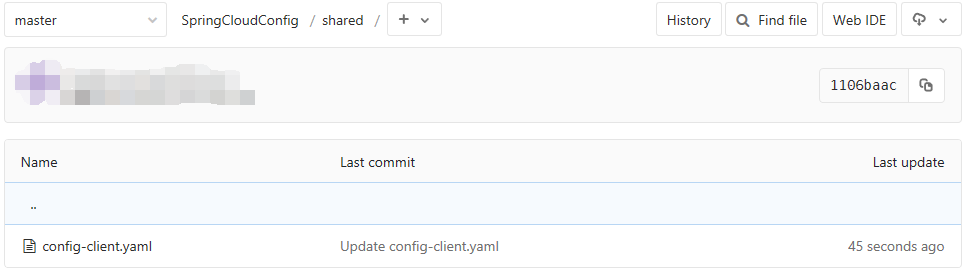
2)在Git上面编写config-client.yaml配置文件,为了方便我把之前的传上Git了。
3)启动Config Server和Config Client,端口8683,8685。
Config Server的展示如下:

客户端和从本地获取没有什么区别。
测试接口如下:
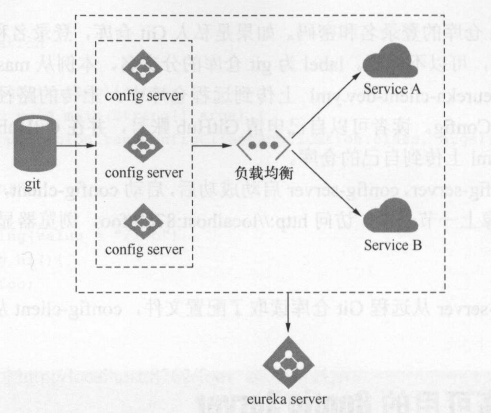
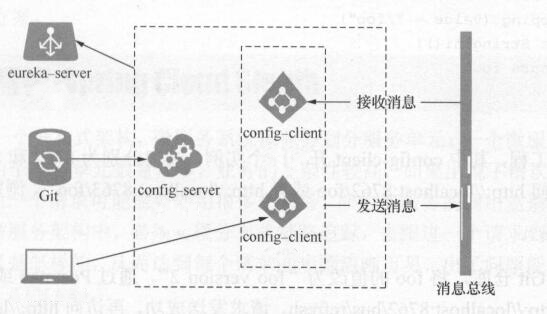
四、构建高可用的Config Server集群。为了方便管理,配置采用注册方式,所以需要加入Eureka服务注册中心。这里我们还是使用以前的注册中心Eureka Server端口。结构图如下
1、改造Config Server
1)在上面工程中,加入Eureka Client依赖。
        <dependency>

            <groupId>org.springframework.cloud</groupId>

            <artifactId>spring-cloud-starter-netflix-eureka-client</artifactId>

        </dependency>
2)在上面工程中,加入启动配置
package com.cetc;

import org.springframework.boot.SpringApplication;

import org.springframework.boot.autoconfigure.SpringBootApplication;

import org.springframework.cloud.config.server.EnableConfigServer;

import org.springframework.cloud.netflix.eureka.EnableEurekaClient;

@SpringBootApplication

@EnableConfigServer

@EnableEurekaClient

public class ConfigServerApplication {

    public static void main(String[] args) {

        SpringApplication.run(ConfigServerApplication.class, args);

    }

}
3)在上面工程基础上,修改配置。
server:

  port: 8683

#  port: 8684

spring:

  application:

    name: config-server

  cloud:

    config:

      server:

        git:

          uri: http://127.0.0.1/lilin/SpringCloudConfig.git

          search-paths: shared

          username: lilin

          password:

      label: master

eureka:

  client:

    service-url:

      defaultZone:

        http://127.0.0.1:8670/eureka/ # 实际开发中建议使用域名的方式
2、改造Config Client.
1)在上面工程基础上,加入Euraka Client依赖。
        <dependency>

            <groupId>org.springframework.cloud</groupId>

            <artifactId>spring-cloud-starter-netflix-eureka-client</artifactId>

        </dependency>
2)在上面工程基础上,修改启动项。
package com.cetc;

import org.springframework.boot.SpringApplication;

import org.springframework.boot.autoconfigure.SpringBootApplication;

import org.springframework.cloud.netflix.eureka.EnableEurekaClient;

@SpringBootApplication

@EnableEurekaClient

public class ConfigClientApplication {

    public static void main(String[] args) {

        SpringApplication.run(ConfigClientApplication.class, args);

    }

}
3)修改bootstrap.yaml配置文件。
spring:

  application:

    name: config-client

  cloud:

    config:

      fail-fast: true

      discovery:

        enabled: true

        service-id: config-server

eureka:

  client:

    service-url:

      defaultZone:

        http://127.0.0.1:8670/eureka/ # 实际开发中建议使用域名的方式
3、启动Eureka Server、2个Config Server、Config Client。端口8670,8683/8684、8685。

可以得知,启动一切正常。
测试接口:

五、使用Spring Cloud bus刷新配置。
        <dependency>

            <groupId>org.springframework.cloud</groupId>

            <artifactId>spring-cloud-starter-bus-amqp</artifactId>

        </dependency>

        <dependency>

            <groupId>org.springframework.boot</groupId>

            <artifactId>spring-boot-starter-actuator</artifactId>

        </dependency>
(2)修改配置文件bootstrap.yaml。
spring:

  application:

    name: config-client

  cloud:

    config:

      fail-fast: true

      discovery:

        enabled: true

        service-id: config-server

  rabbitmq:

    host: 127.0.0.1

    port: 5672

    username: admin

    password: admin

eureka:

  client:

    service-url:

      defaultZone:

        http://127.0.0.1:8670/eureka/ # 实际开发中建议使用域名的方式

management:

  endpoints:

    web:

      exposure:

        include: ["*"]
说明:目前Spring 2.0版本是通过actuator的接口进行外部访问的所以在使用的时候,一定要配置management.endpoints.web.exposure.include。
(3)在需要刷新配置的地方加入@RefreshScope注解,注意这个注解只针对于当前类生效。我们这里是获取的版本号所以在TestResource类加上。
package com.cetc.web.rest;

import org.springframework.beans.factory.annotation.Value;

import org.springframework.cloud.context.config.annotation.RefreshScope;

import org.springframework.web.bind.annotation.GetMapping;

import org.springframework.web.bind.annotation.RequestMapping;

import org.springframework.web.bind.annotation.RestController;

@RestController

@RequestMapping("/api/test")

@RefreshScope

public class TestResource {

    @Value("${version}")

    private String version;

    @GetMapping("/getVersion")

    public String getVersion() {

        return version;

    }

}
(4)测试。启动Eureka Server,2个Config Server,2个Config Client端口分别为8670,8683/8684,8685/8686。

访问两个接口为:

(5)刷新配置。我们修改Git的上面config-client.yaml的版本号为2.0。

通过PostMan发送POST请求http://127.0.0.1:8685/actuator/bus-refresh,进行刷新。
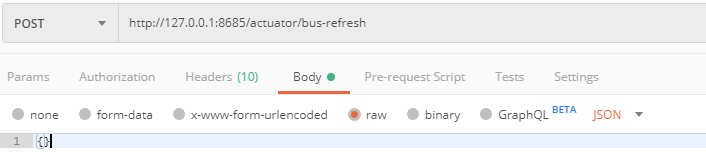
发送请求测试,等待刷新:

从上面可以看出,我想一个接口发送了刷新请求,结果全部实例都进行了刷新,这样的结果好处就是。一次更改,全部可刷新。
说明:通过对启动接口:

我们可以得知,刷新是可以带参数的。而这个参数的意思就是刷新特定实例参数。
比如:http://127.0.0.1:8685/actuator/bus-refresh?destination=config-client:**
六、总结:
1)Spring Cloud Config简单来说就是对配置的简单化,让配置集中化。
2)Spring Cloud Config通过Eureka可以实现集群化,达到高可用。
3)通过对客户端进行改造加入Bus总线,可以实现一次更改,多个服务实例的更新。避免了多个服务重启的问题。
4)Spring Cloud Config的配置获取方式有:本地(native)、Git、SVN、vault等方式。
七、源码地址:https://github.com/lilin409546297/spring-cloud/tree/master/config
Spring-Cloud之Config配置中心-7的更多相关文章
- Spring Cloud 2-Config 分布式配置中心(七)
Spring Cloud Config 1.github配置 2.服务端配置 pom.xml application.xml Application.java 3.配置和命名 1. 配置加载顺序 ...
- Spring Cloud Consul使用——配置中心
1.pom.xml <project xmlns="http://maven.apache.org/POM/4.0.0" xmlns:xsi="http://www ...
- spring cloud学习(六) 配置中心-自动更新
上一篇学习了spring cloud config的基本使用,但发现有个问题,就是每次更改配置后,都需要重启服务才能更新配置,这样肯定是不行的.在上网查资料了解后,spring cloud支持通过AM ...
- spring cloud学习(五) 配置中心
Spring Cloud Config为服务端和客户端提供了分布式系统的外部化配置支持.配置服务中心采用Git的方式存储配置文件,因此我们很容易部署修改,有助于对环境配置进行版本管理. 一.配置中心 ...
- Spring Cloud (6) 分布式配置中心-高可用
高可用 现在已经可以从配置中心读取配置文件了,当微服务很多时都从配置中心读取配置文件,这时可以将配置中心做成一个微服务,将其集群化,从而达到高可用. 改造config-server 加入eureka ...
- Spring Cloud (5) 分布式配置中心
Spring Cloud Config 在分布式系统中,由于服务数量很多,为了方便服务配置文件统一管理,实时更新,所以需要分布式配置中心组件.在Spring Cloud中,使用Spring Cloud ...
- spring cloud 集成分布式配置中心 apollo(单机部署apollo)
一.什么是apollo? Apollo(阿波罗)是携程框架部门研发的分布式配置中心,能够集中化管理应用不同环境.不同集群的配置,配置修改后能够实时推送到应用端,并且具备规范的权限.流程治理等特性,适用 ...
- Spring Cloud Gateway 结合配置中心限流
前言 上篇文章我讲过复杂的限流场景可以通过扩展RedisRateLimiter来实现自己的限流策略. 假设你领导给你安排了一个任务,具体需求如下: 针对具体的接口做限流 不同接口限流的力度可以不同 可 ...
- Spring Cloud之分布式配置中心
用服务的方式来实现 ConfigAppApplication.java package com.packtpub.ConfigApp; import org.springframework.boot. ...
- Spring Cloud Alibaba nacos 配置中心使用
背景 上一文我们讲到了如何去搭建注册中心,这一次我们讲述如何使用nacos作为注册中心 spring-cloud-alibaba-basis 创建基础依赖 首先我们创建一个spring-cloud-a ...
随机推荐
- 【BigData】Java基础_循环
1.for循环 语法: for (初始表达式;布尔表达式;步进) { 循环体: } 实例: package cn.test.logan.day02; import java.util.Scanner; ...
- windows安装IIS不成功的原因
一.背景 之前做过一段时间的实施,因此总结一下IIS安装不成功会有哪些原因导致的,希望给踩坑的人提供思路和帮助. 二.分析原因 1.系统问题,比如Windows家庭版本(独白:我之前花了一天的时间安装 ...
- How to Install Ruby on CentOS/RHEL 7/6
How to Install Ruby on CentOS/RHEL 7/6 . Ruby is a dynamic, object-oriented programming language foc ...
- KMS服务器激活
https://blog.csdn.net/weixin_42588262/article/details/81120403 http://kms.cangshui.net/ https://kms. ...
- jQuery-webcam使用
基本页面 <!DOCTYPE html> <html> <head> <meta charset="utf-8"> <meta ...
- Python 技术篇-pip版本查看和升级
一.pip show pip查看pip版本,下面还提示安装命令和pip可以升级到的最新版本. 二.python -m pip install --upgrade pip升级我们的pip
- Tensorflow不能使用GPU的解决办法
转载:https://blog.csdn.net/kudou1994/article/details/86735451 服务器在训练模型,另一边我在瞎胡乱搞不晓得咋个搞的,就不能使用GPU了.pyth ...
- 第一次使用markdown
一级标题 二级标题 三家标题 四级标题 五级标题 六级标题 用两个空格来换行 斜体字 斜体字 加粗字体 加粗字体 斜体加粗字体 斜体加粗字体 无序列表用*或者+或者-: 第一箱 第二项 第三项 第四项 ...
- Archer代码生成器前端
import {getList, getDetail, add, update, remove} from "@/api/sales/sales"; import {getList ...
- Java之数组类型
如果我们有一组类型相同的变量.例如,5位同学的成绩,可以这么写 public class Main { public static void main(String[] args) { // 5位同学 ...