
Spring Security简介与入门Demo
1:Spring Security简介
Spring Security是一个能够为基于Spring的企业应用系统提供声明式的安全访问控制解决方案的安全框架。它提供了一组可以在Spring应用上下文中配置的Bean,充分利用了Spring IoC,DI(控制反转Inversion of Control ,DI:Dependency Injection 依赖注入)和AOP(面向切面编程)功能,为应用系统提供声明式的安全访问控制功能,减少了为企业系统安全控制编写大量重复代码的工作。
1.2 Spring Security入门Demo
1.2.1最简单Demo
(1)创建工程spring-security-demo ,在pom.xml中添加依赖内容
<properties>

   <webVersion>3.0</webVersion>

<spring.version>4.2..RELEASE</spring.version>

</properties>

<dependencies>

<dependency>

<groupId>org.springframework</groupId>

<artifactId>spring-core</artifactId>

<version>${spring.version}</version>

</dependency>

<dependency>

<groupId>org.springframework</groupId>

<artifactId>spring-web</artifactId>

<version>${spring.version}</version>

</dependency>

<dependency>

<groupId>org.springframework</groupId>

<artifactId>spring-webmvc</artifactId>

<version>${spring.version}</version>

</dependency>

<dependency>

<groupId>org.springframework</groupId>

<artifactId>spring-context-support</artifactId>

<version>${spring.version}</version>

</dependency>

<dependency>

<groupId>org.springframework</groupId>

<artifactId>spring-test</artifactId>

<version>${spring.version}</version>

</dependency>

<dependency>

<groupId>org.springframework</groupId>

<artifactId>spring-jdbc</artifactId>

<version>${spring.version}</version>

</dependency>

<dependency>

<groupId>org.springframework.security</groupId>

<artifactId>spring-security-web</artifactId>

<version>4.1..RELEASE</version>

</dependency>

<dependency>

<groupId>org.springframework.security</groupId>

<artifactId>spring-security-config</artifactId>

<version>4.1..RELEASE</version>

</dependency>

<dependency>

<groupId>javax.servlet</groupId>

<artifactId>servlet-api</artifactId>

<version>2.5</version>

<scope>provided</scope>

</dependency>

</dependencies>

  <build>

    <plugins>

      <plugin>

        <artifactId>maven-compiler-plugin</artifactId>

        <configuration>

          <source>1.8</source>

          <target>1.8</target>

        </configuration>

      </plugin>

       <plugin>

<groupId>org.apache.tomcat.maven</groupId>

<artifactId>tomcat7-maven-plugin</artifactId>

<configuration>

<!-- 指定端口 -->

<port></port>

<!-- 请求路径 -->

<path>/</path>

</configuration>

     </plugin>

    </plugins>

  </build>
(2)创建web.xml
注意过滤器名字必须固定为:springSecurityFilterChain
<?xml version="1.0" encoding="UTF-8"?>

<web-app xmlns:xsi="http://www.w3.org/2001/XMLSchema-instance"

xmlns="http://java.sun.com/xml/ns/javaee"

xsi:schemaLocation="http://java.sun.com/xml/ns/javaee http://java.sun.com/xml/ns/javaee/web-app_2_5.xsd"

version="2.5">

    <context-param>

<param-name>contextConfigLocation</param-name>

<param-value>classpath:spring-security.xml</param-value>

 </context-param>

 <listener>

<listener-class>

org.springframework.web.context.ContextLoaderListener

</listener-class>

 </listener>

 <filter>

<filter-name>springSecurityFilterChain</filter-name>    <filter-class>org.springframework.web.filter.DelegatingFilterProxy</filter-class>

 </filter>

 <filter-mapping>

<filter-name>springSecurityFilterChain</filter-name>

<url-pattern>/*</url-pattern>

 </filter-mapping>

</web-app>
(3)创建index.html
<!DOCTYPE html>

<html>

<head>

<meta charset="UTF-8">

<title>主页</title>

</head>

<body>

<h1>主页面,登录成功</h1>

</body>

</html>
(4)创建spring 配置文件spring-security.xml
<?xml version="1.0" encoding="UTF-8"?>

<beans:beans xmlns="http://www.springframework.org/schema/security"

xmlns:beans="http://www.springframework.org/schema/beans" xmlns:xsi="http://www.w3.org/2001/XMLSchema-instance"

xsi:schemaLocation="http://www.springframework.org/schema/beans http://www.springframework.org/schema/beans/spring-beans.xsd

http://www.springframework.org/schema/security http://www.springframework.org/schema/security/spring-security.xsd">

<!-- 配置 favicon.ico不进行安全拦截-->

<http pattern="/favicon.ico" security="none"/>

<!-- 页面拦截规则 -->

<http use-expressions="false">

<intercept-url pattern="/**" access="ROLE_USER" />

//form-login  为开启表单登陆

<form-login/>

</http>

<!-- 认证管理器 -->

<authentication-manager>

<authentication-provider>

<user-service>

<user name="admin" password="" authorities="ROLE_USER"/>

</user-service>

</authentication-provider>

</authentication-manager>

</beans:beans>
此案例我们没有登录页,而是使用了系统自动生成的登陆页,效果如下:
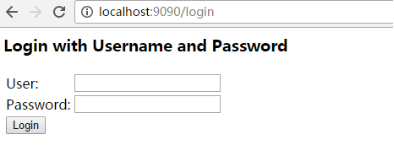
配置说明:
intercept-url 表示拦截页面
/* 表示的是该目录下的资源,只包括本级目录不包括下级目录
/** 表示的是该目录以及该目录下所有级别子目录的资源
form-login 为开启表单登陆
use-expressions 为是否使用使用 Spring 表达式语言( SpEL ),默认为true ,如果开启,则拦截的配置应该写成以下形式
<intercept-url pattern="/**" access="ROLE_USER" />
1.2.2用户自定义登录页
ROLE_USER:必须验证具备该角色后才能访问,注意角色名称必须以ROLE_开头
实际开发中,我们不可能使用系统生成的登录页,而是使用我们自己的登录页。
(1)构建登陆页:login.html
<!DOCTYPE html>

<html>

<head>

<meta http-equiv="Content-Type" content="text/html; charset=UTF-8">

<title>登陆</title>

</head>

<body>

<form action='/login' method='POST'>

<table>

<tr>

<td>用户名:</td>

<td><input type='text' name='username' value=''></td>

</tr>

<tr>

<td>密码:</td>

<td><input type='password' name='password' /></td>

</tr>

<tr>

<td colspan=''><input name="submit" type="submit"

value="登陆" /></td>

</tr>

</table>

</form>

</body>

</html>
(2)构建登陆失败页 login_error.html(内容略)注意:登录提交地址/login 改地址由SpringSecurity生成,提交方法必须是POST
(3)修改 spring 配置文件spring-security.xml
<?xml version="1.0" encoding="UTF-8"?>

<beans:beans xmlns="http://www.springframework.org/schema/security"

xmlns:beans="http://www.springframework.org/schema/beans" xmlns:xsi="http://www.w3.org/2001/XMLSchema-instance"

xsi:schemaLocation="http://www.springframework.org/schema/beans http://www.springframework.org/schema/beans/spring-beans.xsd

http://www.springframework.org/schema/security http://www.springframework.org/schema/security/spring-security.xsd">

<!-- 配置 favicon.ico,security="none"设置此资源不进行安全拦截-->

<http pattern="/favicon.ico" security="none"/>

<!-- 登录页和登录失败页不进行安全拦截 -->

<http pattern="/login.html" security="none"></http>

<http pattern="/login_error.html" security="none"></http>

<!-- 页面拦截规则 -->

<http use-expressions="false">

<intercept-url pattern="/**" access="ROLE_USER" />

<form-login login-page="/login.html" default-target-url="/index.html" always-use-default-target="true" authentication-failure-url="/login_error.html"/>

    <csrf disabled="true"/>

</http>

<!-- 认证管理器 -->

<authentication-manager>

<authentication-provider>

<user-service>

<user name="admin" password="" authorities="ROLE_USER"/>

</user-service>

</authentication-provider>

</authentication-manager>

</beans:beans>
security="none" 设置此资源不被拦截.
如果你没有设置登录页security="none" ,将会出现以下错误
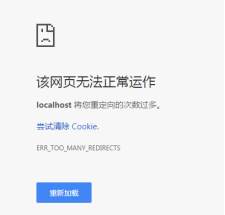
因为登录页会被反复重定向。
login-page:指定登录页面。
authentication-failure-url:指定了身份验证失败时跳转到的页面。
default-target-url:指定了成功进行身份验证和授权后默认呈现给用户的页面。
csrf disabled="true" 关闭csrf ,如果不加会出现错误

CSRF(Cross-site request forgery)跨站请求伪造,也被称为“One Click Attack”或者Session Riding,通常缩写为CSRF或者XSRF,是一种对网站的恶意利用。
Spring Security简介与入门Demo的更多相关文章
- Spring Security极简入门三部曲(上篇)
目录 Spring Security极简入门三部曲(上篇) 写在前面 为什么要用Spring Security 数据库设计 demo时刻 核心代码讲解 小结 Spring Security极简入门三部 ...
- Spring Security极简入门三部曲(中篇)
目录 Spring Security极简入门三部曲(中篇) 验证流程 Authentication接口 过滤器链 AuthenticationProvider接口: demo时刻 代码讲解 小结 Sp ...
- Spring Security 简介
本文引自:https://blog.csdn.net/xlecho/article/details/80026527 在 Web 应用开发中,安全一直是非常重要的一个方面.安全虽然属于应用的非功能性需 ...
- 转 Spring Security 简介
https://blog.csdn.net/xlecho/article/details/80026527 Spring Security 简介 2018年04月21日 09:53:02 阅读数:13 ...
- 笔记43 Spring Security简介
基于Spittr应用 一.Spring Security简介 Spring Security是为基于Spring的应用程序提供声明式安全保护的安全 性框架.Spring Security提供了完整的安 ...
- 适合新手入门Spring Security With JWT的Demo
Demo 地址:https://github.com/Snailclimb/spring-security-jwt-guide .欢迎 star! Spring Security 是Spring 全家 ...
- springboot集成spring security安全框架入门篇
一. :spring security的简介 Spring Security是一个能够为基于Spring的企业应用系统提供声明式的安全访问控制解决方案的安全框架.它提供了一组可以在Spring应用上下 ...
- Spring Security Web应用入门环境搭建
在使用Spring Security配置Web应用之前,首先要准备一个基于Maven的Spring框架创建的Web应用(Spring MVC不是必须的),本文的内容都是基于这个前提下的. pom.xm ...
- spring security oauth2 搭建认证中心demo
oauth2 介绍 oauth2 协议应该是开发者们耳熟能详的协议了,这里就不做过多的介绍了,具体介绍如何在spring security中搭建oauth2的认证服务.Spring-Securit ...
随机推荐
- Linux磁盘系统——磁盘系统简介
Linux磁盘系统——磁盘系统简介 摘要:本文主要学习了Linux系统中有关磁盘的一些知识. 文件系统 说明 硬盘是用来存储数据的,可以将其想象成柜子,只不过柜子是用来存储衣物的.新买来的硬盘,通常要 ...
- ASP.NET Core系列:日志
1. NLog 添加安装包: Install-Package NLog.Web.AspNetCore <?xml version="1.0" encoding="u ...
- QT4.8.7和VS2010环境搭建及使用
(一)环境搭建 首先下载QT4.8.7的安装包.QT Addin 1.11插件和VS2010安装包.第一步:安装好VS2010第二步:安装QT4.8.7(qt-opensource-windows-x ...
- React入门(二)
组件的生命周期 概念:在组件创建.到加载到页面运行.以及组件被销毁的过程中伴随的事件.组件的生命周期是指在组件的特定时期触发的事件. 组件的生命周期分为三个部分: 组件创建阶段:只执行一次 compo ...
- maven 学习---使用Maven创建Web应用程序项目
在本教程中,我们将演示如何使用 Maven 创建一个 Java Web 项目(Spring MVC). 用到的技术/工具: Maven 3.3.3 Eclipse 4.3 JDK 8 Spring 4 ...
- 【PHP】关于系统性能追踪工具molten
一.简介 关于molten的介绍网上有很多,是一个全链路追踪的工具,Molten可以看做是phptrace的的升级版(流行的php问题定位工具譬如phptrace,xhprof,这些工具可以自行Goo ...
- nginx反向代理和负载均衡的基本配置
一.反向代理的基本配置 在原本默认的nginx上修改server配置 server { listen 2222;#监听请求端口 server_name 192.168.100.3;#监听请求地址,ng ...
- jenkins使用小技巧:jenkins构建出来的war/jar包如何带上SVN号?
在实际使用过程中,一般会这样比如说打出来的包是 mypackage.jar, 但是每次打出来都是固定的 mypackage.jar如何来区分和上一个包的区别呢? 一般来说,会把打出来的包带上个 svn ...
- DNS解惑之基本概念(1)
常见问题 1.域名对应的IP地址修改完要将近一天的时间才能有效果? DNS的数据库通常是在跑在DNS服务器的内存当中的,但是我们如果临时增加一条的话其实是写到了硬盘当中,当数据库服务刷新的时候新增的新 ...
- 201871010121-王方-《面向对象程序设计java》第十六周实验总结
项目 内容 这个作业属于哪个课程 https://www.cnblogs.com/nwnu-daizh 这个作业的要求在哪里 https://www.cnblogs.com/nwnu-daizh/p/ ...