JAVA实用案例之验证码开发
验证码在很多地方都会遇到,实现的方法和形式也有很多,主要的目的就是为了安全,防止一些恶意的攻击等。说实话那么多年竟然没注意过这东西,原理很简单,贴出来给大家做个参考。
1、简单介绍
一般稍微有些经验的程序员都不会再自己写原生验证码生成了,因为各种强大的开源组件,足以解决我们大部分的需求。但是,毕竟也是刚接触这东西,还需要从原理入手的。
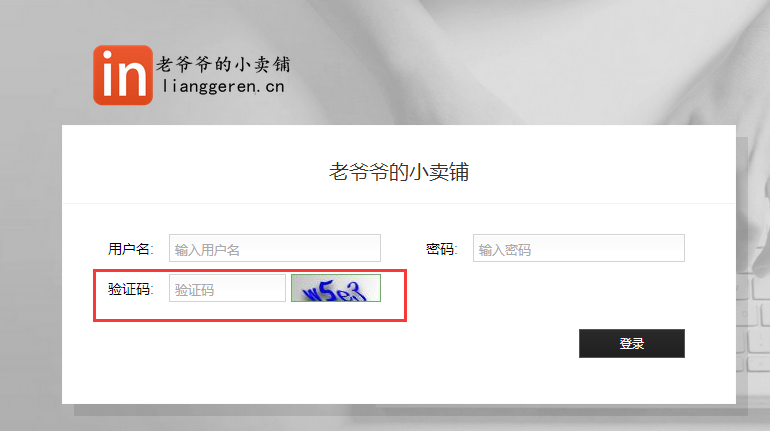
项目效果图:
下面我就简单介绍下原生和使用开源项目kaptcha生成验证码的两种形式。
2、jdk原生生成验证码
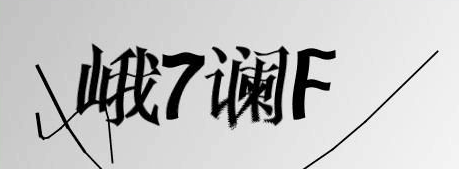
效果:

2.1 验证码生成的流程
1、定义BufferedImage(图像数据缓冲区)对象
2、获得Graphics对象
3、随机生成验证码字母或者数字
4、使用Graphics绘制图片
5、记录验证码信息到session或数据库,以便校验
5、ImageIO输出图片到客户端
2.2 代码讲解
这里我就不整合框架了,简单用servlet讲下步骤,框架中也是这样做
public void doGet(HttpServletRequest request, HttpServletResponse response) throws IOException{

        //定义BufferedImage(图像数据缓冲区)对象

        BufferedImage bi = new BufferedImage(68,22,BufferedImage.TYPE_INT_RGB);

        //绘制图片

        Graphics g = bi.getGraphics();

        //背景色

        Color c = new Color(200,150,255);

        g.setColor(c);

        //图片坐标

        g.fillRect(0, 0, 68, 22);

        //验证码选取

        char[] ch = "ABCDEFGHIJKLMNOPQRSTUVWXYZ0123456789".toCharArray();

        Random r = new Random();

        int len=ch.length,index;

        StringBuffer sb = new StringBuffer();

        for(int i=0; i<4; i++){

            index = r.nextInt(len);

            g.setColor(new Color(r.nextInt(88),r.nextInt(188),r.nextInt(255)));

            Font ft = new Font(Font.SANS_SERIF, Font.BOLD, 16);

            g.setFont(ft);

            g.drawString(ch[index]+"", (i*15)+3, 18);

            sb.append(ch[index]);

        }
        //打印验证码,项目中用日志

        System.out.println(sb.toString());
     //验证码写到session

        request.getSession().setAttribute("checkCode", sb.toString());

        //ImageIO写出图片

        ImageIO.write(bi, "JPG", response.getOutputStream());

    }
jsp:
 <form action="XX" method="get">

    验证码:<input type="text" name="checkcode"/>

    <img alt="点击更换验证码" id="imagecode" onclick="this.src='/servlet/ImageServlet?random='+Math.random();" src="/servlet/ImageServlet"/>

    <input type="submit" value="提交">

  </form>
相信稍微有些经验的同学看过上面的代码都能理解其中的原理吧。至于后面的校验相信大家都会的。
下面我重点讲下使用kaptcha开源组件生成验证码的流程,这里我会用servlet和springboot+springmvc的方式分别进行下介绍。
3、使用kaptcha组件生成验证码
既然说到开源组件,必然功能是强大的,还是先看效果图!
数字字母组合

数字字母汉字组合
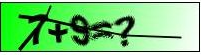
算数计算
3.1 kaptcha的参数详解
| Constant | 描述 | 默认值 |
| kaptcha.border | 图片边框,合法值:yes , no | yes |
| kaptcha.border.color | 边框颜色,合法值: r,g,b (and optional alpha) 或者 white,black,blue. | black |
| kaptcha.border.thickness | 边框厚度,合法值:>0 | 1 |
| kaptcha.image.width | 图片宽 | 200 |
| kaptcha.image.height | 图片高 | 50 |
| kaptcha.producer.impl | 图片实现类 | com.google.code.kaptcha.impl.DefaultKaptcha |
| kaptcha.textproducer.impl | 文本实现类 | com.google.code.kaptcha.text.impl.DefaultTextCreator |
| kaptcha.textproducer.char.string | 文本集合,验证码值从此集合中获取 | abcde2345678gfynmnpwx |
| kaptcha.textproducer.char.length | 验证码长度 | 5 |
| kaptcha.textproducer.font.names | 字体 | Arial, Courier |
| kaptcha.textproducer.font.size | 字体大小 | 40px |
| kaptcha.textproducer.font.color | 字体颜色,合法值: r,g,b 或者 white,black,blue. | black |
| kaptcha.textproducer.char.space | 文字间隔 | 2 |
| kaptcha.noise.impl | 干扰实现类 | com.google.code.kaptcha.impl.DefaultNoise |
| kaptcha.noise.color | 干扰颜色,合法值: r,g,b 或者 white,black,blue. | black |
| kaptcha.obscurificator.impl | 图片样式: 水纹com.google.code.kaptcha.impl.WaterRipple 鱼眼com.google.code.kaptcha.impl.FishEyeGimpy 阴影com.google.code.kaptcha.impl.ShadowGimpy |
com.google.code.kaptcha.impl.WaterRipple |
| kaptcha.background.impl | 背景实现类 | com.google.code.kaptcha.impl.DefaultBackground |
| kaptcha.background.clear.from | 背景颜色渐变,开始颜色 | light grey |
| kaptcha.background.clear.to | 背景颜色渐变,结束颜色 | white |
| kaptcha.word.impl | 文字渲染器 | com.google.code.kaptcha.text.impl.DefaultWordRenderer |
| kaptcha.session.key | session key | KAPTCHA_SESSION_KEY |
| kaptcha.session.date | session date | KAPTCHA_SESSION_DATE |
3.2 代码讲解
1、servlet方式

上图可以看到,kaptcha处理验证码的类是KaptchaServlet。这里我们就可以像原生的方式一样直接请求这个servlet,这里主要讲下使用servlet和使用框架的时候参数配置是不用的,servlet的是配置在web.xml中的,形式如下:
<?xml version="1.0" encoding="UTF-8"?>

<web-app version="2.4" xmlns="http://java.sun.com/xml/ns/j2ee"

    xmlns:xsi="http://www.w3.org/2001/XMLSchema-instance"

    xsi:schemaLocation="http://java.sun.com/xml/ns/j2ee

    http://java.sun.com/xml/ns/j2ee/web-app_2_4.xsd">

    <!-- 登陆验证码Kaptcha 2-->

    <servlet>

        <servlet-name>Kaptcha</servlet-name>

        <servlet-class>

            com.google.code.kaptcha.servlet.KaptchaServlet

        </servlet-class>

        <init-param>

            <description>图片边框,合法值:yes , no</description>

            <param-name>kaptcha.border</param-name>

            <param-value>yes</param-value>

        </init-param>

        <init-param>

            <description>

                边框颜色,合法值: r,g,b (and optional alpha) 或者

                white,black,blue.

            </description>

            <param-name>kaptcha.border.color</param-name>

            <param-value>black</param-value>

        </init-param>

        <init-param>

            <description>边框厚度,合法值:>0</description>

            <param-name>kaptcha.border.thickness</param-name>

            <param-value>1</param-value>

        </init-param>

        <init-param>

            <description>图片宽 200</description>

            <param-name>kaptcha.image.width</param-name>

            <param-value>200</param-value>

        </init-param>

        <init-param>

            <description>图片高 50</description>

            <param-name>kaptcha.image.height</param-name>

            <param-value>50</param-value>

        </init-param>

        <init-param>

            <description>图片实现类</description>

            <param-name>kaptcha.producer.impl</param-name>

            <param-value>

                com.google.code.kaptcha.impl.DefaultKaptcha

            </param-value>

        </init-param>

        <init-param>

            <description>文本实现类</description>

            <param-name>kaptcha.textproducer.impl</param-name>

            <param-value>

                com.google.code.kaptcha.text.impl.DefaultTextCreator

            </param-value>

        </init-param>

        <init-param>

            <description>验证码长度 5</description>

            <param-name>kaptcha.textproducer.char.length</param-name>

            <param-value>5</param-value>

        </init-param>

        <init-param>

            <description>字体 Arial, Courier</description>

            <param-name>kaptcha.textproducer.font.names</param-name>

            <param-value>Arial, Courier</param-value>

        </init-param>

        <init-param>

            <description>字体大小 40px.</description>

            <param-name>kaptcha.textproducer.font.size</param-name>

            <param-value>40</param-value>

        </init-param>

        <init-param>

            <description>

                字体颜色,合法值: r,g,b 或者 white,black,blue.

            </description>

            <param-name>kaptcha.textproducer.font.color</param-name>

            <param-value>black</param-value>

        </init-param>

        <init-param>

            <description>文字间隔 2</description>

            <param-name>kaptcha.textproducer.char.space</param-name>

            <param-value>2</param-value>

        </init-param>

        <init-param>

            <description>干扰实现类</description>

            <param-name>kaptcha.noise.impl</param-name>

            <param-value>

                com.google.code.kaptcha.impl.DefaultNoise

            </param-value>

        </init-param>

        <init-param>

            <description>

                干扰颜色,合法值: r,g,b 或者 white,black,blue.

            </description>

            <param-name>kaptcha.noise.color</param-name>

            <param-value>black</param-value>

        </init-param>

        <init-param>

            <description>

                图片样式: 水纹com.google.code.kaptcha.impl.WaterRipple

                鱼眼com.google.code.kaptcha.impl.FishEyeGimpy

                阴影com.google.code.kaptcha.impl.ShadowGimpy

            </description>

            <param-name>kaptcha.obscurificator.impl</param-name>

            <param-value>

                com.google.code.kaptcha.impl.WaterRipple

            </param-value>

        </init-param>

        <init-param>

            <description>背景实现类</description>

            <param-name>kaptcha.background.impl</param-name>

            <param-value>

                com.google.code.kaptcha.impl.DefaultBackground

            </param-value>

        </init-param>

        <init-param>

            <description>背景颜色渐变,开始颜色</description>

            <param-name>kaptcha.background.clear.from</param-name>

            <param-value>green</param-value>

        </init-param>

        <init-param>

            <description>背景颜色渐变,结束颜色</description>

            <param-name>kaptcha.background.clear.to</param-name>

            <param-value>white</param-value>

        </init-param>

        <init-param>

            <description>文字渲染器</description>

            <param-name>kaptcha.word.impl</param-name>

            <param-value>

                com.google.code.kaptcha.text.impl.DefaultWordRenderer

            </param-value>

        </init-param>

        <init-param>

            <description>

                session中存放验证码的key键

            </description>

            <param-name>kaptcha.session.key</param-name>

            <param-value>KAPTCHA_SESSION_KEY</param-value>

        </init-param>

        <init-param>

            <description>

                The date the kaptcha is generated is put into the

                HttpSession. This is the key value for that item in the

                session.

            </description>

            <param-name>kaptcha.session.date</param-name>

            <param-value>KAPTCHA_SESSION_DATE</param-value>

        </init-param>

    </servlet>

    <servlet-mapping>

        <servlet-name>Kaptcha</servlet-name>

        <url-pattern>/randomcode.jpg</url-pattern>

    </servlet-mapping>

    <welcome-file-list>

        <welcome-file>index.jsp</welcome-file>

    </welcome-file-list>

</web-app>
2、使用springboot+springmvc框架
这里新建一个maven项目,添加依赖
<dependency>

    <groupId>com.github.penggle</groupId>

    <artifactId>kaptcha</artifactId>

    <version>2.3.2</version>

</dependency>
controller:
@Controller

public class UserController {

    @Autowired

    private Producer captchaProducer;

    @RequestMapping("/ran/random")

    public void checkCode(HttpServletRequest request,HttpServletResponse response) throws IOException{

        byte[] captchaChallengeAsJpeg = null;

        ByteArrayOutputStream jpegOutputStream = new ByteArrayOutputStream();

        try {

            //生产验证码字符串并保存到session中

            String createText = captchaProducer.createText();

            request.getSession().setAttribute("checkCode", createText);

            //使用生产的验证码字符串返回一个BufferedImage对象并转为byte写入到byte数组中

            BufferedImage challenge = captchaProducer.createImage(createText);

            ImageIO.write(challenge, "jpg", jpegOutputStream);

        } catch (IllegalArgumentException e) {

            response.sendError(response.SC_NOT_FOUND);

            return;

        }

        //定义response输出类型为image/jpeg类型,使用response输出流输出图片的byte数组

        captchaChallengeAsJpeg = jpegOutputStream.toByteArray();

        response.setHeader("Cache-Control", "no-store");

        response.setHeader("Pragma", "no-cache");

        response.setDateHeader("Expires", 0);

        response.setContentType("image/jpeg");

        ServletOutputStream responseOutputStream =

                response.getOutputStream();

        responseOutputStream.write(captchaChallengeAsJpeg);

        responseOutputStream.flush();

        responseOutputStream.close();

    }

}
配置类CaptchaConfig:
这里@value是为了将相关属性写进application.properties,避免硬编码,为了方便测试我先注掉
package com.allan.base;

import java.util.Properties;

import org.springframework.beans.factory.annotation.Value;

import org.springframework.context.annotation.Bean;

import org.springframework.context.annotation.Configuration;

import com.google.code.kaptcha.impl.DefaultKaptcha;

import com.google.code.kaptcha.util.Config;

/**

 * 验证码配置类

 * @author zhangzhuo

 *

 */

@Configuration

public class CaptchaConfig {

    @Value("${kaptcha.border}")

    private  String  border;

    @Value("${kaptcha.border.color}")

    private  String  borderColor;

    @Value("${kaptcha.textproducer.font.color}")

    private  String  fontColor;

    @Value("${kaptcha.image.width}")

    private  String  imageWidth;

    @Value("${kaptcha.image.height}")

    private  String  imageHeight;

    @Value("${kaptcha.session.key}")

    private  String  sessionKey;

    @Value("${kaptcha.textproducer.char.length}")

    private  String  charLength;

    @Value("${kaptcha.textproducer.font.names}")

    private  String  fontNames;

    @Bean(name="captchaProducer")

    public DefaultKaptcha getKaptchaBean(){

        DefaultKaptcha defaultKaptcha=new DefaultKaptcha();

        Properties properties=new Properties();

      /*  properties.setProperty("kaptcha.border", border);

        properties.setProperty("kaptcha.border.color", borderColor);

        properties.setProperty("kaptcha.textproducer.font.color", fontColor);

        properties.setProperty("kaptcha.image.width", imageWidth);

        properties.setProperty("kaptcha.image.height", imageHeight);

        properties.setProperty("kaptcha.session.key", sessionKey);

        properties.setProperty("kaptcha.textproducer.char.length", charLength);

        properties.setProperty("kaptcha.textproducer.font.names", fontNames);

        properties.setProperty("kaptcha.textproducer.font.size", "30"); */

        properties.setProperty("kaptcha.border", "yes");

        properties.setProperty("kaptcha.border.color", "105,179,90");

        properties.setProperty("kaptcha.textproducer.font.color", "blue");

        properties.setProperty("kaptcha.image.width", "90");

        properties.setProperty("kaptcha.image.height", "28");

        properties.setProperty("kaptcha.textproducer.font.size", "28");

        properties.setProperty("kaptcha.session.key", "code");

        properties.setProperty("kaptcha.textproducer.char.length", "4");

        properties.setProperty("kaptcha.textproducer.char.space", "2");

        properties.setProperty("kaptcha.obscurificator.impl", "com.google.code.kaptcha.impl.ShadowGimpy");

        properties.setProperty("kaptcha.noise.impl", "com.google.code.kaptcha.impl.NoNoise");

        properties.setProperty("kaptcha.textproducer.font.names", "宋体,楷体,微软雅黑");

        Config config=new Config(properties);

        defaultKaptcha.setConfig(config);

        return defaultKaptcha;

    }

}
启动类:
package com.allan.server;

import org.mybatis.spring.annotation.MapperScan;

import org.springframework.boot.SpringApplication;

import org.springframework.boot.autoconfigure.EnableAutoConfiguration;

import org.springframework.context.annotation.ComponentScan;

@EnableAutoConfiguration

@ComponentScan(basePackages = {"com.allan.controller","com.allan.service","com.allan.base"})

@MapperScan(basePackages = "com.allan.mapper")

public class StartApp {

    public static void main(String[] args) {

        SpringApplication.run(StartApp.class, args);

    }

}
jsp:
<p class="main">

      <label>验证码: </label> <input name="randomCode"

               onkeyup="enterSubmit(event)" placeholder="验证码"

                style="width: 105px;" maxlength="4" /> <span class="yzm-pic">

      <img src="/ran/random" alt="验证码,点击图片更换"

                            onclick="this.src='/ran/random?random='+Math.random();" />

                        </span>

</p>
最终的效果图:
最后说下springboot除了上面写代码的形式还可以写成下面的配置文件:
可以定义applicationcontext-check.xml
<?xml version="1.0" encoding="UTF-8"?>

<beans xmlns="http://www.springframework.org/schema/beans"

    xmlns:xsi="http://www.w3.org/2001/XMLSchema-instance"

    xsi:schemaLocation="http://www.springframework.org/schema/beans http://www.springframework.org/schema/beans/spring-beans.xsd">

    <bean id="captchaProducer" class="com.google.code.kaptcha.impl.DefaultKaptcha">

        <property name="config">

            <bean class="com.google.code.kaptcha.util.Config">

                <constructor-arg type="java.util.Properties">

                    <props>

                        <prop key = "kaptcha.border ">yes</prop>

                            <prop key="kaptcha.border.color">105,179,90</prop>

                            <prop key="kaptcha.textproducer.font.color">blue</prop>

                            <prop key="kaptcha.image.width">100</prop>

                            <prop key="kaptcha.image.height">50</prop>

                            <prop key="kaptcha.textproducer.font.size">27</prop>

                            <prop key="kaptcha.session.key">code</prop>

                            <prop key="kaptcha.textproducer.char.length">4</prop>

                            <prop key="kaptcha.textproducer.font.names">宋体,楷体,微软雅黑</prop>

                            <prop key="kaptcha.textproducer.char.string">0123456789ABCEFGHIJKLMNOPQRSTUVWXYZ</prop>

                            <prop key="kaptcha.obscurificator.impl">com.google.code.kaptcha.impl.WaterRipple</prop>

                            <prop key="kaptcha.noise.color">black</prop>

                            <prop key="kaptcha.noise.impl">com.google.code.kaptcha.impl.DefaultNoise</prop>

                            <prop key="kaptcha.background.clear.from">185,56,213</prop>

                            <prop key="kaptcha.background.clear.to">white</prop>

                            <prop key="kaptcha.textproducer.char.space">3</prop>

                    </props>

                </constructor-arg>

            </bean>

        </property>

    </bean>

</beans>
如果写配置文件,这边在启动的时候需要引入配置文件
@ImportResource(locations={"classpath:applicationcontext-check.xml"})
基本上就是这些,至于汉字组合或者计算形式的验证码,这边我们只要实现kaptcha.textproducer.impl和com.google.code.kaptcha.servlet.KaptchaServlet这两个类就行了,大家可以看下源码,很简单的。
最后的最后,如果有对于springboot不熟悉的同学可以看下我整理的这些文章,相信会有些帮助的http://www.cnblogs.com/allanzhang/category/1000281.html
jdk版源码:https://git.oschina.net/allanzhang/checkcode.git
JAVA实用案例之验证码开发的更多相关文章
- JAVA实用案例之水印开发
写在最前面 上周零零碎碎花了一周的时间研究水印的开发,现在终于写了个入门级的Demo,做下笔记同时分享出来供大家参考. Demo是在我上次写的 JAVA实用案例之文件导入导出(POI方式) 框架基础上 ...
- JAVA实用案例之图片水印开发
写在最前面 上周零零碎碎花了一周的时间研究水印的开发,现在终于写了个入门级的Demo,做下笔记同时分享出来供大家参考. Demo是在我上次写的 JAVA实用案例之文件导入导出(POI方式) 框架基础上 ...
- JAVA实用案例之文件导出(JasperReport踩坑实录)
写在最前面 想想来新公司也快五个月了,恍惚一瞬间. 翻了翻博客,因为太忙,也有将近五个多月没认真总结过了. 正好趁着今天老婆出门团建的机会,记录下最近这段时间遇到的大坑-JasperReport. 六 ...
- JAVA实用案例之邮件发送
最近有朋友问邮件怎么发送,就简单写了个demo,因为懒得找jar包,所以项目是创建的maven工程,具体的maven引用的jar如下: <dependency> <groupId&g ...
- JAVA实用案例之文件导入导出(POI方式)
1.介绍 java实现文件的导入导出数据库,目前在大部分系统中是比较常见的功能了,今天写个小demo来理解其原理,没接触过的同学也可以看看参考下. 目前我所接触过的导入导出技术主要有POI和iRepo ...
- 基于TP5.1实用案例及教程
推荐<基于TP5.1实用案例及教程>书 目录: 通用封装 Export通用封装Import通用封装配合Import通用封装的ImportBaseVerify类Files通用封装Direct ...
- SLG手游Java服务器的设计与开发——架构分析
微信公众号[程序员江湖] 作者黄小斜,斜杠青年,某985硕士,阿里 Java 研发工程师,于 2018 年秋招拿到 BAT 头条.网易.滴滴等 8 个大厂 offer,目前致力于分享这几年的学习经验. ...
- Java or Python?测试开发工程师如何选择合适的编程语言?
很多测试开发工程师尤其是刚入行的同学对编程语言和技术栈选择问题特别关注,毕竟掌握一门编程语言要花不少时间成本,也直接关系到未来的面试和就业(不同企业/项目对技术栈要求也不一样),根据自身情况做一个相对 ...
- SQL Delta实用案例介绍,很好的东西,帮了我不少忙
SQL Delta实用案例介绍 概述 本篇文章主要介绍SQL DELTA的简单使用.为了能够更加明了的说明其功能,本文将通过实际项目中的案例加以介绍. 主要容 SQL DELTA 简介 ...
随机推荐
- ORACLE - 管理表空间和数据文件
ORACLE表空间是一个逻辑分区,一个数据文件只能属于一个表空间,一个表空间可以拥有多个数据文件. 一般情况下,如果一个实例分配给多个应用使用,需要创建不同的表空间,每个用户使用自己的表空间. 一.表 ...
- 【整理】01. Fiddler 杂记
抓手机包步骤: Tools -- Fiddler Options -- Connections (默认)Fiddler listens on port:8888 (勾选)Allow remote co ...
- 14. leetcode 383. Ransom Note
Given an arbitrary ransom note string and another string containing letters from all the magazines, ...
- 设计模式的征途—18.策略(Strategy)模式
俗话说条条大路通罗马,很多情况下实现某个目标地途径都不只一条.在软件开发中,也会时常遇到这样的情况,实现某一个功能有多条途径,每一条途径都对应一种算法.此时,可以使用一种设计模式来实现灵活地选择解决途 ...
- 经验分享:极速化 CocoaPods
Cocopods 本身是一个优秀的 iOS 开发的包管理工具,涵盖了 7k+ 的开源组件,包管理库是托管在 Github.由于众所周知的原因它的速度日渐缓慢,有时会频繁报如下错误: 1 2 3 4 $ ...
- MATLAB中多行注释以及取消的快捷键
多行注释:Ctrl+R 取消注释:Ctrl +T
- 用jlink在mini2440上烧写uboot
首先,附上我安装jlink驱动: http://download.csdn.net/detail/zzmno1/3776716#comment 以及我使用的uboot.bin文件下载地址: http: ...
- 如何用QUnit为JS代码做单元测试
非常好的入门文章: http://www.zhangxinxu.com/wordpress/2013/04/qunit-javascript-unit-test-%E5%8D%95%E5%85%83% ...
- Java 异常框架
一张图看懂Java 异常框架之间的关系. 说明: 受检异常:编译的时候报错. 费受检异常:运行时报错,需要知道几个常见的异常 NullPointerException(空指针异常) ArrayInde ...
- Javascript是单线程的深入分析(转)
http://www.cnblogs.com/Mainz/p/3552717.html