Spring Boot with Spring-Data-JPA学习案例
0x01 什么是Spring Boot?
Spring Boot是用来简化Spring应用初始搭建以及开发过程的全新框架,被认为是Spring MVC的“接班人”,和微服务紧密联系在一起。
0x02 为什么学习Spring Boot?
微服务是如今各大企业都开始火热使用的技术,而Spring Boot 是学习Spring Cloud的基础
0x03 Spring Boot 有什么特点?
1.化繁为简
2. 备受关注,是下一代框架
3. 微服务的入门级微框架
0x04 Spring Boot 的目标?
为所有的Spring开发提供一个更快速、更广泛的入门体验
但是当需求和默认配置偏离时,请尽快放弃使用Spring Boot.
提供一系列的非功能性的特点,是大类项目(如嵌入式服务器,安全,标准,健康检查,和外部配置)。
绝对不生成代码,也不需要XML配置。
0x05 准备环境
系统要求
Spring Boot 2.0.0.BUILD-SNAPSHOT 需要JDK1.8 以上和Spring Framework 5.0.2.Release 以上版本
构建支持Maven3.2+ 和Gradle4
Servlet 容器
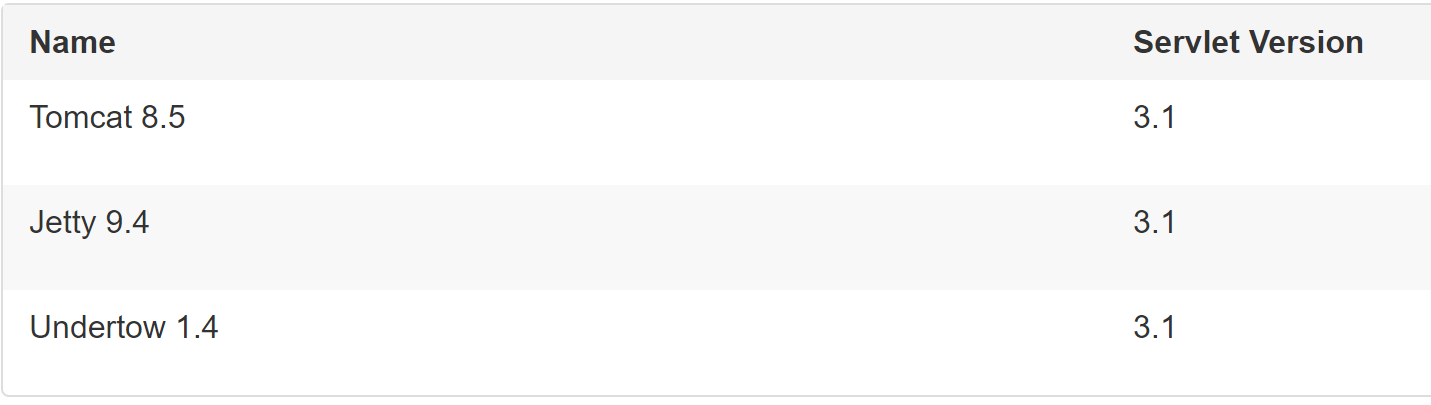
Tips: 也可以将Spring Boot 应用程序部署到任何兼容Servlet 3容器中。
技能要求
熟悉Maven 项目构建
熟悉Spring 注解
熟悉RESful API的理念
IDE
本节课程使用Intellij Idea 作为开发工具
0x06 创建我们的第一个应用程序
接下来我们将会创建一个带有Spring-Data-JPA功能的Spring-Boot Sample。
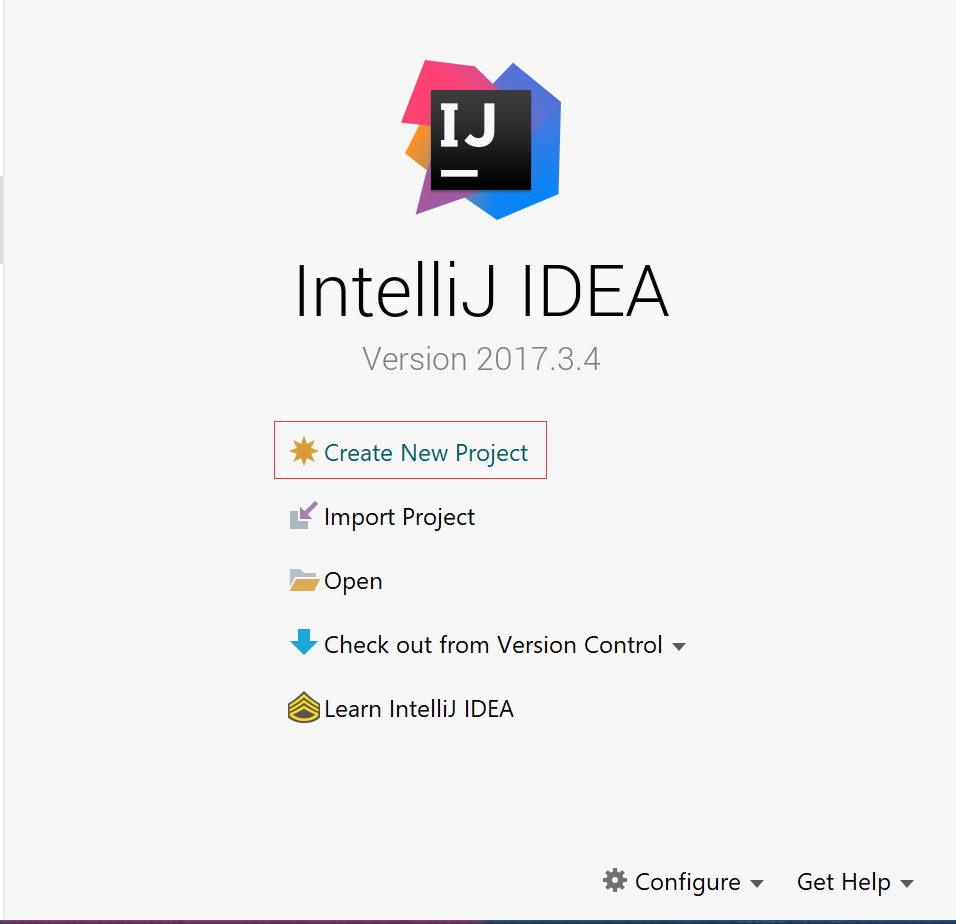
1. 打开我们的Intellij IDEA,选择 ‘Create New Project’
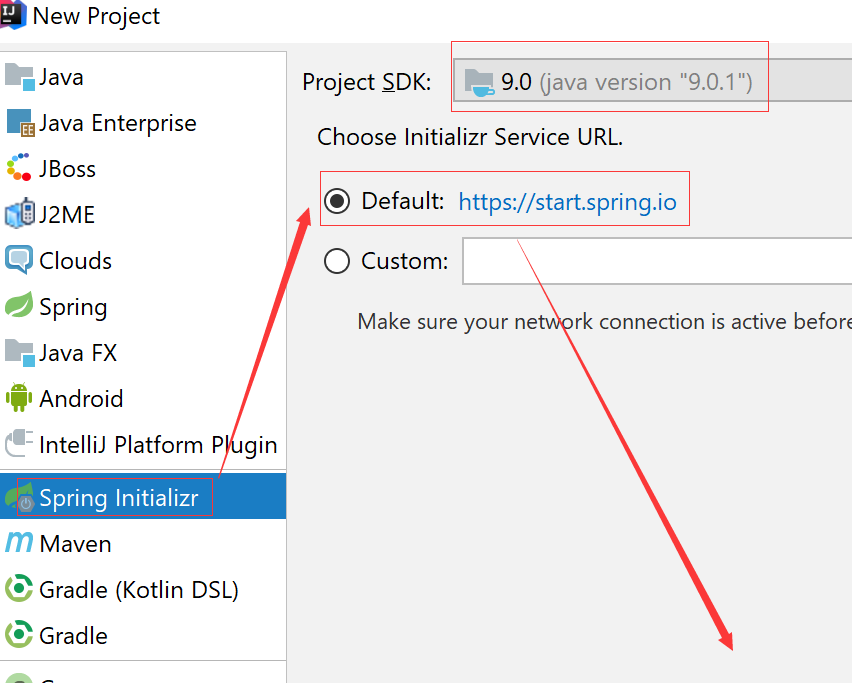
2. 选择Spring Initializr来帮助我们快速创建Spring Boot 程序,JDK 最低1.8,Intializr Service URL保持默认。
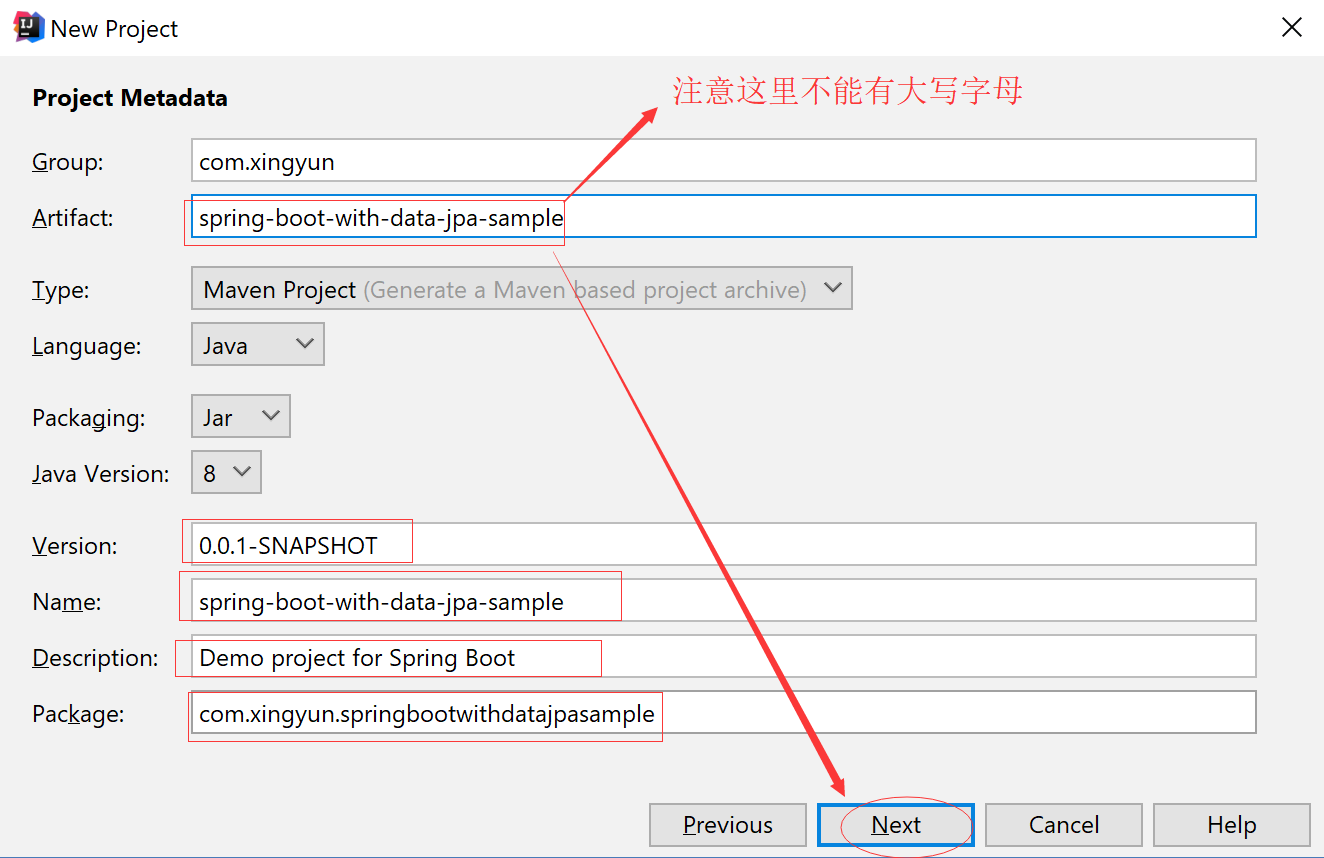
3. 输入以下项目配置信息
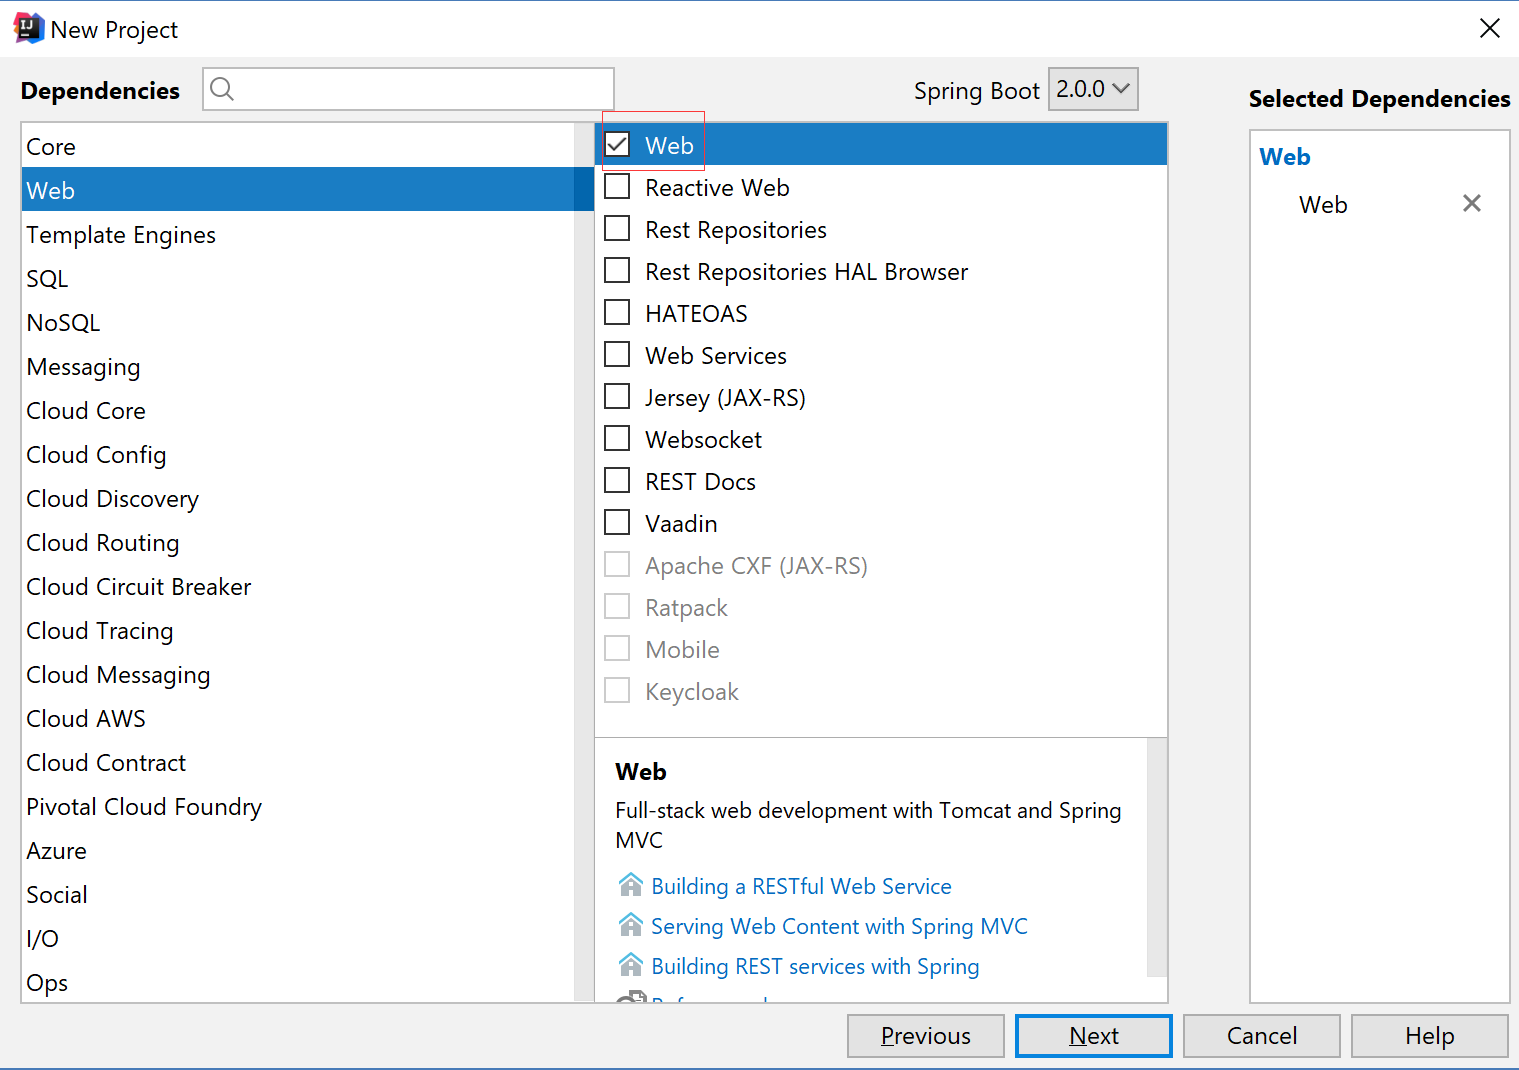
4. 勾选 Web模块
5.SQL 模块分类中勾选 MySQL 和JPA 模块
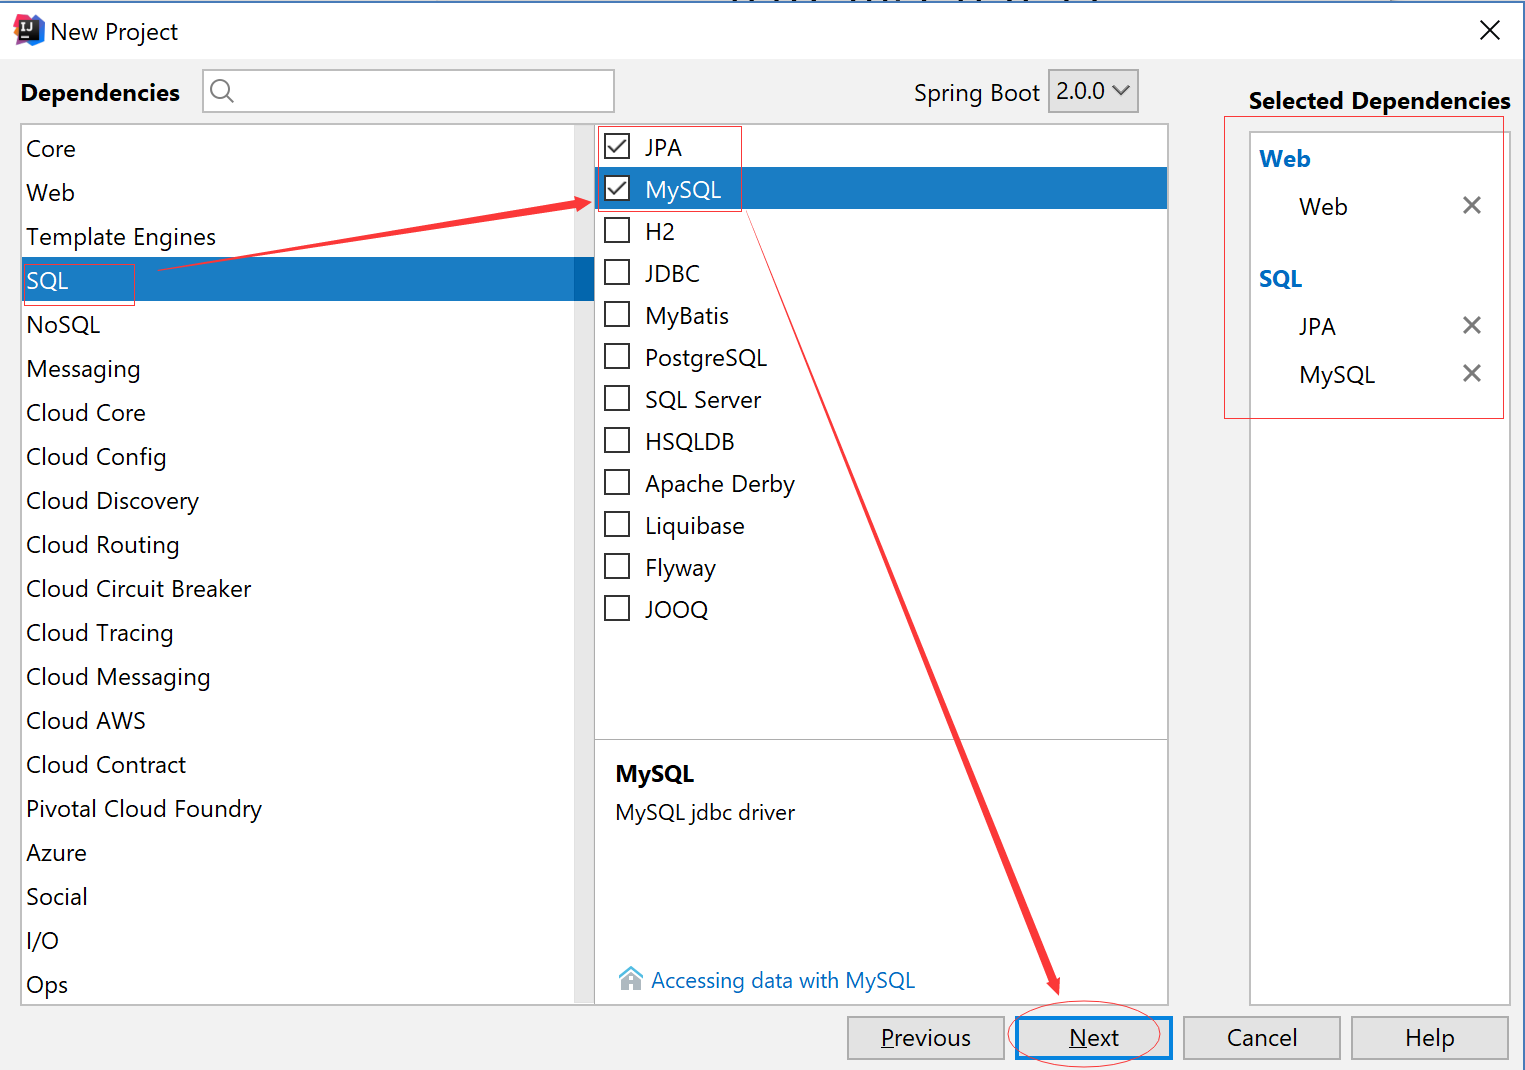
6. 接下来工程信息一切保持默认即可

7. 修改POM.xml
<?xml version="1.0" encoding="UTF-8"?>

<project xmlns="http://maven.apache.org/POM/4.0.0" xmlns:xsi="http://www.w3.org/2001/XMLSchema-instance"

    xsi:schemaLocation="http://maven.apache.org/POM/4.0.0 http://maven.apache.org/xsd/maven-4.0.0.xsd">

    <modelVersion>4.0.0</modelVersion>

    <groupId>com.xingyun</groupId>

    <artifactId>spring-boot-with-data-jpa-sample</artifactId>

    <version>0.0.1-SNAPSHOT</version>

    <packaging>jar</packaging>

    <name>spring-boot-with-data-jpa-sample</name>

    <description>Demo project for Spring Boot</description>

    <parent>

        <groupId>org.springframework.boot</groupId>

        <artifactId>spring-boot-starter-parent</artifactId>

        <version>2.0.0.RELEASE</version>

        <relativePath/> <!-- lookup parent from repository -->

    </parent>

    <properties>

        <project.build.sourceEncoding>UTF-8</project.build.sourceEncoding>

        <project.reporting.outputEncoding>UTF-8</project.reporting.outputEncoding>

        <java.version>1.8</java.version>

    </properties>

    <dependencies>

        <dependency>

            <groupId>org.springframework.boot</groupId>

            <artifactId>spring-boot-configuration-processor</artifactId>

            <optional>true</optional>

        </dependency>

        <dependency>

            <groupId>org.springframework.boot</groupId>

            <artifactId>spring-boot-starter-data-jpa</artifactId>

        </dependency>

        <dependency>

            <groupId>org.springframework.boot</groupId>

            <artifactId>spring-boot-starter-web</artifactId>

        </dependency>

        <dependency>

            <groupId>mysql</groupId>

            <artifactId>mysql-connector-java</artifactId>

            <scope>runtime</scope>

        </dependency>

        <dependency>

            <groupId>org.springframework.boot</groupId>

            <artifactId>spring-boot-starter-test</artifactId>

            <scope>test</scope>

        </dependency>

    </dependencies>

    <build>

        <plugins>

            <plugin>

                <groupId>org.springframework.boot</groupId>

                <artifactId>spring-boot-maven-plugin</artifactId>

            </plugin>

        </plugins>

    </build>

</project>
8.默认的系统配置文件是application.properties
# 配置应用程序的端口
server.port=8080
#配置应用程序的上下文
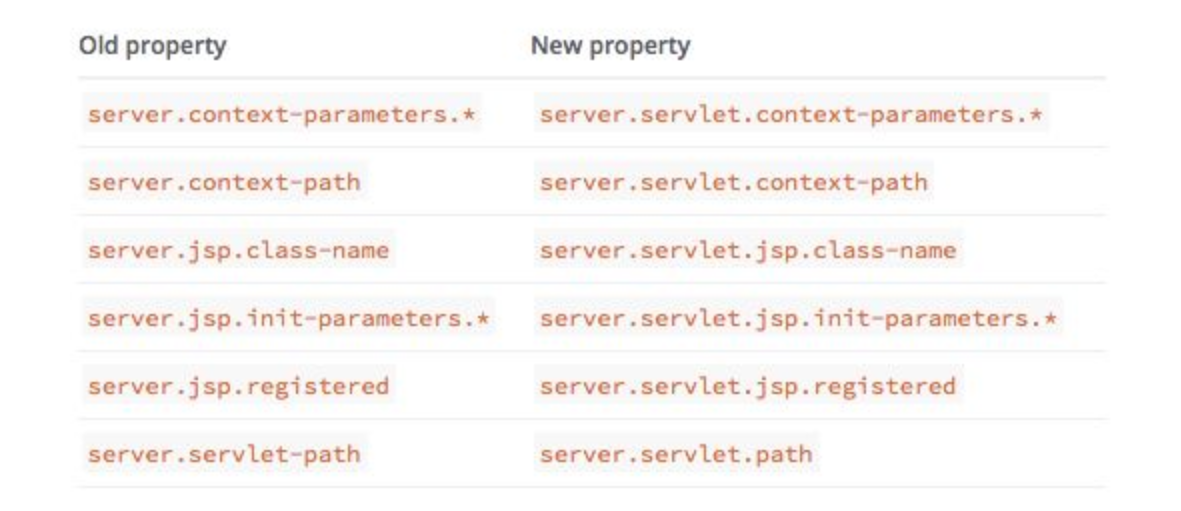
server.servlet.context-path=/
Tips: 我们可以通过这种文件来配置web项目的全局上下文路径和端口号等,但是这里我们需要注释或者删除掉他们,因为我们有一个更好的方式来实现他们。
9. 配置我们的yml文件
总的配置文件,我们可以通过active:dev|prod 激活我们的开发环境配置或者生产环境配置
application.yml
spring:

  profiles:

    active: dev

  datasource:

    driver-class-name: com.mysql.jdbc.Driver

    url: jdbc:mysql://localhost:3306/dbgirl

    username: root

    password:

  jpa:

    hibernate:

      ddl-auto: create

      dialect: MySQLDialect

    show-sql: true
Spring 2.0 更新变动
开发环境配置文件
application-dev.yml
server:

  port: 8081

  servlet:

    context-path: /

cupSize: B

age: 18

content: "cupSize=${cupSize},age=${age}"

book:

 name: 第二行代码

 price: 66.00

 type: 安卓
生产环境配置文件
application-prod.yml
server:

  port: 8086

  servlet:

    context-path: /

cupSize: B

age: 18

content: "cupSize=${cupSize},age=${age}"

book:

 name: 第二行代码

 price: 66.00

 type: 安卓
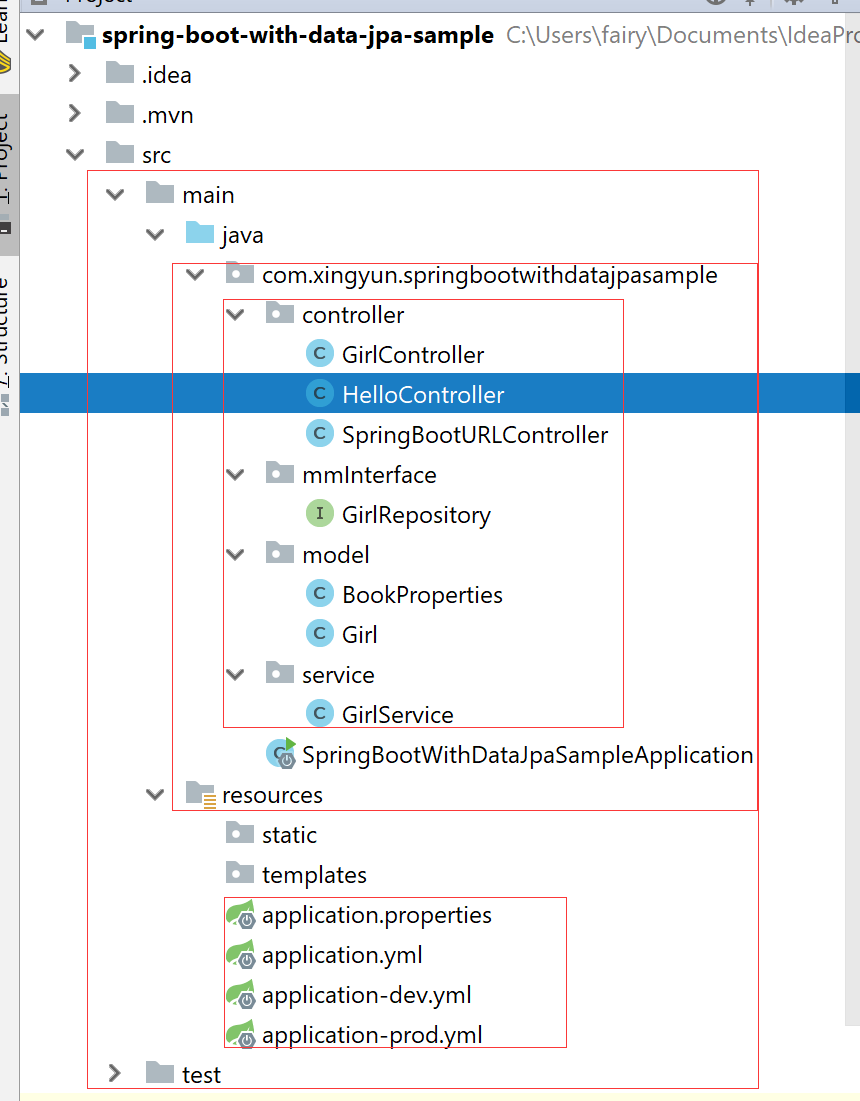
10. 代码结构图如图所示
10.1 代码中获取配置文件中的属性
我们可以读取刚才开发环境下配置文件中的定义的常量属性通过下面的方法
    @Value("${cupSize}")

    private String cupSize;

    @Value("${age}")

    private Integer age;

    @Value("${content}")

    private String content;

    @RequestMapping(value = "/girl",method = RequestMethod.GET)

    public String configurationString(){

        return cupSize+"-----------------"+age+"-------------"+content;

    }
当然如果要配置的常量比较多的时候我们就不能使用上面的方法了,但是我们也有更好的方式实现
10.2 代码中获取配置文件中的属性实体
首先创建实体类 BookProperties.java
package com.xingyun.springbootwithdatajpasample.model;

import org.springframework.boot.context.properties.ConfigurationProperties;

import org.springframework.stereotype.Component;

@Component

@ConfigurationProperties(prefix = "book")

public class BookProperties {

    private String name;

    private Double price;

    private String type;

    public String getName() {

        return name;

    }

    public void setName(String name) {

        this.name = name;

    }

    public Double getPrice() {

        return price;

    }

    public void setPrice(Double price) {

        this.price = price;

    }

    public String getType() {

        return type;

    }

    public void setType(String type) {

        this.type = type;

    }

}
Tips: 注意此文件中用到的两个注解不可省略必须有才行
调用方法如下所示:
@Autowired

    private BookProperties bookProperties;

    @RequestMapping(value = "/book",method = RequestMethod.GET)

    public String bookMethod(){

        return "---------------------"+bookProperties.getName()+bookProperties.getPrice()+bookProperties.getType();

    }
10.3 默认的单个URL映射
  @RequestMapping(value = "/",method = RequestMethod.GET)

    public String home(){

        return "Hello Home Page";

    }

    @RequestMapping(value = "/hello",method = RequestMethod.GET)

    public String say(){

        return "Hello Spring Boot";

    }
10.4 多个URL映射
  @RequestMapping(value = {"/api","/API"},method = RequestMethod.GET)

    public String api(){

        return "Hello API";

    }
10.5 Post 方式访问
 @RequestMapping(value = "/post",method = RequestMethod.POST)

    public String PostMethod(){

        return "Hello Post Page";

    }
10.6 传统风格的URL
 @RequestMapping(value = "/url/b",method = RequestMethod.GET)

    public String urlWithQuestion(@RequestParam(value = "id",required = false,defaultValue = "0") Integer uid){

        return "Hello URL -----/url/b?id=***------id="+uid;

    }
访问请求:
http://127.0.0.1:8081/url/b?id=18
10.7 Restful 风格的URL
 @RequestMapping(value = "/url/a/{id}",method = RequestMethod.GET)

    public String urlWithParams(@PathVariable("id") Integer uid){

        return "Hello URL -----url/a/***------id="+uid;

    }
访问请求:
http://127.0.0.1:8081/url/a/18
10.8 组合注解
上面我们应该已经发现,既要配置GET/POST又要配置映射路径很麻烦,因此我们今后可以用组合注解
 @GetMapping(value = "/url/c")

    public String urlWithQuestion2(@RequestParam(value = "id",required = false,defaultValue = "0") Integer uid){

        return "Hello URL -----/url/c?id=***------id="+uid;

    }
访问请求:
http://127.0.0.1:8081/url/c?id=18
10.9 @JsonFormat Date注解
关于JsonFormat 时间如果希望格式化时间为12小时制的,则使用hh:mm:ss 如果希望格式化时间为24小时制的,则使用HH:mm:ss
    @JsonFormat(pattern = "yyyy-mm-dd HH:ss:mm",locale = "zh",timezone = "GMT+8")//2018-40-07 16:24:40

    Date publishedTime;//发表时间

    @JsonFormat(pattern = "yyyy-mm-dd hh:ss:mm a",locale = "zh",timezone = "GMT+8")//2018-40-07 04:24:40 下午

    Date updatedTime;//修改时间
10.10 使用Spring-Data-JPA 组件结合MySQL实现数据库的增删改查操作
首先我们需要定义一个实体类Girl.java
package com.xingyun.springbootwithdatajpasample.model;

import javax.persistence.Entity;

import javax.persistence.GeneratedValue;

import javax.persistence.Id;

@Entity

public class Girl {

    @Id

    @GeneratedValue

    private Integer id;

    private String girlName;

    private Integer girlAge;

    public Girl() {

    }

    public Integer getId() {

        return id;

    }

    public void setId(Integer id) {

        this.id = id;

    }

    public String getGirlName() {

        return girlName;

    }

    public void setGirlName(String girlName) {

        this.girlName = girlName;

    }

    public Integer getGirlAge() {

        return girlAge;

    }

    public void setGirlAge(Integer girlAge) {

        this.girlAge = girlAge;

    }

}
Tips: 特别注意,几个注解不能少,引入的包路径千万别导错包了,不然会报错。
然后需要创建一个接口类 GirlRepository.java
package com.xingyun.springbootwithdatajpasample.mmInterface;

import com.xingyun.springbootwithdatajpasample.model.Girl;

import org.springframework.data.jpa.repository.JpaRepository;

import java.util.List;

public interface GirlRepository  extends JpaRepository<Girl,Integer>{

    //自定义接口

    public List<Girl> findByGirlAge(Integer girlAge);

}
Tips: 我们需要继承JpaRepository<Girl,Integer>, 这样Spring-Data-JPA就会帮我们实现基本的增删改查。
当然这默认的增删改查无法满足我们的实际业务需求,所以我们也可以在这里扩展我们实现的接口。
增删改查调用代码如下所示:
package com.xingyun.springbootwithdatajpasample.controller;

import com.xingyun.springbootwithdatajpasample.mmInterface.GirlRepository;

import com.xingyun.springbootwithdatajpasample.model.Girl;

import com.xingyun.springbootwithdatajpasample.service.GirlService;

import org.springframework.beans.factory.annotation.Autowired;

import org.springframework.web.bind.annotation.*;

import java.util.List;

import java.util.Optional;

@RestController

public class GirlController {

    @Autowired

    private GirlRepository girlRepository;

    @Autowired

    private GirlService girlService;

    /**

     * 查询所有女生列表

     * @Return

     * */

    @GetMapping("/girls")

    public List<Girl> getGirlList(){

        return girlRepository.findAll();

    }

    /**

     * 添加一个女生

    * */

    @PostMapping("/girls")

    public Girl girlAdd(@RequestParam("girlName") String girlName,@RequestParam("girlAge") Integer girlAge){

        Girl girl=new Girl();

        girl.setGirlName(girlName);

        girl.setGirlAge(girlAge);

        girlRepository.save(girl);

        return girl;

    }

    /**

     * 添加两个女生

     * */

    @GetMapping("/girls/two")

    public String girlAddTwo(){

        girlService.insertTwo();

        return "success";

    }

    /**

     * 通过Id查询一个女生

     * */

    @GetMapping("/girls/{id}")

    public Optional<Girl> girlFindById(@PathVariable("id") Integer uid){

         return girlRepository.findById(uid);

    }

    /**

     * 通过年龄查询一个女生

     * */

    @GetMapping("/girls/age/{girlAge}")

    public List<Girl> girlFindByAge(@PathVariable("girlAge") Integer age){

        return girlRepository.findByGirlAge(age);

    }

    /**

     * 修改一个女生

     */

    @PostMapping(value="/girls/{id}")

    public Girl girlUpdate(@PathVariable("id") Integer uid,@RequestParam("girlName") String girlName,@RequestParam("girlAge") Integer girlAge){

        Girl girl=new Girl();

        girl.setId(uid);

        girl.setGirlName(girlName);

        girl.setGirlAge(girlAge);

        return girlRepository.save(girl);

    }

    /**

     * 删除一个Id

    * */

    @DeleteMapping(value = "/girls/{id}")

    public void girlDelete(@PathVariable("id") Integer uid){

        girlRepository.deleteById(uid);

    }

}
Tips: 这里要注意的一点是我这个版本使用的是 Spring-Boot 2.0.0.RELEASE 版本,更新后有个方法做了修改。
public List<Girl> girlFindById(@PathVariable("id") Integer uid){

         return girlRepository.findById(uid);

    }
这个返回集合不再有效,需要改成下面这种:
    @GetMapping("/girls/{id}")

    public Optional<Girl> girlFindById(@PathVariable("id") Integer uid){

         return girlRepository.findById(uid);

    }
11. 可能出现的问题
在初次学习时候可能会出现一些常见的异常,可以移步去我的CSDN博客看这篇文章
细数Spring Boot 中容易中招的那些坑
https://blog.csdn.net/hadues/article/details/79334355
@ConfigurationProperties(prefix = "xxx")的值取出为空
https://blog.csdn.net/hadues/article/details/79123645
真正解决方案:java.lang.ClassNotFoundException: javax.xml.bind.JAXBException
https://blog.csdn.net/hadues/article/details/79188793
12. 学习源码下载
使用前请在本地创建MySQL数据库dbgirl
dbgirl.sql
-- phpMyAdmin SQL Dump

-- version 4.7.4

-- https://www.phpmyadmin.net/

--

-- Host: 127.0.0.1

-- Generation Time: 2018-03-28 03:43:53

-- 服务器版本: 10.1.30-MariaDB

-- PHP Version: 7.2.1

SET SQL_MODE = "NO_AUTO_VALUE_ON_ZERO";

SET AUTOCOMMIT = 0;

START TRANSACTION;

SET time_zone = "+00:00";

/*!40101 SET @OLD_CHARACTER_SET_CLIENT=@@CHARACTER_SET_CLIENT */;

/*!40101 SET @OLD_CHARACTER_SET_RESULTS=@@CHARACTER_SET_RESULTS */;

/*!40101 SET @OLD_COLLATION_CONNECTION=@@COLLATION_CONNECTION */;

/*!40101 SET NAMES utf8mb4 */;

--

-- Database: `dbgirl`

--

-- --------------------------------------------------------

--

-- 表的结构 `girl`

--

CREATE TABLE `girl` (

  `id` int(11) NOT NULL,

  `girl_age` int(11) DEFAULT NULL,

  `girl_name` varchar(255) DEFAULT NULL

) ENGINE=InnoDB DEFAULT CHARSET=utf8mb4;

--

-- Indexes for dumped tables

--

--

-- Indexes for table `girl`

--

ALTER TABLE `girl`

  ADD PRIMARY KEY (`id`);

--

-- 在导出的表使用AUTO_INCREMENT

--

--

-- 使用表AUTO_INCREMENT `girl`

--

ALTER TABLE `girl`

  MODIFY `id` int(11) NOT NULL AUTO_INCREMENT;

COMMIT;

/*!40101 SET CHARACTER_SET_CLIENT=@OLD_CHARACTER_SET_CLIENT */;

/*!40101 SET CHARACTER_SET_RESULTS=@OLD_CHARACTER_SET_RESULTS */;

/*!40101 SET COLLATION_CONNECTION=@OLD_COLLATION_CONNECTION */;
调用参考readme.txt
使用前需启动My SQL数据库

MySQL

default username:root

default password:

1. http://127.0.0.1:8081/

2. http://127.0.0.1:8081/hello

3. http://127.0.0.1:8081/girl

4.http://127.0.0.1:8081/book

5.http://127.0.0.1:8081/api

  http://127.0.0.1:8081/API

  Tips: Get 请求,多映射

7.http://127.0.0.1:8081/api

Tips:Post 请求

8.http://127.0.0.1:8081/url/a/18

9.http://127.0.0.1:8081/url/b?id=18

10.http://127.0.0.1:8081/url/c?id=18

 Tips:组合注解  @GetMapping(value = "/url/c")

11.http://127.0.0.1:8081/girls/

  Tips:Get 获取所有女生列表

12. http://127.0.0.1:8081/girls/

 Tips: Post girlName girlAge 添加一个女生

 13.http://127.0.0.1:8081/girls/two

 Tips:添加两个女生

 14.根据Id 查询女生

  http://127.0.0.1:8081/girls/1

  15.根据年龄查询女生

  http://127.0.0.1:8081/girls/age/16

  16. http://127.0.0.1:8081/girls/1

  Tips:girlName girlAge Post 根据Id修改一个女生

  17.http://127.0.0.1:8081/girls/1

  Tips:Delete 请求根据id删除一个女生

  创建数据库bean时候切记不要导错包名

  import javax.persistence.Entity;

  import javax.persistence.GeneratedValue;

  import javax.persistence.Id;
推荐学习免费视频教程地址:http://www.imooc.com/learn/767
Spring Boot with Spring-Data-JPA学习案例的更多相关文章
- spring boot系列(五)spring boot 配置spring data jpa (查询方法)
接着上面spring boot系列(四)spring boot 配置spring data jpa 保存修改方法继续做查询的测试: 1 创建UserInfo实体类,代码和https://www.cnb ...
- Spring Boot 整合Spring Data JPA
Spring Boot整合Spring Data JPA 1)加入依赖 <dependency> <groupId>org.springframework.boot</g ...
- Spring Boot 之Spring data JPA简介
文章目录 添加依赖 添加entity bean 创建 Dao Spring Data Configuration 测试 Spring Boot 之Spring data JPA简介 JPA的全称是Ja ...
- spring boot实战(第一篇)第一个案例
版权声明:本文为博主原创文章,未经博主允许不得转载. 目录(?)[+] spring boot实战(第一篇)第一个案例 前言 写在前面的话 一直想将spring boot相关内容写成一个系列的 ...
- 基于Spring Boot和Spring Cloud实现微服务架构学习
转载自:http://blog.csdn.net/enweitech/article/details/52582918 看了几周Spring相关框架的书籍和官方demo,是时候开始总结下这中间的学习感 ...
- 基于Spring Boot和Spring Cloud实现微服务架构学习--转
原文地址:http://blog.csdn.net/enweitech/article/details/52582918 看了几周spring相关框架的书籍和官方demo,是时候开始总结下这中间的学习 ...
- Spring Boot 结合Spring Data结合小项目(增,删,查,模糊查询,分页,排序)
本次做的小项目是类似于,公司发布招聘信息,因此有俩个表,一个公司表,一个招聘信息表,俩个表是一对多的关系 项目整体结构: Spring Boot和Spring Data结合的资源文件 applicat ...
- Spring Boot中Spring data注解的使用
文章目录 Spring Data Annotations @Transactional @NoRepositoryBean @Param @Id @Transient @CreatedBy, @Las ...
- 分享spring、spring boot、spring cloud一些学习资源,从基础知识到项目实战
1.spring注解驱动开发,学习spring boot和spring cloud必备知识 链接: https://pan.baidu.com/s/1xhULzLlpkERhoMi1G5Lgfg 密码 ...
- Spring Boot集成Spring Data Reids和Spring Session实现Session共享
首先,需要先集成Redis的支持,参考:http://www.cnblogs.com/EasonJim/p/7805665.html Spring Boot集成Spring Data Redis+Sp ...
随机推荐
- HI3531串口测试程序(arm)
#include<stdio.h> unsigned int UART0_ADDR = 0x20080000; unsigned int retu=0; int i=0; void del ...
- Windows 7下阻止系统关机
从Vista开始,想阻止系统关机就开始变麻烦了,不能只拦截WM_QUERYENDSESSION了,操作系统只给一个应用程序两秒钟的时间去保存自己的东西,两秒钟之后,不管做完了没有,Game Over! ...
- 用DataRelation给多个DataTable建立关系并显示到TreeView
DataRelation 对象执行两种功能: 它可使与正使用的记录相关的记录可用.如果在父记录 (GetChildRows) 中,则它提供子记录:如果正使用子记录 (GetParentRow),则它提 ...
- JavaScript遍历table
JavaScript遍历table 1.说明 遍历表格中的某行某列,并打印其值 2.实现源码 <!DOCTYPE html PUBLIC "-//W3C//DTD XHTML ...
- Car HDU - 5935
Problem Description Ruins is driving a car to participating in a programming contest. As on a very t ...
- Text Document Analysis CodeForces - 723B
Modern text editors usually show some information regarding the document being edited. For example, ...
- setBit testBit权限管理(shiro项目中来的二)
一,setBit testBit权限管理的理解 1.1.jdk7文档解释 public boolean testBit(int n)Returns true if and only if the de ...
- 在ASP.NET 中检测手机浏览器(转)
引言 之前做的项目中需要在浏览器查看PDF文件.在电脑端没有问题,但是手机端网页打开失败. 后来使用了pdf.js,个人认为pdf.js的页面不够清爽,就希望网站能自动检测登录设备,电脑端保持原样,手 ...
- 第十篇:K均值聚类(KMeans)
前言 本文讲解如何使用R语言进行 KMeans 均值聚类分析,并以一个关于人口出生率死亡率的实例演示具体分析步骤. 聚类分析总体流程 1. 载入并了解数据集:2. 调用聚类函数进行聚类:3. 查看聚类 ...
- 洛谷P4180 [Beijing2010组队]次小生成树Tree(最小生成树,LCT,主席树,倍增LCA,倍增,树链剖分)
洛谷题目传送门 %%%TPLY巨佬和ysner巨佬%%% 他们的题解 思路分析 具体思路都在各位巨佬的题解中.这题做法挺多的,我就不对每个都详细讲了,泛泛而谈吧. 大多数算法都要用kruskal把最小 ...