SpringMVC(一):搭建一个SpringMVC helloword项目
操作步骤:
1)下载spring framework开发包,给eclipse安装spring开发插件,如何安装开发插件&下载开发包请参考我的博文:《Spring(一):eclipse上安装spring开发插件&下载Spring开发包》
2)使用eclipse创建Dynamic web project,并把spring mvc开发必须包引入,引入commons-logging日志包;
3)修改web.xml配置文件,配置dispatcherServlet;在src下创建一个springmvc.xml配置文件,配置文件内指定扫描包,及配置视图解析器。
/WEB-INF/web.xml配置后:
 <?xml version="1.0" encoding="UTF-8"?>

 <web-app xmlns:xsi="http://www.w3.org/2001/XMLSchema-instance"

     xmlns="http://java.sun.com/xml/ns/javaee"

     xsi:schemaLocation="http://java.sun.com/xml/ns/javaee http://java.sun.com/xml/ns/javaee/web-app_3_0.xsd"

     id="WebApp_ID" version="3.0">

     <display-name>SpringMVC_01</display-name>

     <welcome-file-list>

         <welcome-file>index.html</welcome-file>

         <welcome-file>index.htm</welcome-file>

         <welcome-file>index.jsp</welcome-file>

         <welcome-file>default.html</welcome-file>

         <welcome-file>default.htm</welcome-file>

         <welcome-file>default.jsp</welcome-file>

     </welcome-file-list>

     <!-- 因为我这里安装了spring ide 插件,因此可以 alt + / 找到dispatcherServlet -->

     <!-- The front controller of this Spring Web application, responsible for

         handling all application requests -->

     <servlet>

         <servlet-name>springDispatcherServlet</servlet-name>

         <servlet-class>org.springframework.web.servlet.DispatcherServlet</servlet-class>

         <init-param>

             <param-name>contextConfigLocation</param-name>

             <param-value>classpath:springmvc.xml</param-value>

         </init-param>

         <load-on-startup>1</load-on-startup>

     </servlet>

     <!-- Map all requests to the DispatcherServlet for handling -->

     <servlet-mapping>

         <servlet-name>springDispatcherServlet</servlet-name>

         <url-pattern>/</url-pattern>

     </servlet-mapping>

 </web-app>
配置src/springmvc.xml
 <?xml version="1.0" encoding="UTF-8"?>

 <beans xmlns="http://www.springframework.org/schema/beans"

     xmlns:xsi="http://www.w3.org/2001/XMLSchema-instance" xmlns:aop="http://www.springframework.org/schema/aop"

     xmlns:context="http://www.springframework.org/schema/context"

     xmlns:mvc="http://www.springframework.org/schema/mvc"

     xsi:schemaLocation="http://www.springframework.org/schema/beans http://www.springframework.org/schema/beans/spring-beans.xsd

         http://www.springframework.org/schema/aop http://www.springframework.org/schema/aop/spring-aop-4.3.xsd

         http://www.springframework.org/schema/context http://www.springframework.org/schema/context/spring-context-4.3.xsd

         http://www.springframework.org/schema/mvc http://www.springframework.org/schema/mvc/spring-mvc-4.3.xsd">

     <!-- 配置自定义扫描的包 -->

     <context:component-scan base-package="com.dx.springlearn"></context:component-scan>

     <!-- 配置视图解析器:如何把handler方法返回值解析为实际的物理视图(路径) -->

     <bean

         class="org.springframework.web.servlet.view.InternalResourceViewResolver">

         <property name="prefix" value="/WEB-INF/views/"></property>

         <property name="suffix" value=".jsp"></property>

     </bean>

 </beans>
4)创建一个springmvc的handlers包,并在包下创建HelloWord.java,并把类注解为Controller;抒写一个hello方法,把该方法注解为一个Action。
 package com.dx.springlearn.handlers;

 import org.springframework.stereotype.Controller;

 import org.springframework.web.bind.annotation.RequestMapping;

 @Controller

 public class HelloWord {

     /**

      * 1.使用@RequestMapping注解来映射请求的url

      * 2.返回值会通过视图解析器解析为实际的物理视图,对于InternalResourceViewResolver视图解析器,

      *     会做如下解析:通过prefix+returnVal+suffix 拼接出来的实际的物理视图,然后做转化操作。

      *  prefix:/WEB-INF/views/

      *  reuturnVal:success

      *  suffix:.jsp

      * */

     // 接收请求的路径http://localhost:8080/hello

     // 响应返回的视图物理位置:/WEB-INF/views/success.jsp

     @RequestMapping("/hello")

     public String hello(){

         System.out.println("hello word...");

         return "success";

     }

 }
在WebContent目录下创建index.jsp,并添加链接:
<a href="hello">hello action</a>
在WEB-INF/下创建views文件夹,在views文件夹中添加success.jsp页面,页面内添加内容"Success Page ..."
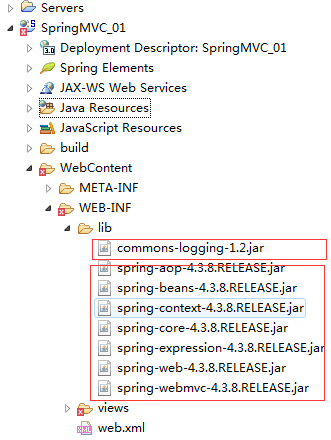
到这里为止,项目完整结构如下:

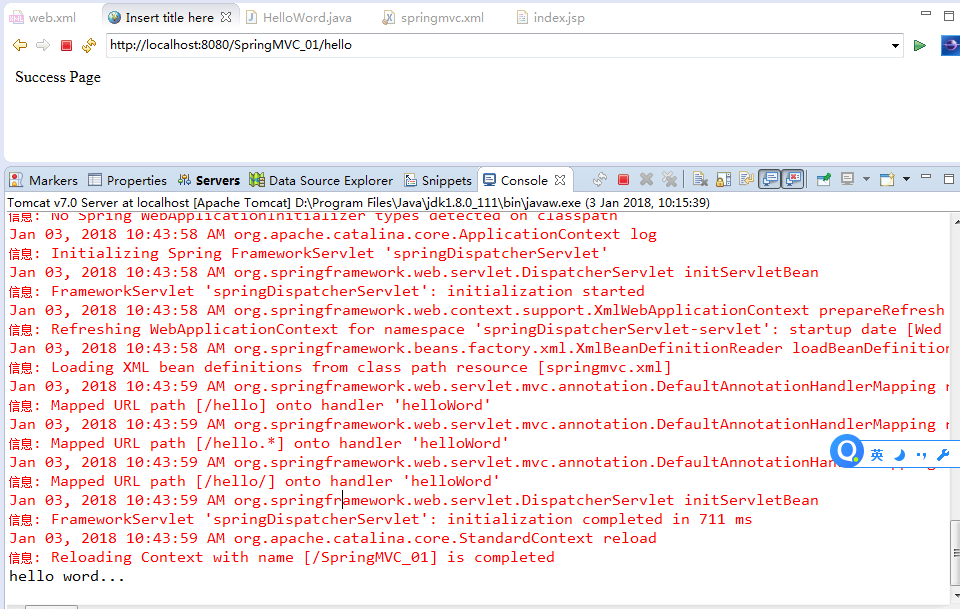
5)运行测试项目是否正常运行。

点击“hello action”链接后:
另外一种配置dispatcherServlet的方式(也是默认配置方式):
1)修改web.xml配置信息:
 <?xml version="1.0" encoding="UTF-8"?>

 <web-app xmlns:xsi="http://www.w3.org/2001/XMLSchema-instance"

     xmlns="http://java.sun.com/xml/ns/javaee"

     xsi:schemaLocation="http://java.sun.com/xml/ns/javaee http://java.sun.com/xml/ns/javaee/web-app_3_0.xsd"

     id="WebApp_ID" version="3.0">

     <display-name>SpringMVC_01</display-name>

     <welcome-file-list>

         <welcome-file>index.html</welcome-file>

         <welcome-file>index.htm</welcome-file>

         <welcome-file>index.jsp</welcome-file>

         <welcome-file>default.html</welcome-file>

         <welcome-file>default.htm</welcome-file>

         <welcome-file>default.jsp</welcome-file>

     </welcome-file-list>

     <!-- 因为我这里安装了spring ide 插件,因此可以 alt + / 找到dispatcherServlet -->

     <!-- The front controller of this Spring Web application, responsible for

         handling all application requests -->

     <servlet>

         <servlet-name>springDispatcherServlet</servlet-name>

         <servlet-class>org.springframework.web.servlet.DispatcherServlet</servlet-class>

         <!--

          <init-param>

             <param-name>contextConfigLocation</param-name>

             <param-value>classpath:springmvc.xml</param-value>

         </init-param>

         -->

         <load-on-startup>1</load-on-startup>

     </servlet>

     <!-- Map all requests to the DispatcherServlet for handling -->

     <servlet-mapping>

         <servlet-name>springDispatcherServlet</servlet-name>

         <url-pattern>/</url-pattern>

     </servlet-mapping>

 </web-app>
2)把springmvc.xml转移位置到WEB-INF/<servlet-name>-servlet.xml,其中<servlet-name>就是web.xml配置的servlet-name名称。
把springmvc.xml转移到WEB-INF下,并重命名为:springDispatcherServlet-servlet.xml,内容做修改。
修改后项目结构如下:

SpringMVC(一):搭建一个SpringMVC helloword项目的更多相关文章
- Intellij IDEA采用Maven+Spring MVC+Hibernate的架构搭建一个java web项目
原文:Java web 项目搭建 Java web 项目搭建 简介 在上一节java web环境搭建中,我们配置了开发java web项目最基本的环境,现在我们将采用Spring MVC+Spring ...
- Spring框架——事务管理方式搭建一个小的项目
学习Spring框架,通过事务管理的方式搭建一个小的项目,该项目可以查询对数据库中的图书库存数量进行修改. 首先,使用MVC分层的设计模式思想搭建项目目录结构. 此部分代码源码之中都有相关注释,所以尽 ...
- asp.netmvc 三层搭建一个完整的项目
接下来用 asp.net mvc 三层搭建一个完整的项目: 架构图: 使用的数据库: 一张公司的员工信息表,测试数据 解决方案项目设计: 1.新建一个空白解决方案名称为Company 2.在该解决方案 ...
- 如何搭建一个WEB服务器项目(二)—— 对数据库表进行基本的增删改查操作
使用HibernateTemplate进行增删改查操作 观前提示:本系列文章有关服务器以及后端程序这些概念,我写的全是自己的理解,并不一定正确,希望不要误人子弟.欢迎各位大佬来评论区提出问题或者是指出 ...
- 从零开始的Spring Boot(1、搭建一个Spring Boot项目Hello World)
搭建一个Spring Boot项目Hello World 写在前面 从零开始的Spring Boot(2.在Spring Boot中整合Servlet.Filter.Listener的方式):http ...
- 搭建一个Web API项目(DDD)
传送阵:写在最后 一.创建一个能跑的起来的Web API项目 1.建一个空的 ASP.NET Web应用 (为什么不直接添加一个Web API项目呢,那样会有些多余的内容(如js.css.Areas等 ...
- 如何快速搭建一个 Node.JS 项目并进入开发?
了解:如何快速搭建一个项目并进入开发? 在此不概述 Node.JS 的历史以及发展过程. 因为之前接触过通过 Java 开发语言,所以明确地知道一个服务器所需的文件,以及一个服务器所需要的操作. 那么 ...
- 如何搭建一个spring boot项目
什么是springboot? Spring Boot俗称微服务.Spring Boot是由Pivotal团队提供的全新框架,其设计目的是用来简化新Spring应用的初始搭建以及开发过程.该框架使用了特 ...
- 搭建一个springMVC项目以及遇到的问题
首先找到jar包(lz现在还在学习maven,以后回了,就用maven了,自己配置时,jar包不全就很容易到时搭建失败)
随机推荐
- 简单使用git和github来管理代码----配置与使用
在以前没听说过github之前,自己写的代码很容易丢或者遗失,等到用时才知码到用时方恨丢,现在用了github,真的是替自己生省不少的事,闲话不多说,上教程. 1 在github上注册账号 https ...
- JS基础四
1.函数是一组可以随时随地运行的语句. 函数是 ECMAScript 的核心. 函数是由这样的方式进行声明的:关键字 function.函数名.一组参数,以及置于括号中的待执行代码. 2.闭包,指的是 ...
- 笔记:Jersey REST 传输格式
通常REST接口会以XML或JSON作为主要传输格式,同时 Jersey 也支持其他的数据格式,比如基本类型.文件.流等格式. 基本类型 Java的基本类型又叫原生类型,包括4种整数(byte.sho ...
- Webpack结合ES6
一.概述ES6现在正是风华正茂的时候,各个公司都是 尝试去使用,并且作为前端工程师ES6也是体现技术的亮点.但是,现在的浏览器对es6支持不是 特别的兼容,最终还是需要把es6转换为es5,webpa ...
- 【Flask】微型web框架flask大概介绍
Flask Flask是一个基于python的,微型web框架.之所以被称为微型是因为其核心非常简单,同时具有很强的扩展能力.它几乎不给使用者做任何技术决定. 安装flask时应该注意其必须的几个支持 ...
- JVM GC算法
在判断哪些内存需要回收和什么时候回收用到GC 算法,本文主要对GC 算法进行讲解. JVM垃圾判定算法 常见的JVM垃圾判定算法包括:引用技术算法.可达性分析算法. 引用技术算法(Reference ...
- touch事件过程
local function onTouchBegan(touch, event) local point = touch:getLocation() --获取touch位置, 基于openGL坐标 ...
- Android中的layout_gravity和gravity的区别
在Android的布局中,除了padding和margin容易弄混之外,还有layout_gravity和gravity.按照字面意思来说,layout_gravity就是相对于layout来设置的. ...
- Leetcode 28——Implement strStr()
Implement strStr(). Return the index of the first occurrence of needle in haystack, or -1 if needle ...
- Welcome to Django!
Welcome to Django! 实验简介 Django是一个可以使Web开发工作更加高效愉快的Web开发框架.Django可以让你用最小的代价构建和维护更高质量的Web应用程序. 从好的方面来看 ...