vue搭建多页面开发环境
自从习惯开发了单页面应用,对多页面的页面间的相互跳转间没有过渡效果、难维护极度反感。但是最近公司技术老大说,当一个应用越来越大的时候单页面模式应付不来,但是没讲怎么应付不来,所以还得自己去复习一遍这两者的区别:
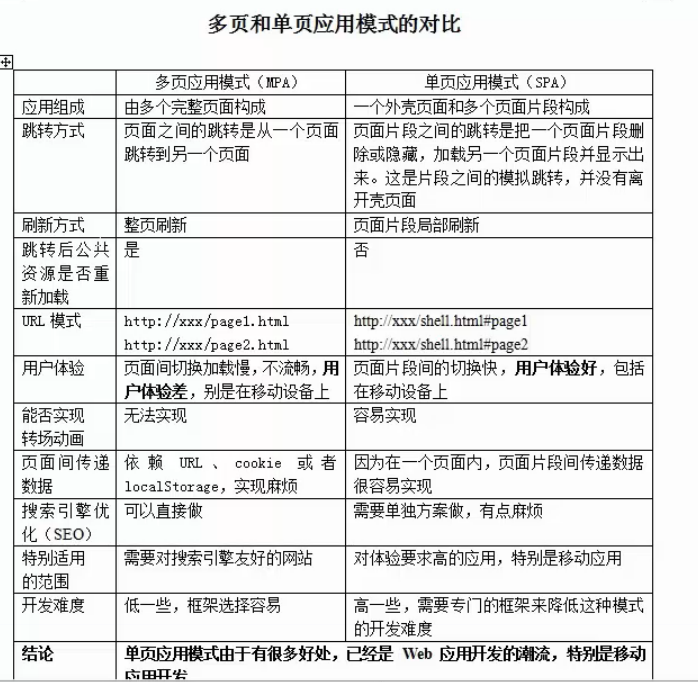
这样对比的话,单页面的优势确实很大,但当我自己去打开某宝,某东的移动端页面时,确实它们都是多页面应用。为什么?我能想到的就几点:
1.单页面使用的技术对低版本的浏览器不友好,大公司还得兼顾使用低版本浏览器的用户啊
2.功能模块开发来说,比如说单页面的业务公用组件,有时候你都不知道分给谁开发
3.seo优化吧(PS:既然是大应用应该很多人都知道,为什么还要做搜索引擎优化)
--------------------------------------------------华丽分割线------------------------------------------------------------------------------------
公司开发移动端使用的技术是vue,其实老大在要求使用多页面开发的时候,已经搭了一个vue多页面的脚手架供给我们去使用,但是我去看了看源码的时候写得很一般,所以决定自己重新去写过。
思路:
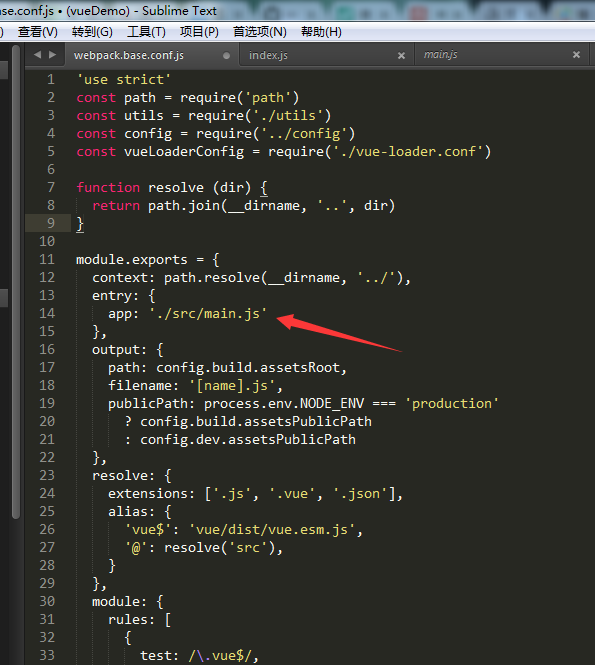
由于vue-cli已经写好了单页面的webpack文件,不去改动之前是它默认的一个页面引用打包的资源。既然是多页面,那么把webpack入口文件改成多个就好了啊。未改动时的webpack.base.conf.js(这个JS的功能主要在于全局配置,比如入口文件,出口文件,解析规则等)
1 // 把箭头部分的入口文件改为以下

2 entry: {

3   'index': '..../main.js'  // 注意省略号是实际开发时的项目路径

4   'product': '..../main.js'

5 }
但是这样做效率得多低下,每增加一个新页面就要手动去添加新的入口,所以这里把入口文件封装为一个函数:

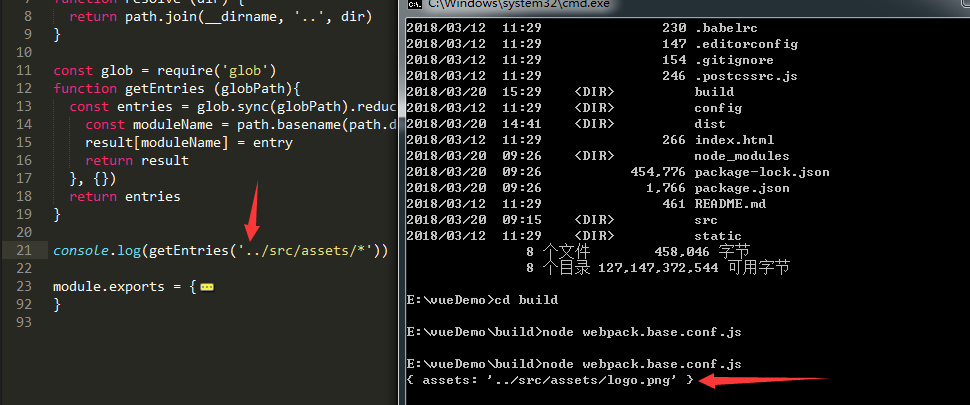
 1 /**

 2  * 获取多页面入口文件

 3  * @globPath 文件路径

 4  */

 5 const glob = require('glob')

 6 function getEntries(globPath)  {

 7   const entries = glob.sync(globPath).reduce((result, entry) => {

 8     const moduleName = path.basename(path.dirname(entry)) // 获取模块名称

 9     result[moduleName] = entry

10     return result

11   }, {})

12   return entries

13 }
注意在使用nodejs的glob模块之前,记得先下载依赖
测试一下这个函数
然后把webpack.base.config.js改为如下:
 1 'use strict'

 2 const path = require('path')

 3 const utils = require('./utils')

 4 const config = require('../config')

 5 const vueLoaderConfig = require('./vue-loader.conf')

 6

 7 function resolve (dir) {

 8   return path.join(__dirname, '..', dir)

 9 }

10

11 const glob = require('glob')

12 function getEntries (globPath){

13   const entries = glob.sync(globPath).reduce((result, entry) => {

14     const moduleName = path.basename(path.dirname(entry)) // 获取模块名称

15     result[moduleName] = entry

16     return result

17   }, {})

18   return entries

19 }

20

21 const entries = getEntries('./src/modules/**/*.js')

22

23 module.exports = {

24   context: path.resolve(__dirname, '../'),

25   entry: entries,   // 改动部分

26   output: {

27     path: config.build.assetsRoot,

28     filename: '[name].js',

29     publicPath: process.env.NODE_ENV === 'production'

30       ? config.build.assetsPublicPath

31       : config.dev.assetsPublicPath

32   },

33   resolve: {

34     extensions: ['.js', '.vue', '.json'],

35     alias: {

36       'vue$': 'vue/dist/vue.esm.js',

37       '@': resolve('src'),

38     }

39   },

40   module: {

41     rules: [

42       {

43         test: /\.vue$/,

44         loader: 'vue-loader',

45         options: vueLoaderConfig

46       },

47       {

48         test: /\.js$/,

49         loader: 'babel-loader',

50         include: [resolve('src'), resolve('test'), resolve('node_modules/webpack-dev-server/client')]

51       },

52       {

53         test: /\.(png|jpe?g|gif|svg)(\?.*)?$/,

54         loader: 'url-loader',

55         options: {

56           limit: 10000,

57           name: utils.assetsPath('img/[name].[hash:7].[ext]')

58         }

59       },

60       {

61         test: /\.(mp4|webm|ogg|mp3|wav|flac|aac)(\?.*)?$/,

62         loader: 'url-loader',

63         options: {

64           limit: 10000,

65           name: utils.assetsPath('media/[name].[hash:7].[ext]')

66         }

67       },

68       {

69         test: /\.(woff2?|eot|ttf|otf)(\?.*)?$/,

70         loader: 'url-loader',

71         options: {

72           limit: 10000,

73           name: utils.assetsPath('fonts/[name].[hash:7].[ext]')

74         }

75       }

76     ]

77   },

78   node: {

79     // prevent webpack from injecting useless setImmediate polyfill because Vue

80     // source contains it (although only uses it if it's native).

81     setImmediate: false,

82     // prevent webpack from injecting mocks to Node native modules

83     // that does not make sense for the client

84     dgram: 'empty',

85     fs: 'empty',

86     net: 'empty',

87     tls: 'empty',

88     child_process: 'empty'

89   }

90 }
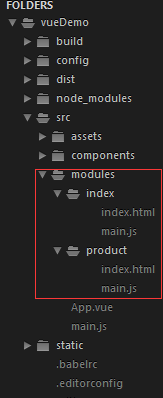
注意我的多页面目录:
---------------------------------------华丽分割线----------------------------------------------------------------------
公共配置搞完之后是打包文件:webpack.prod.conf.js,打包文件的修改主要是输出文件的配置,因为要对应入口文件的文件夹,还有就是一个页面对应一个htmlwebpackplugin配置,这个配置是加在文件的plugins里面的,按照上面的消除手动加入配置的思路这里也加入htmlwebpackplugin的配置函数
/**

 * 页面打包

 * @entries 打包文件

 * @config 参数配置

 * @module 使用的主体

 */

const HtmlWebpackPlugin = require('html-webpack-plugin')

function pack (entries, module) {

  for (const path in entries) {

    const conf = {

      filename: `modules/${path}/index.html`,

      template: entries[path],   // 模板路径

      inject: true,

      chunks: ['manifest', 'vendor', path]   // 必须先引入公共依赖

    }

    module.plugins.push(new HtmlWebpackPlugin(conf))

  }

}
最终打包文件改为如下
'use strict'

const path = require('path')

const utils = require('./utils')

const webpack = require('webpack')

const config = require('../config')

const merge = require('webpack-merge')

const baseWebpackConfig = require('./webpack.base.conf')

const CopyWebpackPlugin = require('copy-webpack-plugin')

const HtmlWebpackPlugin = require('html-webpack-plugin')

const ExtractTextPlugin = require('extract-text-webpack-plugin')

const OptimizeCSSPlugin = require('optimize-css-assets-webpack-plugin')

const UglifyJsPlugin = require('uglifyjs-webpack-plugin')

const env = require('../config/prod.env')

const glob = require('glob')

function getEntries (globPath){

  const entries = glob.sync(globPath).reduce((result, entry) => {

    const moduleName = path.basename(path.dirname(entry)) // 获取模块名称

    result[moduleName] = entry

    return result

  }, {})

  return entries

}

const entries = getEntries('./src/modules/**/*.html')   // 获取多页面所有入口文件

const webpackConfig = merge(baseWebpackConfig, {

  module: {

    rules: utils.styleLoaders({

      sourceMap: config.build.productionSourceMap,

      extract: true,

      usePostCSS: true

    })

  },

  devtool: config.build.productionSourceMap ? config.build.devtool : false,

  output: {

    path: config.build.assetsRoot,

    filename: 'modules/[name]/[name].[chunkhash].js',

    // publicPath: '/' // 改为相对路径

    // chunkFilename: utils.assetsPath('js/[id].[chunkhash].js')

  },

  plugins: [

    // http://vuejs.github.io/vue-loader/en/workflow/production.html

    new webpack.DefinePlugin({

      'process.env': env

    }),

    new UglifyJsPlugin({

      uglifyOptions: {

        compress: {

          warnings: false

        }

      },

      sourceMap: config.build.productionSourceMap,

      parallel: true

    }),

    // extract css into its own file

    new ExtractTextPlugin({

      filename: utils.assetsPath('css/[name].[contenthash].css'),

      // Setting the following option to `false` will not extract CSS from codesplit chunks.

      // Their CSS will instead be inserted dynamically with style-loader when the codesplit chunk has been loaded by webpack.

      // It's currently set to `true` because we are seeing that sourcemaps are included in the codesplit bundle as well when it's `false`,

      // increasing file size: https://github.com/vuejs-templates/webpack/issues/1110

      allChunks: true,

    }),

    // Compress extracted CSS. We are using this plugin so that possible

    // duplicated CSS from different components can be deduped.

    new OptimizeCSSPlugin({

      cssProcessorOptions: config.build.productionSourceMap

        ? { safe: true, map: { inline: false } }

        : { safe: true }

    }),

    // generate dist index.html with correct asset hash for caching.

    // you can customize output by editing /index.html

    // see https://github.com/ampedandwired/html-webpack-plugin

    // keep module.id stable when vendor modules does not change

    new webpack.HashedModuleIdsPlugin(),

    // enable scope hoisting

    new webpack.optimize.ModuleConcatenationPlugin(),

    // split vendor js into its own file

    new webpack.optimize.CommonsChunkPlugin({

      name: 'vendor',

      minChunks (module) {

        // any required modules inside node_modules are extracted to vendor

        return (

          module.resource &&

          /\.js$/.test(module.resource) &&

          module.resource.indexOf(

            path.join(__dirname, '../node_modules')

          ) === 0

        )

      }

    }),

    // extract webpack runtime and module manifest to its own file in order to

    // prevent vendor hash from being updated whenever app bundle is updated

    new webpack.optimize.CommonsChunkPlugin({

      name: 'manifest',

      minChunks: Infinity

    }),

    // This instance extracts shared chunks from code splitted chunks and bundles them

    // in a separate chunk, similar to the vendor chunk

    // see: https://webpack.js.org/plugins/commons-chunk-plugin/#extra-async-commons-chunk

    new webpack.optimize.CommonsChunkPlugin({

      name: 'app',

      async: 'vendor-async',

      children: true,

      minChunks: 3

    }),

    // copy custom static assets

    new CopyWebpackPlugin([

      {

        from: path.resolve(__dirname, '../static'),

        to: config.build.assetsSubDirectory,

        ignore: ['.*']

      }

    ])

  ]

})

if (config.build.productionGzip) {

  const CompressionWebpackPlugin = require('compression-webpack-plugin')

  webpackConfig.plugins.push(

    new CompressionWebpackPlugin({

      asset: '[path].gz[query]',

      algorithm: 'gzip',

      test: new RegExp(

        '\\.(' +

        config.build.productionGzipExtensions.join('|') +

        ')$'

      ),

      threshold: 10240,

      minRatio: 0.8

    })

  )

}

if (config.build.bundleAnalyzerReport) {

  const BundleAnalyzerPlugin = require('webpack-bundle-analyzer').BundleAnalyzerPlugin

  webpackConfig.plugins.push(new BundleAnalyzerPlugin())

}

function pack (entries, module) {

  for (const path in entries) {

    const conf = {

      filename: `modules/${path}/index.html`,

      template: entries[path],   // 模板路径

      inject: true,

      chunks: ['manifest', 'vendor', path]   // 必须先引入公共依赖

    }

    module.plugins.push(new HtmlWebpackPlugin(conf))

  }

}

pack(entries, webpackConfig)

module.exports = webpackConfig
然后启动npm run build尝试打包文件

OK,多页面的打包完成
参考:http://blog.csdn.net/u013291076/article/details/53667382
vue搭建多页面开发环境的更多相关文章
- vue.js多页面开发环境搭建
利用 vue-cli 搭建的项目大都是单页面应用项目,对于简单的项目,单页面就能满足要求.但对于有多个子项目的应用,如果创建多个单页面,显示有点重复,特别是 node_modules 会有多份相同的. ...
- 用grunt搭建web前端开发环境
1.前言 本文章旨在讲解grunt入门,以及讲解grunt最常用的几个插件的使用. 2.安装node.js Grunt和所有grunt插件都是基于nodejs来运行的,如果你的电脑上没有nodejs, ...
- Xamarin Andro教程搭建Xamarin Androidid开发环境(一)
Xamarin Andro教程搭建Xamarin Androidid开发环境(一) "工欲善其事,必先利其器".对于程序员来说,编程的环境就是其手中的利器.如果没有一个合适方便的编 ...
- 快速搭建 Node.js 开发环境以及加速 npm
如何快速搭建 node 开发环境 npm 超慢 github 无法打开的问题 于是我觉得应该写一篇文章解答所有这些起步问题,让新同学也能顺顺利利入门. 快速搭建 Node.js 开发环境 如果你想长期 ...
- Win7的64位系统如何搭建安卓Android开发环境
在搭建安卓Android开发环境,那么现在比较主流的Win7的64位操作系统如何搭建呢?其实很简单,不需要设置任何环境变量,只需要下载两个程序包(ADT和JDK),下载的时候注意选择相应的64位程序包 ...
- 优化单页面开发环境:webpack与react的运行时打包与热更新
前面两篇文章介绍初步搭建单页面应用的开发环境: 第一篇:使用webpack.babel.react.antdesign配置单页面应用开发环境 第二篇:使用react-router实现单页面应用路由 这 ...
- React Native开发 - 搭建React Native开发环境
移动开发以前一般都是原生的语言来开发,Android开发是用Java语言,IOS的开发是Object-C或者Swift.那么对于开发一个App,至少需要两套代码.两个团队.对于公司来说,成本还是有的. ...
- 从零开始搭建Go语言开发环境
一步一步,从零搭建Go语言开发环境. 安装Go语言及搭建Go语言开发环境 下载 下载地址 Go官网下载地址:https://golang.org/dl/ Go官方镜像站(推荐):https://gol ...
- vs2017搭建linux c++开发环境
最近一直在阅读ovs的源码,看到用户态代码的时候,需要对用户态的代码进行调试,一开始想直接使用linux中的GDB进行调试,但是ovs的工程太过于复杂,从网上找了些文章,发现vs2017能够支持lin ...
随机推荐
- js几种数组遍历方法.
第一种:普通的for循环 ; i < arr.length; i++) { } 这是最简单的一种遍历方法,也是使用的最多的一种,但是还能优化. 第二种:优化版for循环 ,len=arr.len ...
- Python+Selenium 利用ID,XPath,tag name,link text,partial link text,class name,css,name定位元素
使用firefox浏览器,查看页面元素,我们以“百度网页”为示例 一.ID定位元素 利用find_element_by_id()方法来定位网页元素对象 ①.定位百度首页,输入框的元素 ②.编写示 ...
- JAVA解决前端跨域问题。
什么是跨域? 通俗来说,跨域按照我自己的想法来理解,是不同的域名之间的访问,就是跨域.不同浏览器,在对js文件进行解析是不同的,浏览器会默认阻止,所以 现在我来说下用java代码解决前端跨域问题. 用 ...
- 2019.03.11 COGS2652 秘术(天文密葬法)(分数规划+长链剖分)
传送门 题意:nnn个点的树,每个点两个值a,ba,ba,b,问长度为mmm的路径∑ai∑bi\frac{\sum a_i}{\sum b_i}∑bi∑ai的最大值. 思路:一眼要01分数规划, ...
- Nexus安装、使用说明、问题总结
Nexus安装.使用说明.问题总结 1 . 私服简介 私服是架设在局域网的一种特殊的远程仓库,目的是代理远程仓库及部署第三方构件.有了私服之后,当 Maven 需要下载构件时,直接请求私服,私服上存在 ...
- Maven学习笔记5:Maven属性、profile和资源过滤
Maven的六类属性 内置属性 主要有两个常用内置属性:${basedir}项目的根目录(包含pom.xml文件的目录),${version}项目版本 POM属性 用户可以使用该属性引用POM文件中对 ...
- 更改MAC地址,突破公司绑定MAC地址的限制
步骤/方法 1 打开开始菜单,选择控制面板. 2 3 打开控制面板项,选择网络和共享中心. 4 5 选择更改适配器设置. 6 7 选择本地要修改MAC地址的网卡. 8 9 右键该网卡, ...
- js实现全屏和缩放
/** * @description 简单的浏览器检查结果. * `webkit` * webkit版本号,如果浏览器为非webkit内核,此属性为`undefined`. * `chrome` * ...
- _ZNote_Qt_按钮增加图片
给Button添加图片方法 有三种 一 : 用代码添加 QPushButton *findBtn = new QPushButton(this); //创建按钮 QIcon ico (":/ ...
- Django积木块11 —— 缓存
缓存 Django的缓存可以缓存视图中的函数,模版中的内容,和一些不长变化的数据. # setting CACHES = { 'default':{ 'BACKEND':'django.core.ca ...