vue搭建多页面开发环境
自从习惯开发了单页面应用,对多页面的页面间的相互跳转间没有过渡效果、难维护极度反感。但是最近公司技术老大说,当一个应用越来越大的时候单页面模式应付不来,但是没讲怎么应付不来,所以还得自己去复习一遍这两者的区别:
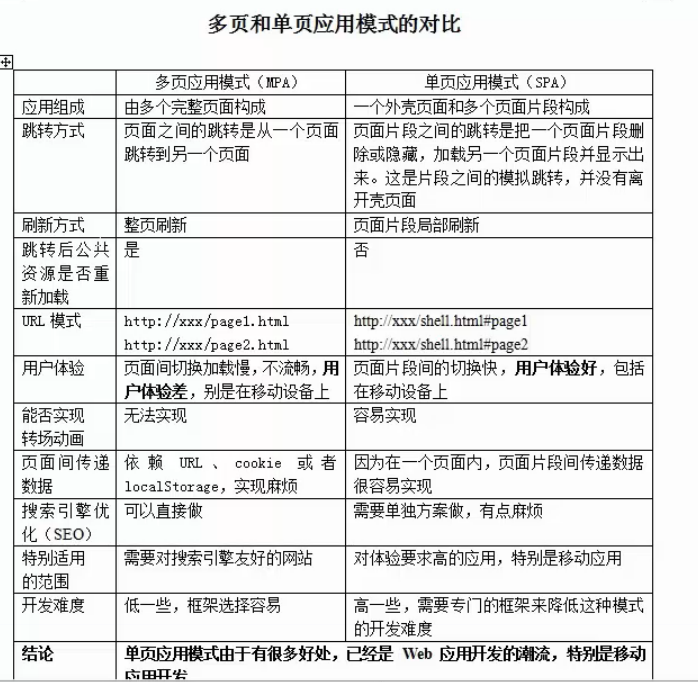
这样对比的话,单页面的优势确实很大,但当我自己去打开某宝,某东的移动端页面时,确实它们都是多页面应用。为什么?我能想到的就几点:
1.单页面使用的技术对低版本的浏览器不友好,大公司还得兼顾使用低版本浏览器的用户啊
2.功能模块开发来说,比如说单页面的业务公用组件,有时候你都不知道分给谁开发
3.seo优化吧(PS:既然是大应用应该很多人都知道,为什么还要做搜索引擎优化)
--------------------------------------------------华丽分割线------------------------------------------------------------------------------------
公司开发移动端使用的技术是vue,其实老大在要求使用多页面开发的时候,已经搭了一个vue多页面的脚手架供给我们去使用,但是我去看了看源码的时候写得很一般,所以决定自己重新去写过。
思路:
由于vue-cli已经写好了单页面的webpack文件,不去改动之前是它默认的一个页面引用打包的资源。既然是多页面,那么把webpack入口文件改成多个就好了啊。未改动时的webpack.base.conf.js(这个JS的功能主要在于全局配置,比如入口文件,出口文件,解析规则等)
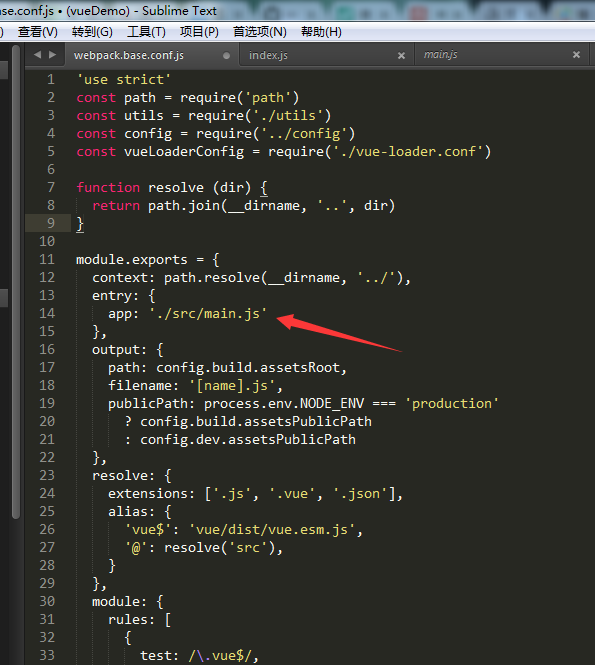
1 // 把箭头部分的入口文件改为以下

2 entry: {

3   'index': '..../main.js'  // 注意省略号是实际开发时的项目路径

4   'product': '..../main.js'

5 }
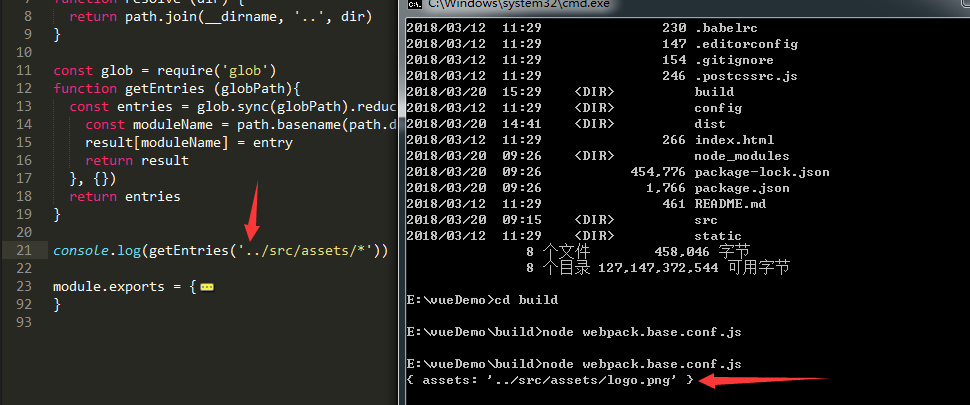
但是这样做效率得多低下,每增加一个新页面就要手动去添加新的入口,所以这里把入口文件封装为一个函数:

 1 /**

 2  * 获取多页面入口文件

 3  * @globPath 文件路径

 4  */

 5 const glob = require('glob')

 6 function getEntries(globPath)  {

 7   const entries = glob.sync(globPath).reduce((result, entry) => {

 8     const moduleName = path.basename(path.dirname(entry)) // 获取模块名称

 9     result[moduleName] = entry

10     return result

11   }, {})

12   return entries

13 }
注意在使用nodejs的glob模块之前,记得先下载依赖
测试一下这个函数
然后把webpack.base.config.js改为如下:
 1 'use strict'

 2 const path = require('path')

 3 const utils = require('./utils')

 4 const config = require('../config')

 5 const vueLoaderConfig = require('./vue-loader.conf')

 6

 7 function resolve (dir) {

 8   return path.join(__dirname, '..', dir)

 9 }

10

11 const glob = require('glob')

12 function getEntries (globPath){

13   const entries = glob.sync(globPath).reduce((result, entry) => {

14     const moduleName = path.basename(path.dirname(entry)) // 获取模块名称

15     result[moduleName] = entry

16     return result

17   }, {})

18   return entries

19 }

20

21 const entries = getEntries('./src/modules/**/*.js')

22

23 module.exports = {

24   context: path.resolve(__dirname, '../'),

25   entry: entries,   // 改动部分

26   output: {

27     path: config.build.assetsRoot,

28     filename: '[name].js',

29     publicPath: process.env.NODE_ENV === 'production'

30       ? config.build.assetsPublicPath

31       : config.dev.assetsPublicPath

32   },

33   resolve: {

34     extensions: ['.js', '.vue', '.json'],

35     alias: {

36       'vue$': 'vue/dist/vue.esm.js',

37       '@': resolve('src'),

38     }

39   },

40   module: {

41     rules: [

42       {

43         test: /\.vue$/,

44         loader: 'vue-loader',

45         options: vueLoaderConfig

46       },

47       {

48         test: /\.js$/,

49         loader: 'babel-loader',

50         include: [resolve('src'), resolve('test'), resolve('node_modules/webpack-dev-server/client')]

51       },

52       {

53         test: /\.(png|jpe?g|gif|svg)(\?.*)?$/,

54         loader: 'url-loader',

55         options: {

56           limit: 10000,

57           name: utils.assetsPath('img/[name].[hash:7].[ext]')

58         }

59       },

60       {

61         test: /\.(mp4|webm|ogg|mp3|wav|flac|aac)(\?.*)?$/,

62         loader: 'url-loader',

63         options: {

64           limit: 10000,

65           name: utils.assetsPath('media/[name].[hash:7].[ext]')

66         }

67       },

68       {

69         test: /\.(woff2?|eot|ttf|otf)(\?.*)?$/,

70         loader: 'url-loader',

71         options: {

72           limit: 10000,

73           name: utils.assetsPath('fonts/[name].[hash:7].[ext]')

74         }

75       }

76     ]

77   },

78   node: {

79     // prevent webpack from injecting useless setImmediate polyfill because Vue

80     // source contains it (although only uses it if it's native).

81     setImmediate: false,

82     // prevent webpack from injecting mocks to Node native modules

83     // that does not make sense for the client

84     dgram: 'empty',

85     fs: 'empty',

86     net: 'empty',

87     tls: 'empty',

88     child_process: 'empty'

89   }

90 }
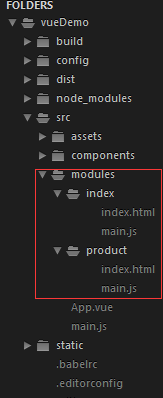
注意我的多页面目录:
---------------------------------------华丽分割线----------------------------------------------------------------------
公共配置搞完之后是打包文件:webpack.prod.conf.js,打包文件的修改主要是输出文件的配置,因为要对应入口文件的文件夹,还有就是一个页面对应一个htmlwebpackplugin配置,这个配置是加在文件的plugins里面的,按照上面的消除手动加入配置的思路这里也加入htmlwebpackplugin的配置函数
/**

 * 页面打包

 * @entries 打包文件

 * @config 参数配置

 * @module 使用的主体

 */

const HtmlWebpackPlugin = require('html-webpack-plugin')

function pack (entries, module) {

  for (const path in entries) {

    const conf = {

      filename: `modules/${path}/index.html`,

      template: entries[path],   // 模板路径

      inject: true,

      chunks: ['manifest', 'vendor', path]   // 必须先引入公共依赖

    }

    module.plugins.push(new HtmlWebpackPlugin(conf))

  }

}
最终打包文件改为如下
'use strict'

const path = require('path')

const utils = require('./utils')

const webpack = require('webpack')

const config = require('../config')

const merge = require('webpack-merge')

const baseWebpackConfig = require('./webpack.base.conf')

const CopyWebpackPlugin = require('copy-webpack-plugin')

const HtmlWebpackPlugin = require('html-webpack-plugin')

const ExtractTextPlugin = require('extract-text-webpack-plugin')

const OptimizeCSSPlugin = require('optimize-css-assets-webpack-plugin')

const UglifyJsPlugin = require('uglifyjs-webpack-plugin')

const env = require('../config/prod.env')

const glob = require('glob')

function getEntries (globPath){

  const entries = glob.sync(globPath).reduce((result, entry) => {

    const moduleName = path.basename(path.dirname(entry)) // 获取模块名称

    result[moduleName] = entry

    return result

  }, {})

  return entries

}

const entries = getEntries('./src/modules/**/*.html')   // 获取多页面所有入口文件

const webpackConfig = merge(baseWebpackConfig, {

  module: {

    rules: utils.styleLoaders({

      sourceMap: config.build.productionSourceMap,

      extract: true,

      usePostCSS: true

    })

  },

  devtool: config.build.productionSourceMap ? config.build.devtool : false,

  output: {

    path: config.build.assetsRoot,

    filename: 'modules/[name]/[name].[chunkhash].js',

    // publicPath: '/' // 改为相对路径

    // chunkFilename: utils.assetsPath('js/[id].[chunkhash].js')

  },

  plugins: [

    // http://vuejs.github.io/vue-loader/en/workflow/production.html

    new webpack.DefinePlugin({

      'process.env': env

    }),

    new UglifyJsPlugin({

      uglifyOptions: {

        compress: {

          warnings: false

        }

      },

      sourceMap: config.build.productionSourceMap,

      parallel: true

    }),

    // extract css into its own file

    new ExtractTextPlugin({

      filename: utils.assetsPath('css/[name].[contenthash].css'),

      // Setting the following option to `false` will not extract CSS from codesplit chunks.

      // Their CSS will instead be inserted dynamically with style-loader when the codesplit chunk has been loaded by webpack.

      // It's currently set to `true` because we are seeing that sourcemaps are included in the codesplit bundle as well when it's `false`,

      // increasing file size: https://github.com/vuejs-templates/webpack/issues/1110

      allChunks: true,

    }),

    // Compress extracted CSS. We are using this plugin so that possible

    // duplicated CSS from different components can be deduped.

    new OptimizeCSSPlugin({

      cssProcessorOptions: config.build.productionSourceMap

        ? { safe: true, map: { inline: false } }

        : { safe: true }

    }),

    // generate dist index.html with correct asset hash for caching.

    // you can customize output by editing /index.html

    // see https://github.com/ampedandwired/html-webpack-plugin

    // keep module.id stable when vendor modules does not change

    new webpack.HashedModuleIdsPlugin(),

    // enable scope hoisting

    new webpack.optimize.ModuleConcatenationPlugin(),

    // split vendor js into its own file

    new webpack.optimize.CommonsChunkPlugin({

      name: 'vendor',

      minChunks (module) {

        // any required modules inside node_modules are extracted to vendor

        return (

          module.resource &&

          /\.js$/.test(module.resource) &&

          module.resource.indexOf(

            path.join(__dirname, '../node_modules')

          ) === 0

        )

      }

    }),

    // extract webpack runtime and module manifest to its own file in order to

    // prevent vendor hash from being updated whenever app bundle is updated

    new webpack.optimize.CommonsChunkPlugin({

      name: 'manifest',

      minChunks: Infinity

    }),

    // This instance extracts shared chunks from code splitted chunks and bundles them

    // in a separate chunk, similar to the vendor chunk

    // see: https://webpack.js.org/plugins/commons-chunk-plugin/#extra-async-commons-chunk

    new webpack.optimize.CommonsChunkPlugin({

      name: 'app',

      async: 'vendor-async',

      children: true,

      minChunks: 3

    }),

    // copy custom static assets

    new CopyWebpackPlugin([

      {

        from: path.resolve(__dirname, '../static'),

        to: config.build.assetsSubDirectory,

        ignore: ['.*']

      }

    ])

  ]

})

if (config.build.productionGzip) {

  const CompressionWebpackPlugin = require('compression-webpack-plugin')

  webpackConfig.plugins.push(

    new CompressionWebpackPlugin({

      asset: '[path].gz[query]',

      algorithm: 'gzip',

      test: new RegExp(

        '\\.(' +

        config.build.productionGzipExtensions.join('|') +

        ')$'

      ),

      threshold: 10240,

      minRatio: 0.8

    })

  )

}

if (config.build.bundleAnalyzerReport) {

  const BundleAnalyzerPlugin = require('webpack-bundle-analyzer').BundleAnalyzerPlugin

  webpackConfig.plugins.push(new BundleAnalyzerPlugin())

}

function pack (entries, module) {

  for (const path in entries) {

    const conf = {

      filename: `modules/${path}/index.html`,

      template: entries[path],   // 模板路径

      inject: true,

      chunks: ['manifest', 'vendor', path]   // 必须先引入公共依赖

    }

    module.plugins.push(new HtmlWebpackPlugin(conf))

  }

}

pack(entries, webpackConfig)

module.exports = webpackConfig
然后启动npm run build尝试打包文件

OK,多页面的打包完成
参考:http://blog.csdn.net/u013291076/article/details/53667382
vue搭建多页面开发环境的更多相关文章
- vue.js多页面开发环境搭建
利用 vue-cli 搭建的项目大都是单页面应用项目,对于简单的项目,单页面就能满足要求.但对于有多个子项目的应用,如果创建多个单页面,显示有点重复,特别是 node_modules 会有多份相同的. ...
- 用grunt搭建web前端开发环境
1.前言 本文章旨在讲解grunt入门,以及讲解grunt最常用的几个插件的使用. 2.安装node.js Grunt和所有grunt插件都是基于nodejs来运行的,如果你的电脑上没有nodejs, ...
- Xamarin Andro教程搭建Xamarin Androidid开发环境(一)
Xamarin Andro教程搭建Xamarin Androidid开发环境(一) "工欲善其事,必先利其器".对于程序员来说,编程的环境就是其手中的利器.如果没有一个合适方便的编 ...
- 快速搭建 Node.js 开发环境以及加速 npm
如何快速搭建 node 开发环境 npm 超慢 github 无法打开的问题 于是我觉得应该写一篇文章解答所有这些起步问题,让新同学也能顺顺利利入门. 快速搭建 Node.js 开发环境 如果你想长期 ...
- Win7的64位系统如何搭建安卓Android开发环境
在搭建安卓Android开发环境,那么现在比较主流的Win7的64位操作系统如何搭建呢?其实很简单,不需要设置任何环境变量,只需要下载两个程序包(ADT和JDK),下载的时候注意选择相应的64位程序包 ...
- 优化单页面开发环境:webpack与react的运行时打包与热更新
前面两篇文章介绍初步搭建单页面应用的开发环境: 第一篇:使用webpack.babel.react.antdesign配置单页面应用开发环境 第二篇:使用react-router实现单页面应用路由 这 ...
- React Native开发 - 搭建React Native开发环境
移动开发以前一般都是原生的语言来开发,Android开发是用Java语言,IOS的开发是Object-C或者Swift.那么对于开发一个App,至少需要两套代码.两个团队.对于公司来说,成本还是有的. ...
- 从零开始搭建Go语言开发环境
一步一步,从零搭建Go语言开发环境. 安装Go语言及搭建Go语言开发环境 下载 下载地址 Go官网下载地址:https://golang.org/dl/ Go官方镜像站(推荐):https://gol ...
- vs2017搭建linux c++开发环境
最近一直在阅读ovs的源码,看到用户态代码的时候,需要对用户态的代码进行调试,一开始想直接使用linux中的GDB进行调试,但是ovs的工程太过于复杂,从网上找了些文章,发现vs2017能够支持lin ...
随机推荐
- 常用jquery
水果:<input type="checkbox" name="shuiGuo" value="2">苹果<input t ...
- 创建JavaScript函数的几种方式
window.onload = function() { // console.log('ok'); //正规的创建函数 function test(abc, d) { return abc(d); ...
- 第二阶段第十次spring会议
昨天我对宠物信息进行了添加和调整. 今天我将继续对宠物信息添加保存按钮. private void button2_Click(object sender, EventArgs e) { Settin ...
- SHELL脚本学习-练习写一个脚本4
#编写一个脚本时,自动生成”#!/bin/bash”这一行和相关注释信息. 把以下的代码保存为一个sh文件,比如test.sh , 新建脚本是使用 bash test.sh newfile 即可. ...
- appium python入门例子
在这里我选的编辑器是pycharm,在这里以微信为例,写了一小demo,具体的代码如下 from appium import webdriverimport timedesired_caps={ 'p ...
- JavaScript变量声明var,let.const
var声明变量的作用域限制在其声明位置的上下文中 var x = 0; // x是全局变量,并且赋值为0. console.log(typeof z); // undefined,因为z还不存在. f ...
- IE9及以下input无背景时,层级混乱问题
IE9及以下版本:input输入框 background:none;时,层级比input的低的元素会显示在input之上,导致input点击不了. 解决方案: background:url(" ...
- Win7 VS2017编译Blender2.79
去年在VS2013环境编译过一次,重装系统后换了VS2017,正好刚编译完Godot3.0.2,顺手把Blender也编译了吧. 官方Windows下编译指南 https://wiki.blender ...
- 感知机、logistic回归 损失函数对比探讨
感知机.logistic回归 损失函数对比探讨 感知机 假如数据集是线性可分的,感知机学习的目标是求得一个能够将正负样本完全分开的分隔超平面 \(wx+b=0\) .其学习策略为,定义(经验)损失函数 ...
- C++中_cplusplus及Extern "C"的理解
一.意义 Extern "C":告诉编译器,这部分代码按C语言的方式进行编译,而不是C++的. _cplusplus:.cpp文件默认定义的宏.用来判断是否为.cpp文件. 二 ...