FastDFS+nginx+keepalived集群搭建
安装环境
nginx-1.6.2
libfastcommon-master.zip
FastDFS_v5.05.tar.gz(http://sourceforge.net/projects/fastdfs/files/)
fastdfs-nginx-module_v1.16.tar.gz
ngx_cache_purge-2.3.tar.gz(用于清除指定url的缓存)
keepalived
VM虚拟机redhat6.5-x64:192.168.1.201、192.168.1.202、192.168.1.203、192.168.1.204、
192.168.1.201、192.168.1.202、192.168.1.203、192.168.1.204、
Xshell4
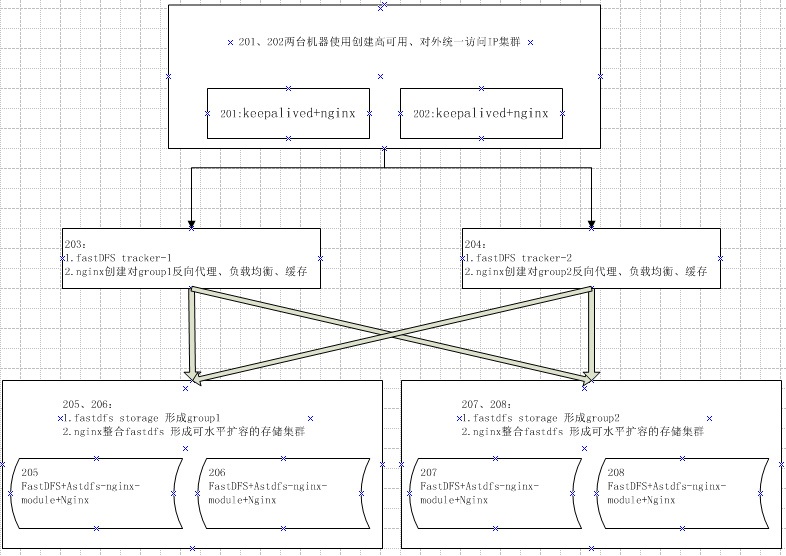
部署方案
安装步骤
步骤一:203、204、205、206、207、208安装FastDFS
参考:https://www.cnblogs.com/cac2020/p/9534967.html
步骤二:配置跟踪器(192.168.1.203 、192.168.1.204 节点)
    mkdir -p /fastdfs/tracker&& cp /etc/fdfs/tracker.conf.sample tracker.conf && vim /etc/fdfs/tracker.conf

修改内容:

    base_path=/fastdfs/tracker

    #关键点:轮询分配到各个group里

    store_lookup=

启动:

    /etc/init.d/fdfs_trackerd start
步骤三:配置FastDFS存储(192.168.1.205-208)
205、206作为group1 , 207、208作为group2
mkdir -p /fastdfs/storage && cp /etc/fdfs/storage.conf.sample storage.conf && vim /etc/fdfs/storage.conf

修改内容:

disabled=false

group_name=group1      #组名,第一组(、)为 group1 第二组(、)为 group2

port=             #storage 端口号,同组的端口号必须相同

base_path=/fastdfs/storage

store_path_count=     #存储路径个数 需要和 store_path 个数匹配

store_path0=/fastdfs/storage #设置存储路径

tracker_server=192.168.1.203: #tracker 服务器的 ip 和端口

tracker_server=192.168.1.204: #多个 tracker 直接添加多条记录

http.server_port=  #设置 http 端口号

启动:

/etc/init.d/fdfs_storaged start
到此为止我们的 FastDFS 集群环境已经搭建完成!!!!
--------------------------------------------------------------------------------------------------------------------------------------------------------------------------------------------------------------------------------
步骤四:4个存储节点(205 206 207 208)整合Nginx
.安装整合包fastdfs-nginx-module_v1..tar.gz

tar -zxvf /usr/local/software/fastdfs-nginx-module_v1..tar.gz -C /usr/local/fast/

vim /usr/local/fast/fastdfs-nginx-module/src/config

修改内容:去掉第四行中的 local 文件层次

.安装Nginx 加载fastdfs-nginx-module模块

tar -zxvf /usr/local/software/nginx-1.6..tar.gz -C /usr/local

cd /usr/local/nginx-1.6. && ./configure --add-module=/usr/local/fast/fastdfs-nginx-module/src/

重新编译命令: make && make install

.修改整合模块配置

cp /usr/local/fast/fastdfs-nginx-module/src/mod_fastdfs.conf /etc/fdfs/  && vim /etc/fdfs/mod_fastdfs.conf

修改内容:

注意:第一组(、)和第二组(、) 节点修改内容,只有组名不同

connect_timeout=

tracker_server=192.168.1.203:

tracker_server=192.168.1.204:

storage_server_port=

url_have_group_name = true

store_path0=/fastdfs/storage

group_name=group1 #第一组为 group1  第二组为 group2

group_count =

#追加以下内容

[group1]

group_name=group1

storage_server_port=

store_path_count=

store_path0=/fastdfs/storage

[group2]

group_name=group2

storage_server_port=

store_path_count=

store_path0=/fastdfs/storage

.复制配置文件

cd /usr/local/fast/FastDFS/conf/ && cp http.conf mime.types /etc/fdfs/

.创建软连接,在/fastdfs/storage 文件存储目录下创建软连接,将其链接到实际存放数据的目录。

命令: ln -s /fastdfs/storage/data/ /fastdfs/storage/data/M00

.修改 Nginx 配置文件4个节点

命令:vim usr/local/nginx.conf

修改内容:

listen ;

server_name localhost;

location ~/group([-])/M00 {

    #alias /fastdfs/storage/data;

    ngx_fastdfs_module;

}

启动4个节点Nginx: /usr/local/nginx/sbin/nginx
步骤五:在2个跟踪器节点上安装nginx为4个存储节点提供负载均衡
.安装ngx_cache_purge-2.3.tar.gz(清除指定url的缓存)

tar -zxvf /usr/local/software/ngx_cache_purge-2.3.tar.gz –C /usr/local/fast/

.安装Nginx  加入 ngx_cache_purge (加入清除缓存模块)

tar -zxvf /usr/local/software/nginx-1.6..tar.gz -C /usr/local

cd /usr/local/nginx-1.6. && ./configure --add-module=/usr/local/fast/ngx_cache_purge-2.3/src/

重新编译命令: make && make install

.修改nginx配置

vim /usr/local/nginx/conf/nginx.conf

修改内容:

events {

    worker_connections  ;

    use epoll;

}

http {

    include       mime.types;

    default_type  application/octet-stream;

    sendfile        on;

    tcp_nopush     on;

    keepalive_timeout  ;

    #设置缓存

    server_names_hash_bucket_size ;

    client_header_buffer_size 32k;

    large_client_header_buffers  32k;

    client_max_body_size 300m;

    proxy_redirect off;

    proxy_set_header Host $http_host;

    proxy_set_header Cookie $http_cookie;

    proxy_set_header X-Real-IP $remote_addr;

    proxy_set_header X-Forwarded-For $proxy_add_x_forwarded_for;

    proxy_connect_timeout ;

    proxy_read_timeout ;

    proxy_send_timeout ;

    proxy_buffer_size 16k;

    proxy_buffers  64k;

    proxy_busy_buffers_size 128k;

    proxy_temp_file_write_size 128k;

    #设置缓存存储路径、存储方式、分配内存大小、磁盘最大空间、缓存期限

    proxy_cache_path /fastdfs/cache/nginx/proxy_cache levels=:

    keys_zone=http-chche:200m max_size=1g inactive=30d;

    proxy_temp_path /fastdfs/cache/nginx/proxy_cache/tmp;

    # weight 权重  max_fails 失败重试次数 fail_timeout 连接失败超时时间

    #设置 group1 的服务器

    upstream fdfs_group1 {

         server 192.168.1.205: weight= max_fails= fail_timeout=30s;

         server 192.168.1.206: weight= max_fails= fail_timeout=30s;

    }

    #设置 group2 的服务器

    upstream fdfs_group2 {

         server 192.168.1.207: weight= max_fails= fail_timeout=30s;

         server 192.168.1.208: weight= max_fails= fail_timeout=30s;

    }

 server {

        listen       ;

        server_name  localhost;

        #charset koi8-r;

        #access_log  logs/host.access.log  main;

        #设置 group 的负载均衡参数

        location /group1/M00 {

           proxy_next_upstream http_502 http_504 error timeout invalid_header;

            proxy_cache http-cache;

            proxy_cache_valid    12h;

            proxy_cache_key $uri$is_args$args;

            proxy_pass http://fdfs_group1;

            expires 30d;

        }

         location /group2/M00 {

            proxy_next_upstream http_502 http_504 error timeout invalid_header;

            proxy_cache http-cache;

            proxy_cache_valid   12h;

            proxy_cache_key $uri$is_args$args;

            proxy_pass http://fdfs_group2;

            expires 30d;

        }

        #设置清除缓存的访问权限

        location ~/purge(/.*) {

            allow 127.0.0.1;

            allow 192.168.1.0/;

            deny all;

            proxy_cache_purge http-cache $$is_args$args;

        }

        #error_page                /.html;

        # redirect server error pages to the static page /50x.html

        #

        error_page        /50x.html;

        location = /50x.html {

            root html;

        }

}

.按以上nginx 配置文件的要求,创建对应的缓存目录2个跟踪器节点都需要:

mkdir -p /fastdfs/cache/nginx/proxy_cache

mkdir -p /fastdfs/cache/nginx/proxy_cache/tmp

启动ngnix:/usr/local/nginx/sbin/nginx
步骤六:201、202节点安装keepalived+nginx,对203、204提供负载均衡并对外外提供统一访问IP
.安装nginx

修改nginx配置

vim /usr/local/nginx/conf/nginx.conf

修改内容:

upstream fastdfs_tracker {

    server 192.168.1.203: weight= max_fails= fail_timeout=30s;

    server 192.168.1.204: weight= max_fails= fail_timeout=30s;

}

server {

        listen       ;

        server_name  localhost;

        location / {

            root html;

            index  index.html index.htm;

        }

        error_page        /50x.html;

        location = /50x.html {

            root html;

        }

        ## FastDFS Proxy 代理路径设置为 /fastdfs

        location /fastdfs {

            root   html;

            index  index.html index.htm;

            proxy_pass  http://fastdfs_tracker/;

            proxy_set_header Host  $http_host;

            proxy_set_header Cookie $http_cookie;

            proxy_set_header X-Real-IP $remote_addr;

            proxy_set_header X-Forwarded-For $proxy_add_x_forwarded_for;

            proxy_set_header X-Forwarded-Proto $scheme;

            client_max_body_size  300m;

        }

}

.安装keepalived

修改keepalived配置

参考:https://www.cnblogs.com/cac2020/p/9528106.html
最后注意:千万不要使用 kill - 命令强杀 FastDFS 进程,否则可能会导致 binlog 数据丢失
关闭集群步骤:

、  两台一级负载节点

关闭 keepalived 命令:service keepalived stop

关闭 nginx 命令:/usr/local/nginx/sbin/nginx –s stop

、  两台二级负载节点,跟踪器节点

关闭 nginx 命令:/usr/local/nginx/sbin/nginx –s stop

关闭 trackerd 跟踪器命令:/etc/init.d/fdfs_trackerd stop

、    四台三级负载节点,存储节点

关闭 nginx 命令:/usr/local/nginx/sbin/nginx –s stop

关闭 storage 存储器命令: /etc/init.d/fdfs_storaged stop

注意:千万不要使用 kill - 命令强杀 FastDFS 进程,否则可能会导致 binlog 数据丢失
参考手册:keepalived+nginx+fastdfs集群安装手册.pdf
FastDFS+nginx+keepalived集群搭建的更多相关文章
- FastDFS+Nginx+fastdfs-nginx-module集群搭建
一.实验环境说明 操作系统: Centos 6.6 x64 FastDFS 相关版本: fastdfs-5.05 fastdfs-nginx-module-v1.16 libfastcommon-v1 ...
- Centos7+nginx+keepalived集群及双主架构案例
目录简介 一.简介 二.部署nginx+keepalived 集群 三.部署nginx+keepalived双主架构 四.高可用之调用辅助脚本进行资源监控,并根据监控的结果状态实现动态调整 一.简介 ...
- tomcat+nginx+redis集群搭建并解决session共享问题。
1 集群搭建 https://www.cnblogs.com/yjq520/p/7685941.html 2 session共享 https://blog.csdn.net/tuesdayma/art ...
- Nginx+Keepalived 集群方案
1.Keepalived高可用软件 Keepalived软件起初是专为LVS负载均衡软件设计的,用来管理并监控LVS集群系统中各个服务节点的状态,后来又加入了可以实现高可用的VRRP功能.因此,kee ...
- 构建企业级Nginx+Keepalived集群架构
随着Nginx在国内的发展潮流,越来越多的互联网公司都在使用Nginx. Nginx高性能.稳定性成为IT人士青睐的http和反向代理服务器,今天我们来实战构建Nginx+Keepalived高可用架 ...
- 企业级Nginx+Keepalived集群实战(双主架构)
随着Nginx在国内的发展潮流,越来越多的互联网公司都在使用Nginx,Nginx高性能.稳定性成为IT人士青睐的HTTP和反向代理服务器.Nginx负载均衡一般位于整个网站架构的最前端或者中间层,如 ...
- FastDFS教程IV-文件服务器集群搭建
1.简介 本文主要介绍FastDFS文件服务器的集群搭建,在阅读本文之前,您需具备FastDFS文件服务器单节点安装,扩容,迁移等方面的知识.同时,您还需了解Keepalived,nginx方 ...
- 多puppetmaster,多ca,keepalived+haproxy(nginx)puppet集群搭建
多puppetmaster,多ca,keepalived+haproxy(nginx)puppet集群搭建 一.服务器详情 192.168.122.111 pm01.jq.com pm01 #(pup ...
- fastdfs集群版搭建(一)- storage集群搭建与统一入口访问
前言 接着上篇博客:详细的最新版fastdfs单机版搭建,今天来讲讲fastdfs的集群搭建,限于篇幅,今天先搭建stoarge集群,并实现统一的http访问方式: 没看我上篇博客的小伙伴,最好先去瞅 ...
随机推荐
- C# 多线程ManualResetEvent、等待所有线程
需求:成员A可能有几十个,我需要更新所有的A,然后根据A的数据,去更新成员B. 解决方案:思路是想通过多线程更新所有的A,然后通过等待线程来确定所有的A是否都更新完,最后更新B. Member B = ...
- 23种设计模式之状态模式(State)
状态模式是一种对象的行为型模式,允许一个对象在其内部状态改变时改变它的行为,对象看起来似乎修改了它的类.状态模式封装了状态的转换过程,但是它需要枚举可能的状态,因此,需要事先确定状态种类,这也导致在状 ...
- 【POJ2154】Color Pólya定理+欧拉函数
[POJ2154]Color 题意:求用$n$种颜色染$n$个珠子的项链的方案数.在旋转后相同的方案算作一种.答案对$P$取模. 询问次数$\le 3500$,$n\le 10^9,P\le 3000 ...
- elasticsearch的索引自动清理及自定义清理
近发现elasticsearch近期索引文件大的吓人,清理了下之前的索引文件,发现服务器性能大大的减轻了一半,想一直保留近一个月的索引文件,但是又不想每个月手动清楚,在此写了一个小脚本 查询索引: c ...
- C++虚函数virtual,纯虚函数pure virtual和Java抽象函数abstract,接口interface与抽象类abstract class的比较
由于C++和Java都是面向对象的编程语言,它们的多态性就分别靠虚函数和抽象函数来实现. C++的虚函数可以在子类中重写,调用是根据实际的对象来判别的,而不是通过指针类型(普通函数的调用是根据当前指针 ...
- H-数学考试 想法题+最新头文件 2018年长沙理工大学第十三届程序设计竞赛
https://www.nowcoder.com/acm/contest/96/H 坑点:INF开太小了... #define _CRT_SECURE_NO_WARNINGS #include< ...
- 2018/03/29 每日一个Linux命令 之 ping
ping 用于测试两及其网络是否通 主要用于检测网络是否通畅. -- 具体语法 ping [-dfnqrRv][-c<完成次数>][-i<间隔秒数>][-I<网络界面&g ...
- 2018/03/18 isset、empty、is_null的区别
在平常的工作中,判断一个值是否为空的情况时,会直接使用 if ($var) 这种形式,有时也会使用这三个函数进行比较,但是当时也没有很深入的学习. -- 还是通过实例来判断这几个的用法和场景 首先定义 ...
- 【JMeter】JMeter进行简单的数据库(mysql)压力测试
JMeter进行简单的数据库(mysql)压力测试 1.点击测试计划,再点击“浏览”,把JDBC驱动添加进来: 注:JDBC驱动一般的位置在java的安装地址下,路径类似于: \java\jre ...
- 002-nginx-在 nginx 反向代理中使用域名,配置动态域名解析
一.概述 代理(proxy),即中间人,它代替客户端发送请求给服务器,收到响应后再转给客户端.通常意义上的代理是从用户的角度讲的,用户通过某个代理可以访问多个网站,这个代理是靠近用户的,比如某些公司可 ...