salesforce lightning零基础学习(七) 列表展示数据时两种自定义编辑页面
上一篇Lightning内容描述的是LDS,通过LDS可以很方便的实例化一个对象的数据信息。当我们通过列表展示数据需要编辑时,我们常使用两种方式去处理编辑页面:Pop Up Window弹出修改详情以及在本页面隐藏详情页面显示编辑页面。
实现这个功能以前主要需要先了解几个标签:
lightning:recordForm: 此标签允许用户快速的创建一个form去查看,添加以及修改一条记录。集合了 lightning:recordEditForm 以及 lightning:recordViewForm 两个标签功能。
下面例举一些此标签常用的属性:
objectName: 想要展示的object的API Name,此属性为必填的属性;
recordId:想要展示记录的ID;
mode:指定Form的交互方式以及样式。值有三个:
- view – 记录在View模式下展示,默认显示编辑(铅笔)图标,点击编辑图标后进入编辑模式;
- edit – 记录展示包含Save和Cancel的Edit模式;
- readonly – 记录在View模式下展示,不允许编辑。
更多属性请查看:https://developer.salesforce.com/docs/component-library/bundle/lightning:recordForm/specification
上面也说到了lightning:recordForm集合了lightning:recordViewForm以及lightning:recordEditForm.下面的demo是通过这两个元素进行展示,所以简单的说一下这两个标签:
lightning:recordViewForm:此标签封装了一个wrapper,通过recordId, 使用lightning:outputField用来展示记录相关的字段值以及Label名称。正常我们想要展示一条记录,按照之前的学习有两种实现的方式,第一种是后台搜索出来,init handler实例化,第二种是使用LDS,通过此标签,我们只需要传递记录ID,便可以使用记录中所有可以访问字段的信息。
此元素有两个必填的属性:
objectApiName:想要展示的object的API Name;
recordId: 想要展示数据的ID。
lightning:recordEditForm:此标签用途和lightning:recordViewForm大部分相同,区别为此标签用于Form配合lightning:inputField实现编辑一个form功能。如果recordId为空,则进行创建一条数据的功能,如果recordId有值,则进行更新记录功能。
官方提供的简单的demo如下:https://developer.salesforce.com/docs/component-library/bundle/lightning:recordEditForm/documentation
常用属性:
objectApiName:想要编辑的object的API Name;
recordId:想要编辑的记录的Id,如果此属性为空,则认为是新建记录;
recordTypeId:想要编辑的记录的record type id,用于指定新建/编辑记录的record type
onload:Form数据加载后触发的回调函数;
onsubmit:Form数据submit后触发的回调函数;
onsuccess:数据操作成功后的回调函数;
onerror: 数据操作失败后的回调函数;
lightning:overlayLibrary:此标签包含两个功能:弹出popup modal以及展示Popover(弹出框)。此标签包含了两个主要的方法:
showCustomModal:此方法用于弹出一个popup modal,样式和使用标准界面修改一条记录弹出的modal类似。此方法包含以下常用参数:
- header:传入类型为object,用于展示在modal header部分;
- body:传入类型为object,用于展示在modal body部分;
- footer:传入类型为object,用于展示在modal的footer部分;
- showCloseButton:指定是否在modal中展示关闭按钮,默认为true;
- cssClass:逗号分隔的一个list的css class应用于此modal;
- closeCallback:modal关闭时的回调函数。
此方法的语法格式如下:
component.find('overlayLib').showCustomModal({

   //modal attributes

}).then(function (overlay) {

    //closes the modal immediately

    overlay.close();

});
modal效果展示图如下:

showCustomPopover:此方法用于弹出一个弹出框,类似标签中title样式,hover后在旁边展示的描述信息的效果。此方法包含以下常用参数:
- body:传入类型为object,用于展示popover中的body部分;
- referenceSelector:指定popover要展示在哪个元素后面;
- cssClass:逗号分隔的一个list的css class应用于此modal。
popover显示效果如下:

这两个方法的demo可以访问:https://developer.salesforce.com/docs/component-library/bundle/lightning:overlayLibrary/documentation
注意:演示这两个功能时,一定注意不要使用single app,single app展示这种方式会出现报错:

测试这两种样式可以考虑demo中component implements="flexipage:availableForAllPageTypes",然后放在一个object的detail页面看效果。下面为demo部分。
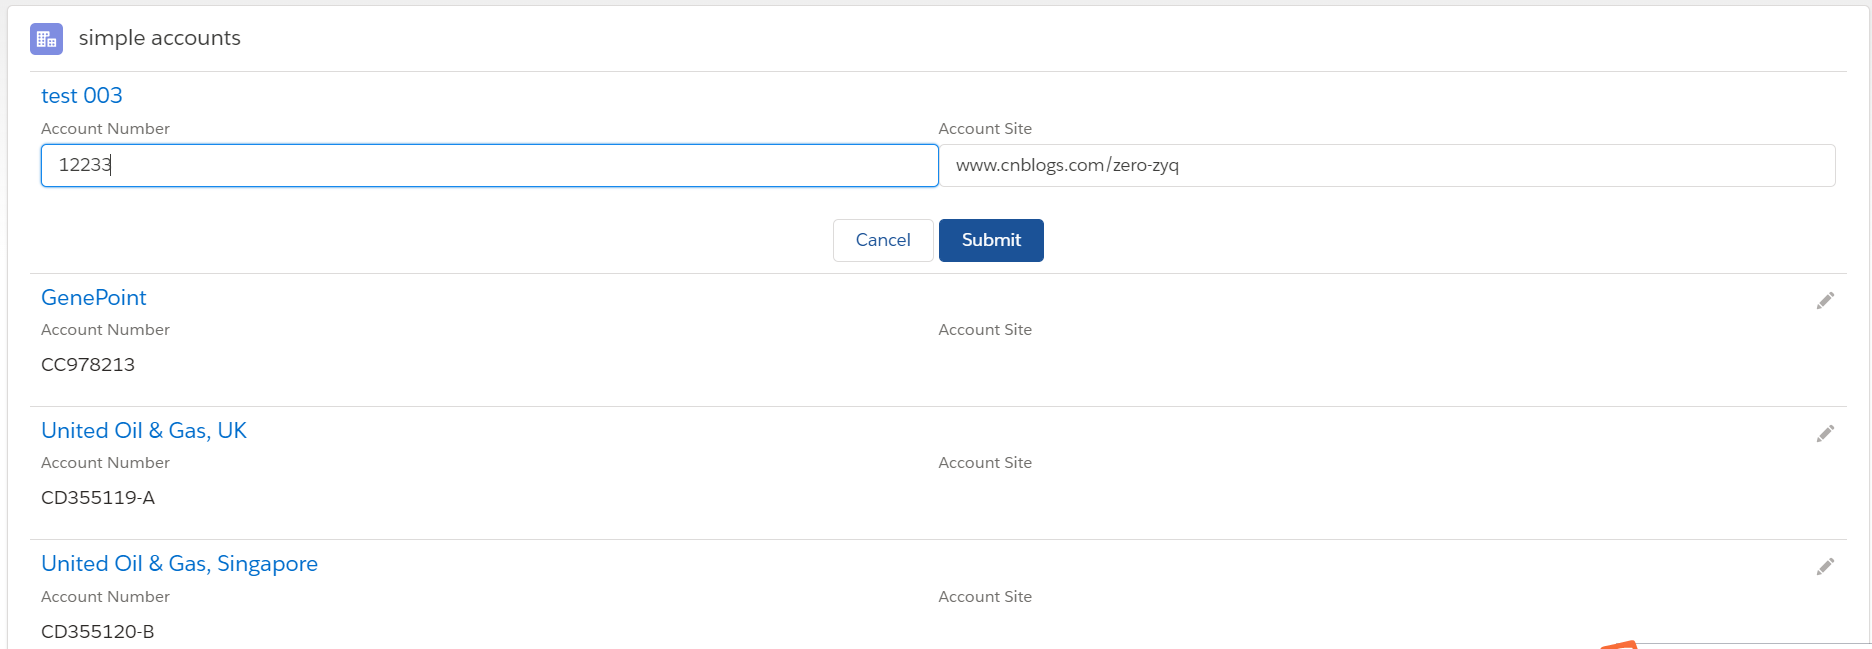
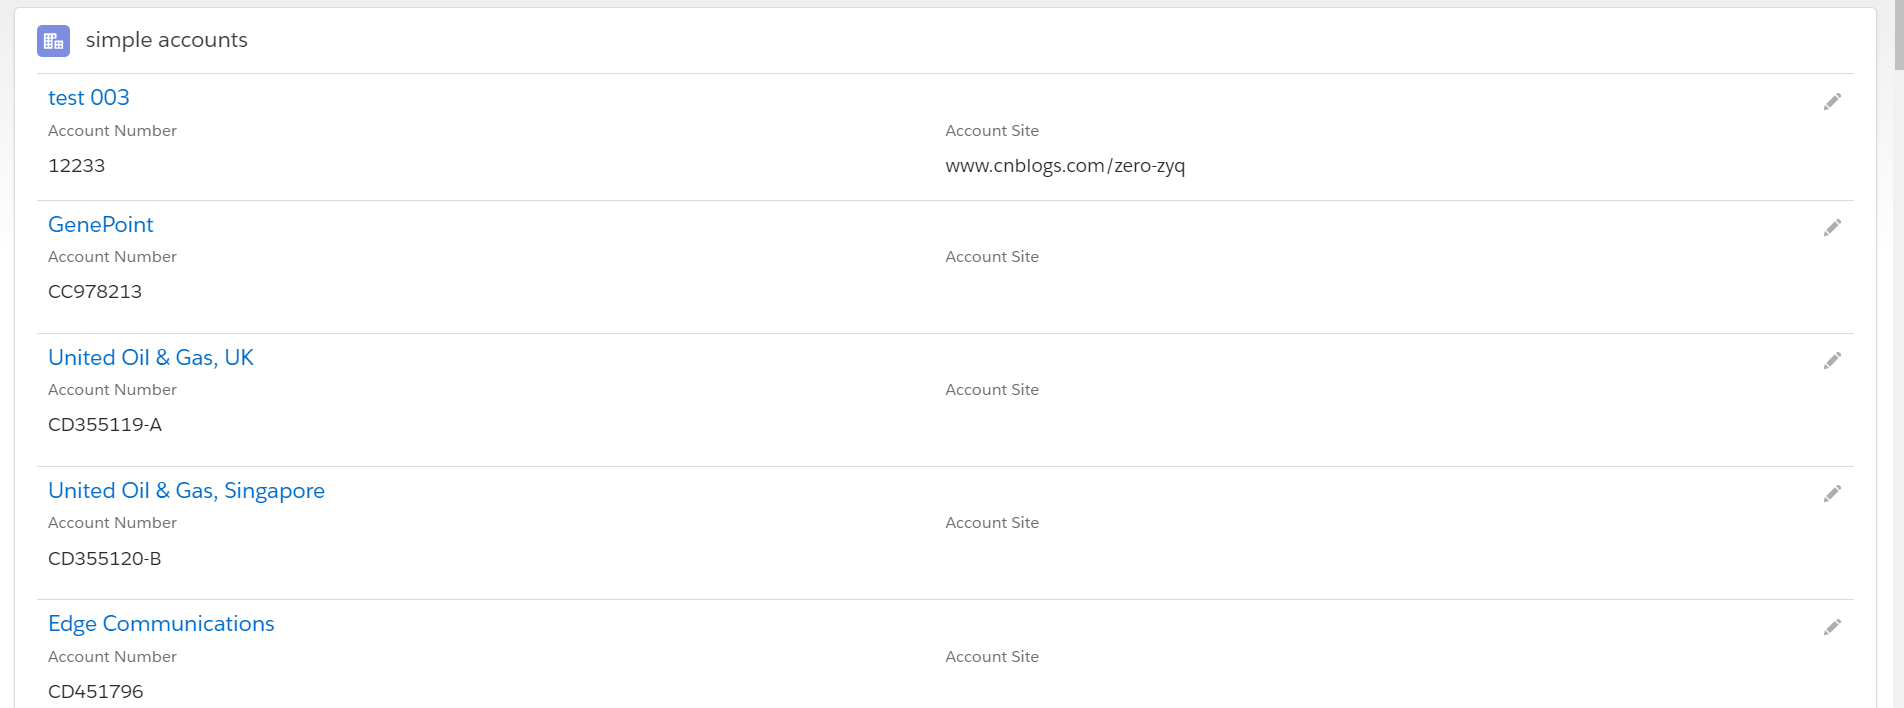
一. 列表使用Card样式展示,点击Edit图标覆盖原View布局显示Edit布局,点击Save以后显示View布局的List样式。
1.SimpleAccountList:此类用于默认初始化搜索出来10条Account信息;
 public class SimpleAccountListController {

     @AuraEnabled

     public static List<Account> getAccountList() {

         return [SELECT Id,Name,AccountNumber,Site

                     FROM Account

                     LIMIT 10];

     }

 }
2.SimpleAccount.cmp:用于默认初始化展示view视图,点击edit的icon后显示edit部分视图;
 <aura:component implements="flexipage:availableForRecordHome,force:hasRecordId">

     <aura:attribute name="acc" type="Account"/>

     <lightning:recordViewForm aura:id="viewForm" recordId="{!v.acc.Id}" objectApiName="Account">

         <div class="slds-media">

             <div class="slds-media__body">

                 <lightning:layout class="slds-hint-parent">

                     <a onclick="{!c.navToRecord}">

                         <h3 class="slds-text-heading_small slds-m-bottom_xx-small">{!v.acc.Name}</h3>

                     </a>

                     <lightning:buttonIcon iconName="utility:edit" class="slds-col_bump-left" iconClass="slds-button__icon_hint" variant="bare" alternativeText="Edit Record" onclick="{!c.editRecord}"/>

                 </lightning:layout>

                 <lightning:layout multipleRows="true">

                     <lightning:layoutItem size="6">

                         <lightning:outputField fieldName="AccountNumber"/>

                     </lightning:layoutItem>

                     <lightning:layoutItem size="6">

                         <lightning:outputField fieldName="Site"/>

                     </lightning:layoutItem>

                 </lightning:layout>

             </div>

         </div>

     </lightning:recordViewForm>

     <lightning:recordEditForm aura:id="editForm" recordId="{!v.acc.Id}" objectApiName="Account" class="slds-hide" onsuccess="{!c.handleSuccess}">

         <div class="slds-media">

             <div class="slds-media__body">

                 <lightning:layout>

                     <a onclick="{!c.navToRecord}">

                         <h3 class="slds-text-heading_small slds-m-bottom_xx-small">{!v.acc.Name}</h3>

                     </a>

                 </lightning:layout>

                 <lightning:layout multipleRows="true">

                     <lightning:layoutItem size="6">

                         <lightning:inputField fieldName="AccountNumber"/>

                     </lightning:layoutItem>

                     <lightning:layoutItem size="6">

                         <lightning:inputField fieldName="Site"/>

                     </lightning:layoutItem>

                 </lightning:layout>

                 <lightning:layout horizontalAlign="center" class="slds-m-top_large">

                     <lightning:button variant="neutral" label="Cancel" title="Cancel" type="text" onclick="{!c.handleCancel}"/>

                     <lightning:button variant="brand" label="Submit" title="Submit" type="submit"/>

                 </lightning:layout>

             </div>

         </div>

     </lightning:recordEditForm>

 </aura:component>
3.SimpleAccountController.js: 处理跳转到account页面以及点击edit,save以及cancel操作处理;
 ({

     navToRecord : function (component, event, helper) {

         var navEvt = $A.get("e.force:navigateToSObject");

         navEvt.setParams({

             "recordId": component.get("v.acc.Id")

         });

             navEvt.fire();

     },

     editRecord : function(component, event, helper) {

         helper.showHide(component);

     },

     handleSuccess : function(component, event, helper) {

          helper.showHide(component);

         var recUpdate = $A.get("e.c:recordUpdated");

         recUpdate.fire();

     },

     handleCancel : function(component, event, helper) {

         helper.showHide(component);

         event.preventDefault();

     }

 })
4.SimpleSimpleAccountHelper.js:用于切换view/edit视图的显示;
 ({

     showHide : function(component) {

         var editForm = component.find("editForm");

         $A.util.toggleClass(editForm, "slds-hide");

         var viewForm = component.find("viewForm");

         $A.util.toggleClass(viewForm, "slds-hide");

     }

 })
5.SimpleAccountList.cmp:用于展示account的list;
 <aura:component  controller="SimpleAccountListController" implements="flexipage:availableForRecordHome,force:hasRecordId">

     <aura:attribute name="simpleAccounts" type="Object[]"/>

     <aura:attribute name="acc" type="Account"/>

     <aura:handler name="init" value="{!this}" action="{!c.doInit}"/>

     <lightning:card iconName="standard:account" title="simple accounts" class="slds-is-relative">

         <div class="slds-p-left_medium slds-p-right_medium">

             <ul class="slds-list_vertical slds-has-dividers_top-space">

                 <aura:if isTrue="{!v.simpleAccounts.length > 0}">

                     <aura:iteration items="{!v.simpleAccounts}" var="item">

                         <li class="slds-list__item">

                             <c:SimpleAccount acc="{!item}"/>

                         </li>

                     </aura:iteration>

                     <aura:set attribute="else">

                         <li class="slds-list__item">

                             <h3 class="slds-text-small slds-text-color_error">No accounts found.</h3>

                         </li>

                     </aura:set>

                 </aura:if>

             </ul>

         </div>

     </lightning:card>

 </aura:component>
6. SimpleAccountListController.js:用于初始化数据
 ({

     doInit : function(component, event, helper) {

         var action = component.get("c.getAccountList");

         action.setCallback(this, function(response){

             var simpleAccounts = response.getReturnValue();

             component.set("v.simpleAccounts", simpleAccounts);

         });

         $A.enqueueAction(action);

     }

 })
7.将SimpleAccountList.cmp放在account的detail page中。
效果展示:
1.默认通过card布局展示列表
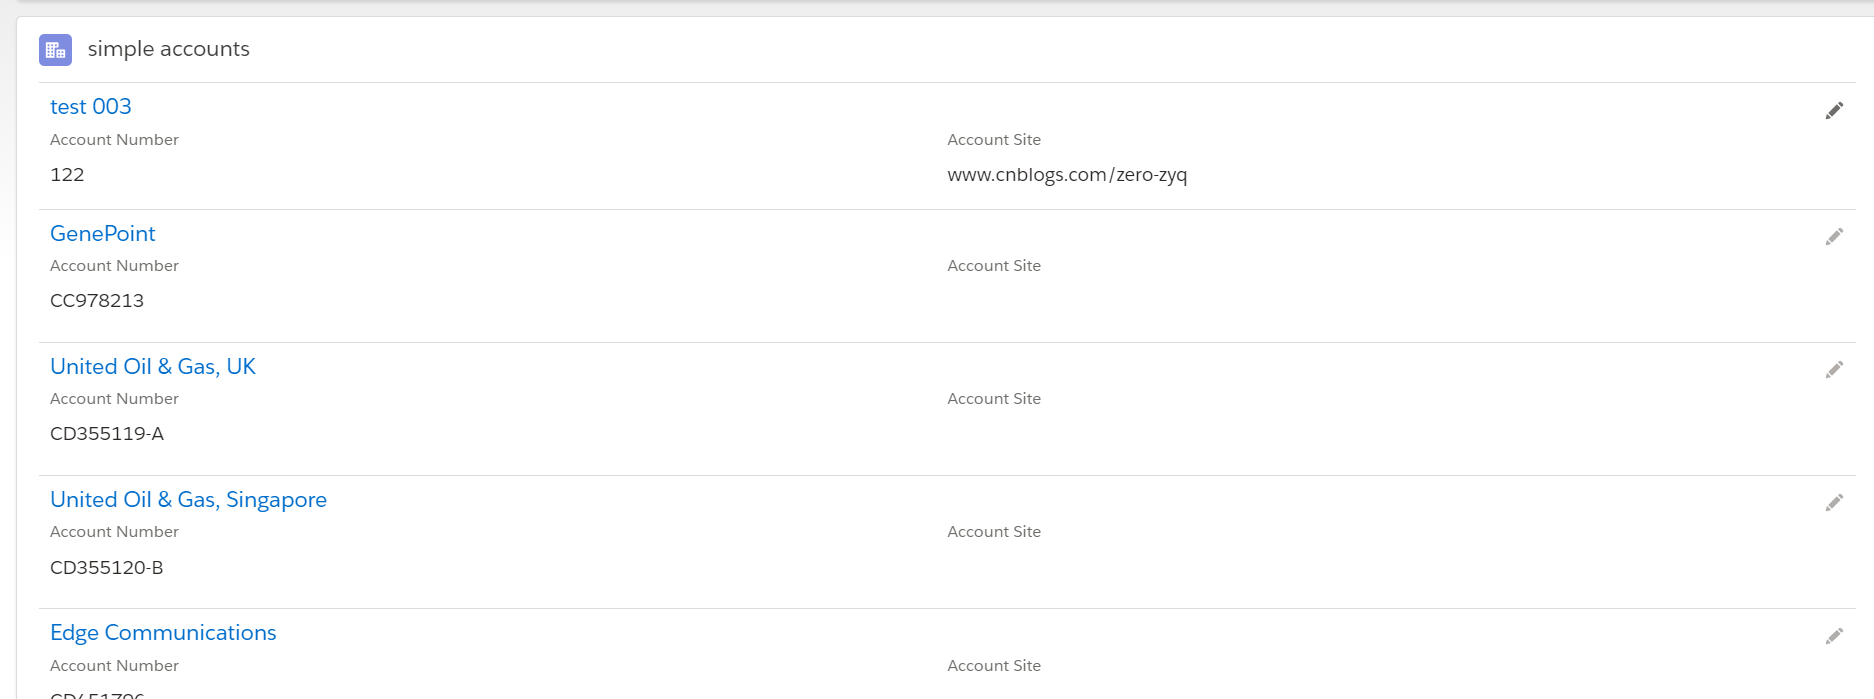
2.点击其中的一个edit,会切换成edit模式,其他的不变化;
3.点击save后正常显示save以后的列表效果。
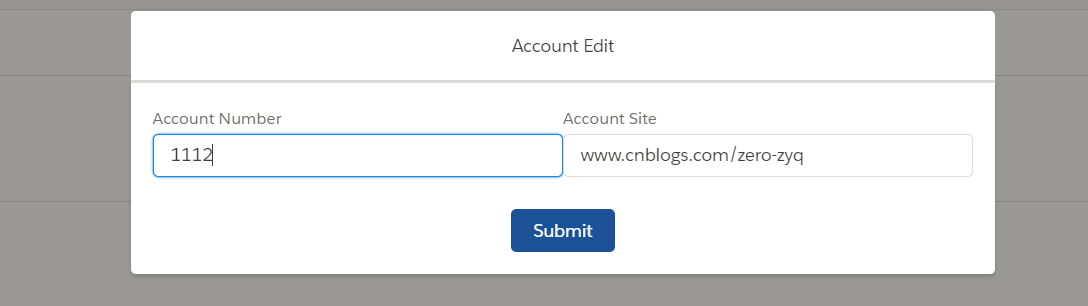
二.显示View列表,点击Edit后展示PopUp Modal,修改后,隐藏Modal,然后继续展示列表。
1.SimpleAccountEdit.cmp:用来展示编辑Account的UI
 <aura:component implements="flexipage:availableForRecordHome,force:hasRecordId">

     <aura:attribute name="recordId" type="String"  />

     <lightning:overlayLibrary aura:id="popuplib"/>

     <lightning:recordEditForm aura:id="editForm" recordId="{!v.recordId}" objectApiName="Account" onsuccess="{!c.handleSuccess}" onsubmit="{!c.handleSubmit}">

         <div class="slds-media">

             <div class="slds-media__body">

                 <lightning:layout multipleRows="true">

                     <lightning:layoutItem size="6">

                         <lightning:inputField fieldName="AccountNumber"/>

                     </lightning:layoutItem>

                     <lightning:layoutItem size="6">

                         <lightning:inputField fieldName="Site"/>

                     </lightning:layoutItem>

                 </lightning:layout>

                 <lightning:layout horizontalAlign="center" class="slds-m-top_large">

                     <lightning:button variant="brand" label="Submit" title="Submit" type="submit"/>

                 </lightning:layout>

             </div>

         </div>

     </lightning:recordEditForm>

 </aura:component>
2. SimpleAccountEditController.js:Edit操作 submit以及操作success的handler操作;
 ({

     handleSubmit : function(component,event,helper) {

         component.find("editForm").submit();

     },

     handleSuccess : function(component,event,helper) {

        console.log('save success');

        component.find("popuplib").notifyClose();

     },

 })
3.SimpleAccountUsingModal.cmp:用来显示Account的View UI
 <aura:component implements="flexipage:availableForRecordHome,force:hasRecordId">

     <aura:attribute name="acc" type="Account"/>

     <lightning:overlayLibrary aura:id="popuplib"/>

     <lightning:recordViewForm aura:id="viewForm" recordId="{!v.acc.Id}" objectApiName="Account">

         <div class="slds-media">

             <div class="slds-media__body">

                 <lightning:layout class="slds-hint-parent">

                     <a onclick="{!c.navToRecord}">

                         <h3 class="slds-text-heading_small slds-m-bottom_xx-small">{!v.acc.Name}</h3>

                     </a>

                     <lightning:buttonIcon iconName="utility:edit" class="slds-col_bump-left" iconClass="slds-button__icon_hint" variant="bare" alternativeText="Edit Record" onclick="{!c.handleClick}"/>

                 </lightning:layout>

                 <lightning:layout multipleRows="true">

                     <lightning:layoutItem size="6">

                         <lightning:outputField fieldName="AccountNumber"/>

                     </lightning:layoutItem>

                     <lightning:layoutItem size="6">

                         <lightning:outputField fieldName="Site"/>

                     </lightning:layoutItem>

                 </lightning:layout>

             </div>

         </div>

     </lightning:recordViewForm>

 </aura:component>
4.SimpleAccountUsingModalController.js:用于点击编辑按钮,显示SimpleAccountEdit组件;
 ({

     handleClick : function(component, event, helper) {

         var modalBody;

         $A.createComponent("c:SimpleAccountEdit", { recordId : component.get('v.acc.Id')},

            function(content, status) {

               modalBody = content;

                if (status === "SUCCESS") {

                    component.find('popuplib').showCustomModal({

                        header: "Account  Edit",

                        body: modalBody,

                        showCloseButton: true,

                        cssClass: "mymodal",

                    });

                }

            });

     }

 })
5.SimpleAccountListUsingModal.cmp: 用于列表循环simpleAccountUsingModal组件,列表显示card布局的account数据;
 <aura:component  controller="SimpleAccountListController" implements="flexipage:availableForRecordHome,force:hasRecordId">

     <aura:attribute name="simpleAccounts" type="Object[]"/>

     <aura:attribute name="acc" type="Account"/>

     <aura:handler name="init" value="{!this}" action="{!c.doInit}"/>

     <lightning:card iconName="standard:account" title="simple accounts" class="slds-is-relative">

         <div class="slds-p-left_medium slds-p-right_medium">

             <ul class="slds-list_vertical slds-has-dividers_top-space">

                 <aura:if isTrue="{!v.simpleAccounts.length > 0}">

                     <aura:iteration items="{!v.simpleAccounts}" var="item">

                         <li class="slds-list__item">

                             <c:SimpleAccountUsingModal acc="{!item}"/>

                         </li>

                     </aura:iteration>

                     <aura:set attribute="else">

                         <li class="slds-list__item">

                             <h3 class="slds-text-small slds-text-color_error">No accounts found.</h3>

                         </li>

                     </aura:set>

                 </aura:if>

             </ul>

         </div>

     </lightning:card>

 </aura:component>
6.SimpleAccountListUsingModalController.js:用于初始化list数据
 ({

     doInit : function(component, event, helper) {

         var action = component.get("c.getAccountList");

         action.setCallback(this, function(response){

             var simpleAccounts = response.getReturnValue();

             component.set("v.simpleAccounts", simpleAccounts);

         });

         $A.enqueueAction(action);

     }

 })
效果展示:
1.正常显示account的list

2.点击Edit按钮以后会弹出popup modal用来显示编辑Form
3.点击Submit后继续展示account list,modal消失。

总结:篇中使用两种方式实现list 模式下两种方式Edit数据方式,demo比较粗糙,其中有很多地方是可以优化的,比如edit没有处理异常的操作等等。感兴趣的同学可以考虑优化,篇中有问题的地方欢迎指出。不懂得欢迎留言。
salesforce lightning零基础学习(七) 列表展示数据时两种自定义编辑页面的更多相关文章
- salesforce lightning零基础学习(十五) 公用组件之 获取表字段的Picklist(多语言)
此篇参考:salesforce 零基础学习(六十二)获取sObject中类型为Picklist的field values(含record type) 我们在lightning中在前台会经常碰到获取pi ...
- salesforce lightning零基础学习(十七) 实现上传 Excel解析其内容
本篇参考: https://developer.mozilla.org/zh-CN/docs/Web/API/FileReader https://github.com/SheetJS/sheetjs ...
- salesforce lightning零基础学习(二) lightning 知识简单介绍----lightning事件驱动模型
看此篇博客前或者后,看一下trailhead可以加深印象以及理解的更好:https://trailhead.salesforce.com/modules/lex_dev_lc_basics 做过cla ...
- salesforce lightning零基础学习(三) 表达式的!(绑定表达式)与 #(非绑定表达式)
在salesforce的classic中,我们使用{!expresion}在前台页面展示信息,在lightning中,上一篇我们也提及了,如果展示attribute的值,可以使用{!v.expresi ...
- salesforce lightning零基础学习(十三) 自定义Lookup组件(Single & Multiple)
上一篇简单的介绍了自定义的Lookup单选的组件,功能为通过引用组件Attribute传递相关的sObject Name,捕捉用户输入的信息,从而实现搜索的功能. 我们做项目的时候,可能要从多个表中获 ...
- salesforce lightning零基础学习(十一) Aura框架下APP构造实现
前面的一些lightning文章讲述了aura的基础知识,aura封装的常用js以及aura下的事件处理.本篇通过官方的一个superbadge来实现一个single APP的实现. superbad ...
- salesforce lightning零基础学习(八) Aura Js 浅谈一: Component篇
我们在开发lightning的时候,常常会在controller.js中写 component.get('v.label'), component.set('v.label','xxValue'); ...
- salesforce lightning零基础学习(六)Lightning Data Service(LDS)
本篇可参看:https://trailhead.salesforce.com/modules/lightning_data_service Lightning中针对object的detail页面,一个 ...
- salesforce lightning零基础学习(四) 事件(component events)简单介绍
lightning component基于事件驱动模型来处理用户界面的交互.这种事件驱动模型和js的事件驱动模型也很相似,可以简单的理解成四部分: 1.事件源:产生事件的地方,可以是页面中的输入框,按 ...
随机推荐
- 762. Prime Number of Set Bits in Binary Representation二进制中有质数个1的数量
[抄题]: Given two integers L and R, find the count of numbers in the range [L, R] (inclusive) having a ...
- Linux知识扩展一:执行前为什么加./
转载:https://www.cnblogs.com/fortunel/p/8663669 1 ./表示当前路径,在执行可执行文件时,linux系统会从环境变量PATH中查找该文件的路径,但因为 L ...
- jar与war包区别,转自https://www.jianshu.com/p/3b5c45e8e5bd
https://www.jianshu.com/p/3b5c45e8e5bd
- JVM总括四-类加载过程、双亲委派模型、对象实例化过程
JVM总括四-类加载过程.双亲委派模型.对象实例化过程 目录:JVM总括:目录 一. 类加载过程 类加载过程就是将.class文件转化为Class对象,类实例化的过程,(User user = new ...
- python基础 (编码进阶,文件操作和深浅copy)
1.编码的进阶 字符串在Python内部的表示是unicode编码,因此,在做编码转换时,通常需要以unicode作为中间编码. 即先将其他编码的字符串解码(decode)成unicode,再从uni ...
- MFC里面解析json文件格式
CString strTemp; //CString ->string; string stringMsg = (LPCSTR)(CStringA)strTemp; //string -> ...
- Node.js web发布到AWS ubuntu 之后,关闭Putty,Node 项目也随之关闭的解决办法
最近公司把BlockChain和对应的Node Web都发布到了AWS 的ubuntu 系统上. 但是遇到了一个问题,每次启动 Node Web之后,关闭Putty,Node Web也随之关闭. 由于 ...
- Luogu3587[POI2015]POD - hash + 单调队列
Solution 还是去看了题解. 感谢大佬的博客→ 题解传送门 是一道思路比较新的题. 搞一个前缀和, 记录前 $i$ 个位置每种颜色的出现次数, 如果位置 $i$ 是 颜色 $a[i]$ 的最后 ...
- 叙述 activemq 与spring 主题实现 小功能实现
在上一篇文章里 我说到了 maven的配置 我现在直接说 xml配置 首先我先描述 生产者的信息 <?xml version="1.0" encoding="UT ...
- python基本数据类型之整型和浮点型
python基本数据类型之数字与浮点型 在python3中,整数的数据类型为int,而浮点数的数据类型为float.python2中整数可以是int和long(长整型)两种类型,python3只保留了 ...