
6_3.springboot2.x数据整合Mybatis(注解和非注解)
1、配置文件
pom.xml
导入mybatis提供的启动器
 <dependency>

            <groupId>org.mybatis.spring.boot</groupId>

            <artifactId>mybatis-spring-boot-starter</artifactId>

            <version>2.1.0</version>

 </dependency>
application.yml
spring:

  datasource:

    username: root

    password: 123456

    url: jdbc:mysql://localhost:3306/mybatis?useUnicode=true&characterEncoding=utf-8&useSSL=false&serverTimezone = GMT

    driver-class-name: com.mysql.cj.jdbc.Driver

    initialization-mode: always

    type: com.alibaba.druid.pool.DruidDataSource

    #   数据源其他配置

    initialSize: 5

    minIdle: 5

    maxActive: 20

    maxWait: 60000

    timeBetweenEvictionRunsMillis: 60000

    minEvictableIdleTimeMillis: 300000

    validationQuery: SELECT 1 FROM DUAL

    testWhileIdle: true

    testOnBorrow: false

    testOnReturn: false

    poolPreparedStatements: true

    #   配置监控统计拦截的filters,去掉后监控界面sql无法统计,'wall'用于防火墙

    filters: stat,wall,log4j

    maxPoolPreparedStatementPerConnectionSize: 20

    useGlobalDataSourceStat: true

    connectionProperties: druid.stat.mergeSql=true;druid.stat.slowSqlMillis=500
Druid数据源配置:
package com.spboot.springboot.config;

import com.alibaba.druid.pool.DruidDataSource;

import com.alibaba.druid.support.http.StatViewServlet;

import com.alibaba.druid.support.http.WebStatFilter;

import org.springframework.boot.context.properties.ConfigurationProperties;

import org.springframework.boot.web.servlet.FilterRegistrationBean;

import org.springframework.boot.web.servlet.ServletRegistrationBean;

import org.springframework.context.annotation.Bean;

import org.springframework.context.annotation.Configuration;

import javax.sql.DataSource;

import java.util.Arrays;

import java.util.HashMap;

import java.util.Map;

@Configuration

public class DruidConfig {

    @ConfigurationProperties("spring.datasource")

    @Bean

    public DataSource druid(){

        return new DruidDataSource();

    }

    //配置Druid监控

    //1.配置一个管理后台的servlet

    @Bean

    public ServletRegistrationBean StatViewServlet(){

        ServletRegistrationBean bean = new ServletRegistrationBean(new StatViewServlet(), "/druid/*");

        Map<String,String> initParams = new HashMap<String ,String >();

        initParams.put("loginUsername","admin");

        initParams.put("loginPassword","123456");

        initParams.put("allow","");//默认允许所有

        initParams.put("deny","192.168.1.1");

        bean.setInitParameters(initParams);

        return bean;

    }

    //2.配置一个web监控的filter

    @Bean

    public FilterRegistrationBean WebStatFilter(){

        FilterRegistrationBean bean = new FilterRegistrationBean();

        bean.setFilter(new WebStatFilter());

        Map<String,String> initParams = new HashMap<String ,String >();

        initParams.put("exclusions","*.js,*.css,/druid/*");

        bean.setInitParameters(initParams);

        bean.setUrlPatterns(Arrays.asList("/*"));

        return bean;

    }

}
2、注解版
1、pojo类
package com.spboot.springboot.pojo;

public class Department {

    private Integer id;

    private String DepartmentName;

    public Integer getId() {

        return id;

    }

    public void setId(Integer id) {

        this.id = id;

    }

    public String getDepartmentName() {

        return DepartmentName;

    }

    public void setDepartmentName(String departmentName) {

        DepartmentName = departmentName;

    }

}
2、新建Mybatis配置类
自定义MyBatis的配置规则;给容器中添加一个ConfigurationCustomizer
package com.spboot.springboot.config;

import org.apache.ibatis.session.Configuration;

import org.mybatis.spring.annotation.MapperScan;

import org.mybatis.spring.boot.autoconfigure.ConfigurationCustomizer;

import org.springframework.context.annotation.Bean;

@MapperScan(value = "com.spboot.springboot.mapper")

@org.springframework.context.annotation.Configuration

public class MybatisConfig {

    @Bean

    public ConfigurationCustomizer configurationCustomizer() {

        return new ConfigurationCustomizer() {

            @Override

            public void customize(Configuration configuration) {

                configuration.setMapUnderscoreToCamelCase(true);

            }

        };

    }

}
如果使用@MapperScan(value = "com.spboot.springboot.mapper")注解,则会扫描mapper包下的所有mapper接口,也可以单独在mapper接口类中一一配置。
3、mapper接口
package com.spboot.springboot.mapper;

import com.spboot.springboot.pojo.Department;

import org.apache.ibatis.annotations.*;

//告诉这是一个操作数据库的mapper

//@Mapper

public interface DepartmentMapper {

    @Select("select * from department where id=#{id}")

    public Department getDeptById(Integer id);

    @Delete("delete from department where id=#{id}")

    public int deleteDepartmentById(Integer id);

    @Options(useGeneratedKeys = true,keyProperty = "id")

    @Insert("insert into department(department_name) values(#{department_name})")

    public int insertDepart(Department department);

    @Update("update department set department_name=#{department_name} where id=#{id}")

    public int updateDept(Department department);

}
4、controller
@RestController

public class controller {

    @Autowired

    DepartmentMapper mapper;

    @RequestMapping("/dept/{id}")

    public Department getDepartment(@PathVariable("id") Integer id){

       return mapper.getDeptById(id);

    }

    @RequestMapping("/dept")

    public Department insertDepartment(Department department){

        mapper.insertDepart(department);

        return department;

    }

}
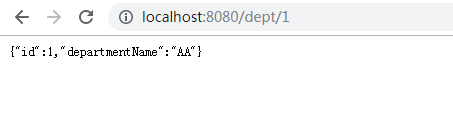
测试:
3、配置文件版
1、pojo
package com.spboot.springboot.pojo;

public class Employee {

    private Integer id;

    private String lastName;

    private Integer gender;

    private String email;

    private Integer dId;

    public Integer getId() {

        return id;

    }

    public void setId(Integer id) {

        this.id = id;

    }

    public String getLastName() {

        return lastName;

    }

    public void setLastName(String lastName) {

        this.lastName = lastName;

    }

    public Integer getGender() {

        return gender;

    }

    public void setGender(Integer gender) {

        this.gender = gender;

    }

    public String getEmail() {

        return email;

    }

    public void setEmail(String email) {

        this.email = email;

    }

    public Integer getdId() {

        return dId;

    }

    public void setdId(Integer dId) {

        this.dId = dId;

    }

}
2、mapper接口
package com.spboot.springboot.mapper;

import com.spboot.springboot.pojo.Employee;

//将接口扫描到容器中 @mapper

public interface EmployeeMapper {

    public Employee getEmpById(Integer id);

    public void insertEmpty(Employee employee);

}
3、mybatis-config.xml
<?xml version="1.0" encoding="UTF-8" ?>

<!DOCTYPE configuration

        PUBLIC "-//mybatis.org//DTD Config 3.0//EN"

        "http://mybatis.org/dtd/mybatis-3-config.dtd">

<configuration>

<settings>

    <setting name="mapUnderscoreToCamelCase" value="true"/>

</settings>

    </configuration>
<setting name="mapUnderscoreToCamelCase" value="true"/>启用从数据库列名A_COLUMN到驼峰式经典Java属性名aColumn的自动映射
4、EmployeeMapper.xml
mapper映射文件
<?xml version="1.0" encoding="UTF-8" ?>

<!DOCTYPE mapper

        PUBLIC "-//mybatis.org//DTD Mapper 3.0//EN"

        "http://mybatis.org/dtd/mybatis-3-mapper.dtd">

<mapper namespace="com.spboot.springboot.mapper.EmployeeMapper">

    <select id="getEmpById" resultType="com.spboot.springboot.pojo.Employee">

    SELECT * FROM employee WHERE id = #{ID}

    </select>

    <insert id="insertEmpty">

    INSERT Into employee (lastName,email,gender,d_id) values (#{lastName},#{email},#{gender},#{d_id})

    </insert>

</mapper>
注意关键一步:在application.yml加载mybaits配置文件包括(mybatis-config.xml和*Mapper.xml)

5、controller
  @Autowired

    EmployeeMapper employeeMapper;

    @RequestMapping("/emp/{id}")

    public Employee getEmp(@PathVariable("id") Integer id){

        return employeeMapper.getEmpById(id);

    }
测试:

ok 完成!
6_3.springboot2.x数据整合Mybatis(注解和非注解)的更多相关文章
- SpringBoot整合Mybatis多数据源 (AOP+注解)
SpringBoot整合Mybatis多数据源 (AOP+注解) 1.pom.xml文件(开发用的JDK 10) <?xml version="1.0" encoding=& ...
- springMVC学习笔记(二)-----注解和非注解入门小程序
最近一直在做一个电商的项目,周末加班,忙的都没有时间更新博客了.终于在上周五上线了,可以轻松几天了.闲话不扯淡了,继续谈谈springMvc的学习. 现在,用到SpringMvc的大部分使用全注解配置 ...
- 6_4.springboot2.x数据整合springData介绍
介绍 Spring Data 项目的目的是为了简化构建基于Spring 框架应用的数据访问技术,包括非关系数据库.Map-Reduce 框架.云数据服务等等:另外也包含对关系数据库的访问支持. spr ...
- SpringMVC中注解和非注解方式下的映射器和适配器总结
1. 非注解方式 1.1 处理器适配器 上一节中使用的处理器适配器是:org.springframework.web.servlet.mvc.SimpleControllerHandlerAdapte ...
- 【SpringMVC学习03】SpringMVC中注解和非注解方式下的映射器和适配器总结
从上一篇的springmvc入门中已经看到,springmvc.xml中的配置了映射器和适配器,是使用非注解的方式来配置的,这是非注解方式的一种,这里再复习一下: 1. 非注解方式 1.1 处理器适配 ...
- Springboot使用Cookie,生成cookie,获取cookie信息(注解与非注解方式)
先 创建一个控制类吧, 其实我没有分层啊,随便做个例子: MyGetCookieController: @RestControllerpublic class MyGetCookieControlle ...
- 6_5.springboot2.x数据整合springData JPA
1.配置文件 pom.xml <dependencies> <dependency> <groupId>org.springframework.boot</g ...
- springboot整合mybatis完整示例, mapper注解方式和xml配置文件方式实现(我们要优雅地编程)
一.注解方式 pom <dependency> <groupId>org.mybatis.spring.boot</groupId> <artifactId& ...
- springboot2.0+mysql整合mybatis,发现查询出来的时间比数据库datetime值快了8小时
参考:https://blog.csdn.net/lx12345_/article/details/82020858 修改后查询数据正常
随机推荐
- jQuery - DOM相关
1. 操作文本 console.log($("#t1").html()); // 获取span元素中的内容, 包含html标签 $("#t1").html(&q ...
- jQuery - 动画相关
// 显示隐藏 $("div").show(); // 显示 $("div").hide(); // 隐藏 // 显示过程3秒, 3秒之内, 元素的宽,高和透明 ...
- 七种数据库中Select Top的使用方法 (只显示数据库的几条记录)
七种数据库中Select Top的使用方法 1. Oracle数据库 SELECT * FROM TABLENAME WHERE ROWNUM <= N 2. Infomix数据库 SELE ...
- PHP ftp_rawlist() 函数
定义和用法 ftp_rawlist() 函数返回 FTP 服务器上指定目录中文件的详细列表. 语法 ftp_rawlist(ftp_connection,dir,recursive) 参数 描述 ft ...
- Java中的线程Thread方法之---stop()
搞过Java线程的人都知道,stop这个方法是臭名昭著了,早就被弃用了,但是现在任然有很多钟情与他的人,永远都放不下他,因为从他的字面意思上我们可以知道他貌似可以停止一个线程,这个需求是每个搞线程开发 ...
- SpringBoot_Redis配置
Spring Boot – redis 1.添加依赖 <!-- 引入 spring-boot-starter-redis 当前最新版本--> <dependency> < ...
- Linux ifconfig 单网卡配置多网段
1 2 3 4 5 6 7 8 9 10 11 ifconfig eth0 down ifconfig eth0 hw ether 01:02:03:04:05:06 ifconfig eth0 ...
- Codeforces 1163A - Eating Soup
题目链接:http://codeforces.com/problemset/problem/1163/A 题意:n 只猫围成一圈,离开 m 只,最多剩下几组猫. 思路:当 n == m 即猫都离开时 ...
- 4.1_springboot2.2任务之异步、定时、邮件任务
1.异步任务 在Java应用中,绝大多数情况下都是通过同步的方式来实现交互处理的:但是在处理与第三方系统交互的时候,容易造成响应迟缓的情况,之前大部分都是使用多线程来完成此类任务,其实,在Spri ...
- 自学之linux的基本命令
cd cd 用于进入指定文件夹 cd ..用于回到上个文件夹 ls ls用于列出文件夹里的所有元素 ls/home/ 列出home文件夹的元素 ls -l 可以看到文件名,拥有者是谁,什么时候修改的 ...