
4 基于优化的攻击——CW
CW攻击原论文地址——https://arxiv.org/pdf/1608.04644.pdf
1.CW攻击的原理
CW攻击是一种基于优化的攻击,攻击的名称是两个作者的首字母。首先还是贴出攻击算法的公式表达:
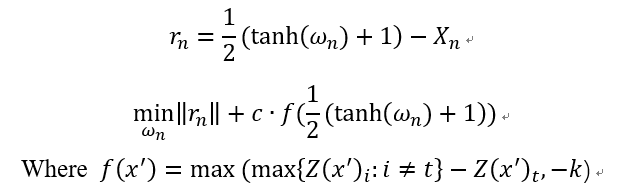
下面解释下算法的大概思想,该算法将对抗样本当成一个变量,那么现在如果要使得攻击成功就要满足两个条件:(1)对抗样本和对应的干净样本应该差距越小越好;(2)对抗样本应该使得模型分类错,且错的那一类的概率越高越好。
其实上述公式的两部分loss也就是基于这两点而得到的,首先说第一部分,rn对应着干净样本和对抗样本的差,但作者在这里有个小trick,他把对抗样本映射到了tanh空间里面,这样做有什么好处呢?如果不做变换,那么x只能在(0,1)这个范围内变换,做了这个变换 ,x可以在-inf到+inf做变换,有利于优化。
再来说说第二部分,公式中的Z(x)表示的是样本x通过模型未经过softmax的输出向量,对于干净的样本来说,这个这个向量的最大值对应的就是正确的类别(如果分类正确的话),现在我们将类别t(也就是我们最后想要攻击成的类别)所对应的逻辑值记为 ,将最大的值(对应类别不同于t)记为
 ,如果通过优化使得
 变小,攻击不就离成功了更近嘛。那么式子中的k是什么呢?k其实就是置信度(confidence),可以理解为,k越大,那么模型分错,且错成的那一类的概率越大。但与此同时,这样的对抗样本就更难找了。最后就是常数c,这是一个超参数,用来权衡两个loss之间的关系,在原论文中,作者使用二分查找来确定c值。
下面总结一下CW攻击:
CW是一个基于优化的攻击,主要调节的参数是c和k,看你自己的需要了。它的优点在于,可以调节置信度,生成的扰动小,可以破解很多的防御方法,缺点是,很慢~~~
最后在说一下,就是在某些防御论文中,它实现CW攻击,是直接用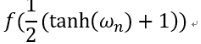 替换PGD中的loss,其余步骤和PGD一模一样。
2.CW代码实现
class CarliniWagnerL2Attack(Attack, LabelMixin):

    def __init__(self, predict, num_classes, confidence=0,

                 targeted=False, learning_rate=0.01,

                 binary_search_steps=9, max_iterations=10000,

                 abort_early=True, initial_const=1e-3,

                 clip_min=0., clip_max=1., loss_fn=None):

        """

        Carlini Wagner L2 Attack implementation in pytorch

        Carlini, Nicholas, and David Wagner. "Towards evaluating the

        robustness of neural networks." 2017 IEEE Symposium on Security and

        Privacy (SP). IEEE, 2017.

        https://arxiv.org/abs/1608.04644

        learning_rate: the learning rate for the attack algorithm

        max_iterations: the maximum number of iterations

        binary_search_steps: number of binary search times to find the optimum

        abort_early: if set to true, abort early if getting stuck in local min

        confidence: confidence of the adversarial examples

        targeted: TODO

        """

        if loss_fn is not None:

            import warnings

            warnings.warn(

                "This Attack currently do not support a different loss"

                " function other than the default. Setting loss_fn manually"

                " is not effective."

            )

        loss_fn = None

        super(CarliniWagnerL2Attack, self).__init__(

            predict, loss_fn, clip_min, clip_max)

        self.learning_rate = learning_rate

        self.max_iterations = max_iterations

        self.binary_search_steps = binary_search_steps

        self.abort_early = abort_early

        self.confidence = confidence

        self.initial_const = initial_const

        self.num_classes = num_classes

        # The last iteration (if we run many steps) repeat the search once.

        self.repeat = binary_search_steps >= REPEAT_STEP

        self.targeted = targeted

    def _loss_fn(self, output, y_onehot, l2distsq, const):

        # TODO: move this out of the class and make this the default loss_fn

        #   after having targeted tests implemented

        real = (y_onehot * output).sum(dim=1)

        # TODO: make loss modular, write a loss class

        other = ((1.0 - y_onehot) * output - (y_onehot * TARGET_MULT)

                 ).max(1)[0]

        # - (y_onehot * TARGET_MULT) is for the true label not to be selected

        if self.targeted:

            loss1 = clamp(other - real + self.confidence, min=0.)

        else:

            loss1 = clamp(real - other + self.confidence, min=0.)

        loss2 = (l2distsq).sum()

        loss1 = torch.sum(const * loss1)

        loss = loss1 + loss2

        return loss

    def _is_successful(self, output, label, is_logits):

        # determine success, see if confidence-adjusted logits give the right

        #   label

        if is_logits:

            output = output.detach().clone()

            if self.targeted:

                output[torch.arange(len(label)), label] -= self.confidence

            else:

                output[torch.arange(len(label)), label] += self.confidence

            pred = torch.argmax(output, dim=1)

        else:

            pred = output

            if pred == INVALID_LABEL:

                return pred.new_zeros(pred.shape).byte()

        return is_successful(pred, label, self.targeted)

    def _forward_and_update_delta(

            self, optimizer, x_atanh, delta, y_onehot, loss_coeffs):

        optimizer.zero_grad()

        adv = tanh_rescale(delta + x_atanh, self.clip_min, self.clip_max)

        transimgs_rescale = tanh_rescale(x_atanh, self.clip_min, self.clip_max)

        output = self.predict(adv)

        l2distsq = calc_l2distsq(adv, transimgs_rescale)

        loss = self._loss_fn(output, y_onehot, l2distsq, loss_coeffs)

        loss.backward()

        optimizer.step()

        return loss.item(), l2distsq.data, output.data, adv.data

    def _get_arctanh_x(self, x):

        result = clamp((x - self.clip_min) / (self.clip_max - self.clip_min),

                       min=self.clip_min, max=self.clip_max) * 2 - 1

        return torch_arctanh(result * ONE_MINUS_EPS)

    def _update_if_smaller_dist_succeed(

            self, adv_img, labs, output, l2distsq, batch_size,

            cur_l2distsqs, cur_labels,

            final_l2distsqs, final_labels, final_advs):

        target_label = labs

        output_logits = output

        _, output_label = torch.max(output_logits, 1)

        mask = (l2distsq < cur_l2distsqs) & self._is_successful(

            output_logits, target_label, True)

        cur_l2distsqs[mask] = l2distsq[mask]  # redundant

        cur_labels[mask] = output_label[mask]

        mask = (l2distsq < final_l2distsqs) & self._is_successful(

            output_logits, target_label, True)

        final_l2distsqs[mask] = l2distsq[mask]

        final_labels[mask] = output_label[mask]

        final_advs[mask] = adv_img[mask]

    def _update_loss_coeffs(

            self, labs, cur_labels, batch_size, loss_coeffs,

            coeff_upper_bound, coeff_lower_bound):

        # TODO: remove for loop, not significant, since only called during each

        # binary search step

        for ii in range(batch_size):

            cur_labels[ii] = int(cur_labels[ii])

            if self._is_successful(cur_labels[ii], labs[ii], False):

                coeff_upper_bound[ii] = min(

                    coeff_upper_bound[ii], loss_coeffs[ii])

                if coeff_upper_bound[ii] < UPPER_CHECK:

                    loss_coeffs[ii] = (

                        coeff_lower_bound[ii] + coeff_upper_bound[ii]) / 2

            else:

                coeff_lower_bound[ii] = max(

                    coeff_lower_bound[ii], loss_coeffs[ii])

                if coeff_upper_bound[ii] < UPPER_CHECK:

                    loss_coeffs[ii] = (

                        coeff_lower_bound[ii] + coeff_upper_bound[ii]) / 2

                else:

                    loss_coeffs[ii] *= 10

    def perturb(self, x, y=None):

        x, y = self._verify_and_process_inputs(x, y)

        # Initialization

        if y is None:

            y = self._get_predicted_label(x)

        x = replicate_input(x)

        batch_size = len(x)

        coeff_lower_bound = x.new_zeros(batch_size)

        coeff_upper_bound = x.new_ones(batch_size) * CARLINI_COEFF_UPPER

        loss_coeffs = torch.ones_like(y).float() * self.initial_const

        final_l2distsqs = [CARLINI_L2DIST_UPPER] * batch_size

        final_labels = [INVALID_LABEL] * batch_size

        final_advs = x

        x_atanh = self._get_arctanh_x(x)

        y_onehot = to_one_hot(y, self.num_classes).float()

        final_l2distsqs = torch.FloatTensor(final_l2distsqs).to(x.device)

        final_labels = torch.LongTensor(final_labels).to(x.device)

        # Start binary search

        for outer_step in range(self.binary_search_steps):

            delta = nn.Parameter(torch.zeros_like(x))

            optimizer = optim.Adam([delta], lr=self.learning_rate)

            cur_l2distsqs = [CARLINI_L2DIST_UPPER] * batch_size

            cur_labels = [INVALID_LABEL] * batch_size

            cur_l2distsqs = torch.FloatTensor(cur_l2distsqs).to(x.device)

            cur_labels = torch.LongTensor(cur_labels).to(x.device)

            prevloss = PREV_LOSS_INIT

            if (self.repeat and outer_step == (self.binary_search_steps - 1)):

                loss_coeffs = coeff_upper_bound

            for ii in range(self.max_iterations):

                loss, l2distsq, output, adv_img = \

                    self._forward_and_update_delta(

                        optimizer, x_atanh, delta, y_onehot, loss_coeffs)

                if self.abort_early:

                    if ii % (self.max_iterations // NUM_CHECKS or 1) == 0:

                        if loss > prevloss * ONE_MINUS_EPS:

                            break

                        prevloss = loss

                self._update_if_smaller_dist_succeed(

                    adv_img, y, output, l2distsq, batch_size,

                    cur_l2distsqs, cur_labels,

                    final_l2distsqs, final_labels, final_advs)

            self._update_loss_coeffs(

                y, cur_labels, batch_size,

                loss_coeffs, coeff_upper_bound, coeff_lower_bound)

        return final_advs
4 基于优化的攻击——CW的更多相关文章
- 5.基于优化的攻击——CW
CW攻击原论文地址——https://arxiv.org/pdf/1608.04644.pdf 1.CW攻击的原理 CW攻击是一种基于优化的攻击,攻击的名称是两个作者的首字母.首先还是贴出攻击算法的公 ...
- 2.基于梯度的攻击——FGSM
FGSM原论文地址:https://arxiv.org/abs/1412.6572 1.FGSM的原理 FGSM的全称是Fast Gradient Sign Method(快速梯度下降法),在白盒环境 ...
- 1 基于梯度的攻击——FGSM
FGSM原论文地址:https://arxiv.org/abs/1412.6572 1.FGSM的原理 FGSM的全称是Fast Gradient Sign Method(快速梯度下降法),在白盒环境 ...
- 4.基于梯度的攻击——MIM
MIM攻击原论文地址——https://arxiv.org/pdf/1710.06081.pdf 1.MIM攻击的原理 MIM攻击全称是 Momentum Iterative Method,其实这也是 ...
- 3.基于梯度的攻击——PGD
PGD攻击原论文地址——https://arxiv.org/pdf/1706.06083.pdf 1.PGD攻击的原理 PGD(Project Gradient Descent)攻击是一种迭代攻击,可 ...
- 3 基于梯度的攻击——MIM
MIM攻击原论文地址——https://arxiv.org/pdf/1710.06081.pdf 1.MIM攻击的原理 MIM攻击全称是 Momentum Iterative Method,其实这也是 ...
- 2 基于梯度的攻击——PGD
PGD攻击原论文地址——https://arxiv.org/pdf/1706.06083.pdf 1.PGD攻击的原理 PGD(Project Gradient Descent)攻击是一种迭代攻击,可 ...
- uva live 6190 Beautiful Spacing (二分法+dp试 基于优化的独特性质)
I - Beautiful Spacing Time Limit:8000MS Memory Limit:65536KB 64bit IO Format:%lld & %llu ...
- 京东云与AI 10 篇论文被AAAI 2020 收录,京东科技实力亮相世界舞台
美国时间2月7-12日,AAAI 2020大会在纽约正式拉开序幕,AAAI作为全球人工智能领域的顶级学术会议,每年评审并收录来自全球最顶尖的学术论文,这些学术研究引领着技术的趋势和未来.京东云与AI在 ...
随机推荐
- Python入门-2编程基本概念:03引用的本质-栈内存和堆内存-内存示意图
引用 在Python中,变量也称为:对象的引用.因为,变量存储的就是对象的地址. 变量通过地址引用了“对象”. 变量位于:栈内存(压栈出栈等细节,后续再介绍). 对象位于:堆内存. Python是动态 ...
- Codeforces Round #451 (Div. 2) [ D. Alarm Clock ] [ E. Squares and not squares ] [ F. Restoring the Expression ]
PROBLEM D. Alarm Clock 题 OvO http://codeforces.com/contest/898/problem/D codeforces 898d 解 从前往后枚举,放进 ...
- React-native 触摸事件
http://www.360doc.com/content/16/0711/23/34978982_574835465.shtml
- 关于java代理(静态代理和动态代理)
参考文章:http://kuangbaoxu.iteye.com/blog/193240
- 实现类数组转化成数组(DOM 操作获得的返回元素值是一个类数组)
目标 实现类数组转化成数组 实例 链接地址 使用方法 const foo = document.querySelectorAll('.result') //链接地址输入控制台输入这行代码 const ...
- 2019.12.12网页设计大赛&2019.12.13程序设计大赛观后感
有幸参加了一次网页设计大赛和程序设计大赛,其实在大一的时候就参加过一次程序设计大赛,那时候也没怎么听,现在又有了一次机会来听,这次就认真的听了这两次的比赛,也有很多的感悟. 1.要学习完成一个任务的多 ...
- triplet
询问次数<=min(2*n,n+35) 一种类似hash的交互题 部分分n=5,限制10次 发现都问出来可以通过次数和大小确定所有的值和对应位置! n比较大 发现(X1,X2,i)能确定一些情况 ...
- JAVA开发框架
1.Bootstrap Bootstrap是美国Twitter公司的设计师Mark Otto和Jacob Thornton合作基于HTML.CSS.JavaScript 开发的简洁.直观.强悍 ...
- 软工团队Git现场编程实战
组员职责分工 成员 分工 鲍子涵 分配职责,整合代码 吴宜航 UI设计与实现 钟博 UI设计与实现(Main Coder) 黄海东 数据整理 王镇隆 前端api接口分析和使用(Main Coder) ...
- Laravel find in set排序
做项目遇到个需求,需要对结果集中的数据进行指定规则的顺序排列.例如,用户状态有四种: 0=>未激活:1=>正常:2=>禁用:3=>软删除 现在的需求是,我要按照:正常-> ...