iPhone图片拉伸:resizableImageWithCapInsets
1 [[UIImage imageNamed:@"button_textured_30"] resizableImageWithCapInsets:UIEdgeInsetsMake(0, 5, 0, 5)];
其中Insets这个参数的格式是(top,left,bottom,right),从上、左、下、右分别在图片上画了一道线,这样就给一个图片加了一个框。
只有在框里面的部分才会被拉伸,而框外面的部分则不会改变。
4个参数是上边界,左边界,下边界,右边界距离,也可以为负值。
其中Insets这个参数的格式是(top,left,bottom,right),从上、左、下、右分别在图片上画了一道线,这样就给一个图片加了一个框。只有在框里面的部分才会被拉伸,而框外面的部分则不会改变。比如(20,5,10,5),意思是下图矩形里面的部分可以被拉伸,而其余部分不变。

据说stretchableImageWithLeftCapWidth:topCapHeight这个函数也能够实现,但是在iOS5里面建议不要使用这个函数。效果如下图: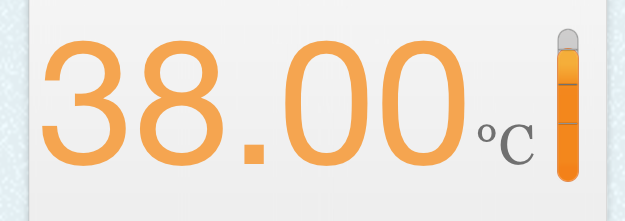
当修改了数据之后,变成这样:

下面来看如何实现。
温度计共由三张图组成:
背景图ThermometerBackground.png:

刻度图ThermometerCalibration:

里面的溶液Calibration:

首先将背景图加入superview中,再将刻度图和溶液图加入背景图中:(为简化起见,一些不必要的代码已经省略)
- //将背景图加入superview
- UIImageView *thermometerBackground = [[UIImageView alloc] initWithFrame:THERMOMETER_FRAME];
- [thermometerBackground setImage:[UIImage imageNamed:@"ThermometerBackground.png"]];
- [self.view addSubview:self.thermometerBackground];
- //将溶液图加入背景图
- UIImageView *thermometer = [[UIImageView alloc]init];
- [self.thermometerBackground addSubview:self.thermometer];
- //将刻度图加入背景图
- UIImageView *thermometerCalibration = [[UIImageView alloc] initWithImage:[UIImage imageNamed:@"ThermometerCalibration.png"]];
- [self.thermometerCalibration setFrame:CGRectMake(0, 10, thermometerBackground.frame.size.width, thermometerCalibration.image.size.height*thermometerBackground.frame.size.width/thermometerCalibration.frame.size.width)];
- [self.thermometerBackground addSubview:thermometerCalibration];
然后,根据度数生成对应高度的image;
- UIImage* image = [UIImage imageNamed:@"Thermometer.png"];
- UIEdgeInsets insets = UIEdgeInsetsMake(20, 0, 25, 0);
- image = [image resizableImageWithCapInsets:insets];
- int top = 10.00+(38.00-temperature)*20.00;
- [self.thermometer setFrame:CGRectMake(0, top, self.thermometerBackground.frame.size.width, self.thermometerBackground.frame.size.height-top)];
- [self.thermometer setImage:image];
在这里,top这个变量就代表了根据度数计算出的溶液的高度。
这样,当改变温度temperature的大小时,只要在viewWillAppear里调用这段代码,就能够动态生成温度计图片了。
iPhone图片拉伸:resizableImageWithCapInsets的更多相关文章
- iOS 图片拉伸 resizableImageWithCapInsets
UIImage *image = [[UIImage imageNamed:@"test.png"] resizableImageWithCapInsets:UIEdgeInse ...
- 使用图片拉伸resizableImageWithCapInsets
在仿写QQ会话的时候背景蓝色图片是拉伸而来,但是有些地方是受保护的不能拉伸 所以定义了下面的工具类中的一个方法,专门拉伸图片 UIImageResizingModeStretch:拉伸模式,通过拉伸U ...
- ios UIImage图片拉伸 resizableImageWithCapInsets:
常见的按钮添加和背景设置如下: UIButton *button = [[UIButton alloc] initWithFrame:CGRectMake(80, 130, 160, 44)];[bu ...
- iOS图片拉伸技巧
纵观移动市场,一款移动app,要想长期在移动市场立足,最起码要包含以下几个要素:实用的功能.极强的用户体验.华丽简洁的外观.华丽外观的背后,少不了美工的辛苦设计,但如果开发人员不懂得怎么合理展示这些设 ...
- 【原】iOS学习之图片拉伸处理(类似qq的气泡)
原理是拉伸里面的内容,将边保护起来 方法1: ①[image resizableImageWithCapInsets:UIEdgeInsetsMake(, , , )]; ②[image resiza ...
- iOS开发——UI基础-按钮内边距,图片拉伸
一.内边距 UIButton有三个属性,分别可以设置按钮以及内部子控件的内边距 1.contentEdgeInsets 如果是设置contentEdgeInsets, 会把UIImageView和UI ...
- (转)iOS图片拉伸技巧
( 原文博客地址: http://blog.csdn.net/q199109106q/article/details/8615661) 纵观移动市场,一款移动app,要想长期在移动市场立足,最起码要 ...
- IOS中图片拉伸技巧与方法总结(转载)
以下内容转载自:http://my.oschina.net/u/2340880/blog/403996 IOS中图片拉伸技巧与方法总结 一.了解几个图像拉伸的函数和方法 1.直接拉伸法 简单暴力,却是 ...
- iOS杂谈-图片拉伸的实现
如上图是一个按钮的背景图,在Android上,很多图片资源都是类似这样子的,但是由于按钮的高度及宽度与图片的世纪尺寸不同,所以需要采用9patch来实现拉伸处理, 可参考:http://www.cnb ...
随机推荐
- @@fetch_status
@@fetch_status是MicroSoft SQL SERVER的一个全局变量 其值有以下三种,分别表示三种不同含义:[返回类型integer] 0 FETCH 语句成功 -1 FETCH 语句 ...
- jQuery动画二级下拉菜单
在线演示 本地下载
- linux根分区满了如何处理,查找大文件方法
一:如果linux根分区使用量达到100%,会造成如下现象: root不能登录 系统不能正常启动 二:通过命令查找根分区内的大文件 du -sh /* 2>/dev/null | sort -h ...
- 在Linux系统下使用Github的基本教程
1. 安装git: sudo apt-get install git-core git-gui git-doc 2.到https://github.com/ 注册一个帐号,一会儿客户端登录的时候要使用 ...
- zabbix 邮件报警
一.设置sendmail 安装sendmail yum install -y sendmail systemctl start sendmail.service 配置 cd /usr/lib/zab ...
- eclipse设置控制台字体大小
步骤如下
- Hibernate -- 配置c3p0连接池, 事务隔离级别, 管理session
知识点1:配置c3p0连接池(了解) * 引入c3p0-0.9.1.jar * 在hibernate.cfg.xml文件中增加如下配置 <!-- C3P0连接池设定--> <!-- ...
- javascript onclick 函数不执行
今天被这个问题搞伤了. 原本是要给table中的元素添加onclick事件处理函数,刚开始还可以,后来就不行了,百试不得其解,反复检查,程序也没问题,耗了一个多小时,偏偏我就不信电脑会扯拐,就要看看还 ...
- Web Service简介
1.1.Web Service基本概念 Web Service也叫XML Web Service WebService是一种可以接收从Internet或者Intranet上的其它系统中传递过来的请求, ...
- Java 基于JavaMail的邮件发送
http://blog.csdn.net/xietansheng/article/details/51673073 http://blog.csdn.net/xietansheng/article/d ...