《React后台管理系统实战 :三》header组件:页面排版、天气请求接口及页面调用、时间格式化及使用定时器、退出函数
一、布局及排版
1.布局src/pages/admin/header/index.jsx
import React,{Component} from 'react'

import './header.less'

export default class Header extends Component{

    render(){

        return(

            <div className='header'>

                <div className='header-top'>

                    <span>欢迎,admin</span>

                    <a href='javascript:'>退出</a>

                </div>

                <div className='header-bottom'>

                    <div className='header-bottom-left'>

                        <span>首页</span>

                    </div>

                    <div className='header-bottom-right'>

                        <span>2020-2-6 10:10:10</span>

                        <img src='http://www.weather.com.cn/m2/i/icon_weather/21x15/d14.gif' alt='天气'/>

                        <span>雪</span>

                    </div>

                </div>

            </div>

        )

    }

}
2. 样式src/pages/admin/header/header.less
.header{

    height: 80px;

    .header-top{

        height: 40px;

        line-height: 40px;

        // 以上两行控制行内文字居中

        text-align:right;

        border-bottom: 2px solid lightseagreen;

        padding-right: 30px;

        span{

            margin-right:10px;

        }

    }

    .header-bottom{

        height: 40px;

        background-color: white;

        display:flex;

        align-items: center;

        padding:0 30px;

        .header-bottom-left{

            width: 25%;

            text-align:center;

            font-size: 18px;

            position: relative;

            //以下用伪元素::after及transform来实现下指三角形

            &::after {

                content: '';

                position: absolute;

                right: 50%;

                top: 100%;

                transform: translateX(50%);

                border-top: 20px solid white;

                border-right: 20px solid transparent;

                border-bottom: 20px solid transparent;

                border-left: 20px solid transparent;

              }

        }

        .header-bottom-right{

            width:75%;

            text-align:right;

            img{

                margin: 0 10px;

                height:4px;

                width:3px;

            }

        }

    }

}
效果:

二、天气请求接口函数
1. 基础知识
1. 1【jsonp】 请求库https://github.com/webmodules/jsonp
jsonp原理
1). jsonp只能解决GET类型的ajax请求跨域问题

2). jsonp请求不是ajax请求, 而是一般的get请求

3). 基本原理

    浏览器端:

        动态生成<script>来请求后台接口(src就是接口的url)

        定义好用于接收响应数据的函数(fn), 并将函数名通过请求参数提交给后台(如: callback=fn)

    服务器端:

        接收到请求处理产生结果数据后, 返回一个函数调用的js代码, 并将结果数据作为实参传入函数调用

    浏览器端:

        收到响应自动执行函数调用的js代码, 也就执行了提前定义好的回调函数, 并得到了需要的结果数据
- jsonp本质是get 请求
- 用来解决跨域问题
- 浏览器端通过script标签发请求
Request URL: http://api.map.baidu.com/telematics/v3/weather?location=%E5%BE%90%E5%B7%9E&output=json&ak=3p49MVra6urFRGOT9s8UBWr2&callback=__jp0注意最后多了一个callback=__jp0,它指定了返回时用来处理数据的函数名 - 服务器返回一个函数执行语句代码类似
__jp0&&__jp0({"error":0,"status":"success",...})在network里查看请求,注意看它的名字和请求时的指定一样
jsonp(url, opts, fn)

url (String) url to fetch

opts (Object), optional

	param (String) name of the query string parameter to specify the 		      callback (defaults to callback)

    timeout (Number) how long after a timeout error is emitted. 0 to    disable (defaults to 60000)

    prefix (String) prefix for the global callback functions that handle     jsonp responses (defaults to __jp)

    name (String) name of the global callback functions that handle jsonp responses (defaults to prefix + incremented counter)

fn callback

The callback is called with err, data parameters.

If it times out, the err will be an Error object whose message is Timeout.

Returns a function that, when called, will cancel the in-progress jsonp

request (fn won't be called).
1.2. promise对象函数,及jsonp的写法
【1】天气接口函数
【2】返回一个promise函数
【3】发送一个jsonp请求,{}内为空意思是使用默认配置选项
【4】异步返回成功数据给调用者
【5】异步返回失败信息给调用者
// 【1】天气接口函数

export const reqWeather=(city) => {

	//百度天气api接口

    const url = `http://api.map.baidu.com/telematics/v3/weather?location=${city}&output=json&ak=3p49MVra6urFRGOT9s8UBWr2`

    //【2】返回一个promise函数

    return new Promise((resolve,reject) => {

        //【3】发送一个jsonp请求,{}内为空意思是使用默认配置选项

        jsonp(url,{},(err,data) => {

            //【3.1】如果请求成功

            if(!err && data.status==='success'){

				//请求成功处理语句编写处

				resolve({obj}) //【4】异步返回成功数据给调用者

            }else{//【3.2】如果请求失败

				//请求失败处理语句编写处

				reject() //【5】异步返回失败信息给调用者

            }

        })

    })

}
1.3. 获取天气信息(支持jsonp)
请求URL:
http://api.map.baidu.com/telematics/v3/weather
请求方式:
GET
参数类型:
|参数		     |是否必选 |类型     |说明

|location    |Y       |string   |城市名称

|output      |Y       |string   |返回数据格式: json

|ak          |Y       |string   |唯一的应用key(3p49MVra6urFRGOT9s8UBWr2)
返回示例:
{

  "error": 0,

  "status": "success",

  "date": "2019-06-02",

  "results": [

    {

      "currentCity": "北京",

      "pm25": "119",

      "index": [

        {

          "des": "建议着长袖T恤、衬衫加单裤等服装。年老体弱者宜着针织长袖衬衫、马甲和长裤。",

          "tipt": "穿衣指数",

          "title": "穿衣",

          "zs": "舒适"

        },

        {

          "des": "不宜洗车,未来24小时内有雨,如果在此期间洗车,雨水和路上的泥水可能会再次弄脏您的爱车。",

          "tipt": "洗车指数",

          "title": "洗车",

          "zs": "不宜"

        },

        {

          "des": "各项气象条件适宜,无明显降温过程,发生感冒机率较低。",

          "tipt": "感冒指数",

          "title": "感冒",

          "zs": "少发"

        },

        {

          "des": "天气较好,赶快投身大自然参与户外运动,尽情感受运动的快乐吧。",

          "tipt": "运动指数",

          "title": "运动",

          "zs": "适宜"

        },

        {

          "des": "紫外线强度较弱,建议出门前涂擦SPF在12-15之间、PA+的防晒护肤品。",

          "tipt": "紫外线强度指数",

          "title": "紫外线强度",

          "zs": "弱"

        }

      ],

      "weather_data": [

        {

          "date": "周日 06月02日 (实时:30℃)",

          "dayPictureUrl": "http://api.map.baidu.com/images/weather/day/duoyun.png",

          "nightPictureUrl": "http://api.map.baidu.com/images/weather/night/leizhenyu.png",

          "weather": "多云转雷阵雨",

          "wind": "西南风3-4级",

          "temperature": "31 ~ 20℃"

        },

        {

          "date": "周一",

          "dayPictureUrl": "http://api.map.baidu.com/images/weather/day/duoyun.png",

          "nightPictureUrl": "http://api.map.baidu.com/images/weather/night/duoyun.png",

          "weather": "多云",

          "wind": "南风微风",

          "temperature": "34 ~ 20℃"

        },

        {

          "date": "周二",

          "dayPictureUrl": "http://api.map.baidu.com/images/weather/day/leizhenyu.png",

          "nightPictureUrl": "http://api.map.baidu.com/images/weather/night/leizhenyu.png",

          "weather": "雷阵雨",

          "wind": "东风微风",

          "temperature": "28 ~ 21℃"

        },

        {

          "date": "周三",

          "dayPictureUrl": "http://api.map.baidu.com/images/weather/day/duoyun.png",

          "nightPictureUrl": "http://api.map.baidu.com/images/weather/night/duoyun.png",

          "weather": "多云",

          "wind": "北风3-4级",

          "temperature": "33 ~ 19℃"

        }

      ]

    }

  ]

}
2.编写天气请求接口src/api/index.js
【0】借用antd返回信息组件
【1】天气请求接口函数编写
【2】从数据中解构取出图片、天气
【3】异步返回图片、天气给调用函数者
【4】返回错误信息给调用者
import ajax from './ajax'

import jsonp from 'jsonp'

import {message} from 'antd' //【0】借用antd返回信息组件 默认暴露不要大括号,否则需要大括号

// const BASE = 'http://localhost:5000'

const BASE = ''

//导出一个函数,第1种写法

//登录接口函数

// export function reqLogin(username,password){

//     return ajax('login',{username,password},'POST')

// }

//导出一个函数,第2种写法

// 登录接口函数

export const reqLogin=(username,password)=>ajax(BASE+'login',{username,password},'POST')

//添加用户接口

export const AddUser=(user)=>ajax(BASE+'/manage/user/add',user,'POST')

// 【1】天气请求接口函数编写

export const reqWeather=(city) => {

    const url = `http://api.map.baidu.com/telematics/v3/weather?location=${city}&output=json&ak=3p49MVra6urFRGOT9s8UBWr2`

    //返回一个promise函数

    return new Promise((resolve,reject) => {

        //发送一个jsonp请求

        jsonp(url,{},(err,data) => {

            //输出请求的数据到控制台

            console.log('jsonp()', err, data)

            //如果请求成功

            if(!err && data.status==='success'){

                //【2】从数据中解构取出图片、天气

                const {dayPictureUrl,weather}=data.results[0].weather_data[0]

                //【3】异步返回图片、天气给调用函数者

                resolve({dayPictureUrl,weather})

            }else{//如果请求失败

            //【4】返回错误信息给调用者

                message.error('天气信息获取失败')

            }

        })

    })

}

reqWeather('上海')
刷新页面即会在控制台输入【1.3 的 返回示例】类似的信息,之所以会直接运行,原因是login页面请求了api,从而触发reqWeather('上海')直接运行
三、header.jsx组件时间部分
3.1时间格式处理工具编写
时间获取:
Date.now() //返回样式:1581070286188
时间格式化工具编写 src/utils/dateUtils.js
功能:把【时间获取Date.now()】的时间处理成如下格式 2020-2-6 10:10:10
/*

包含n个日期时间处理的工具函数模块

*/

/*

  格式化日期

*/

export function formateDate(time) {

    if (!time) return ''

    let date = new Date(time)

    return date.getFullYear() + '-' + (date.getMonth() + 1) + '-' + date.getDate()

      + ' ' + date.getHours() + ':' + date.getMinutes() + ':' + date.getSeconds()

  }
3.2 src/pages/admin/header.jsx
【1】时间格式化工具
【2】内存中存取用户信息工具
【3】当前时间格式化后的字符串
【4】每过一秒获取一次系统时间
定时器函数setInterval(()=>{},1000)
【5】在第一次render()之后执行一次
一般在此执行异步操作: 发ajax请求/启动定时器
【6】解构state内的数据
【7】获取memoryUtils中的用户名
【8】把变量填入标签内:用户名、当前时间、天气图标、天气
import React,{Component} from 'react'

import './header.less'

import {formateDate} from '../../../utils/dateUtils.js' //【1】时间格式化工具

import memoryUtils from '../../../utils/memoryUtils' //【2】内存中存取用户信息工具

export default class Header extends Component{

    state={

        curentTime:formateDate(Date.now()), //【3】当前时间格式化后的字符串

        dayPictureUrl:'', //天气小图标地址

        weather:'', //天气文字

    }

    // 【4】每过一秒获取一次系统时间

    getTime=()=>{

        //定时器函数setInterval()

        this.intervalId = setInterval(()=>{

            let curentTime=formateDate(Date.now()) //获取当前时间并格式化为字符串

            this.setState({curentTime}) //更新到state里,实现每秒更新一次时间

        },1000)

    }

/*  【5】在第一次render()之后执行一次

   一般在此执行异步操作: 发ajax请求/启动定时器*/

    componentDidMount(){

        this.getTime()

    }

    render(){

        //【6】解构state内的数据

        const {curentTime,dayPictureUrl,weather} = this.state

        //【7】获取memoryUtils中的用户名

        const username = memoryUtils.user.username

        return(

            <div className='header'>

		//【8】把变量填入标签内:用户名、当前时间、天气图标、天气

                <div className='header-top'>

                    <span>欢迎,{username}</span>

                    <a href='javascript:'>退出</a>

                </div>

                <div className='header-bottom'>

                    <div className='header-bottom-left'>

                        <span>首页</span>

                    </div>

                    <div className='header-bottom-right'>

                        <span>{curentTime}</span>

                        <img src={dayPictureUrl} alt='天气'/>

                        <span>{weather}</span>

                    </div>

                </div>

            </div>

        )

    }

}
效果:2020-2-7 20:36:58 时间会动态变化
四、天气部分
天气显示src/pages/admin/header.jsx
【1】引入接口函数,非默认导
【2】天气小图标地址
【3】天气文字
【4】异步获取天气
【5】渲染之后调用一次天气
【6】解构state内的数据
【7】写入页面
import React,{Component} from 'react'

import './header.less'

import {formateDate} from '../../../utils/dateUtils.js' //时间格式化工具

import memoryUtils from '../../../utils/memoryUtils' //内存中存取用户信息工具 默认导出,不用加花括号

import {reqWeather} from '../../../api/index' //【1】引入接口函数,非默认导出,加花括号

export default class Header extends Component{

    state={

        curentTime:formateDate(Date.now()), //当前时间格式化后的字符串

        dayPictureUrl:'', //【2】天气小图标地址

        weather:'', //【3】天气文字

    }

    //【4】异步获取天气

    getWeather = async () => {

        //解构天气小图标,天气

        const {dayPictureUrl, weather} = await reqWeather('上海')

        //更新状态

        this.setState({dayPictureUrl, weather})

    }

    // 每过一秒获取一次系统时间

    getTime=()=>{

        //定时器函数setInterval()

        this.intervalId = setInterval(()=>{

            let curentTime=formateDate(Date.now()) //获取当前时间并格式化为字符串

            this.setState({curentTime})

        },1000)

    }

/*  在第一次render()之后执行一次

   一般在此执行异步操作: 发ajax请求/启动定时器*/

    componentDidMount(){

        this.getTime() //调用时间,因为getTime内部写了定时,所以每隔1秒会更新一次时间state,页面就会重新渲染一次

        this.getWeather() //【5】渲染之后调用一次天气

    }

    render(){

        //【6】解构state内的数据

        const {curentTime,dayPictureUrl,weather} = this.state

        //获取用户名

        const username = memoryUtils.user.username

        return(

            <div className='header'>

                <div className='header-top'>

                    <span>欢迎,{username}</span>

                    <a href='javascript:'>退出</a>

                </div>

                <div className='header-bottom'>

                    <div className='header-bottom-left'>

                        <span>首页</span>

                    </div>

					{/*【7】写入页面*/}

                    <div className='header-bottom-right'>

                        <span>{curentTime}</span>

                        <img src={dayPictureUrl} alt='天气'/>

                        <span>{weather}</span>

                    </div>

                </div>

            </div>

        )

    }

}
效果: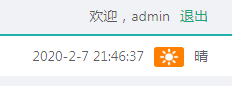
五、显示当前路径模块
【1】用于包装当前组件,使其具有路由的3属性history
【1.1】包装起来,使有路由组件的属性
【2】导入导航配置菜单
【3】根据当前网址,在menuListConfig内找到对应的title
【4】得到当前需要显示的title
【5】显示title
import React,{Component} from 'react'

import './header.less'

import {formateDate} from '../../../utils/dateUtils.js' //时间格式化工具

import memoryUtils from '../../../utils/memoryUtils' //内存中存取用户信息工具 默认导出,不用加花括号

import {reqWeather} from '../../../api/index' //引入接口函数,非默认导出,加花括号

//import {message} from 'antd'

import {withRouter} from 'react-router-dom' //【1】用于包装当前组件,使其具有路由的3属性history

import menuList from '../../../config/menuConfig.js' //【2】导入导航配置菜单

class Header extends Component{

    state={

        curentTime:formateDate(Date.now()), //当前时间格式化后的字符串

        dayPictureUrl:'', //天气小图标地址

        weather:'', //天气文字

    }

    // 获取路径

    // getPath=()=>{

    // }

//【3】根据当前网址,在menuListConfig内找到对应的title

    getTitle = () => {

        // 得到当前请求路径

        const path = this.props.location.pathname

        let title

        menuList.forEach(item => {

          if (item.key===path) { // 如果当前item对象的key与path一样,item的title就是需要显示的title

            title = item.title

          } else if (item.children) {

            // 在所有子item中查找匹配的

            const cItem = item.children.find(cItem => path.indexOf(cItem.key)===0)

            // 如果有值才说明有匹配的

            if(cItem) {

              // 取出它的title

              title = cItem.title

            }

          }

        })

        return title //返回title

      }

    //异步获取天气

    getWeather = async () => {

        //解构天气小图标,天气

        const {dayPictureUrl, weather} = await reqWeather('上海')

        //更新状态

        this.setState({dayPictureUrl, weather})

    }

    // 每过一秒获取一次系统时间

    getTime=()=>{

        //定时器函数setInterval()

        this.intervalId = setInterval(()=>{

            let curentTime=formateDate(Date.now()) //获取当前时间并格式化为字符串

            this.setState({curentTime})

        },1000)

    }

/*  在第一次render()之后执行一次

   一般在此执行异步操作: 发ajax请求/启动定时器*/

    componentDidMount(){

        this.getTime()

        this.getWeather()

    }

    render(){

        //解构state内的数据

        const {curentTime,dayPictureUrl,weather} = this.state

        //获取用户名

        const username = memoryUtils.user.username

        // 【4】得到当前需要显示的title

        const title = this.getTitle()

        return(

            <div className='header'>

                <div className='header-top'>

                    <span>欢迎,{username}</span>

                    <a href='javascript:'>退出</a>

                </div>

                <div className='header-bottom'>

                    <div className='header-bottom-left'>

                    {/*【5】显示title*/}

                        <span>{title}</span>

                    </div>

                    <div className='header-bottom-right'>

                        <span>{curentTime}</span>

                        <img src={dayPictureUrl} alt='天气'/>

                        <span>{weather}</span>

                    </div>

                </div>

            </div>

        )

    }

}

export default withRouter(Header)//【1.1】包装起来,使当前组件具有路由组件的属性
效果:http://localhost:3000/role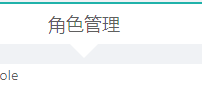
六、退出登录
【antd对话框】https://ant.design/components/modal-cn/
import {Modal} from 'antd'

//退出登录

    loginOut=()=>{

        Modal.confirm({

            title: '确定要退出登录吗?',

            content: '是请点确定,否则点取消',

            onOk() {

              console.log('OK');

            },

            onCancel() {

              console.log('Cancel');

            },

          })

    }
完整代码src/pages/admin/header/index.jsx
【1】内存中存取用户信息工具 默认导出,不用加花括号
【2】删除localstorage中的用户登录数据
【3】引入对话框模块
【4】退出登录函数
【5】改成前头函数,因为下面要用到
【6】删除localstorage中登录信息。及内存中登录信息
【7】删除内存中user信息
【8】跳转到登录页面,用替换因为无需退回
【9】调用退出
import React,{Component} from 'react'

import './header.less'

import {formateDate} from '../../../utils/dateUtils.js' //时间格式化工具

import memoryUtils from '../../../utils/memoryUtils' //【1】内存中存取用户信息工具 默认导出,不用加花括号

import storageUtils from '../../../utils/storageUtils' //【2】删除localstorage中的用户登录数据

import {reqWeather} from '../../../api/index' //引入接口函数,非默认导出,加花括号

import {withRouter} from 'react-router-dom' //用于包装当前组件,使其具体路由的3属性history

import menuList from '../../../config/menuConfig.js' //导入导航配置菜单

import {Modal} from 'antd' //【3】引入对话框模块

class Header extends Component{

    state={

        curentTime:formateDate(Date.now()), //当前时间格式化后的字符串

        dayPictureUrl:'', //天气小图标地址

        weather:'', //天气文字

    }

    // 获取路径

    // getPath=()=>{

    // }

    getTitle = () => {

        // 得到当前请求路径

        const path = this.props.location.pathname

        let title

        menuList.forEach(item => {

          if (item.key===path) { // 如果当前item对象的key与path一样,item的title就是需要显示的title

            title = item.title

          } else if (item.children) {

            // 在所有子item中查找匹配的

            const cItem = item.children.find(cItem => path.indexOf(cItem.key)===0)

            // 如果有值才说明有匹配的

            if(cItem) {

              // 取出它的title

              title = cItem.title

            }

          }

        })

        return title

      }

    //异步获取天气

    getWeather = async () => {

        //解构天气小图标,天气

        const {dayPictureUrl, weather} = await reqWeather('上海')

        //更新状态

        this.setState({dayPictureUrl, weather})

    }

    // 每过一秒获取一次系统时间

    getTime=()=>{

        //定时器函数setInterval()

        this.intervalId = setInterval(()=>{

            let curentTime=formateDate(Date.now()) //获取当前时间并格式化为字符串

            this.setState({curentTime})

        },1000)

    }

    //【4】退出登录函数

    loginOut=()=>{

        Modal.confirm({

            title: '确定要退出登录吗?',

            content: '是请点确定,否则点取消',

            onOk:()=> {//【5】改成前头函数,因为下面要用到this.props.history.replace()

              console.log('OK');

              //【6】删除localstorage中登录信息。及内存中登录信息

              storageUtils.removeUser()

              memoryUtils.user={}//【7】删除内存中user信息

              //【8】跳转到登录页面,用替换因为无需退回

              this.props.history.replace('/login')

             }//,取消时什么也不做,所以可省略不写

            // onCancel() {

            //   console.log('Cancel');

            // },

          })

    }

//在第一次render()之后执行一次

   //一般在此执行异步操作: 发ajax请求启动定时器

    componentDidMount(){

        this.getTime();

        this.getWeather();

    }

    render(){

        //解构state内的数据

        const {curentTime,dayPictureUrl,weather} = this.state

        //获取用户名

        const username = memoryUtils.user.username

        // 得到当前需要显示的title

        const title = this.getTitle()

        return(

            <div className='header'>

                <div className='header-top'>

                    <span>欢迎,{username}</span>

                    {/*【9】*/}

                    <a href='javascript:' onClick={this.loginOut}>退出</a>

                </div>

                <div className='header-bottom'>

                    <div className='header-bottom-left'>

                        <span>{title}</span>

                    </div>

                    <div className='header-bottom-right'>

                        <span>{curentTime}</span>

                        <img src={dayPictureUrl} alt='天气'/>

                        <span>{weather}</span>

                    </div>

                </div>

            </div>

        )

    }

}

export default withRouter(Header)
效果: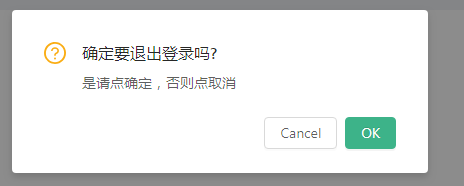
七、警告完善
退出后控制台会提示如下信息:
此为定时器函数未清除造成的问题
Warning: Can't perform a React state update on an unmounted component. This is a no-op, but it indicates a memory leak in your application. To fix, cancel all subscriptions and asynchronous tasks in the componentWillUnmount method.

    in Header (created by Context.Consumer)

    in withRouter(Header) (at admin.jsx:42)

    in section (created by BasicLayout)

    in BasicLayout (created by Context.Consumer)

    in Adapter (at admin.jsx:41)

    in section (created by BasicLayout)

    in BasicLayout (created by Context.Consumer)

    in Adapter (at admin.jsx:37)

    in Admin (created by Context.Consumer)
解决:清除定时器函数
/*

  当前组件卸载之前调用

   */

  componentWillUnmount () {

    // 清除定时器

    clearInterval(this.intervalId)

  }
完整代码
【1】当前组件卸载之前调用清除定时器,避免其造成警告信息
import React,{Component} from 'react'

import './header.less'

import {formateDate} from '../../../utils/dateUtils.js' //时间格式化工具

import memoryUtils from '../../../utils/memoryUtils' //内存中存取用户信息工具 默认导出,不用加花括号

import storageUtils from '../../../utils/storageUtils' //删除localstorage中的用户登录数据

import {reqWeather} from '../../../api/index' //引入接口函数,非默认导出,加花括号

import {withRouter} from 'react-router-dom' //用于包装当前组件,使其具体路由的3属性history

import menuList from '../../../config/menuConfig.js' //导入导航配置菜单

import {Modal} from 'antd'

class Header extends Component{

    state={

        curentTime:formateDate(Date.now()), //当前时间格式化后的字符串

        dayPictureUrl:'', //天气小图标地址

        weather:'', //天气文字

    }

    // 获取路径

    // getPath=()=>{

    // }

    getTitle = () => {

        // 得到当前请求路径

        const path = this.props.location.pathname

        let title

        menuList.forEach(item => {

          if (item.key===path) { // 如果当前item对象的key与path一样,item的title就是需要显示的title

            title = item.title

          } else if (item.children) {

            // 在所有子item中查找匹配的

            const cItem = item.children.find(cItem => path.indexOf(cItem.key)===0)

            // 如果有值才说明有匹配的

            if(cItem) {

              // 取出它的title

              title = cItem.title

            }

          }

        })

        return title

      }

    //异步获取天气

    getWeather = async () => {

        //解构天气小图标,天气

        const {dayPictureUrl, weather} = await reqWeather('上海')

        //更新状态

        this.setState({dayPictureUrl, weather})

    }

    // 每过一秒获取一次系统时间

    getTime=()=>{

        //定时器函数setInterval()

        this.intervalId = setInterval(()=>{

            let curentTime=formateDate(Date.now()) //获取当前时间并格式化为字符串

            this.setState({curentTime})

        },1000)

    }

    //退出登录

    loginOut=()=>{

        Modal.confirm({

            title: '确定要退出登录吗?',

            content: '是请点确定,否则点取消',

            onOk:()=> {//改成前头函数,因为下面要用到this.props.history.replace()

              console.log('OK');

              //删除localstorage中登录信息。及内存中登录信息

              storageUtils.removeUser()

              memoryUtils.user={}

              //跳转到登录页面,用替换因为无需退回

              this.props.history.replace('/login')

             }//,取消时什么也不做,所以可省略不写

            // onCancel() {

            //   console.log('Cancel');

            // },

          })

    }

//在第一次render()之后执行一次

   //一般在此执行异步操作: 发ajax请求启动定时器

    componentDidMount(){

        this.getTime();

        this.getWeather();

    }

/*

  【1】当前组件卸载之前调用清除定时器,避免其造成警告信息

   */

  componentWillUnmount () {

    // 清除定时器

    clearInterval(this.intervalId)

  }

    render(){

        //解构state内的数据

        const {curentTime,dayPictureUrl,weather} = this.state

        //获取用户名

        const username = memoryUtils.user.username

        // 得到当前需要显示的title

        const title = this.getTitle()

        return(

            <div className='header'>

                <div className='header-top'>

                    <span>欢迎,{username}</span>

                    <a href='javascript:' onClick={this.loginOut}>退出</a>

                </div>

                <div className='header-bottom'>

                    <div className='header-bottom-left'>

                        <span>{title}</span>

                    </div>

                    <div className='header-bottom-right'>

                        <span>{curentTime}</span>

                        <img src={dayPictureUrl} alt='天气'/>

                        <span>{weather}</span>

                    </div>

                </div>

            </div>

        )

    }

}

export default withRouter(Header)
优化<a链接为button自定义组件
/src/component/link-button/index.jsx
import React,{component} from 'react'

import './index.less'

export default function LinkButton(props){

    return <button {...props} className='link-button'></button>

}
index.less
.link-button{

    background-color: transparent;

  border: none;

  outline: none;

  color: #1da57a;

  cursor: pointer;

}
页面引入LinkButton
【1】引入自定按键
【2】使用自定义组件
import React,{Component} from 'react'

import './header.less'

import {formateDate} from '../../../utils/dateUtils.js' //时间格式化工具

import memoryUtils from '../../../utils/memoryUtils' //内存中存取用户信息工具 默认导出,不用加花括号

import storageUtils from '../../../utils/storageUtils' //删除localstorage中的用户登录数据

import {reqWeather} from '../../../api/index' //引入接口函数,非默认导出,加花括号

import {withRouter} from 'react-router-dom' //用于包装当前组件,使其具体路由的3属性history

import menuList from '../../../config/menuConfig.js' //导入导航配置菜单

import {Modal} from 'antd'

import LinkButton from '../../../components/link-button/index'//【1】引入自定按键

class Header extends Component{

    state={

        curentTime:formateDate(Date.now()), //当前时间格式化后的字符串

        dayPictureUrl:'', //天气小图标地址

        weather:'', //天气文字

    }

    // 获取路径

    // getPath=()=>{

    // }

    getTitle = () => {

        // 得到当前请求路径

        const path = this.props.location.pathname

        let title

        menuList.forEach(item => {

          if (item.key===path) { // 如果当前item对象的key与path一样,item的title就是需要显示的title

            title = item.title

          } else if (item.children) {

            // 在所有子item中查找匹配的

            const cItem = item.children.find(cItem => path.indexOf(cItem.key)===0)

            // 如果有值才说明有匹配的

            if(cItem) {

              // 取出它的title

              title = cItem.title

            }

          }

        })

        return title

      }

    //异步获取天气

    getWeather = async () => {

        //解构天气小图标,天气

        const {dayPictureUrl, weather} = await reqWeather('上海')

        //更新状态

        this.setState({dayPictureUrl, weather})

    }

    // 每过一秒获取一次系统时间

    getTime=()=>{

        //定时器函数setInterval()

        this.intervalId = setInterval(()=>{

            let curentTime=formateDate(Date.now()) //获取当前时间并格式化为字符串

            this.setState({curentTime})

        },1000)

    }

    //退出登录

    loginOut=()=>{

        Modal.confirm({

            title: '确定要退出登录吗?',

            content: '是请点确定,否则点取消',

            onOk:()=> {//改成前头函数,因为下面要用到this.props.history.replace()

              console.log('OK');

              //删除localstorage中登录信息。及内存中登录信息

              storageUtils.removeUser()

              memoryUtils.user={}

              //跳转到登录页面,用替换因为无需退回

              this.props.history.replace('/login')

             }//,取消时什么也不做,所以可省略不写

            // onCancel() {

            //   console.log('Cancel');

            // },

          })

    }

//在第一次render()之后执行一次

   //一般在此执行异步操作: 发ajax请求启动定时器

    componentDidMount(){

        this.getTime();

        this.getWeather();

    }

/*

  当前组件卸载之前调用清除定时器,避免其造成警告信息

   */

  componentWillUnmount () {

    // 清除定时器

    clearInterval(this.intervalId)

  }

    render(){

        //解构state内的数据

        const {curentTime,dayPictureUrl,weather} = this.state

        //获取用户名

        const username = memoryUtils.user.username

        // 得到当前需要显示的title

        const title = this.getTitle()

        return(

            <div className='header'>

                <div className='header-top'>

                    <span>欢迎,{username}</span>

                    {/*【2】使用自定义组件*/}

                    <LinkButton href='javascript:' onClick={this.loginOut}>退出</LinkButton>

                </div>

                <div className='header-bottom'>

                    <div className='header-bottom-left'>

                        <span>{title}</span>

                    </div>

                    <div className='header-bottom-right'>

                        <span>{curentTime}</span>

                        <img src={dayPictureUrl} alt='天气'/>

                        <span>{weather}</span>

                    </div>

                </div>

            </div>

        )

    }

}

export default withRouter(Header)
效果:
《React后台管理系统实战 :三》header组件:页面排版、天气请求接口及页面调用、时间格式化及使用定时器、退出函数的更多相关文章
- 《React后台管理系统实战 :一》:目录结构、引入antd、引入路由、写login页面、使用antd的form登录组件、form前台验证、高阶函数/组件
实战 上接,笔记:https://blog.csdn.net/u010132177/article/details/104150177 https://gitee.com/pasaulis/react ...
- 《React后台管理系统实战 :二》antd左导航:cmd批量创建子/目录、用antd进行页面布局、分离左导航为单独组件、子路由、动态写左导航、css样式相对陷阱
一.admin页面布局及路由创建 0)cmd批量创建目录及子目录 //创建各个目录,及charts和子目录bar md home category product role user charts\b ...
- 《React后台管理系统实战 零》:基础笔记
day01 1. 项目开发准备 1). 描述项目 2). 技术选型 3). API接口/接口文档/测试接口 2. 启动项目开发 1). 使用react脚手架创建项目 2). 开发环境运行: npm s ...
- 《React后台管理系统实战 :四》产品分类管理页:添加产品分类、修改(更新)产品分类
一.静态页面 目录结构 F:\Test\react-demo\admin-client\src\pages\admin\category add-cate-form.jsx index.jsx ind ...
- 「免费开源」基于Vue和Quasar的前端SPA项目crudapi后台管理系统实战之自定义组件(四)
基于Vue和Quasar的前端SPA项目实战之序列号(四) 回顾 通过上一篇文章 基于Vue和Quasar的前端SPA项目实战之布局菜单(三)的介绍,我们已经完成了布局菜单,本文主要介绍序列号功能的实 ...
- React后台管理系统-商品管理列表组件
1.商品列表页面结构 <div id="page-wrapper"> <PageTitle title="商品列表" ...
- Vue实战狗尾草博客后台管理系统第三章
Vue实现狗尾草博客后台管理系统第三章 本章节,咱们开发管理系统侧边栏及面包屑功能. 先上一张效果图 样式呢,作者前端初审,关于设计上毫无美感可言,大家可根据自己情况设计更好看的哦~ 侧边栏 这里我们 ...
- 一个vue请求接口渲染页面的例子
new Vue({ el:'#bodylist', data: { list: [ { "type_id": "1", "type_name" ...
- React后台管理系统-品类选择器二级联动组件
1.页面大致是这个样子 2.页面结构 <div className="col-md-10"> <select name="&quo ...
随机推荐
- 【PAT甲级】1100 Mars Numbers (20 分)
题意: 输入一个正整数N(<100),接着输入N组数据每组包括一行字符串,将其翻译为另一个星球的数字. AAAAAccepted code: #define HAVE_STRUCT_TIMESP ...
- 【MySQL】库的操作
"SQL语言主要用于存取数据.查询数据.更新数据和管理关系数据库系统,SQL语言由IBM开发. SQL语言分为3种类型: DDL语句 数据库定义语言:数据库.表.视图.索引.存储过程,例如C ...
- 安卓之button按钮
一.需求 短按按钮时显示 您点击了控件:Button 长按按钮时显示 您点击了控件:Button 二.布局xml文件 <?xml version="1.0" encodi ...
- LeetCode练题——35. Search Insert Position
1.题目 35. Search Insert Position Easy 1781214Add to ListShare Given a sorted array and a target value ...
- Python爬虫:数据解析 之 xpath
资料: W3C标准:https://www.w3.org/TR/xpath/all/ W3School:https://www.w3school.com.cn/xpath/index.asp 菜鸟教程 ...
- 给博客页面添加 live2d 小萝莉
添加依赖 在页脚HTML代码的地方添加下面的代码: <script src="https://eqcn.ajz.miesnfu.com/wp-content/plugins/wp-3d ...
- es 搜索功能简介
DSL 语法介绍 语法 范围 /_search 集群上搜索所有的索引 /index1/_search index1 /index1,index2/_search index1和index2 /inde ...
- 杭电 1114 Piggy-Bank 完全背包问题
Piggy-Bank Time Limit: 2000/1000 MS (Java/Others) Memory Limit: 65536/32768 K (Java/Others)Total ...
- java调用exe
前言:最近做了一个Java跨平台开启,关闭,重启nginx的功能,在Java操作exe上遇到了一些问题,下面是对这个问题一个总结 一.Java操作exe的三种方式 (1)Runtime.getRunt ...
- 大盘及策略收益率的公式推导与Python代码
一.模型前提与假设 设策略总天数为\(n\).第\(t\)日大盘的收盘价为\(P_t\).第\(t\)日的单日收益率为\(r_t\).\(n\)天的累积收益率为\(r_{cum}\) 假设策略仅买卖大 ...