DrawLayout使用侧滑抽屉
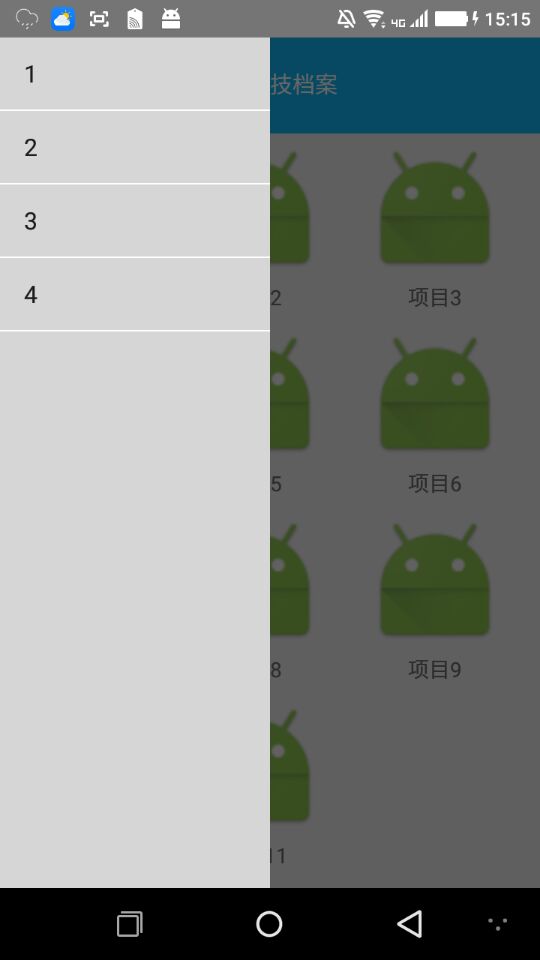

布局:fg_left_drawer
<?xml version="1.0" encoding="utf-8"?>

<LinearLayout xmlns:android="http://schemas.android.com/apk/res/android"

    android:layout_width="match_parent"

    android:layout_height="match_parent">

    <ListView

        android:id="@+id/list_left_listview"

        android:layout_width="180dp"

        android:layout_height="match_parent"

        android:layout_gravity="start"

        android:choiceMode="singleChoice"

        android:background="#d6d6d6"

        android:divider="#FFFFFF"

        android:dividerHeight="1dp" />

</LinearLayout>
创建LeftDrawFragment
public class LeftDrawFragment  extends Fragment{

    private ListView listView;

    private ArrayAdapter<String> myAdapter = null;

    private String []data = {"1","2","3","4"};

    private DrawerLayout drawerLayout;

    @Override

    public View onCreateView(LayoutInflater inflater, ViewGroup container, Bundle savedInstanceState) {

        View view = inflater.inflate(R.layout.fg_left_drawer, container, false);

//        tv_content = (TextView) view.findViewById(R.id.tv_content);

//        String text = getArguments().getString("text");

//        tv_content.setText(text);

        listView = (ListView)view.findViewById(R.id.list_left_listview);

        myAdapter = new ArrayAdapter<String>(getActivity(),android.R.layout.simple_list_item_1,data);

        listView.setAdapter(myAdapter);

        listView.setOnItemClickListener(new AdapterView.OnItemClickListener() {

            @Override

            public void onItemClick(AdapterView<?> adapterView, View view, int i, long l) {

                drawerLayout.closeDrawer(Gravity.LEFT);

                Toast.makeText(getActivity(),"点击了"+data[i],Toast.LENGTH_SHORT).show();

            }

        });

        return view;

    }

    //暴露给Activity,用于传入DrawerLayout,因为点击后想关掉DrawerLayout

    public void setDrawerLayout(DrawerLayout drawer_layout){

        this.drawerLayout = drawer_layout;

    }

}
第三步,default_nav_head.xml
<?xml version="1.0" encoding="utf-8"?>

<LinearLayout xmlns:android="http://schemas.android.com/apk/res/android"

    android:layout_width="match_parent"

    android:layout_height="64dp"

    android:background="#12b7f5">

    <LinearLayout

        android:layout_width="85dp"

        android:layout_height="match_parent"

        android:id="@+id/default_nav_left_layout">

        <ImageView

            android:layout_width="45dp"

            android:layout_height="wrap_content"

            android:src="@drawable/ic_launcher"

            android:layout_marginLeft="5dp"

            />

    </LinearLayout>

    <TextView

        android:layout_width="80dp"

        android:layout_height="match_parent"

        android:layout_weight="1"

        android:text="档案"

        android:gravity="center"

        android:textColor="#ffffff"

        android:textSize="15dp"

        android:ellipsize="marquee"

        android:focusable="true"

        android:focusableInTouchMode="true"

        android:singleLine="true"

        android:marqueeRepeatLimit="marquee_forever"

        />

    <RelativeLayout

        android:layout_width="85dp"

        android:layout_height="match_parent"

        android:id="@+id/default_nav_right_layout"

        >

        <ImageView

            android:layout_width="45dp"

            android:layout_height="wrap_content"

            android:src="@drawable/ic_launcher"

            android:layout_alignParentRight="true"

            android:layout_marginRight="5dp"

            />

    </RelativeLayout>

</LinearLayout>
fg_content.xml
<?xml version="1.0" encoding="utf-8"?>

<RelativeLayout xmlns:android="http://schemas.android.com/apk/res/android"

    android:layout_width="match_parent"

    android:layout_height="match_parent"

    android:orientation="vertical"

    >

   <GridView

       android:layout_width="match_parent"

       android:layout_height="match_parent"

       android:id="@+id/home_content_gridview"

       android:numColumns="auto_fit"

       android:columnWidth="90dp"

       android:horizontalSpacing="10dp"

       android:verticalSpacing="10dp"

       android:layout_margin="5dp">

   </GridView>

</RelativeLayout>
创建ContentFragment
public class ContentFragment  extends Fragment{

    private GridView gridView;

    private MainAdapter adapter;

    @Override

    public View onCreateView(LayoutInflater inflater, ViewGroup container, Bundle savedInstanceState) {

        View view = inflater.inflate(R.layout.fg_content, container, false);

//        tv_content = (TextView) view.findViewById(R.id.tv_content);

//        String text = getArguments().getString("text");

//        tv_content.setText(text);

        gridView = (GridView) view.findViewById(R.id.home_content_gridview);

        adapter = new MainAdapter(getActivity());

        gridView.setAdapter(adapter);

        return view;

    }

}
activity_xml
<?xml version="1.0" encoding="utf-8"?>

<android.support.v4.widget.DrawerLayout xmlns:android="http://schemas.android.com/apk/res/android"

    android:id="@+id/drawer_layout"

    android:layout_width="match_parent"

    android:layout_height="match_parent">

    <LinearLayout

        android:layout_width="match_parent"

        android:layout_height="match_parent"

        android:orientation="vertical">

        <include layout="@layout/default_nav_head"/>

        <FrameLayout

            android:id="@+id/ly_content"

            android:layout_width="match_parent"

            android:layout_height="match_parent"

            />

    </LinearLayout>

   <fragment

       android:layout_width="match_parent"

       android:layout_height="match_parent"

       android:tag="LEFT"

       android:layout_gravity="left"

       android:name="com.example.mac.mainapplication.Activity.LeftDrawFragment"

       android:id="@+id/left_drawer_fragment"/>

</android.support.v4.widget.DrawerLayout>
mainactivity
public class MainActivity extends BaseActivity implements View.OnClickListener {

    private DrawerLayout drawerLayout;

    private LeftDrawFragment leftDrawFragment;

    private FragmentManager fManager;

    private LinearLayout leftLayout;

    private RelativeLayout rightLayout;

    @Override

    protected void onCreate(Bundle savedInstanceState) {

        super.onCreate(savedInstanceState);

        setContentView(R.layout.activity_main);

        fManager = getSupportFragmentManager();

        leftDrawFragment = (LeftDrawFragment)fManager.findFragmentById(R.id.left_drawer_fragment);

        drawerLayout = (DrawerLayout)findViewById(R.id.drawer_layout);

        leftDrawFragment.setDrawerLayout(drawerLayout);

        ContentFragment contentFragment = new ContentFragment();

        Bundle args = new Bundle();

        args.putString("text","");

        contentFragment.setArguments(args);

        FragmentManager fm = getSupportFragmentManager();

        fm.beginTransaction().replace(R.id.ly_content,contentFragment).commit();

        leftLayout = (LinearLayout)findViewById(R.id.default_nav_left_layout);

        leftLayout.setOnClickListener(this);

        rightLayout = (RelativeLayout)findViewById(R.id.default_nav_right_layout);

        rightLayout.setVisibility(View.INVISIBLE);

    }

    @Override

    public void onClick(View view) {

        switch (view.getId()){

            case R.id.default_nav_left_layout:

                drawerLayout.openDrawer(Gravity.LEFT);

                break;

            default:

                break;

        }

    }

}
数据参考:http://blog.csdn.net/coder_pig/article/details/49000185
DrawLayout使用侧滑抽屉的更多相关文章
- Android使用ToolBar+DrawerLayout+NavigationView实现侧滑抽屉效果
学会使用DrawerLayout 学会使用NavigationView 学会使用ToolBar+DrawerLayout+NavigationView实现侧滑抽屉效果 学会实现Toolbar在顶部以及 ...
- 仿QQ5.0侧滑菜单
一.概述 侧滑菜单现在已经非常流行了,目前大概有这么几种:最普通的侧滑,抽屉侧滑,QQ侧滑 注:本文来自慕课网 二.最普通的侧滑 先上图 代码如下: public class MainActivity ...
- Android开源代码分享
一.AppMsg实现自定义Toast. github下载地址 二.CircleImageView实现带边框圆形头像. github下载地址 ...
- Android support library支持包常用控件介绍(二)
谷歌官方推出Material Design 设计理念已经有段时间了,为支持更方便的实现 Material Design设计效果,官方给出了Android support design library ...
- 用Flutter开发的跨平台项目,完美运行在Android和IOS上,Material简洁风格,包括启动页、引导页、注册、登录、首页、体系、公众号、导航、项目,还有漂亮的妹子图库,运行极度流畅,结构清晰,代码规范,值得拥有
Flutter学习资源汇总持续更新中...... Flutter官方网站 Flutter中文网 wendux的Flutter实战 Flutter官方exampleflutter_gallery 阿里巴 ...
- React Native——react-navigation的使用
在 React Native 中,官方已经推荐使用 react-navigation 来实现各个界面的跳转和不同板块的切换. react-navigation 主要包括三个组件: StackNavig ...
- HBuilder mui 手机app开发 Android手机app开发 ios手机app开发
经过一段时间的学习,做公司项目,对mui框架有了更加深入完整的了解,其实刚开始接触HBuilder中的mui框架只是简单的了解,并没有深入的研究,后来由于工作的需求,不得不深入研究,并运用的项目中去. ...
- Android Jetpack Compose 引入示例工程
引入 Jetpack Compose 示例工程 去GitHub上找到Compose的示例工程 https://github.com/android/compose-samples ,clone到本地 ...
- iOS:抽屉侧滑动画两种形式(1、UIView侧滑 2、ViewController侧滑)
前言: 在iOS中抽屉动画是很常用的一种技术,使用它有很炫的体验效果,为app增添特色,形式就两种,一个是UIView的侧滑,另一个就是ViewController的侧滑. 实现方式: 抽屉侧滑动画有 ...
随机推荐
- this总结
this总结,mark一下: Object中的this: Object方法中的this,指向的就是该对象,即谁调用this就指向谁,与C#等服务器语言的思想比较一致. let demo = { nam ...
- Unity工程3D和2D开发模式切换
在新建工程时,经常会选择默认的3D工程,但是如果想做2D游戏又不小心选了3D工程呢,总不能把工程删了重新建吧,有个办法就是打开 Edit > Project Settings > Edit ...
- VR资源浏览网站
https://my.matterport.com 资源 https://my.matterport.com/show/?m=kCeVCzCjQ5s
- C#读取Excel日期时间
//如果为20171219 if (dt.Rows[i][title].ToString().Trim().Length == 8) { realDate = dt.Rows[i][title].To ...
- lua常用操作
1 .Lua生成随机数: Lua 生成随机数需要用到两个函数:math.randomseed(xx), math.random([n [, m]]) 1. math.randomseed(n) 接收一 ...
- JS基本动画
<style type="text/css"> .color_red { background: red; } div { position: absolute; to ...
- JavaBean与Map<String,Object>相互转换
一.为什么要实现javaBean与Map<String,Object>相互转换 Spring中的BaseCommandController对象可以将传递过来的参数封装到一个JavaBean ...
- [算法] N 皇后
N皇后问题是一个经典的问题,在一个N*N的棋盘上放置N个皇后,每行一个并使其不能互相攻击(同一行.同一列.同一斜线上的皇后都会自动攻击). 一. 求解N皇后问题是算法中回溯法应用的一个经典案例 回溯算 ...
- c# SQL Server数据库操作-管理命令参数的类:SqlParameter
使用SqlCommand类来执行Transact-SQL语句或存储过程时,有时需要用参数传值或作为返回值,SqlParameter类正是为了此需要而设计的类.下面介绍如何使用该类为SqlCommand ...
- 摄像头的管理(camera) ---- HTML5+
模块:camera Camera模块管理设备的摄像头,可用于拍照.摄像操作,通过plus.camera获取摄像头管理对象. 应用场景:保存自拍,保存照片,上传照片,保存视频,上传视频: 通过之前的模块 ...