Android开发 ---构建对话框Builder对象,消息提示框、列表对话框、单选提示框、多选提示框、日期/时间对话框、进度条对话框、自定义对话框、投影
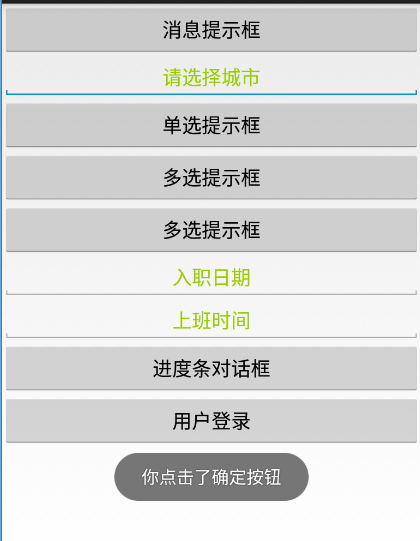
效果图:


1、activity_main.xml
描述:
a、定义了一个消息提示框按钮
点击按钮弹出消息
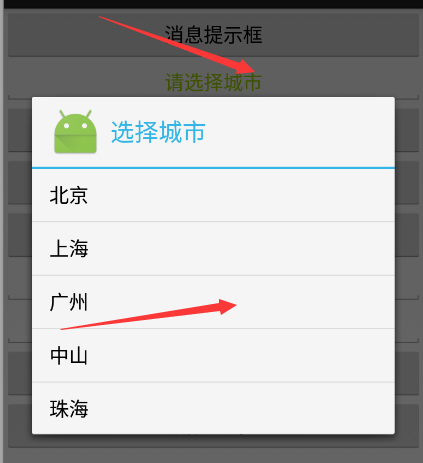
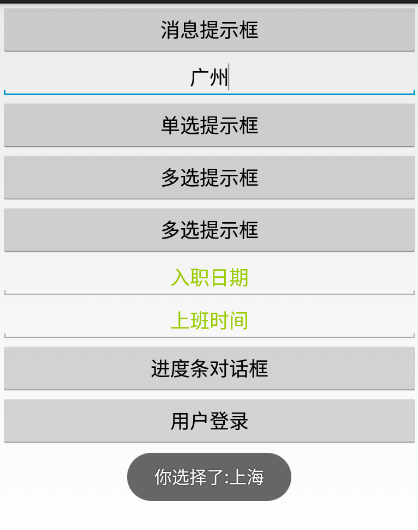
b、定义了一个选择城市的输入框
点击按钮选择城市
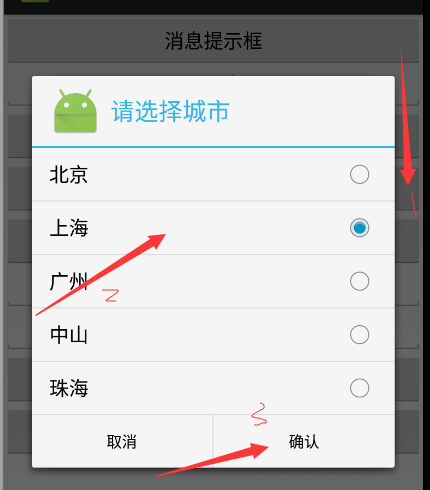
c、定义了一个单选提示框按钮
点击按钮选择某项内容
d、定义了一个多选提示框按钮
点击按钮选择多项内容
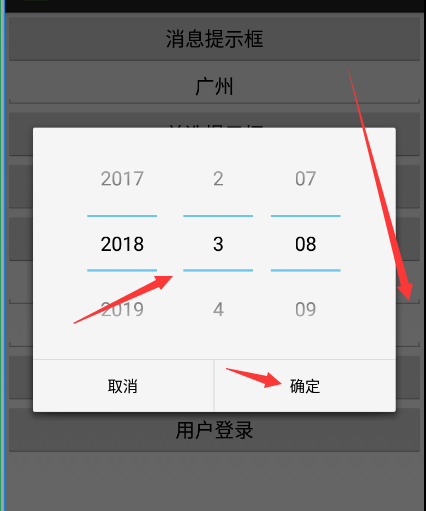
e、定义了一个选择入职日期的输入框
点击按钮选择入职日期
f、定义了一个选择上班时间的输入框
点击按钮选择时间
g、定义了一个进度条对话框按钮
点击按钮进行文件下载
h、定义了一个用户登录的按钮
点击按钮进行用户登录
点击这些按钮,弹出对话框完成相应的操作
<?xml version="1.0" encoding="utf-8"?>

<ScrollView xmlns:android="http://schemas.android.com/apk/res/android"

    android:id="@+id/activity_scrollview"

    android:layout_width="match_parent"

    android:layout_height="match_parent"

    android:scrollbars="vertical"

    >

    <LinearLayout

        android:layout_width="match_parent"

        android:layout_height="match_parent"

        android:orientation="vertical"

        >

        <Button

            android:layout_width="match_parent"

            android:layout_height="wrap_content"

            android:text="消息提示框"

            android:onClick="test_1"

            />

        <EditText

            android:layout_width="match_parent"

            android:layout_height="wrap_content"

            android:id="@+id/city"

            android:hint="请选择城市"

            android:gravity="center"

            android:onClick="test_2"
       <!--输入框提示信息的颜色为绿色-->

            android:textColorHint="@android:color/holo_green_light"

            />

        <Button

            android:layout_width="match_parent"

            android:layout_height="wrap_content"

            android:text="单选提示框"

            android:onClick="test_3"

            />

        <Button

            android:layout_width="match_parent"

            android:layout_height="wrap_content"

            android:text="多选提示框"

            android:onClick="test_4"

            />

        <EditText

            android:layout_width="match_parent"

            android:layout_height="wrap_content"

            android:id="@+id/intime"

            android:hint="入职日期"

            android:gravity="center"

            android:onClick="test_5"

            android:textColorHint="@android:color/holo_green_light"

            />

        <EditText

            android:layout_width="match_parent"

            android:layout_height="wrap_content"

            android:id="@+id/workingTime"

            android:hint="上班时间"

            android:gravity="center"

            android:onClick="test_6"

            android:textColorHint="@android:color/holo_green_light"

            />

        <Button

            android:layout_width="match_parent"

            android:layout_height="wrap_content"

            android:text="进度条对话框"

            android:onClick="test_7"

            />

        <Button

            android:layout_width="match_parent"

            android:layout_height="wrap_content"

            android:text="用户登录"

            android:onClick="test_8"

            />

    </LinearLayout>

</ScrollView>
2、activity_main.xml
package com.nf.android_dialog; import android.annotation.TargetApi;
import android.app.Activity;
import android.app.AlertDialog;
import android.app.DatePickerDialog;
import android.app.ProgressDialog;
import android.app.TimePickerDialog;
import android.content.DialogInterface;
import android.icu.util.Calendar;
import android.os.Build;
import android.os.Bundle;
import android.os.SystemClock;
import android.view.LayoutInflater;
import android.view.View;
import android.widget.DatePicker;
import android.widget.EditText;
import android.widget.TimePicker;
import android.widget.Toast; public class MainActivity extends Activity {
private EditText ucity,intime,workTime;
@Override
protected void onCreate(Bundle savedInstanceState) {
super.onCreate(savedInstanceState);
setContentView(R.layout.activity_main);
ucity = (EditText)findViewById(R.id.city);
intime = (EditText)findViewById(R.id.intime);
workTime = (EditText)findViewById(R.id.workingTime);
}
//消息提示框
public void test_1(View view){
//在当前Activity中构建一个对话框Builder对象
final AlertDialog.Builder builder = new AlertDialog.Builder(this);
//设置builder将要构建的Dialog属性
//设置对话框的标题
builder.setTitle("消息");
//设置对话框的主要内容
builder.setMessage("今天12点,大家一起吃饭");
//设置对话框上的图标
builder.setIcon(R.mipmap.ic_launcher);
//对话框中绑定确定按钮
//当点击确定按钮是,new一个DialogInterface的单击监听事件的方法
builder.setPositiveButton("确定",new DialogInterface.OnClickListener(){
@Override
public void onClick(DialogInterface dialogInterface,int i){
//当点击按钮时,弹出对话内容“你点击了确定按钮”
Toast.makeText(MainActivity.this,"你点击了确定按钮",Toast.LENGTH_SHORT).show();
}
});
//对话框中绑定取消按钮
builder.setNegativeButton("取消",null);
//生产Dialog
//调用Builder对象的create()方法创建AlertDialog对象
AlertDialog dialog = builder.create();
//调用AlertDialog对象的show()方法将对话框显示出来
dialog.show();
}
//列表对话框
//构建数据
String[] citys = {"北京","上海","广州","中山","珠海"};//数组
public void test_2(View view){
//当点击选择城市输入框时,在当前Activity中构建一个对话框Builder对象
AlertDialog.Builder builder = new AlertDialog.Builder(this);
//设置对话框标题
builder.setTitle("选择城市");
//设置对话框图标
builder.setIcon(R.mipmap.ic_launcher);
//设置列表的项,传入citys输入,new一个点击监听事件的方法
builder.setItems(citys,new DialogInterface.OnClickListener(){
@Override
public void onClick(DialogInterface dialogInterface,int i){
//当点击了某一项后,弹出提示,你选择了某个城市
Toast.makeText(MainActivity.this,"你选择了"+citys[i],Toast.LENGTH_SHORT).show();
//不仅将选择的内容弹出来,还要将内容绑定到输入框中
ucity.setText(citys[i]);
ucity.setSelection(citys[i].length());
}
});
builder.create().show();
}
//单选提示框
int selectedIndex = -1;
public void test_3(View view){
//同上构建builder对象
AlertDialog.Builder builder = new AlertDialog.Builder(this);
//标题
builder.setTitle("请选择城市");
//图标
builder.setIcon(R.mipmap.ic_launcher);
//设置单选按钮,传入citys数据,1,表示默认选中第二项
builder.setSingleChoiceItems(citys,1,new DialogInterface.OnClickListener(){
@Override
public void onClick(DialogInterface dialogInterface,int i){
selectedIndex = i;//记录被选中的下标
}
});
//绑定按钮
builder.setPositiveButton("确认",new DialogInterface.OnClickListener(){
@Override
public void onClick(DialogInterface dialogInterface,int i){
if (selectedIndex>=0){
//当点击确认按钮后弹出选择的内容
Toast.makeText(MainActivity.this,"你选择了:"+citys[selectedIndex],Toast.LENGTH_SHORT).show();
}
}
});
//绑定取消按钮
builder.setNegativeButton("取消",null);
builder.create().show();
}
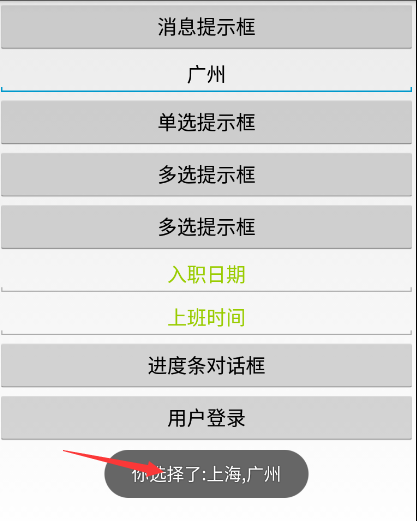
//多选提示框
//默认多选按钮的每一项都未被选中
boolean[] selected = {false,false,false,false,false};
public void test_4(View view){
//同上
AlertDialog.Builder builder = new AlertDialog.Builder(this);
builder.setTitle("请选择城市");
builder.setIcon(R.mipmap.ic_launcher);
//设置为复选框,传入citys数据,selected表示多选按钮的状态都为false
builder.setMultiChoiceItems(citys,selected,new DialogInterface.OnMultiChoiceClickListener(){
@Override
public void onClick(DialogInterface dialogInterface,int i,boolean b){
if (b){
//如果项被选中,则将该项的值设置为b,b代表true;
selected[i] = b;
}
}
});
builder.setPositiveButton("确认",new DialogInterface.OnClickListener(){
@Override
public void onClick(DialogInterface dialogInterface,int i){
//创建缓存
StringBuffer sb = new StringBuffer();
//通过循环遍历将所有为true选项的citys中的数据追加到缓存中
for (int j=0;j<selected.length;j++){
if (selected[j]){
sb.append(citys[j]+",");
}
}
//判断缓存中是否有值
if (sb.length()>0){
//如果有值则将缓存中的值进行截取字符串,减1是为了除去最后一个逗号
String newStr = sb.substring(0,sb.length() - 1);
//然后将截取到的字符串弹出来
Toast.makeText(MainActivity.this,"你选择了:"+newStr,Toast.LENGTH_SHORT).show();
}
}
});
//设置取消按钮
builder.setNegativeButton("取消",null);
builder.create().show();
}
//日期对话框
@TargetApi(Build.VERSION_CODES.N)
public void test_5(View view){
//构建一个日历对象
Calendar cal = Calendar.getInstance();//当前日期
//2个月后的今天日期是多少
cal.add(Calendar.MONTH,2);
//创建日历对话框,设置选择日期的监听事件的方法
DatePickerDialog dialog = new DatePickerDialog(this,new DatePickerDialog.OnDateSetListener() {
//参数i表示数字年,参数i1表示数字月,参数i2表示数字日
@Override
public void onDateSet(DatePicker datePicker, int i, int i1, int i2) {
//给ui组件绑定选中的日期
intime.setText(i + "-" + (i1 + 1) + "-" + i2);
intime.setSelection(intime.getText().length());
}
},cal.get(Calendar.YEAR),cal.get(Calendar.MONTH),cal.get(Calendar.DATE)+1);
//显示日历对话框
dialog.show();
}
//时间对话框
@TargetApi(Build.VERSION_CODES.N)
public void test_6(View view){
//构建一个日历对象
Calendar cal = Calendar.getInstance();//当前日期
//在当前Activity中构建一个时间对象,并监听选择的时间
TimePickerDialog dialog = new TimePickerDialog(this,new TimePickerDialog.OnTimeSetListener() {
//参数i表示数字小时,参数i1表示数字分钟
@Override
public void onTimeSet(TimePicker timePicker, int i, int i1) {
//设置时间显示的字符串格式
String time = i + ":" + i1;
//将时间绑定到UI输入框中
workTime.setText(time);
}
},cal.get(Calendar.HOUR)+1,cal.get(Calendar.MINUTE),true);
dialog.show();
}
//定义进度条对话框
ProgressDialog progressDialog;
boolean isRun = true;
int i = 1;
public void test_7(View view){
i=1;
//当点击按钮后就进行下载
isRun = true;
//在当前Activity中实例化一个进度条对话框
progressDialog = new ProgressDialog(this);
//设置标题
progressDialog.setTitle("下载");
//设置图标
progressDialog.setIcon(R.mipmap.ic_launcher);
progressDialog.setMessage("文件正在下载中....."); //控制进度条样式风格,这里是条形风格,还可以设置圆圈分隔等
progressDialog.setProgressStyle(ProgressDialog.STYLE_HORIZONTAL);
//设置一个按钮,当点击取消下载
progressDialog.setButton(ProgressDialog.BUTTON_NEGATIVE,"取消下载",new DialogInterface.OnClickListener(){
@Override
public void onClick(DialogInterface dialogInterface,int i){
//则停止进度
isRun = false;
//并将进度重新设置为0
i=0;
}
});
//显示进度条对话框
progressDialog.show();
//开始执行下载操作
new Thread(new Runnable() {
@Override
public void run() {
while (isRun){
runOnUiThread(new Runnable() {
@Override
public void run() {
progressDialog.setMessage("文件已下载"+i+"%");
}
});
//设置进度
progressDialog.setProgress(i);
SystemClock.sleep(100);
i++;
//如果i大于100,则停止下载,并提示文件下载完毕
if (i>100){
isRun = false;
runOnUiThread(new Runnable() {
@Override
public void run() {
progressDialog.setMessage("文件已下载完毕");
}
});
//休眠1秒,关闭对话框
SystemClock.sleep(1000);
progressDialog.dismiss();
}
}
}
}).start();
}
//自定义对话框
private EditText uname,upwd;
public void test_8(View view){
//获取LayoutInflater对象
LayoutInflater inflater = LayoutInflater.from(this);
//通过投影加载自定义Dialog布局View
View layout = inflater.inflate(R.layout.layout_dialog_login,null);
uname = (EditText)layout.findViewById(R.id.uname);
upwd = (EditText)layout.findViewById(R.id.upwd);
//构建对话框
AlertDialog.Builder builder = new AlertDialog.Builder(this);
builder.setTitle("用户登录");
builder.setIcon(R.mipmap.ic_launcher);
//设置View,将投影加载到的布局绑定到对话框
builder.setView(layout);
//设置button
builder.setPositiveButton("登录",new DialogInterface.OnClickListener(){
@Override
public void onClick(DialogInterface dialogInterface,int i){
//当点击登录按钮后,获取用户名和密码输入框中的文本,转化为字符串
String name = uname.getText().toString();
String pwd = upwd.getText().toString();
//弹出信息
Toast.makeText(MainActivity.this,"用户名:"+name+",密码:"+pwd,Toast.LENGTH_SHORT).show();
}
});
builder.setNeutralButton("注册",null);
builder.setNeutralButton("取消",null);
builder.create().show();
}
}
3、layout_dialog_login.xml
<?xml version="1.0" encoding="utf-8"?>

<LinearLayout xmlns:android="http://schemas.android.com/apk/res/android"

    android:orientation="vertical"

    android:layout_width="match_parent"

    android:layout_height="match_parent"

    android:layout_margin="10dp">

    <TextView

        android:layout_width="match_parent"

        android:layout_height="wrap_content"

        android:text="用户名:"

        android:textSize="15sp"

        />

    <EditText

        android:layout_width="match_parent"

        android:layout_height="50dp"

        android:id="@+id/uname"

        android:hint="请输入用户名"

        />

    <TextView

        android:layout_width="match_parent"

        android:layout_height="wrap_content"

        android:text="密    码:"

        android:textSize="15sp"

        />

    <EditText

        android:layout_width="match_parent"

        android:layout_height="50dp"

        android:id="@+id/upwd"

        android:inputType="textPassword"

        android:hint="请输入密码"

        />

</LinearLayout>
Android开发 ---构建对话框Builder对象,消息提示框、列表对话框、单选提示框、多选提示框、日期/时间对话框、进度条对话框、自定义对话框、投影的更多相关文章
- Android开发学习之路--异步消息Handler,Message,Looper和AsyncTask之初体验
在简易音乐播放器中,用了Handler,也没有过多地去研究学习,这里再学习下android下的异步消息处理机制.这里用了Handler主要是在线程中不能更新UI,而需要通过Handler才可以.关于异 ...
- Android开发 ---基本UI组件2:图像按钮、单选按钮监听、多选按钮监听、开关
Android开发 ---基本UI组件2 1.activity_main.xml 描述: 定义一个按钮 <?xml version="1.0" encoding=" ...
- Android开发——构建自定义组件
Android中,你的应用程序程序与View类组件有着一种固定的联系,例如按钮(Button). 文本框(TextView), 可编辑文本框(EditText), 列表框(ListView), 复选框 ...
- Android开发——使用intent传递对象
intent传递对象有两种方法: 方式一:Serializable 方式 方式二:Parcelable方式 在这里不多介绍了,这一篇就是快速上手使用教程,至于详细原理介绍的,请看这一篇http://w ...
- Android开发学习之路-Handler消息派发机制源码分析
注:这里只是说一下sendmessage的一个过程,post就类似的 如果我们需要发送消息,会调用sendMessage方法 public final boolean sendMessage(Mess ...
- Android开发 - 下拉刷新和分段头悬停列表
项目源码 本文所述项目已开源,源码地址 为什么做PullToRefresh-PinnedSection-ListView 前段时间因为项目需求,需要在Android中对ListView同时增加下拉刷新 ...
- Android开发之使用BaseAdapter的notifyDataSetChanged()无法更新列表
在做一个通讯录的app,使用BaseAdapter作为adapter.重写了getCount().getItem().getItemId() .getView()方法. 因为新建联系人在第二个acti ...
- Android Studio常见对话框(普通对话框、单选对话框、多选对话框、进度条对话框、消息对话框、自定义对话框)
Android Studio常见对话框(普通对话框.单选对话框.多选对话框.进度条对话框.消息对话框.自定义对话框) 1.普通对话框 2.单选对话框 3.多选对话框 4.进度条对话框 5.消息对话框 ...
- Android开发学习笔记-自定义对话框
系统默认的对话框只能显示简单的标题内容以及按钮,而如果想要多现实其他内容则就需要自定义对话框,下面是自定义对话框的方法. 1.先定义对话框的模版 <?xml version="1.0& ...
随机推荐
- 线段树 HDU-1166 敌兵布阵
敌兵布阵是一个线段树典题,题目如下(点此查看题目出处): Problem Description C国的死对头A国这段时间正在进行军事演习,所以C国间谍头子Derek和他手下Tidy又开始忙乎了.A国 ...
- restful规范快速记忆
restful规范: 十个规则: 用户发来请求,url必须: 1.因为是面向资源编程,所以每个URL代表一种资源,URL中尽量不要用动词,要用名词 2.尽量使用HTTPS,https代替http 3. ...
- 实现Runnable接口创建多线程及其优势
实现Runnable接口创建多线程: 创建一个Runnable接口的实现类RunnableImpl: 主线程中: 其中,链式编程的Thread类的静态方法currentThread方法点getName ...
- 创建servlet程序知识点详解---servlet-day01
方法调用完后,其中的所有局部变量都会消失 ###网络架构 -CS:Client Server 客户端服务器 特点:每种平台都需要开发相对应的app, 开发成本高 功能升级需要下载最新的客户端,用户 ...
- 0.1:Why are We Addicted to Games
文章著作权归作者所有.转载请联系作者,并在文中注明出处,给出原文链接. 本系列原更新于作者的github博客,这里给出链接. 前言 本系列仅用于记录并分享自己的学习过程,以及学习过程中遇到的问题,如有 ...
- nginx-编译安装 第一章
nginx 第一章:编译安装 nginx 官网网站:http://nginx.org/en/ 1.基础说明 基本HTTP服务器功能其他HTTP服务器功能邮件代理服务器功能TCP/UDP代理服务器功能体 ...
- Java this关键字 学习笔记
前言: 这篇博文就是系统的学习一下Java中的this关键字,本人对this关键字的理解知识简单的停留在对 类的成员变量进行赋值,这次所以决定系统的体会一下this 关键字 转自:https://b ...
- 【Git】Git使用记录: 撤回已经commit到本地的提交记录
话不多说直接上步骤: git bash直接干到你的code. 直接敲命令: git reset --soft HEAD~1 搞定 就是这么简单粗暴. 如有顾虑请自行找个案例测试即可. 参考资料 htt ...
- MyBatis mapper parameterType
1. 传入简单类型 JAVA代码: public User get(Long id) { return (User) getSqlSession().selectOne("com.liu ...
- Struts2 环境配置
1.下载struts2开发包 2.将apps中的 Struts-blank.war 解压,里面的 lib 中就是所需jar包 3.新建一个web project项目,将jar包导入复制粘贴到lib中 ...