Django的rest_framework认证组件之局部设置源码解析
前言:
Django的rest_framework组件的功能很强大,今天来我来给大家剖析一下认证组件
下面进入正文分析,我们从视图开始,一步一步来剖析认证组件
1、进入urls文件
url(r'^login/', views.LoginCBV.as_view(),name="login"),
2、然后执行LoginCBV这个类的as_view方法
3、LoginCBV这个类是我们自己的写的,但是LoginCBV类根本没有写as_view这个方法,那么我们该怎么办? 此时我们应该去找LoginCBV的父类,看父类是否as_view方法
4、先确认LoginCBV这个类的父类,很清楚,我们看到LoginCBV这个类的父类是APIView这个类
class LoginCBV(APIView):
5、下面我们去APIView这个类中查找是否有as_view这个方法,我们在APIView这个类中找到了as_view方法,这个被classmethod修饰符修饰,也就是说这个方法是一个类方法,由一个类本身就可以调用这个方法,这个时候大家在会议一下,在urls文件中,是不是一个类在调用as_view方法。
如果大家都classmethod这个修饰符不清楚,可以看下我的这篇博客:https://www.cnblogs.com/bainianminguo/p/10475204.html
    @classmethod

    def as_view(cls, **initkwargs):
6、下面我们来具体看下as_view这个方法,到底做了什么事情?下面是方法的源码
@classmethod
def as_view(cls, **initkwargs):
"""
Store the original class on the view function. This allows us to discover information about the view when we do URL
reverse lookups. Used for breadcrumb generation.
"""
if isinstance(getattr(cls, 'queryset', None), models.query.QuerySet):
def force_evaluation():
raise RuntimeError(
'Do not evaluate the `.queryset` attribute directly, '
'as the result will be cached and reused between requests. '
'Use `.all()` or call `.get_queryset()` instead.'
)
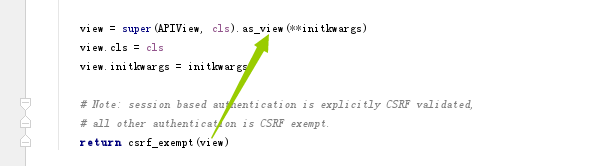
cls.queryset._fetch_all = force_evaluation view = super(APIView, cls).as_view(**initkwargs)
view.cls = cls
view.initkwargs = initkwargs # Note: session based authentication is explicitly CSRF validated,
# all other authentication is CSRF exempt.
return csrf_exempt(view)
我们来重点看下需要我们知道的,首先这个函数的返回值是一个view方法

接着我们看下view这个方法,从这里我们可以看到,view就是执行APIView父类的as_view方法,下面我们接着去找APIView类的父类的as_view方法
7、进入APIView父类中,我们看到APIView类的父类是View
class APIView(View):
8、进入View类中,看下as_view这个方法到底了干了什么?
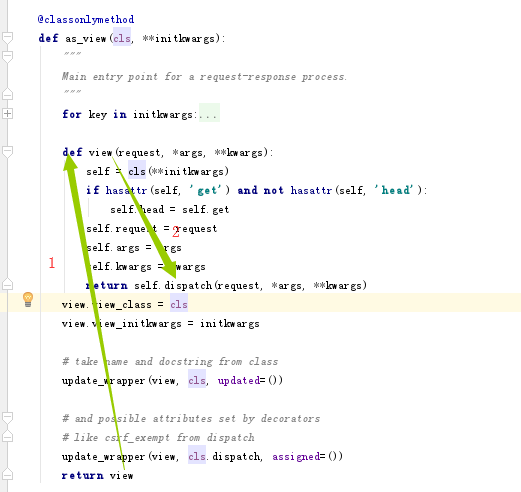
    @classonlymethod

    def as_view(cls, **initkwargs):

        """

        Main entry point for a request-response process.

        """

        for key in initkwargs:

            if key in cls.http_method_names:

                raise TypeError("You tried to pass in the %s method name as a "

                                "keyword argument to %s(). Don't do that."

                                % (key, cls.__name__))

            if not hasattr(cls, key):

                raise TypeError("%s() received an invalid keyword %r. as_view "

                                "only accepts arguments that are already "

                                "attributes of the class." % (cls.__name__, key))

        def view(request, *args, **kwargs):

            self = cls(**initkwargs)

            if hasattr(self, 'get') and not hasattr(self, 'head'):

                self.head = self.get

            self.request = request

            self.args = args

            self.kwargs = kwargs

            return self.dispatch(request, *args, **kwargs)

        view.view_class = cls

        view.view_initkwargs = initkwargs

        # take name and docstring from class

        update_wrapper(view, cls, updated=())

        # and possible attributes set by decorators

        # like csrf_exempt from dispatch

        update_wrapper(view, cls.dispatch, assigned=())

        return view
下面我们来分析这个方法的源码,方法的返回值是view这个函数,而view这个函数的返回值是self.dispatch这个方法
9、下面我们首先要找到self.dispatch这个方法,然后在看下这个方法到底干了什么?
这个self到底是哪个类的实例呢?我们来梳理一下子类和父类的关系
LoginCBV【类】------->APIView【类】------->View【类】------>view【方法】-----》dispatch【方法】
那么我们就需要先从LoginCBV这个类中找dispatch方法,发现没有找到,然后继续找LoginCBV这个类的父类,也就是APIView这个类,看这个类是否dispatch方法
10、我们最终在APIView这个类中找到了dispatch方法,所以这里调的dispatch方法一定是APIView这个类的方法
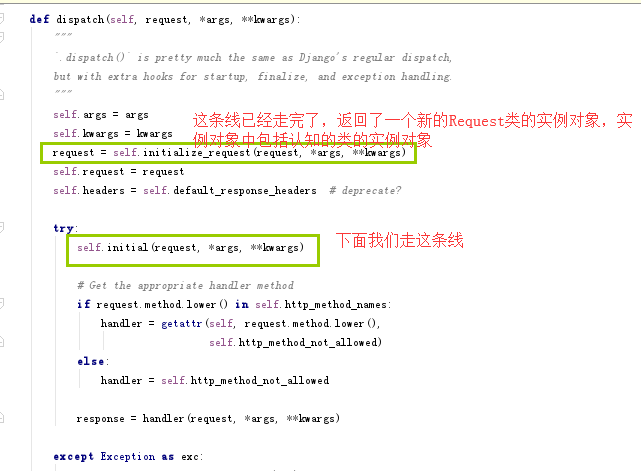
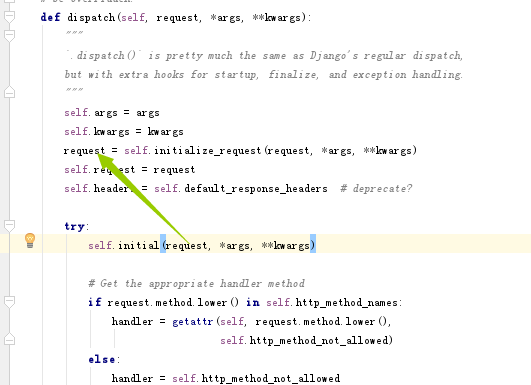
    def dispatch(self, request, *args, **kwargs):

        """

        `.dispatch()` is pretty much the same as Django's regular dispatch,

        but with extra hooks for startup, finalize, and exception handling.

        """

        self.args = args

        self.kwargs = kwargs

        request = self.initialize_request(request, *args, **kwargs)

        self.request = request

        self.headers = self.default_response_headers  # deprecate?

        try:

            self.initial(request, *args, **kwargs)

            # Get the appropriate handler method

            if request.method.lower() in self.http_method_names:

                handler = getattr(self, request.method.lower(),

                                  self.http_method_not_allowed)

            else:

                handler = self.http_method_not_allowed

            response = handler(request, *args, **kwargs)

        except Exception as exc:

            response = self.handle_exception(exc)

        self.response = self.finalize_response(request, response, *args, **kwargs)

        return self.response
这个方法很重要,我们来看下
首先rest_framework处理后的request
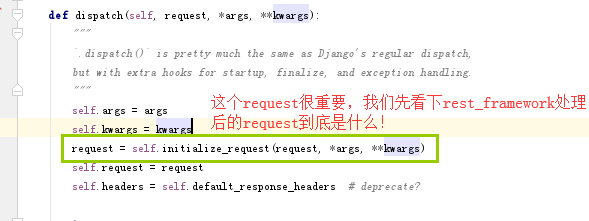
然后看下self.initialize.request方法干了什么,当然找这个方法到底在是哪个类的方法,也是要按照之前我们找dispatch方法的一样,我这里就直接找到这个方法了,self.initialize.request这个方法是APIView这个类的方法
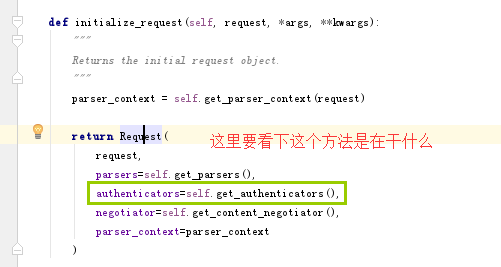
    def initialize_request(self, request, *args, **kwargs):

        """

        Returns the initial request object.

        """

        parser_context = self.get_parser_context(request)

        return Request(

            request,

            parsers=self.get_parsers(),

            authenticators=self.get_authenticators(),

            negotiator=self.get_content_negotiator(),

            parser_context=parser_context

        )
这个函数返回一个Request的实例对象,然后我们在看下Request这个类的,Request类的源码如下
class Request(object):

    """

    Wrapper allowing to enhance a standard `HttpRequest` instance.

    Kwargs:

        - request(HttpRequest). The original request instance.

        - parsers_classes(list/tuple). The parsers to use for parsing the

          request content.

        - authentication_classes(list/tuple). The authentications used to try

          authenticating the request's user.

    """

    def __init__(self, request, parsers=None, authenticators=None,

                 negotiator=None, parser_context=None):

        assert isinstance(request, HttpRequest), (

            'The `request` argument must be an instance of '

            '`django.http.HttpRequest`, not `{}.{}`.'

            .format(request.__class__.__module__, request.__class__.__name__)

        )

        self._request = request

        self.parsers = parsers or ()

        self.authenticators = authenticators or ()

        self.negotiator = negotiator or self._default_negotiator()

        self.parser_context = parser_context

        self._data = Empty

        self._files = Empty

        self._full_data = Empty

        self._content_type = Empty

        self._stream = Empty

        if self.parser_context is None:

            self.parser_context = {}

        self.parser_context['request'] = self

        self.parser_context['encoding'] = request.encoding or settings.DEFAULT_CHARSET

        force_user = getattr(request, '_force_auth_user', None)

        force_token = getattr(request, '_force_auth_token', None)

        if force_user is not None or force_token is not None:

            forced_auth = ForcedAuthentication(force_user, force_token)

            self.authenticators = (forced_auth,)
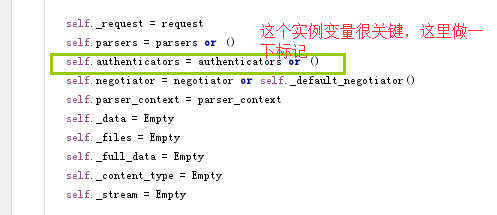
不知道大家是否明白这段代码的意思,如果authenticators为真,则self.authenticators等于authenticators,如果authenticators为假,则self.authenticators等于一个空的元组
self.authenticators = authenticators or ()
我们这里要看下实例化Request这个类的时候,authenticators这个参数传递的是什么?
我们在回到initlize_request方法的返回值,下面我们要来看下self.get_authenticators()方法是在做什么
下面看下self.get_authenticators()这个方法的源码,从字面的我们就可以理解,self.authentication_classes是一个认证的类的列表。auth()是每个类的实例对象,这个方法的返回值就是列表,列表中的元素就是每个认证类的实例对象,这里先剧透一下,authentication_class这个属性是由我们自己的配置的
    def get_authenticators(self):

        """

        Instantiates and returns the list of authenticators that this view can use.

        """

        return [auth() for auth in self.authentication_classes]
到这里,APIView类中的dispatch方法的initialize_request条线就做完了,就是给我们返回了一个新的Request类的实例,这个实例的authenticators就包括我们认证组件相关的类的实例对象
下面我们继续往下走APIView类的dispatch方法,走self.initial方法
11、下面先看下initial方法的源码
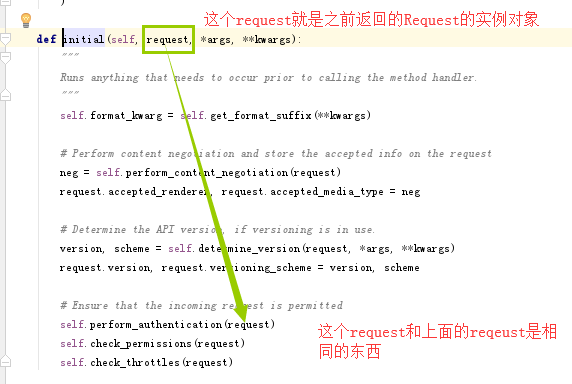
    def initial(self, request, *args, **kwargs):

        """

        Runs anything that needs to occur prior to calling the method handler.

        """

        self.format_kwarg = self.get_format_suffix(**kwargs)

        # Perform content negotiation and store the accepted info on the request

        neg = self.perform_content_negotiation(request)

        request.accepted_renderer, request.accepted_media_type = neg

        # Determine the API version, if versioning is in use.

        version, scheme = self.determine_version(request, *args, **kwargs)

        request.version, request.versioning_scheme = version, scheme

        # Ensure that the incoming request is permitted

        self.perform_authentication(request)

        self.check_permissions(request)

        self.check_throttles(request)
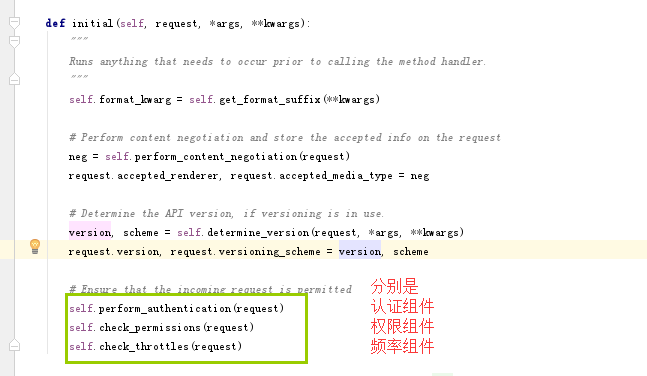
12、我们这里来看下认证组件干了什么事情?进入认证组件perform_authentication方法。只返回一个request.user
    def perform_authentication(self, request):

        """

        Perform authentication on the incoming request.

        Note that if you override this and simply 'pass', then authentication

        will instead be performed lazily, the first time either

        `request.user` or `request.auth` is accessed.

        """

        request.user
13、莫名其妙,返回一个实例的属性?其实这里大家不要忘记了,如果一个类的方法被property修饰了,调用这个方法的就可以使用属性的方式调用,而不用加括号了,如果大家不清楚,可以看我这篇博客:https://www.cnblogs.com/bainianminguo/p/9950607.html
14、下面我们看下request.user到底是什么?我们先要知道request是什么?看下面的截图
在dispatch方法中initial方法的参数有一个request,而这个request就是initialize_request的返回值,而initialize_request的返回值就是Request的实例对象
这个request有一个user的属性或者方法,我们下面来找下
15、下面我们来看下request.user到底是个什么东西?我们在Request类中确实找到了user这个方法,这个方法也被property装饰器装饰了,所以也印证了我们之前的猜测了,request.user是一个被property修饰的方法
    @property

    def user(self):

        """

        Returns the user associated with the current request, as authenticated

        by the authentication classes provided to the request.

        """

        if not hasattr(self, '_user'):

            with wrap_attributeerrors():

                self._authenticate()

        return self._user
16、然后看下self._authenticate方法
    def _authenticate(self):

        """

        Attempt to authenticate the request using each authentication instance

        in turn.

        """

        for authenticator in self.authenticators:

            try:

                user_auth_tuple = authenticator.authenticate(self)

            except exceptions.APIException:

                self._not_authenticated()

                raise

            if user_auth_tuple is not None:

                self._authenticator = authenticator

                self.user, self.auth = user_auth_tuple

                return

        self._not_authenticated()
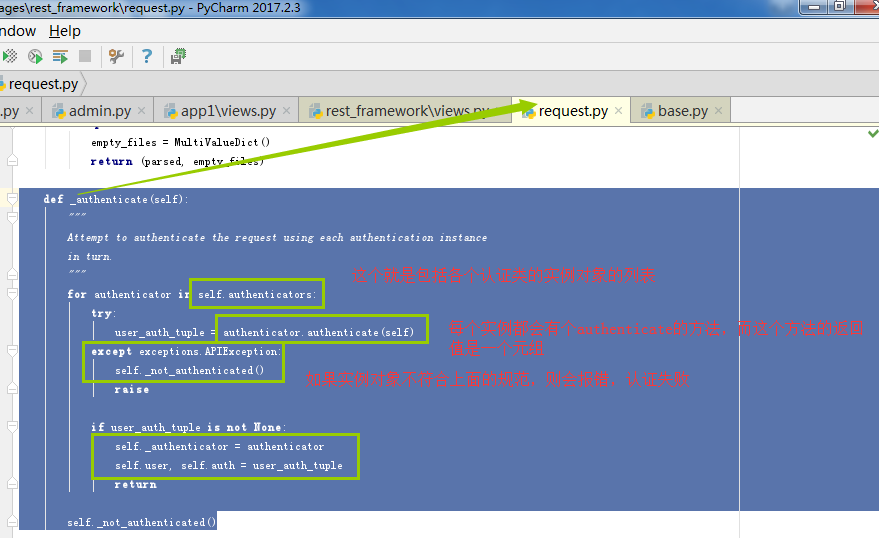
如果符合规范,则返回None,如果不符合规范,则raise抛出错误
到这里,我们就认证组件的源码梳理完了,下面我们来看下具体怎么写认证组件
17、下面进入如何写认证组件
我们的类中要有这么一个属性。

然后认证组件的类中要

18、做认证,我们是通过一个token来做的,每次用户登陆,我们都会给他重新一个token,然后把这个token告诉客户,下次客户来访问带着token,我们就认为认证通过了
所以我们先设计表,一个model表,一个Token表,两张表是一对一的关系
class User(models.Model):

    name = models.CharField(max_length=32)

    pwd = models.CharField(max_length=32)

class Token(models.Model):

    user = models.OneToOneField(to=User)

    token = models.CharField(max_length=128)
19、然后我们写用户登陆的处理逻辑
from django.http import JsonResponse

class LoginCBV(APIView):

    def get(self,request):

        pass

    def post(self,request):

        name = request.data.get("name")

        pwd = request.data.get("pwd")

        obj = models.User.objects.filter(name=name,pwd=pwd).exists()

        res = {"code":200,"message":"","token":""}

        if obj:

            user_obj = models.User.objects.filter(name=name,pwd=pwd).first()

            token = create_token(name)

            models.Token.objects.update_or_create(user_obj,defaults={"token":token})

            token_obj = models.Token.objects.get(user=user_obj)

            res["token"] = token_obj.token

        else:

            res["code"] = 201

            res["message"] = "用户名或者密码错误"

        import json

        return JsonResponse(json.dumps(res))

上面的update_or_create的方法写错了,正确的写法是下面的写法
models.Token.objects.update_or_create(user=user_obj,defaults={"token":token})
20、这里还写了一个生成token的函数,加盐的盐为用户的名称

利用时间和用户的名称计算出来一个md5值,作为这次登陆的token
import hashlib

import time

def create_token(user):

    now = time.time()

    test_md5 = hashlib.md5(bytes(str(now),encoding="utf-8"))

    test_md5.update(bytes(user,encoding="utf-8"))

    return test_md5.hexdigest()
21、下面我们开始写的认证组件,如果我们想控制访问这条url:
url(r'^book_cbv/', views.Book_cbv.as_view(),name="test3"),
22、那么我们就需要进入Book_cbv这个类中来做操作,这个属性我们之前也看到了,名称必须是authentication,且值要为一个list

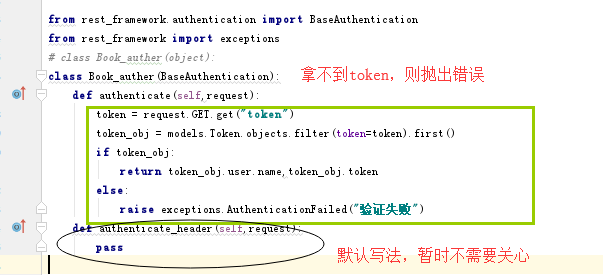
23、最后我们下Book_auther这个类
class Book_auther(BaseAuthentication):

    def authenticate(self,request):

        token = request.GET.get("token")

        token_obj = models.Token.objects.filter(token=token).first()

        if token_obj:

            return token_obj.user.name,token_obj.token

        else:

            raise exceptions.AuthenticationFailed("验证失败")

    def authenticate_header(self,request):

        pass
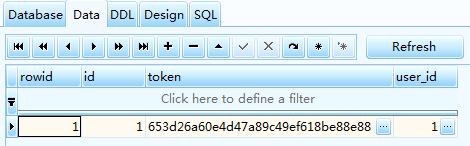
24、最后我们用postman测试一下,首先先用post登陆一下,生成一下token

然后看下Token表中是否有token字段

25、我们再次用postman登录一下,看下token是否会更新,我们看到token已经更新
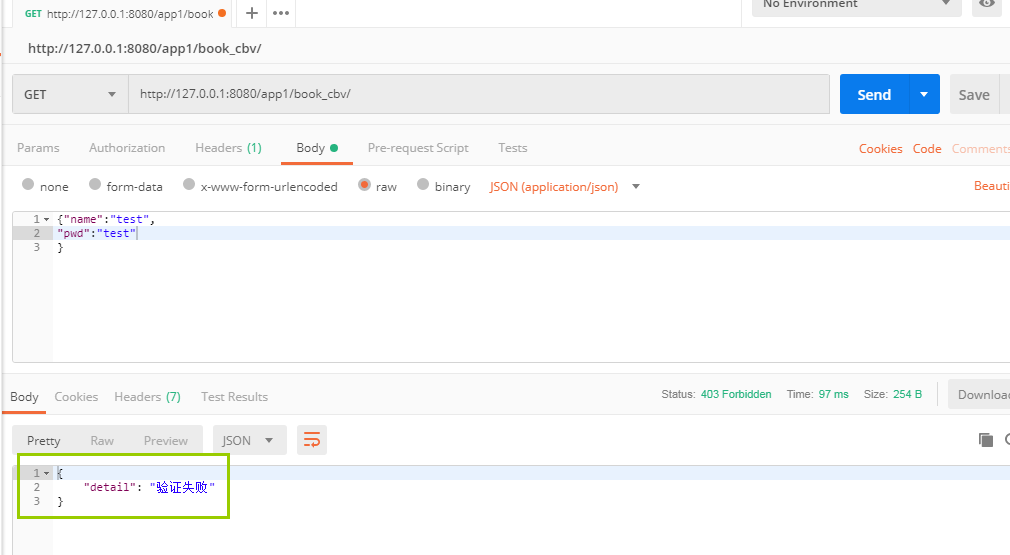
26、我们首先先不携带token去访问book表,看下效果,提示验证失败
27、下面我们携带token去访问,这样就可以返回查询到的结果了

大家要慢慢的体会
Django的rest_framework认证组件之局部设置源码解析的更多相关文章
- abp vnext2.0核心组件之.Net Core默认DI组件切换到AutoFac源码解析
老版Abp对Castle的严重依赖在vnext中已经得到了解决,vnext中DI容器可以任意更换,为了实现这个功能,底层架构相较于老版abp,可以说是进行了高度重构.当然这得益于.Net Core的D ...
- Django的rest_framework认证组件之全局设置源码解析
前言: 在我的上一篇博客我介绍了一下单独为某条url设置认证,但是如果我们想对所有的url设置认证,该怎么做呢?我们这篇博客就是给大家介绍一下在Rest_framework中如何实现全局的设置认证组件 ...
- Django之REST_FRAMEWORK 认证组件
Django之DRF之认证组件 # from rest_framework.views import APIView # APIView 中的 dispatch 中 执行的 self.initial( ...
- wtforms组件使用实例及源码解析
WTForms是一个支持多个web框架的form组件,主要用于对用户请求数据进行验证. WTforms作用:当网站中需要用到表单时,WTForms变得很有效.应该把表单定义为类,作为单独的一个模块. ...
- spring默认启动位置以及contextConfigLocation设置源码解析
这几天在看spring的源码,涉及到spring启动位置的部分,下面就看看spring到底是从哪儿开始加载的.本文使用的是spring3.0M3 首先spring的加载会借助一个监听器ContextL ...
- iOS富文本组件的实现—DTCoreText源码解析 数据篇
本文转载 http://blog.cnbang.net/tech/2630/ DTCoreText是个开源的iOS富文本组件,它可以解析HTML与CSS最终用CoreText绘制出来,通常用于在一些需 ...
- iOS富文本组件的实现—DTCoreText源码解析 渲染篇
本文转载至 http://blog.cnbang.net/tech/2729/ 上一篇介绍了DTCoreText怎样把HTML+CSS解析转换成NSAttributeString,本篇接着看看怎样把N ...
- Django settings源码解析
Django settings源码 Django中有两个配置文件 局部配置:配置文件settings.py,即项目同名文件夹下的settings.py文件 全局配置:django内部全局的配置文件se ...
- abp vnext2.0核心组件之领域实体组件源码解析
接着abp vnext2.0核心组件之模块加载组件源码解析和abp vnext2.0核心组件之.Net Core默认DI组件切换到AutoFac源码解析集合.Net Core3.1,基本环境已经完备, ...
随机推荐
- Redis集群配置(linux)
*弄了一天,有问题直接问我.qq:137416943 1.redis集群的配置和简单使用 Redis集群配置 0.首先要配置环境: 0.1 安装c++ yum install gcc-c++ ...
- 【java多线程】队列系统之LinkedBlockingDeque源码
1.简介 上一篇我们介绍了 LinkedBlockingDeque 的兄弟篇 LinkedBlockingQueue .听名字也知道一个实现了 Queue 接口,一个实现了 Deque 接口,由于 D ...
- day 12
一,什么是装饰器? 装饰器本质上就是一个python函数,他可以让其他函数在不需要做任何代码变动的前提下,增加额外的功能,装饰器的返回值也是一个函数对象. 装饰器的应用场景:比如插入日志,性能测试,事 ...
- 如果debug调试的时候中断总是停在析构函数的delete[] p上
如果debug调试的时候中断总是停在析构函数的delete[] p上,那可能 有两种情况: 1.调用析构函数的这个对象没有被分配空间,先找到调用调用析构函数出错的这个对象, 然后查看它是否被分配了空间 ...
- ClientDataSet
TField对象的SetText和GetText事件处理函数 使用TField对象的SetText和GetText事件处理函数可方便的解决字段的代码与代码所对应值的显示问题 TSimpleDatase ...
- ubuntu安装nginx及其默认目录结构
一. 安装包安装 1.1 安装Nginx $sudo apt-get install nginx Ubuntu安装之后的文件结构大致为: 所有的配置文件都在/etc/nginx下,并且每个虚拟主机已经 ...
- django的forms认证组件
django的forms认证组件 每个网站的注册界面都需要有相应的"认证"功能,比如说认证注册页面的用户名是否已被注册,二次输入的密码是否一致以及认证用户输入的用户名.邮箱.手机号 ...
- jmeter单sql语句测试
前提:在进行接口或者性能测试时需要用到数据库连接,此文讲解简单的单sql语句执行 步骤1:启动jmeter,新建一个测试计划,新建一个Thread(此处不作详细说明) 步骤2:再新建一个JDBC Co ...
- django之两个使用模板的例子
from django.db import models # Create your models here. class Book(models.Model): title=models.CharF ...
- python3 re.compile中含有变量
id = '7F' reg = re.compile(id + '[^\dA-F]?\d') line = ‘122s 7f 3' match = reg.search(line) 在程序中有时候会遇 ...