03 Vue -课程详细(传参id)、图片显示、推荐课程(主动重定向)
1、CourseDetail 课程详细信息

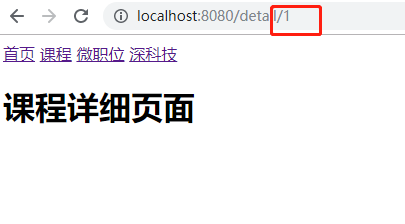
1.如何传入参数id
(1)router中导入

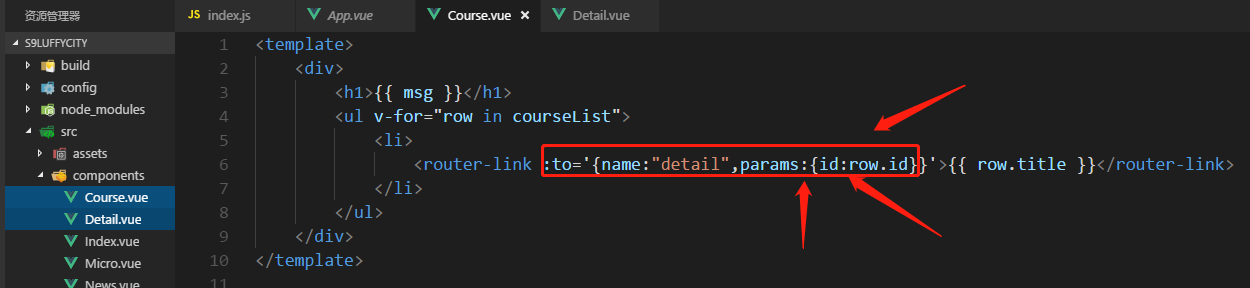
(2) router-link 关联子组件
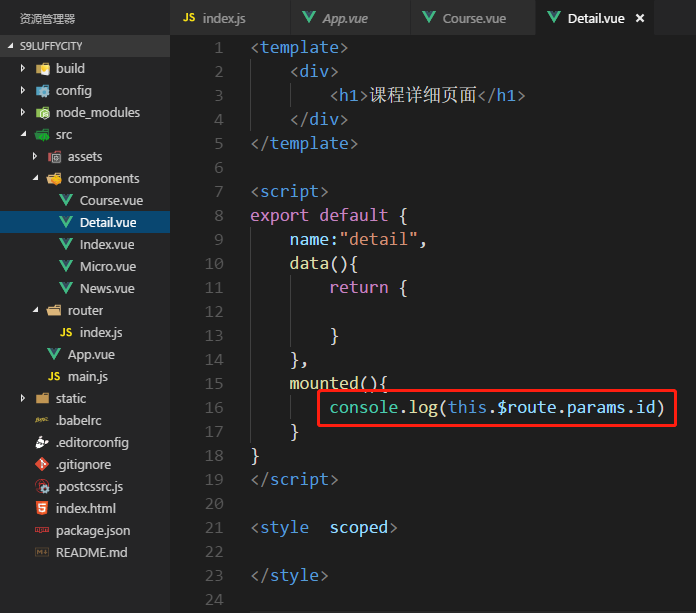
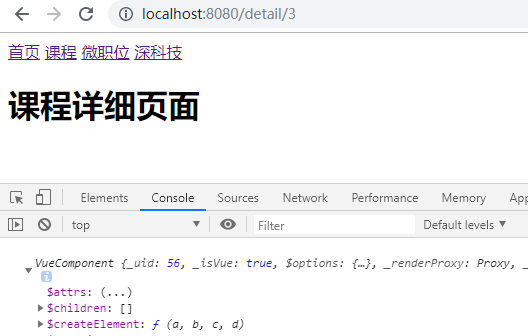
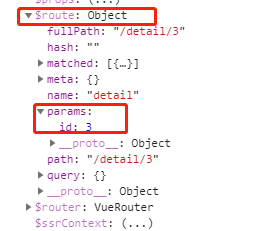
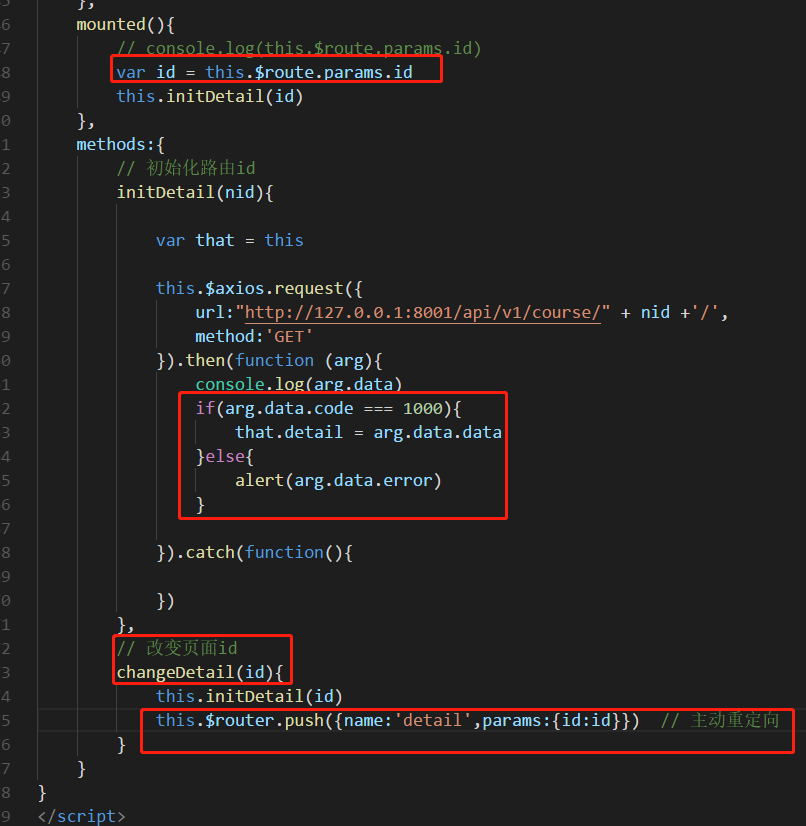
(3)detail.vue接受id

(4)通过id查询详细
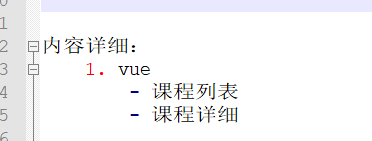
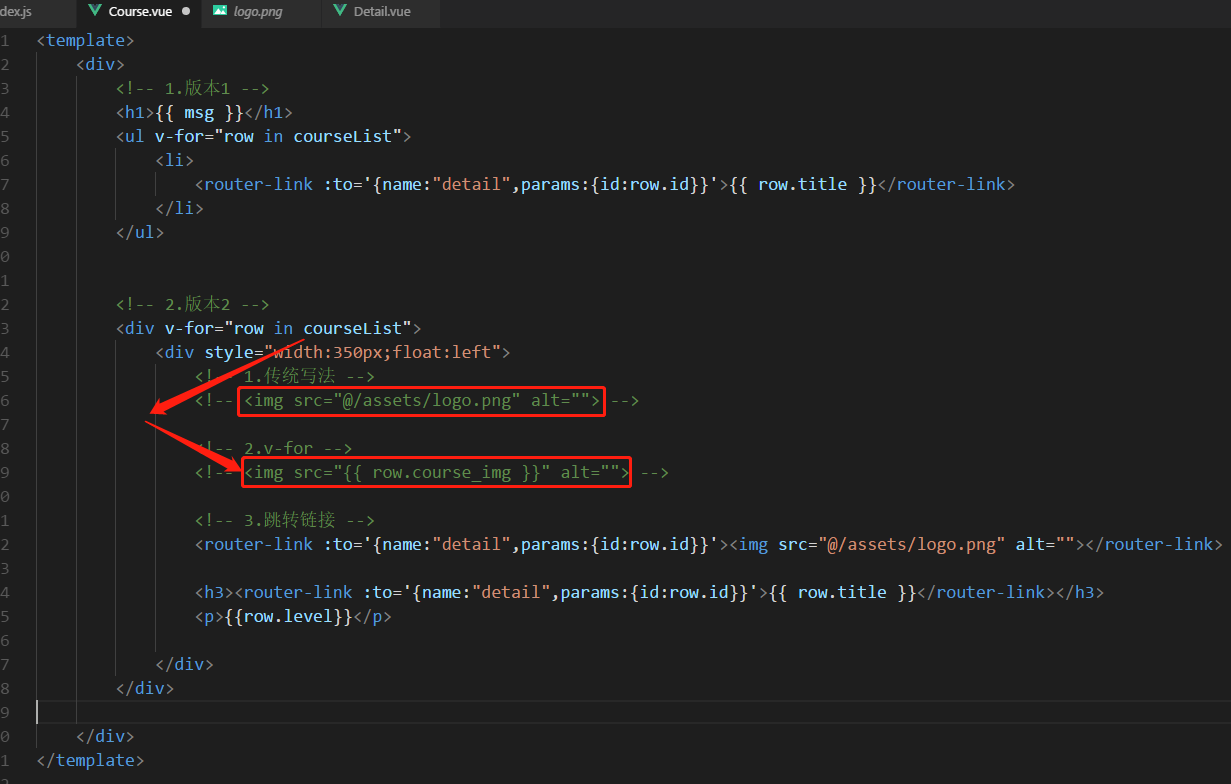
2.图片显示
(1)图片路径与效果
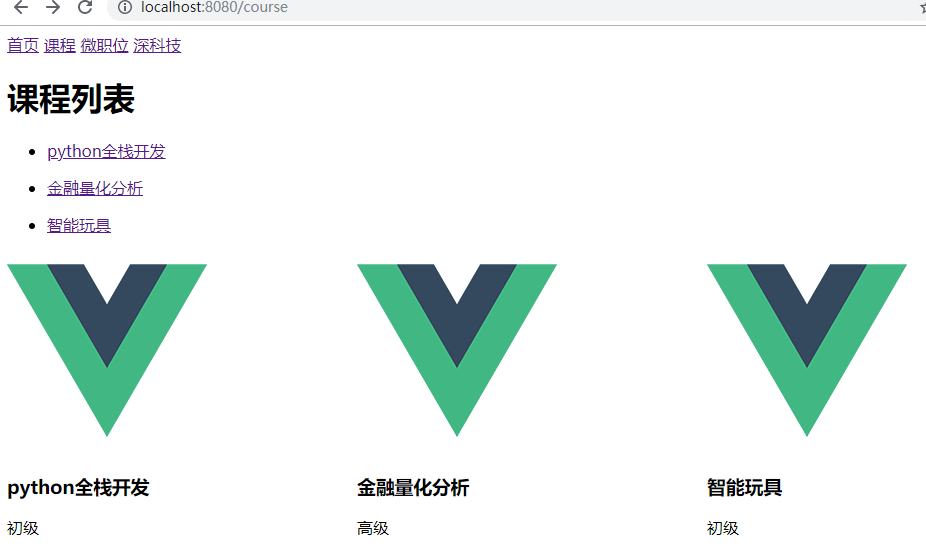
(2)v-for循环图片路径
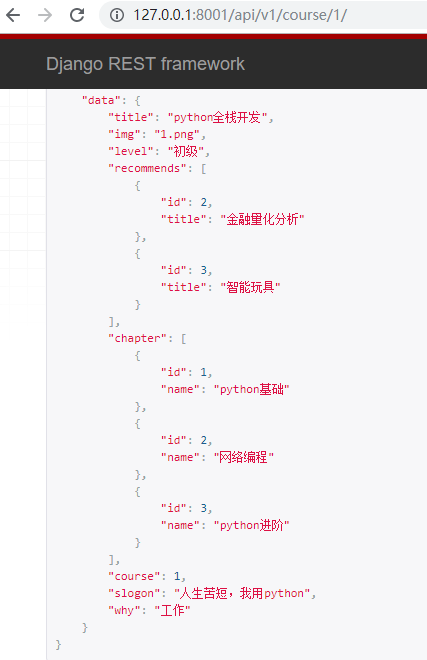
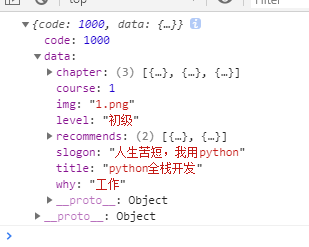
3.ajax请求:点击跳转
(1)后端json数据
(2)ajax请求

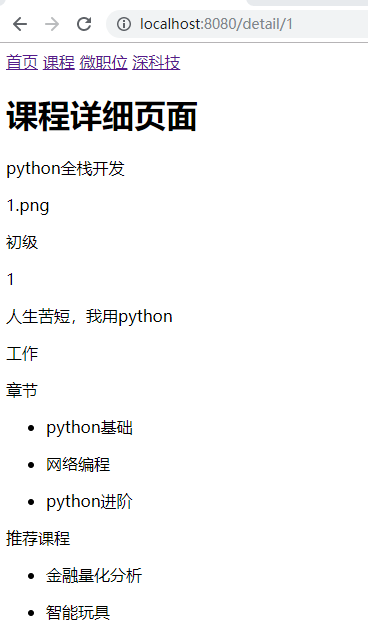
(3)效果图
2、推荐课程切换
1. url 跳转了,id没有跳转
detail组件不会重写加载,init不会执行
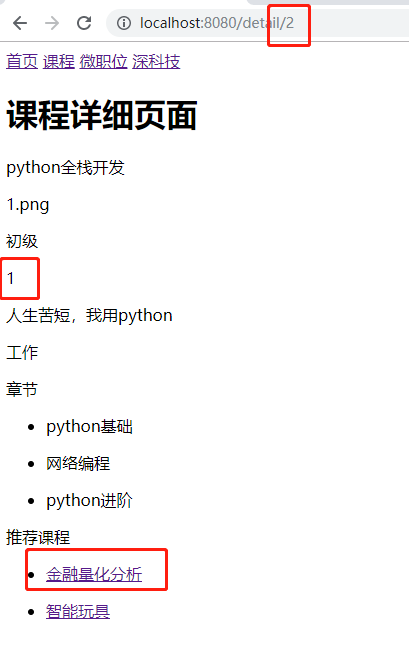
2.主动重定向:改变url和页面id


3、代码与总结
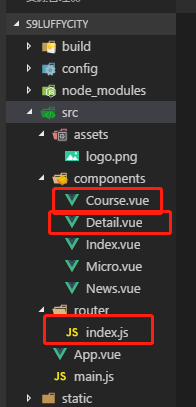
1.Detail组件代码
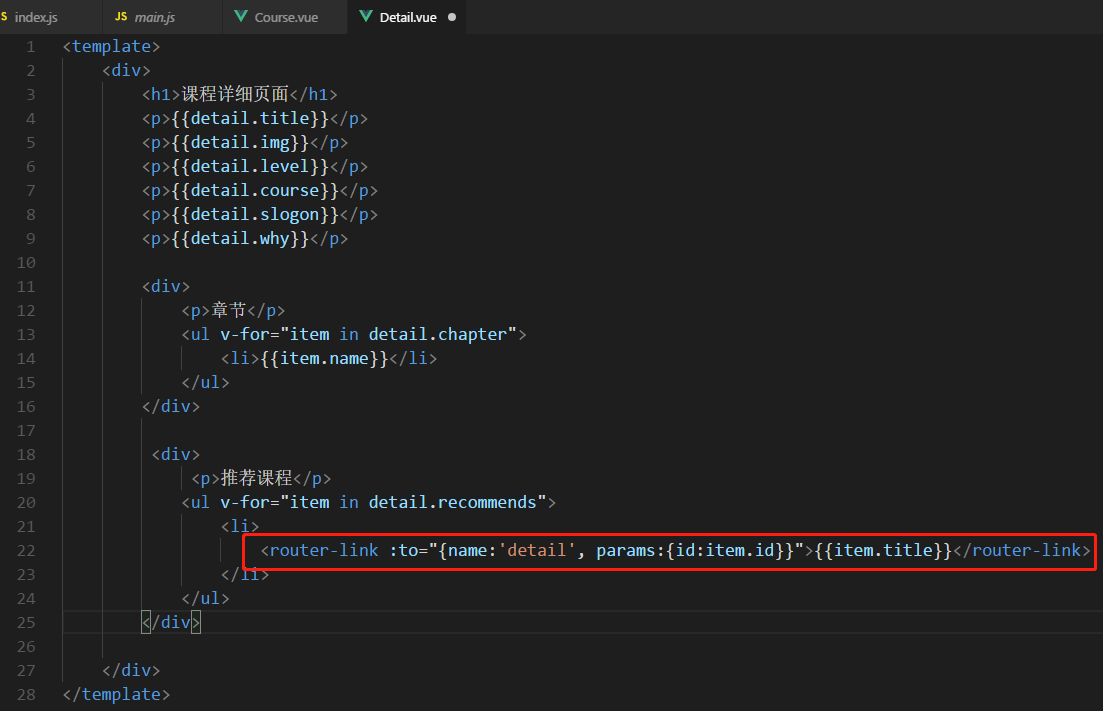
<template>

    <div>

        <h1>课程详细页面</h1>

        <p>{{detail.title}}</p>

        <p>{{detail.img}}</p>

        <p>{{detail.level}}</p>

        <p>{{detail.course}}</p>

        <p>{{detail.slogon}}</p>

        <p>{{detail.why}}</p>

        <div>

            <p>章节</p>

            <ul v-for="item in detail.chapter">

                <li>{{item.name}}</li>

            </ul>

        </div>

         <div>

             <p>推荐课程</p>

            <ul v-for="item in detail.recommends">

                <!--<li><router-link :to="{name:'detail',params:{id:item.id}}">{{item.title}}</router-link></li>-->

                <li @click="changeDetail(item.id)">{{item.title}}</li>

            </ul>

        </div>

    </div>

</template>

<script>

export default {

    name:"detail",

    data(){

        return {

            detail:{

                title:null,

                img:null,

                level:null,

                recommends:[],

                chapter:[],

                course:null,

                slogon:null,

                why:null,

            }

        }

    },

    mounted(){

        // console.log(this.$route.params.id)

        var id = this.$route.params.id

        this.initDetail(id)

    },

    methods:{

        // 初始化路由id

        initDetail(nid){

            var that = this

            this.$axios.request({

                url:"http://127.0.0.1:8001/api/v1/course/" + nid +'/',

                method:'GET'

            }).then(function (arg){

                console.log(arg.data)

                if(arg.data.code === 1000){

                    that.detail = arg.data.data

                }else{

                    alert(arg.data.error)

                }

            }).catch(function(){

            })

        },

        // 改变页面id

        changeDetail(id){

            this.initDetail(id)

            this.$router.push({name:'detail',params:{id:id}})  // 主动重定向

        }

    }

}

</script>

<style  scoped>

</style>
2.Course组件代码
<template>

    <div>

        <!-- 1.版本1 -->

        <h1>{{ msg }}</h1>

        <ul v-for="row in courseList">

            <li>

                <router-link :to='{name:"detail",params:{id:row.id}}'>{{ row.title }}</router-link>

            </li>

        </ul>

        <!-- 2.版本2 -->

        <div v-for="row in courseList">

            <div style="width:350px;float:left">

                <!-- 1.传统写法 -->

                <!-- <img src="@/assets/logo.png" alt=""> -->

                <!-- 2.v-for -->

                <!-- <img src="{{ row.course_img }}" alt=""> -->

                <!-- 3.跳转链接 -->

                <router-link :to='{name:"detail",params:{id:row.id}}'><img src="@/assets/logo.png" alt=""></router-link>

                <h3><router-link :to='{name:"detail",params:{id:row.id}}'>{{ row.title }}</router-link></h3>

                <p>{{row.level}}</p>

            </div>

        </div>

    </div>

</template>

<script>

export default {

    name:"course",

    data(){

        return {

            msg:"课程列表",

            courseList:[]

        }

    },

    mounted:function(){

        // vue页面刚加载时自动执行

        this.initCourse()

    },

    methods:{

        initCourse:function(){

            // 通过ajax向接口发送请求,并获取课程列表

            // jquery/axios

            // npm install axios --save

            //第一步:在main.js中配置

            //第二步:使用axios发送请求

            var that = this

            this.$axios.request({

                //参数

                url:"http://127.0.0.1:8001/api/v1/course",

                method:"GET"

            }).then(function(ret){

                //ajax请求发送成功后,获取响应的内容

                console.log(ret)

                if(ret.data.code === 1000){

                    that.courseList = ret.data.data

                }else{

                    alert("获取数据失败")

                }

            }).catch(function(){

                //ajax请求失败后,获取响应的内容

            })

        }

    }

}

</script>

<style  scoped>

</style>
3.router/index.js
import Vue from 'vue'

import Router from 'vue-router'

// import HelloWorld from '@/components/HelloWorld'

import Index from "@/components/Index"

import Course from "@/components/Course"

import Micro from "@/components/Micro"

import News from "@/components/News"

import Detail from "@/components/Detail"

Vue.use(Router)

export default new Router({

  routes: [

    {

      path: '/index',

      name: 'index',

      component: Index

    },

    {

      path: '/course',

      name: 'course',

      component: Course

    },

    {

      path: '/micro',

      name: 'micro',

      component: Micro

    },

    {

      path: '/news',

      name: 'news',

      component: News

    },

    {

      path: '/detail/:id',

      name: 'detail',

      component: Detail

    },

  ],

  'mode':'history'

})
4.作业

03 Vue -课程详细(传参id)、图片显示、推荐课程(主动重定向)的更多相关文章
- 18 vue 动态路由传参
params形式 http://192.168.1.100:8080/#/infoDetailed/231 //定义路由{ path: "/infoDetailed/:newsId" ...
- vue.js 1中父组件跳到子组件中并传参让子组件显示不同的内容
父组件中的点击跳转: <ul class="insurance-entry clearfloat"> <li v-link="{name:'produc ...
- vue 父子组件传参
父向子组件传参 例子:App.vue为父,引入componetA组件之后,则可以在template中使用标签(注意驼峰写法要改成componet-a写法,因为html对大小写不敏感,component ...
- webpack+vue 组件间传参(单一事件中心管理组件通信--$root),如果有路由的话会失效
先给一个例子: <body> <div id="box"> <com-a></com-a> <com-b></co ...
- vue子组件传参给父组件
关于父组件传参给子组件,可以看我另一篇文章 教程开始: 我们要实现的效果是:在子组件的Input框输入,父组件中实时更新显示.(也就是把子组件中的数据传给父组件) 一.子组件代码 template部分 ...
- vue父组件传参给子组件
其实组件之间传参有很多种方法: 1.通过本地存储 2.使用vuex状态管理 今天记录一下第三种方法 1.首页我们先创建一个项目(创建项目自行百度) 2.打开项目,在components文件夹下新建一个 ...
- vue路由组件传参
在组件中使用 $route 会使之与其对应路由形成高度耦合,从而使组件只能在某些特定的 URL 上使用,限制了其灵活性. 使用 props 将组件和路由解耦: 取代与 $route 的耦合 const ...
- vue之路由传参三种基本方式
现有如下场景,点击父组件的li元素跳转到子组件中,并携带参数,便于子组件获取数据. 父组件中: <li v-for="article in articles" @click= ...
- vue中路由传参的方式
一.params的类型: 配置路由格式: /router/:id 传递的方式: 在path后面跟上对应的值 传递后形成的路径: /router/123, /router/abc 通过:to字符串拼接的 ...
随机推荐
- iostream重载__int128
Normal (Naive)写法,用 string(char* ) std::ostream& operator <<(std::ostream&out,const __i ...
- Kubernetes---容器的生命周期
⒈ ⒉Init容器 介绍: Pod 能够具有一个或多个容器,应用运行在容器里面,但是它也可能有一个或多个先于应用容器启动的Init容器. Init容器与普通的容器非常像,除了如下两点: >Ini ...
- 2019上海网络赛 F. Rhyme scheme 普通dp
Rhyme scheme Problem Describe A rhyme scheme is the pattern of rhymes at the end of each line of a p ...
- cdoj 574 High-level ancients dfs序+线段树 每个点所加权值不同
High-level ancients Time Limit: 20 Sec Memory Limit: 256 MB 题目连接 http://acm.uestc.edu.cn/#/problem/s ...
- Python初学者常见错误详解
Python初学者常见错误详解 0.忘记写冒号 在 if.elif.else.for.while.class.def 语句后面忘记添加 “:” if spam == 42 print('Hello ...
- 命令行发送SMTP协议邮件(163邮箱)
这里我们用163邮箱为例子,借助命令行发送smtp邮件 1.连接服务器 在终端上输入:telnet smtp.163.com 25 回车,然后就连接了服务器的25端口,成功会输出 220 163.co ...
- 使用Docker搭建MySQL服务
一.安装docker windows 和 mac 版可以直接到官网下载 docker desktop linux 的安装方法可以参考 https://www.cnblogs.com/myzony/p/ ...
- VmWare 网络模式
VMware虚拟机三种联网方法及原理 一.Brigde--桥接:默认使用VMnet0 1.原理: Bridge 桥"就是一个主机,这个机器拥有两块网卡,分别处于两个局域网中,同时在" ...
- 0502 xss 实验
0x01 dvwa xss(reflected) 1.1 Security Level: low use the typical <script>alert(1)</script&g ...
- CI/CD持续集成小结
一.概念 什么是devops,基于Gitlab从零开始搭建自己的持续集成流水线(Pipeline) https://blog.csdn.net/chengzi_comm/article/details ...