Netty(二):数据在ChannelPipeline中的流经
本文目的:测试数据在ChannelPipeline中的流经顺序及状态。
先看本文的测试代码:
AdditionalInBoundHandler:入站处理器,不做任何处理,只是在响应读事件时打印用来观察,并继续通过fireChannelRead传递读事件。
public class AdditionalInBoundHandler extends ChannelInboundHandlerAdapter {

    private String name;

    public AdditionalInBoundHandler(String name){

        this.name = name;

    }

    @Override

    public void channelRead(ChannelHandlerContext ctx, Object msg){

        System.out.println("go through additional InBoundHandler[" + name + "]; msg type[" + msg.getClass() + "]");

        ctx.fireChannelRead(msg);

    }

}
BigIntegerDecoder:解码器,用来读取Bytebuf中的字节数据,解码成BigInter对象。
public class BigIntegerDecoder extends ByteToMessageDecoder {

    @Override

    protected void decode(ChannelHandlerContext ctx, ByteBuf in, List<Object> out) {

        System.out.println("BigIntegerDecoder");

        // Wait until the length prefix is available.

        if (in.readableBytes() < 4) {

            return;

        }

        in.markReaderIndex();

        int length = in.readInt();

        if (in.readableBytes() < length){

            in.resetReaderIndex();

            return;

        }

        byte[] data = new byte[length];

        in.readBytes(data);

        out.add(new BigInteger(data));

    }
NettyServerHandler:将读到的BigInteger加1并写出。
public class NettyServerHandler extends SimpleChannelInboundHandler<BigInteger> {

    @Override

    public void channelRead0(ChannelHandlerContext ctx, BigInteger msg) throws Exception {

        System.out.println("NettyServerHandler");

        ctx.writeAndFlush(msg.add(BigInteger.ONE));

    }

    @Override

    public void exceptionCaught(ChannelHandlerContext ctx, Throwable cause) throws Exception {

        cause.printStackTrace();

        ctx.close();

    }

}
NumberEncoder:将BigInteger对象编码成字节数字,由ByteBuf写出。
public class NumberEncoder extends MessageToByteEncoder<Number> {

    @Override

    protected void encode(ChannelHandlerContext ctx, Number msg, ByteBuf out) {

        System.out.println("NumberEncoder");

        // Convert to a BigInteger first for easier implementation.

        BigInteger v;

        if (msg instanceof BigInteger) {

            v = (BigInteger) msg;

        } else {

            v = new BigInteger(String.valueOf(msg));

        }

        // Convert the number into a byte array.

        byte[] data = v.toByteArray();

        int dataLength = data.length;

        // Write a message.

        out.writeInt(dataLength);  // data length

        out.writeBytes(data);      // data

    }

}
AdditionalOutboundHandler:出站处理器,不对数据做任何处理,直接写出,只是简单增加了打印功能,方便测试。
public class AdditionalOutBoundHandler extends ChannelOutboundHandlerAdapter {

    private String name;

    public AdditionalOutBoundHandler(String name) {

        this.name = name;

    }

    @Override

    public void write(ChannelHandlerContext ctx, Object msg, ChannelPromise promise) throws Exception {

        System.out.println("go through additional outbound handler[" + name + "];msg type [" + msg.getClass() + "]");

        ctx.write(msg, promise);

    }

}
测试代码:channelHandlerTest。通过EmbeddedChannel进行测试。
public class ChannelHandlerTest {

    @Test

    public void channelHandlerTest(){

        ByteBuf buf = Unpooled.buffer();

        EmbeddedChannel embeddedChannel = new EmbeddedChannel();

        ChannelPipeline pipeline = embeddedChannel.pipeline();

        pipeline.addLast(new AdditionalInBoundHandler("in handler 1"));

        pipeline.addLast(new AdditionalInBoundHandler("in handler 2"));

        pipeline.addLast(new BigIntegerDecoder());

        pipeline.addLast(new NumberEncoder());

        pipeline.addLast(new AdditionalOutBoundHandler("out handler 1"));

        pipeline.addLast(new AdditionalInBoundHandler("in handler 3"));

        pipeline.addLast(new NettyServerHandler());

        pipeline.addLast(new AdditionalInBoundHandler("in handler 4"));

        pipeline.addLast(new AdditionalOutBoundHandler("out handler 2"));

        byte[] bytes = new byte[]{0x01, 0x02, 0x03, 0x04};

        BigInteger bi = new BigInteger(bytes);

        buf.writeInt(4);

        buf.writeBytes(bytes);

        //因为nettyServerHandler fire了写事件,因此channelpipeline尾部没数据可读

        assertTrue(!embeddedChannel.writeInbound(buf));

        ByteBuf readBuf = embeddedChannel.readOutbound();

        int length = readBuf.readInt();

        bytes = new byte[length];

        readBuf.readBytes(bytes);

        System.out.println(new BigInteger(bytes));

    }

}
我们可以看到ChannelPipeline中的顺序是头到尾:InBound1(入) -> InBound2(入) -> BigIntegerDecoder(入) -> NumberEncoder(出) -> OutBound1(出) -> InBound3(入) -> NettyServerHandler(入) -> InBound4(入) -> OutBound2(出)。
执行测试代码,我们可以看到控制台中的输出是:

我们通过一张流程图片更清晰的看一下整个流经过程以及数据的状态:
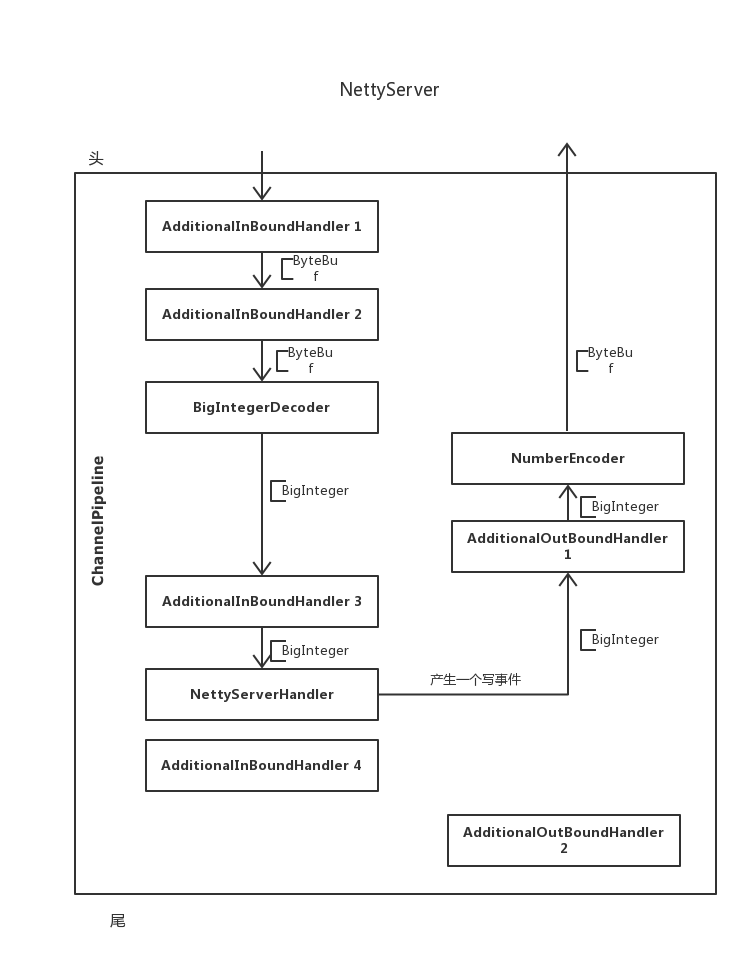
图上的箭头很清楚的表示了数据流经的过程,[XXX则注释出了此时的数据对象。
入站数据沿着ChannelPipeline的头至尾依次寻找下一个可以处理对应消息的处理器。
出战数据则会沿着ChannelPipeline的尾至头依次寻找下一个可以处理对应消息的处理器。
比如为什么数据没有流经InBoundHandler4和OutBoundHandler2?
因为NettyServerHandler发出了一个写事件,因此数据从尾至头的方法找下一个可以处理写消息的处理器,即OutBoundHandler1,在顺延下去。
Netty(二):数据在ChannelPipeline中的流经的更多相关文章
- SpringMVC(二)返回值设置、数据在域中的保存与SpringMVC案例
个人博客网:https://wushaopei.github.io/ (你想要这里多有) 一.返回值的设置 1.返回 String [1]返回 String 默认情况 @RequestMappi ...
- Scrapy基础(十二)————异步导出Item数据到Mysql中
异步导出数据到Mysql中 上次说过从Item中同步写入数据库,因为网络的下载速度和数据库的I/O速度是不一样的所以有可能会发生下载快,但是写入数据库速度慢,造成线程的堵塞:关于堵塞和非堵塞,同步和异 ...
- 【Netty】ChannelHandler和ChannelPipeline
一.前言 前面学习了Netty的ByteBuf,接着学习ChannelHandler和ChannelPipeline. 二.ChannelHandler和ChannelPipeline 2.1 Cha ...
- 一个I/O线程可以并发处理N个客户端连接和读写操作 I/O复用模型 基于Buf操作NIO可以读取任意位置的数据 Channel中读取数据到Buffer中或将数据 Buffer 中写入到 Channel 事件驱动消息通知观察者模式
Tomcat那些事儿 https://mp.weixin.qq.com/s?__biz=MzI3MTEwODc5Ng==&mid=2650860016&idx=2&sn=549 ...
- 在dubbo的一端,看Netty处理数据包,揭网络传输原理
如今,我们想要开发一个网络应用,那是相当地方便.不过就是引入一个框架,然后设置些参数,然后写写业务代码就搞定了. 写业务代码自然很重要,但是你知道: 你的数据是怎么来的吗?通过网络传输过来的呗. 你知 ...
- 自顶向下深入分析Netty(七)--ChannelPipeline和ChannelHandler总述
自顶向下深入分析Netty(七)--ChannelPipeline和ChannelHandler总述 自顶向下深入分析Netty(七)--ChannelPipeline源码实现 自顶向下深入分析Net ...
- Netty(二):如何处理io请求?
文接上一篇.上篇讲到netty暴露一个端口出来,acceptor, handler, pipeline, eventloop 都已准备好.但是并没体现其如何处理接入新的网络请求,今天我们就一起来看看吧 ...
- 一文搞懂 Netty 发送数据全流程 | 你想知道的细节全在这里
欢迎关注公众号:bin的技术小屋,如果大家在看文章的时候发现图片加载不了,可以到公众号查看原文 本系列Netty源码解析文章基于 4.1.56.Final版本 在<Netty如何高效接收网络数据 ...
- (转)原始图像数据和PDF中的图像数据
比较原始图像数据和PDF中的图像数据,结果见表1.1.表1.1中各种“解码器”的解释见本文后续的“PDF支持的图像格式”部分,“PDF中的图像数据”各栏中的数据来自开源的PdfView.如果您有兴趣查 ...
随机推荐
- Java Interger小知识
Integer装箱与拆箱 装箱: Integer i = 10; 相当于:Integer i = Integer.valueOf(10); 拆箱: Integer i = 10; //装箱 int t ...
- 关于$f(x)=\int_0^x\left|\sin\frac1t\right|\text dt$求导的问题
首先,我们考虑\(f(x)\)在\(\mathbb R\)上都是定义的.根据定义,显然有\(f(0)=0\):其次,对于\(x\neq0\),不妨先设\(x\gt0\),则有在\(t\rightarr ...
- flask-模板使用
flask-模板使用 模板方法: 模板中的url_for跟后台视图的url_for使用起来基本是一样的,也可以传递参数 使用方式 {{ url_for('func') }} 过滤器: 过滤器是通过管道 ...
- 10.2 io流 之字节流和字符流
FileWriter 用于写入字符流.要写入原始字节流,请考虑使用 FileOutputStream. io流相关文档: https://www.cnblogs.com/albertrui/p/836 ...
- AJ学IOS(56)网络基础以及如何搭建服务器
AJ分享,必须精品 一:为什么要学习网络编程 关于这个问题,为什么要学习网络编程,AJ的理解就是,这东西是时代发展的必要,没什么为什么,就是应该学,除非你就是想玩单机,但是就算是单机也会有购买金币之类 ...
- 浅谈Vector
浅谈Vector 在之前的文章中,我们已经说过线程不安全的ArrayList和LinkedList,今天我们来讲讲一个线程安全的列表容器,他就是Vector,他的底层和ArrayList一样使用数组来 ...
- 详解 JDK8 新增的日期时间类
JDK8 新增的日期时间类 在本人之前的博文<处理时间的类 -- System类.Date类 .SimpleDateFormat类 与 Calendar类>中,讲到过表示时间的类,有三类: ...
- eclipse集成 json editor plugin插件
打开eclipse 找到: help--->install new software ——>add name:jsoneditor location:https://marketplace ...
- [YII2] 修改默认控制器Controller以及默认方法Action
试了好多方法都没成功,下面方法绝对能成功设置 在框架里面有源码,在/vendor/yiisoft/yii2/web/Application.php的第34行找到了: class Application ...
- 使用NLP从文章中自动提取关键字
背景 在研究和新闻文章中,关键词构成了一个重要的组成部分,因为它们提供了文章内容的简洁表示.关键词在从信息检索系统,书目数据库和搜索引擎优化中定位文章方面也起着至关重要的作用.关键词还有助于将文章分类 ...