
App基本界面组件案例
今天的收获颇大呀,我发现了一个更高效快速的学习方法,如果真的是因为学习内容太多,无从下手的话,不妨去别人或者自己崇拜的大佬里的博客园里面转一转,你就会有意外的收获,不仅给你学习的压力,还更直观的给介绍了学习的方向和重点,这真的是捷径,我们要学会观看别人的博客园,从里面找到重点,获得收获。像一些零散的知识点里面都罗列的特别的详细,大佬就是大佬,总有我们崇拜的理由。在一位大佬的博客园里我看到了几个有趣的简易的app,感觉很有趣,就学习了一下。下面的内容我就是学习大佬之精华:
并且为了保存和加强对GitHub的学习,并且把一下代码上传到了GitHub上面,命名(playtest_married):
婚姻建议程序:
一:单选框按钮样例(RadioGroup和RadioButton建立单选框按钮)
strings.xml:
<resources>

    <string name="app_name">婚姻建议程序app</string>

    <string name="sex">性别</string>

    <string name="age">年龄</string>

    <string name="btn_ok">确定</string>

    <string name="result">建议:</string>

    <string name="not_hurry">青春还很富裕,先奋斗,结婚还不急!</string>

    <string name="find_couple">时候到了,可以尝试找个对象了!</string>

    <string name="get_married">你已经事业有成了,该结婚了!</string>

    <string name="boy">男生</string>

    <string name="gril">女生</string>

    <string name="boy_age_1">小于25岁</string>

    <string name="boy_age_2">25岁到30岁</string>

    <string name="boy_age_3">大于30岁</string>

    <string name="gril_age_1">小于25岁</string>

    <string name="gril_age_2">25岁到30岁</string>

    <string name="gril_age_3">大于30岁</string>

</resources>
activity_main.xml:
<?xml version="1.0" encoding="utf-8"?>

<LinearLayout xmlns:android="http://schemas.android.com/apk/res/android"

    xmlns:app="http://schemas.android.com/apk/res-auto"

    xmlns:tools="http://schemas.android.com/tools"

    android:layout_width="match_parent"

    android:layout_height="match_parent"

    android:orientation="vertical"

    tools:context=".MainActivity">

    <TextView

        android:id="@+id/sex"

        android:layout_width="wrap_content"

        android:layout_height="wrap_content"

        android:text="@string/sex"

        android:textSize="25sp" />

    <RadioGroup

        android:id="@+id/radgrpsex"

        android:checkedButton="@+id/radbtnboy"

        android:layout_width="wrap_content"

        android:layout_height="wrap_content"

        android:orientation="vertical">

         <RadioButton

             android:id="@+id/radbtnboy"

             android:layout_width="wrap_content"

             android:layout_height="wrap_content"

             android:textSize="20sp"

             android:text="@string/boy"/>

        <RadioButton

              android:id="@+id/radbtngril"

              android:layout_width="wrap_content"

              android:layout_height="wrap_content"

              android:textSize="20sp"

              android:text="@string/gril"/>

    </RadioGroup>

    <TextView

        android:id="@+id/age"

        android:layout_width="match_parent"

        android:layout_height="wrap_content"

        android:text="@string/age"

        android:textSize="25sp"/>

        <RadioGroup

            android:id="@+id/radgrpage"

            android:layout_width="wrap_content"

            android:layout_height="wrap_content"

            android:orientation="vertical"

            android:checkedButton="@+id/radbtnage1">

            <RadioButton

                android:id="@+id/radbtnage1"

                android:textSize="20sp"

                android:layout_width="wrap_content"

                android:layout_height="wrap_content"

                android:text="@string/boy_age_1"/>

           <RadioButton

               android:id="@+id/radbtnage2"

               android:textSize="20sp"

               android:layout_width="wrap_content"

               android:layout_height="wrap_content"

               android:text="@string/boy_age_2"/>

          <RadioButton

                android:id="@+id/radbtnage3"

                android:textSize="20sp"

                android:layout_width="wrap_content"

                android:layout_height="wrap_content"

                android:text="@string/boy_age_3"/>

        </RadioGroup>

    <Button

        android:id="@+id/btn_ok"

        android:layout_width="wrap_content"

        android:layout_height="wrap_content"

        android:layout_gravity="center_horizontal"

        android:background="#4CAF50"

        android:text="@string/btn_ok"/>

    <TextView

        android:id="@+id/txtresult"

        android:layout_width="wrap_content"

        android:layout_height="wrap_content"

        android:text="@string/result"

        android:textSize="25sp"/>

</LinearLayout>
MainActivity.java:
package com.example.playtest;

import androidx.appcompat.app.AppCompatActivity;

import android.os.Bundle;

import android.view.View;

import android.widget.Button;

import android.widget.RadioButton;

import android.widget.RadioGroup;

import android.widget.TextView;

public class MainActivity extends AppCompatActivity {

    private Button mbtnok;

    private TextView mtxtr;

    private RadioGroup mradgrpsex,mradgrpage;

    private RadioButton mradbtnage1,mradbtnage2,mradbtnage3;

    @Override

    protected void onCreate(Bundle savedInstanceState) {

        super.onCreate(savedInstanceState);

        setContentView(R.layout.activity_main);

        mbtnok=(Button)findViewById(R.id.btn_ok);

        mbtnok.setOnClickListener(btnokOnClick);

        mtxtr=(TextView)findViewById(R.id.txtresult);

        mradgrpage=(RadioGroup)findViewById(R.id.radgrpage);

        mradgrpsex=(RadioGroup)findViewById(R.id.radgrpsex);

        mradbtnage1=(RadioButton) findViewById(R.id.radbtnage1);

        mradbtnage2=(RadioButton) findViewById(R.id.radbtnage2);

        mradbtnage3=(RadioButton) findViewById(R.id.radbtnage3);

        mradgrpsex.setOnCheckedChangeListener(radgrpsexOnClickedChange);

    }

    private View.OnClickListener btnokOnClick=new View.OnClickListener(){

        @Override

        public void onClick(View v){

            String strres=getString(R.string.result);

            switch(mradgrpage.getCheckedRadioButtonId()){

                case R.id.radbtnage1:

                    strres+=getString(R.string.not_hurry);break;

                case R.id.radbtnage2:

                    strres+=getString(R.string.find_couple);break;

                case R.id.radbtnage3:

                    strres+=getString(R.string.get_married);break;

            }

            mtxtr.setText(strres);

        }

    };

    private RadioGroup.OnCheckedChangeListener radgrpsexOnClickedChange=new RadioGroup.OnCheckedChangeListener(){

        @Override

        public void onCheckedChanged(RadioGroup group,int checkedid){

            if(checkedid==R.id.radbtnboy){

                mradbtnage1.setText(getString(R.string.boy_age_1));

                mradbtnage2.setText(getString(R.string.boy_age_2));

                mradbtnage3.setText(getString(R.string.boy_age_3));

            }

            else{

                mradbtnage1.setText(getString(R.string.gril_age_1));

                mradbtnage2.setText(getString(R.string.gril_age_2));

                mradbtnage3.setText(getString(R.string.gril_age_3));

            }

        }

    };

}
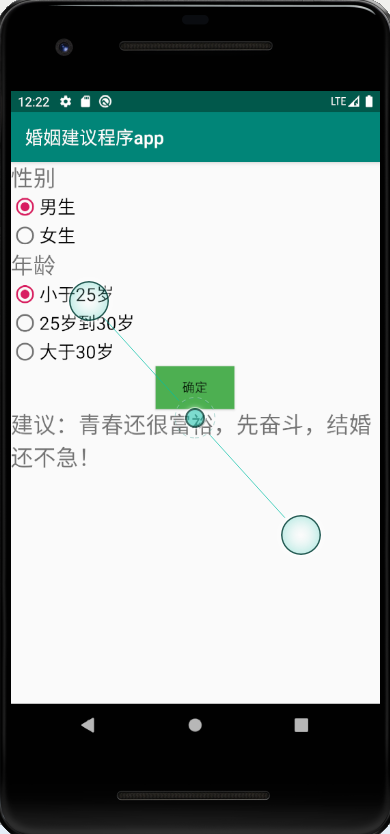
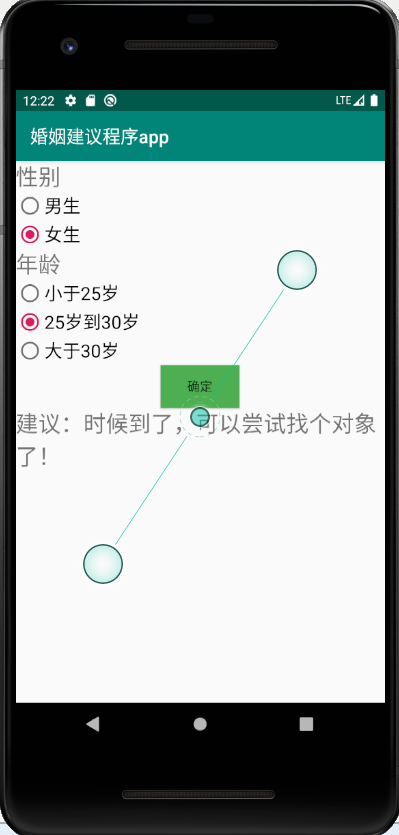
运行结果显示:
二:下拉框(Spinner)和数字转轮(NumberPicker)的使用
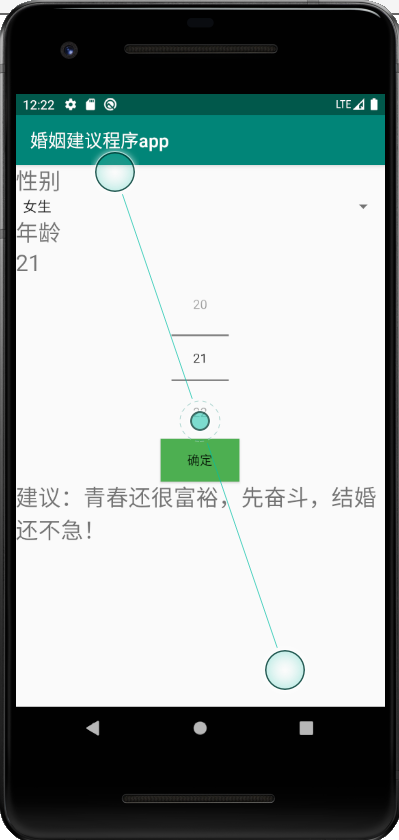
这个是在上面的婚姻建议程序app的基础上改的,将其换成了下拉框和数字转轮的形式
strings.xml:
<resources>

    <string name="app_name">婚姻建议程序app</string>

    <string name="sex">性别</string>

    <string name="age">年龄</string>

    <string name="btn_ok">确定</string>

    <string name="result">建议:</string>

    <string name="not_hurry">青春还很富裕,先奋斗,结婚还不急!</string>

    <string name="find_couple">时候到了,可以尝试找个对象了!</string>

    <string name="get_married">你已经事业有成了,该结婚了!</string>

    <string name="boy">男生</string>

   <string-array name="sex_list">

       <item>男生</item>

       <item>女生</item>

   </string-array>

    <string name="sex_select">请选择性别:</string>

    <string name="boy_age_1">小于25岁</string>

    <string name="boy_age_2">25岁到30岁</string>

    <string name="boy_age_3">大于30岁</string>

    <string name="gril_age_1">小于25岁</string>

    <string name="gril_age_2">25岁到30岁</string>

    <string name="gril_age_3">大于30岁</string>

</resources>
activity_main.xml:
<?xml version="1.0" encoding="utf-8"?>

<LinearLayout xmlns:android="http://schemas.android.com/apk/res/android"

    xmlns:app="http://schemas.android.com/apk/res-auto"

    xmlns:tools="http://schemas.android.com/tools"

    android:layout_width="match_parent"

    android:layout_height="match_parent"

    android:orientation="vertical"

    tools:context=".MainActivity">

    <TextView

        android:id="@+id/sex"

        android:layout_width="match_parent"

        android:layout_height="wrap_content"

        android:text="@string/sex"

        android:textSize="25sp" />

    <Spinner

        android:id="@+id/spnsex"

        android:layout_width="match_parent"

        android:layout_height="wrap_content"

        android:entries="@array/sex_list"

        android:spinnerMode="dialog"

        android:prompt="@string/sex_select"/>

    <TextView

        android:id="@+id/age"

        android:layout_width="match_parent"

        android:layout_height="wrap_content"

        android:text="@string/age"

        android:textSize="25sp"/>

    <TextView

        android:id="@+id/txtage"

        android:layout_width="wrap_content"

        android:layout_height="wrap_content"

        android:textSize="25sp"/>

    <NumberPicker

        android:id="@+id/numage"

        android:layout_width="wrap_content"

        android:layout_height="wrap_content"

        android:layout_gravity="center_horizontal"/>

    <Button

        android:id="@+id/btn_ok"

        android:layout_width="wrap_content"

        android:layout_height="wrap_content"

        android:layout_gravity="center_horizontal"

        android:background="#4CAF50"

        android:text="@string/btn_ok"/>

    <TextView

        android:id="@+id/txtresult"

        android:layout_width="wrap_content"

        android:layout_height="wrap_content"

        android:text="@string/result"

        android:textSize="25sp"/>

</LinearLayout>
MainActivity.java:
package com.example.playtest;

import androidx.appcompat.app.AppCompatActivity;

import android.os.Bundle;

import android.view.View;

import android.widget.AdapterView;

import android.widget.Button;

import android.widget.NumberPicker;

import android.widget.Spinner;

import android.widget.TextView;

public class MainActivity extends AppCompatActivity {

    private NumberPicker numage;

    private Spinner spsex;

    private Button mbtnok;

    private TextView mtxtresult,mtxtage;

    private String strsex;

    @Override

    protected void onCreate(Bundle savedInstanceState) {

        super.onCreate(savedInstanceState);

        setContentView(R.layout.activity_main);

        mtxtage=(TextView)findViewById(R.id.txtage);

        mtxtage.setText("25");

        numage=(NumberPicker)findViewById((R.id.numage));

        numage.setMinValue(0);

        numage.setMaxValue(100);

        numage.setValue(25);

        numage.setOnValueChangedListener(numChange);

        mbtnok=(Button)findViewById(R.id.btn_ok);

        mbtnok.setOnClickListener(btnonClick);

        mtxtresult=(TextView)findViewById(R.id.txtresult);

        spsex=(Spinner)findViewById(R.id.spnsex);

        spsex.setOnItemSelectedListener(spsexOnItemSelected);

    }

    private View.OnClickListener btnonClick=new View.OnClickListener() {

        @Override

        public void onClick(View v) {

            int age=numage.getValue();

            String strresult=getString(R.string.result);

            if(age<25)

                strresult+=getString(R.string.not_hurry);

            else if(age>30)

                strresult+=getString(R.string.get_married);

            else

                strresult+=getString(R.string.find_couple);

            mtxtresult.setText(strresult);

        }

    };

    private AdapterView.OnItemSelectedListener spsexOnItemSelected=new AdapterView.OnItemSelectedListener() {

        @Override

        public void onItemSelected(AdapterView<?> parent, View view, int position, long id) {

            strsex=parent.getSelectedItem().toString();

        }

        @Override

        public void onNothingSelected(AdapterView<?> parent) {

        }

    };

    private NumberPicker.OnValueChangeListener numChange=new NumberPicker.OnValueChangeListener() {

        @Override

        public void onValueChange(NumberPicker picker, int oldVal, int newVal) {

            mtxtage.setText(String.valueOf(newVal));

        }

    };

}
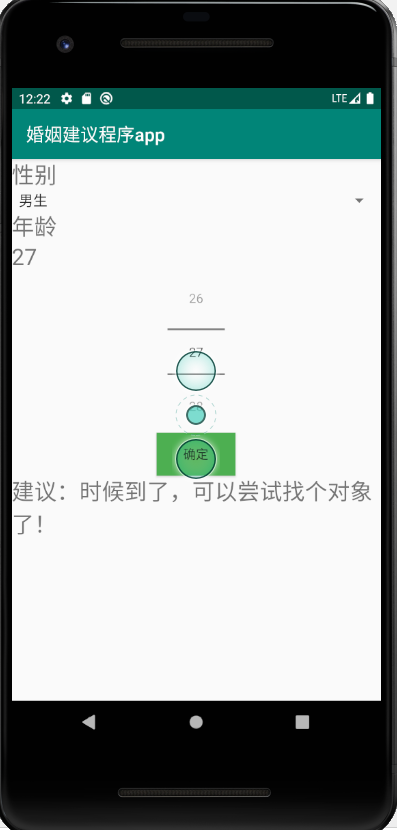
运行结果:
App基本界面组件案例的更多相关文章
- 四种常见的APP分类界面布局设计案例学习
相信各位对于APP设计,已经很熟练啦.如何在熟练的基础上提高我们界面的优美度,或者是进行APP界面的迭代设计. 重构APP设计布局是我们必须要经历的一个过程. 在之前,学习UI设计的时候,经常要接触到 ...
- App 引导界面
App 引导界面 1.前言 最近在学习实现App的引导界面,本篇文章对设计流程及需要注意的地方做一个浅显的总结. 附上项目链接,供和我水平类似的初学者参考——http://files.cnblogs. ...
- ionic入门之色彩、图标、边距和界面组件:列表
目录: 色彩.图标和边距 色彩 图标 内边距 界面组件:列表 列表:.list 成员容器:.item .item: 嵌入文本 .item : 嵌入图标 .item : 嵌入头像 .item : 嵌入缩 ...
- 精华 ionic入门之色彩、图标、边距和界面组件:列表
目录:色彩.图标和边距色彩图标内边距界面组件:列表列表:.list成员容器:.item.item: 嵌入文本.item : 嵌入图标.item : 嵌入头像.item : 嵌入缩略图.item : 嵌 ...
- 前端笔记之Vue(二)组件&案例&props&计算属性
一.Vue组件(.vue文件) 组件 (Component) 是 Vue.js 最强大的功能之一.组件可以扩展 HTML 元素,封装可重用的代码.在较高层面上,组件是自定义元素,Vue.js 的编译器 ...
- 循序渐进VUE+Element 前端应用开发(25)--- 各种界面组件的使用(1)
在我们使用Vue+Element开发前端的时候,往往涉及到很多界面组件的使用,其中很多直接采用Element官方的案例即可,有些则是在这个基础上封装更好利用.更少代码的组件:另外有些则是直接采用第三方 ...
- 循序渐进VUE+Element 前端应用开发(26)--- 各种界面组件的使用(2)
在我们使用Vue+Element开发前端的时候,往往涉及到很多界面组件的使用,其中很多直接采用Element官方的案例即可,有些则是在这个基础上封装更好利用.更少代码的组件:另外有些则是直接采用第三方 ...
- Android界面组件的四种启动方式
Android界面组件启动有四种方式 standard,singleTop,singleTask,singleInstance. standard:每次调用都会都会产生新的组件. singletop: ...
- 安卓开发_慕课网_Fragment实现Tab(App主界面)
学习内容来自“慕课网” 这里用Fragment来实现APP主界面 思路: 底部横向排列4个LinearLayout,每个LinearLayout包含一个图片按钮和一个文字 1.默认显示第一个功能(微信 ...
随机推荐
- CLion的使用
配置远程Linux编译器 实现目标:1.将项目中的源码和target和Linux服务器同步.2.代码在服务器端运行 配置ToolChains setting -> Build,Execution ...
- 003-explode分割字符串
<?php $str = "品牌电脑@品牌手机@高档男士衬衫@高档女士挎包"; //定义字符串常量 $str_arr = explode("@", $st ...
- 实训23 功能FC的建立与调用
第4章:实训23 功能的生成与条用 功能简称FC 是用户编写的没有自己存储区的逻辑块 . 功能主要用来执行条用一次就可以完成的操作. 类似于C语言中的 函数 步骤一 单击确定 以后 出现了 在下面图框 ...
- 2.8 学习总结 之 JQ初识
一.说在前面 昨天 学习了kotlin的相关知识 今天 学习JQ Jquery它是javascript的一个轻量级框架,对javascript进行封装,它提供了很多方便的选择器.供你快速定位到需要操作 ...
- 洛谷 P2426 删数
题目传送门 解题思路: 区间DP,f[i][j]表示区间i~j可获得的最大值,因为本题的所有区间是可以直接一次性把自己全删掉的,所以所有区间初始化为被一次性删除的值,然后枚举断点,跑区间DP. AC代 ...
- JS - 对话框
1,<span onclick="return confirmAct();">执行操作</span> 2, function confirmAct(){ i ...
- JS - 获取任意一天的0点和23:59:59时间
转载自 https://www.cnblogs.com/sk-3/archive/2019/07/23/11232750.html 使用了setHours() 方法 setHours() 方法用于设置 ...
- JS+CSS - table 表格固定表头和第一列、内容可滚动 (转载)
<!DOCTYPE html> <html> <head> <meta http-equiv="Content-Type" content ...
- 查看linux硬件的信息
cpu: cat /proc/cpuinfo 内存: cat /proc/meminfo 查看内存使用情况: free -m -m指以M的单位显示 查看硬盘使用情况: df -h ...
- php.laravel.middleware
关于中间件,在php-laravel中的定义就是对请求的一个过滤,相当于JSP技术中的filter的存在.需要知道编写了一个中间件可以配置在三个地方(就目前5.7版本而言)让其发挥作用,具体需要看/a ...